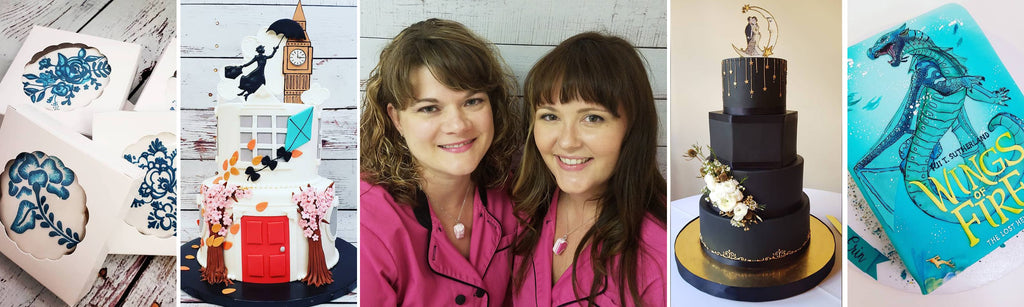
Sugarworks Blog

Breanna and Bonnie's Inspired Dinos!
We are super excited to host Breanna and Bonnie of Arizona's Inspired Sugar as this month's guest artists! Breanna and Bonnie love all things related to Sugar Art and are always on the lookout for fun new techniques. They're making waves with their imagination and versatility- bringing a wide range of styles, ideas, and techniques into their craft. You can watch them bringing their skills to the competition stage on Season 1, Episode 1 of Netflix’s Sugar Rush.
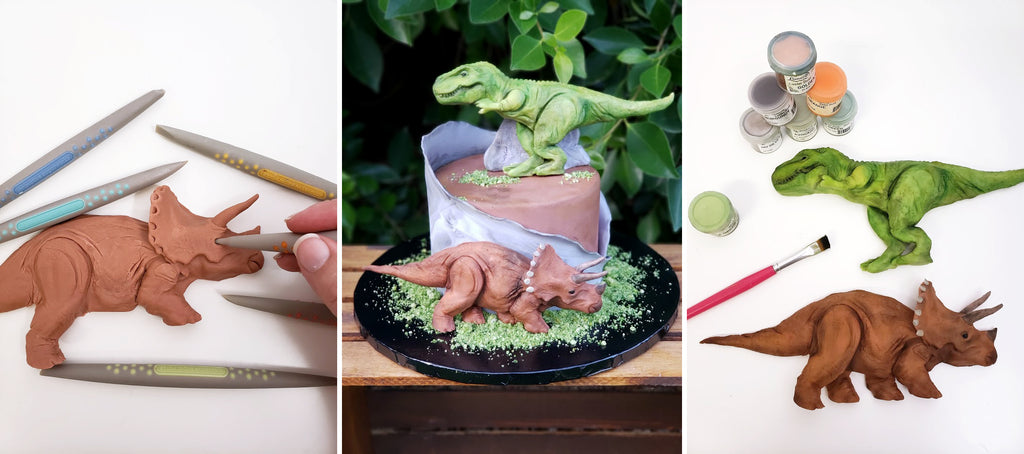
Today Breanna and Bonnie are showing us how they made a customer's dream of realistic 3d dinosaurs a reality without breaking the customer's budget. These dinos are fun, realistic, and surprisingly simple. Check it out, and give 'em a try the next time someone orders a Jurassic BDay cake!
Supplies:
- Plastic Toy Dinosaurs
- Silicone Mold Putty
- Sugar Shapers
- Utility Knife
- Fondant, Gum Paste or Modeling Chocolate
- Tylose/CMC powder (if using fondant)
- Piping Gel or Gum Glue
- Edible Dusts
- Paintbrush
We are so excited to share with you our process for making realistic Sugar Dinosaurs! We discovered this technique when we had a client who really loved the idea of having 3D elements on her cake, but needed to keep it on a 2D budget. Her son was adamant that he did not want cutesy creatures on his cake- after all he was turning 7! They also didn’t want to add plastic toys.
So, we set out to see if we could find a quick and easy way to make some awesome looking dinosaurs without spending hours and hours sculpting. Having never made our own molds before…this was an adventure that surprised us with how quick and easy it actually was!
Part of what makes these so simple is the fact that they are not 360 degrees sculpted. The are flat on the back side, which was fine by us because we knew one would be attached to the side of the cake and the other to a big rock on top. We weren’t particularly concerned with there being a “backside”- the main thing was making a cool design quickly!
Step 1
Our local craft store carries this product called Easy Mold for about $24. This product is food grade non-toxic putty and is single use- meaning once you shape it, it can’t be reshaped into something else. There are a ton of other really awesome silicone molding materials out there though, so feel free to use whichever silicone mold putty you prefer.
We picked up two inexpensive plastic dinosaurs from Walmart (one was $6 and one was $8). Keep in mind that the size you pick is the exact size your mold will be, so plan accordingly. Make sure to clean them and let them fully dry.
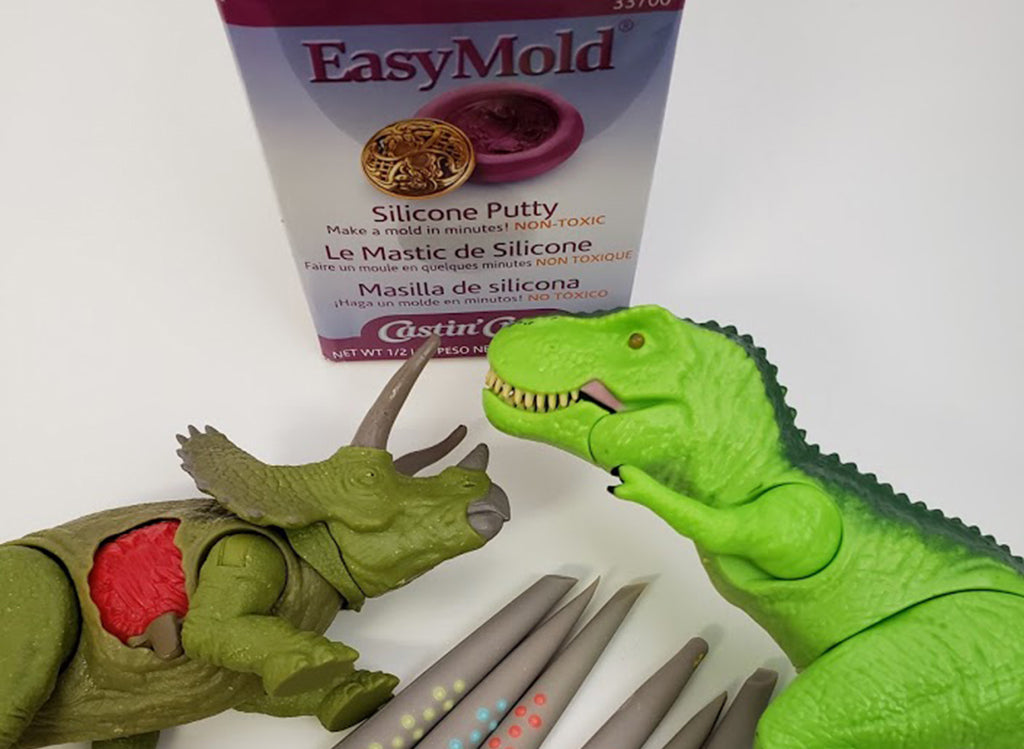
Gather up your Sugar Shapers and prepare to have a good time!
Step 2
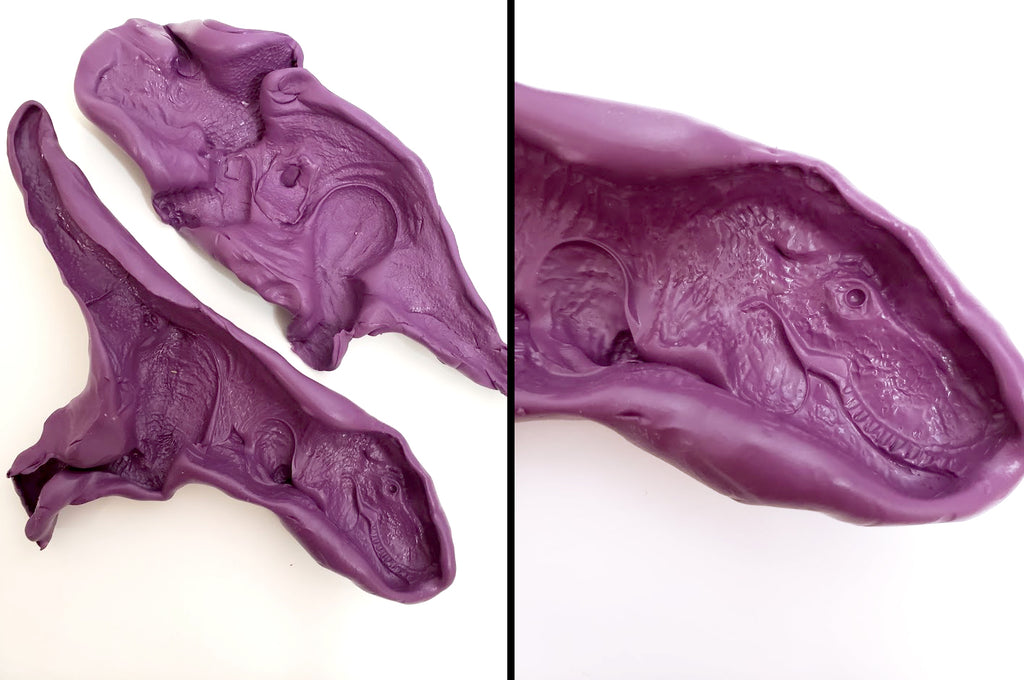
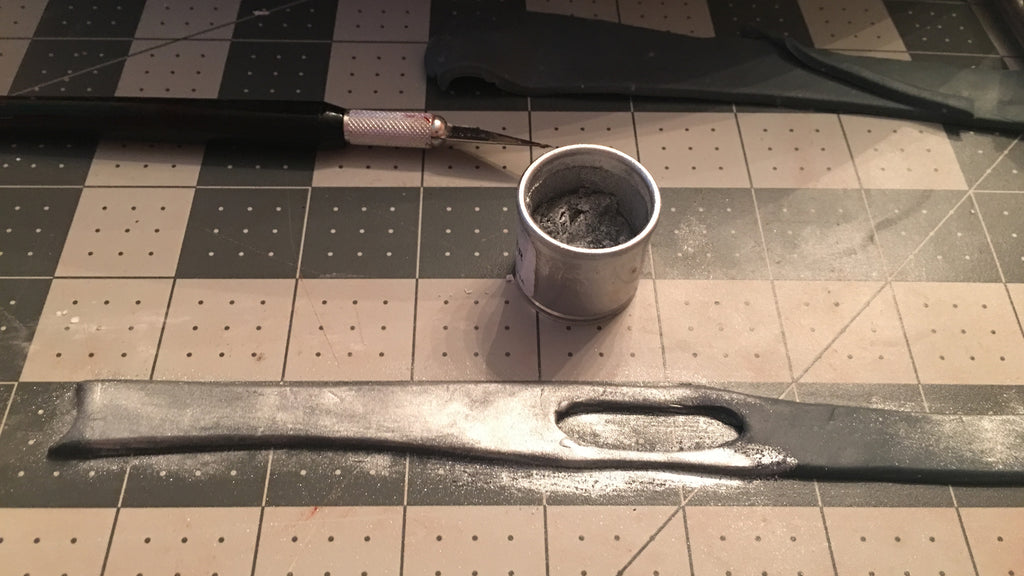
The Easy Mold comes with ½ lb of product which is split into 2 containers- white and dark purple. Our toys were about 6-7” in length, so one box was enough for both molds.
Remove half of each color and knead together quickly. Once you start mixing them together you only have about 3 minutes to work with this before it sets, so make sure you are READY!
Roll into a log the approximate length and height of your toy, and about ¾” thick. You do not want to break it into pieces and try to add it in stages, it needs to be one solid piece of silicone. It will end up being a bit thicker around the edges. Just keep in mind that you do not want any super thin areas that could possibly tear, so if it looks thin, just work quickly to push the product in from the edges to thicken up the center.
Now, since we are only going to make one side of the Dinosaur, you don’t want to cover the entire toy. Just enough to get one arm/leg and a full body profile. Press on the putty firmly because you want to pick up all those awesome details from the toys. We wrapped around the legs a bit to make sure to get as much of the shape as possible. Just keep in mind that you need to be able to remove the toy.
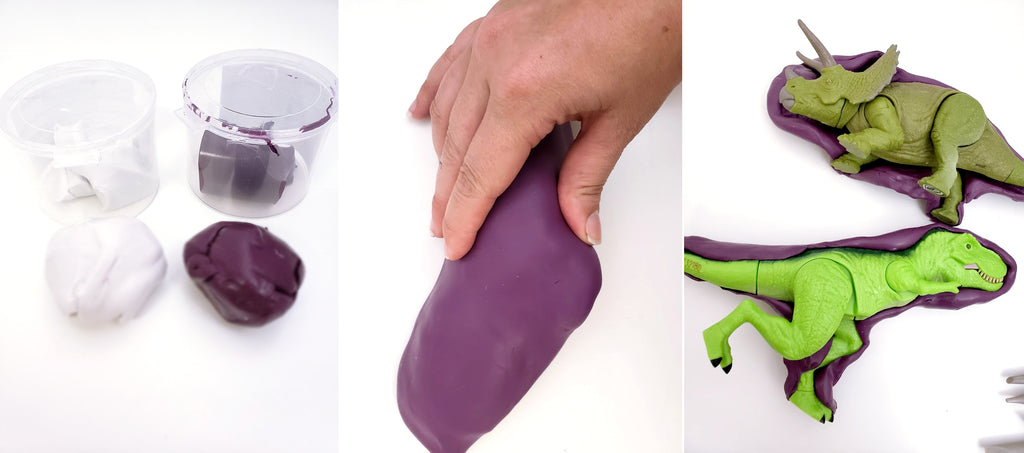
Remember- this sets in 3 minutes- so you have to be quick about it. Focus on getting the general shape. Now set it aside and don’t mess with it for 30 minutes, until it has time to set fully. Then remove your dino toy and be amazed at all the fabulous details!
Step 3
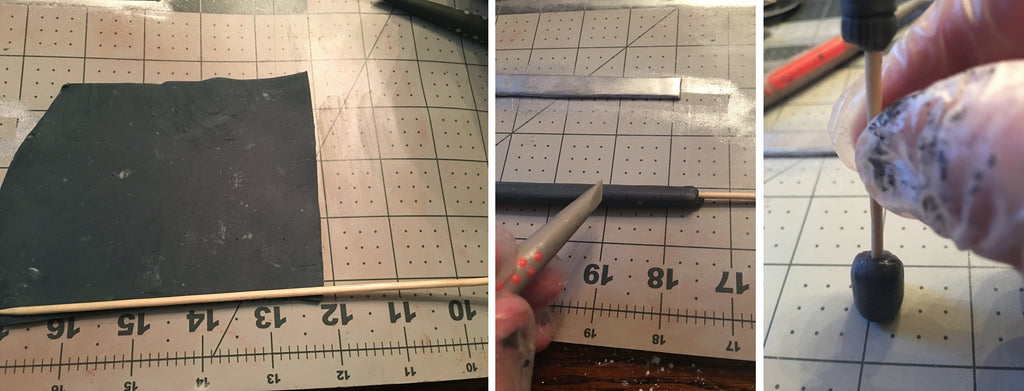
Woo! Time to mold! Feel free to use your favorite medium to create your dinos. We used fondant with about a tablespoon of Tylose added. Yeah…lots. You could also use some modeling chocolate or gum paste. The idea is that you want a very firm medium that will keep its shape as you pull it out of the mold, while allowing you to add additional detailing.
Start with a pale shade of brown or green and roll it into the general shape of your mold. Then start pressing it in. Be sure to really press it into the face, arms and legs. Don’t be surprised if small details like the T-Rex’s tiny arms don’t come out though, you can add that in later. Clean up around the edges as much as you can. We like to kind of roll the fondant back from the edge to get a softer, less blunt look.

Flip your mold over so the flat side is on your table, then pull the mold gently up and off your fondant. Voila! This is a nice starter Dino for you to work with! No long hours of molding proportions, or struggling to get the face to stop looking like Barney.

Step 4
Now for the super fun part! Get out those Sugar Shapers and start to add in extra details! Set your toy Dino in front of you to use as a guide and start to work in extra wrinkles and deepen creases. We like to press in the eye and add a small ball of black fondant and a little eyelid to make the face extra realistic.
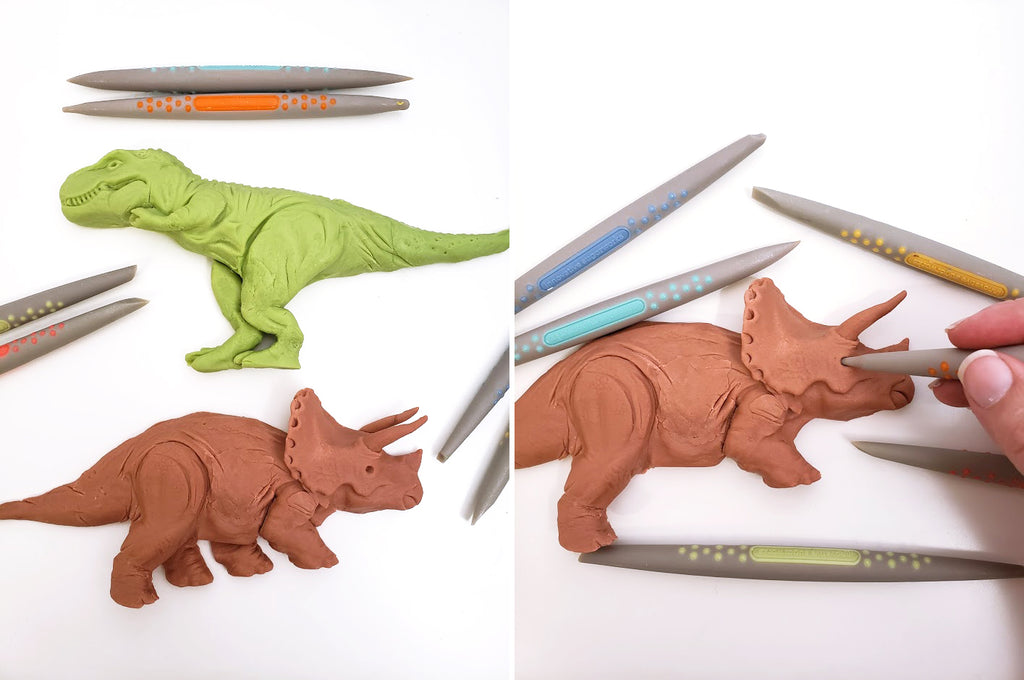
You may need to use a utility knife to cut off any extra fondant that doesn’t belong. If you take a close look at the area on the Triceratops between the font leg and the neck, you can see where there was a bit extra that didn’t get removed when we were cleaning up the edges and just needs to be cut off.
You can also see that this T-Rex’s arm did not survive the unmolding, so we had to fix it up a bit by rolling a little log and cutting the end to make a hand.
Now you are going to put your Molds to use a second time and make another set of arms, legs and horns. (We didn’t bother making a second arm for the T-Rex but you certainly can if you are feeling bad for his situation.)

Just press a bit of fondant into the molds, going up a little further than you want to show from the front. You are going to attach it to the body from behind (the flat side), with a bit of gum glue or piping gel, so you need a little extra length to work with.
Step 5
Dust with your favorite petal and luster dusts to bring out all those fabulous details!
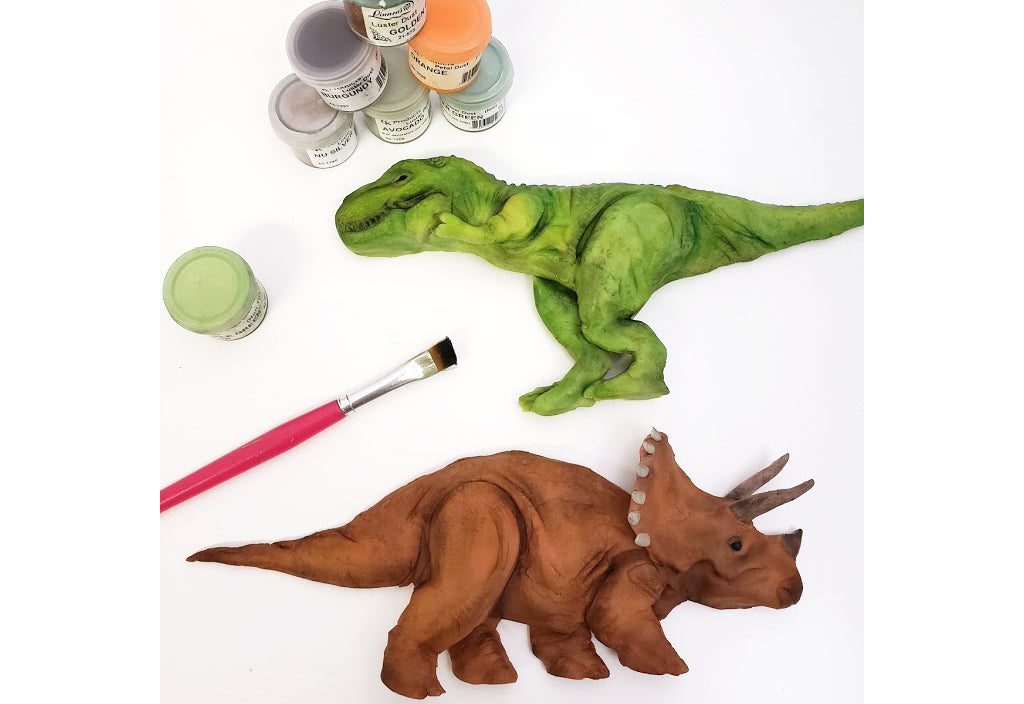
We suggest starting with your lighter, highlighting colors. For example, on T-Rex we went in with yellow first, then added in shades of green, and ended with hints of browns and finally black. The darker colors really help all the texture to pop, however you don’t want to go crazy here with them. By adding a bit of dark brown to the creases around the arms and legs, it quickly makes your creatures so much more lifelike!
We also went in and added a few gray horns to the Triceratops and made sure to shade those a bit too. Dust is magic here folks. Don’t skip this step because this is what makes all the work the Sugar Shapers did really shine!
Step 6
Let them dry until they are firm enough to attach to the cake without drooping, or if you want to be able to bend them to fit the rounded sides, then make sure to add it right away. If you’re like us…and you went a little crazy with the Tylose…maybe you can add it to the cake within the hour. We are in Arizona though, so things get dry quick here.
We attached the Triceratops to the sides with a bit of piping gel. The T-Rex looks best if he has something else hanging out on top of the cake with him. This could be a Volcano, some trees, or if you are feeling super inspired like we were- a big rock. You could make this out of rice cereal if you want to cover a lot of ground or just a bit of fondant. The important part here is to help give him something to lean against in support and it also helps cover up the fact that his backside is not 3D.
We stuck a dowel through the rock into the cake with about ½” left for him to stick onto to hold him up. You don’t want to put a lot of pressure on those little legs.
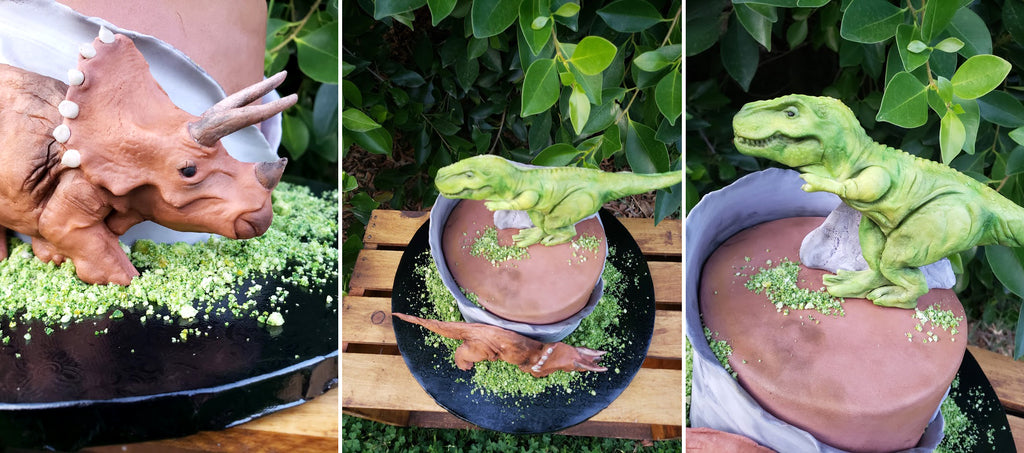
There you have it! We hope this helps you the next time you need to create a realistic dinosaur! Have fun molding and Happy Baking!
We hope you enjoyed this fantastic tutorial by Breanna and Bonnie of Inspired Sugar! And we also hope you yourself are now Inspired to try your hands at molded cake toppers!
If you want to see more of Breanna and Bonnie's excellent work, follow them online here:
Web: inspiredsugarcakes.com
Facebook: facebook.com/inspiredsugar
Instagram: @inspiredsugar

Reva Alexander-Hawk's Mother of the Bride Cake
This month, our featured guest is the illustrious Reva Alexander-Hawk of Merci Beaucoup cake and pastry business.
Upon launching Merci Beaucoup, Reva rapidly achieved a reputation for creating innovative and tantalizing confections leading to appearances on top-rated televisions shows including Cake Wars, Ridiculous Cakes, Amazing Wedding Cakes and Wedding Cake Championship, among others. She has also received magazine coverage by leading international publications. Reva’s never-ending pursuit of excellence has led her to tackle new challenges, including; expanding her operations to the East coast, developing a book, and sharing her decades of insights and knowledge on the craft of baking through teaching.
Now Reva's shaking up the wedding industry with a new innovation. And she's going to tell us all about it.
The Making of a New Tradition…the Mother of the Bride cake
Now hear me out on this… We always hear that it is the Bride’s day but I think it is time to recognize and celebrate some of the others in the bridal party and dare I say… the Parents.
Having moved to the south eastern region of the United States- the state of Georgia to be exact, I have noticed that people here like their weddings big. And that every wedding has a Bridal cake and a Groom's cake. Well move over because it is time to make room for the Mother of the Bride cake!
What a fun and original way to say Thank YOU to mom for putting up with your crazy ideas and saying yes to everything that you asked for. A Cake that is designed just for them with the flavor that they love and let me mention it again, that is just for them!
I am now offering this as an add on item for my clients especially when the discussion of flavors is at a stand still. With small personalized bridal party cakes everyone can have their favorite flavors presented to them.
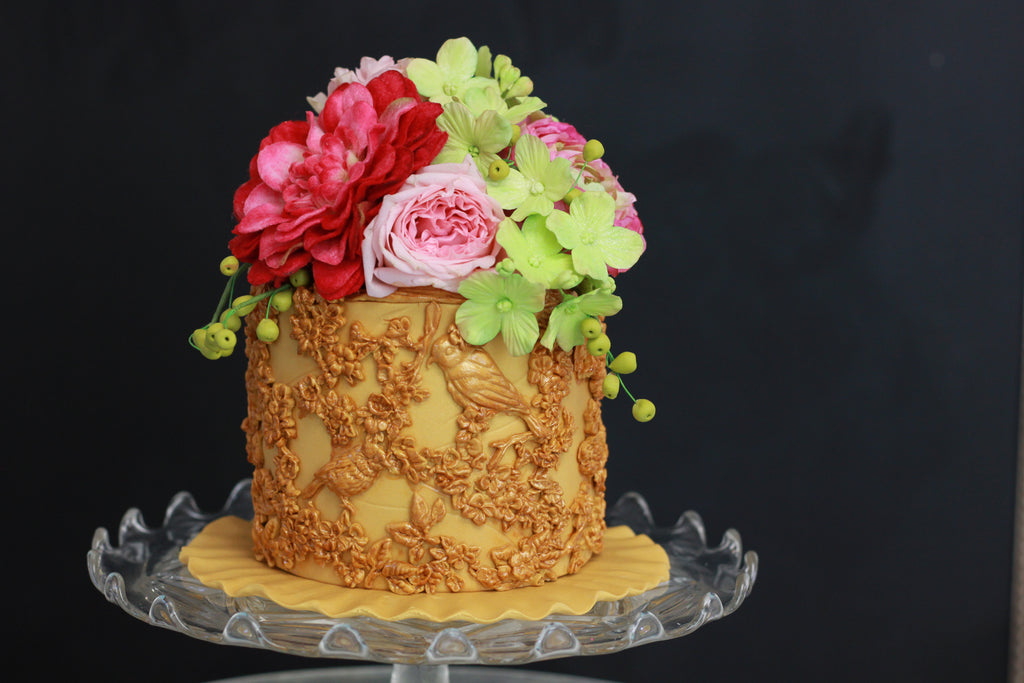
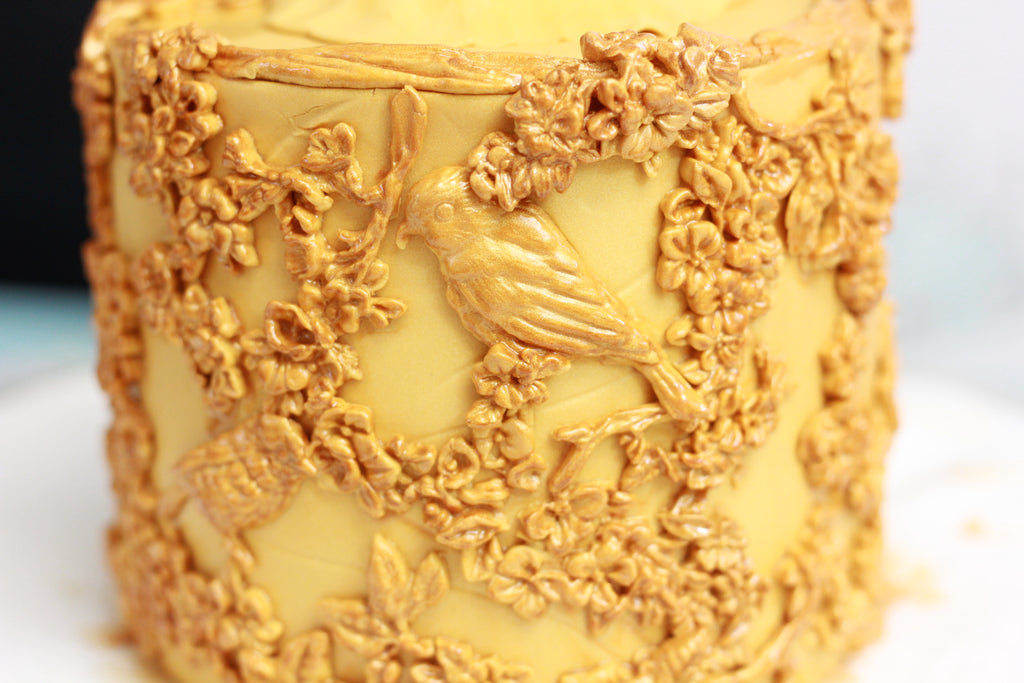
Here I have an example of a cake that is simple yet elegant that has a big impact in a short amount of time. And with the help of the Innovative Sugarworks tool line the process doesn’t take too long at all.
Now I know you are asking yourself “do we really need more cake at a wedding?” And the answer is YES, always! But fear not, this is a personal sized cake and can be given as a gift before or after the wedding as well. (But it makes more of an impact if it is presented at the reception.)
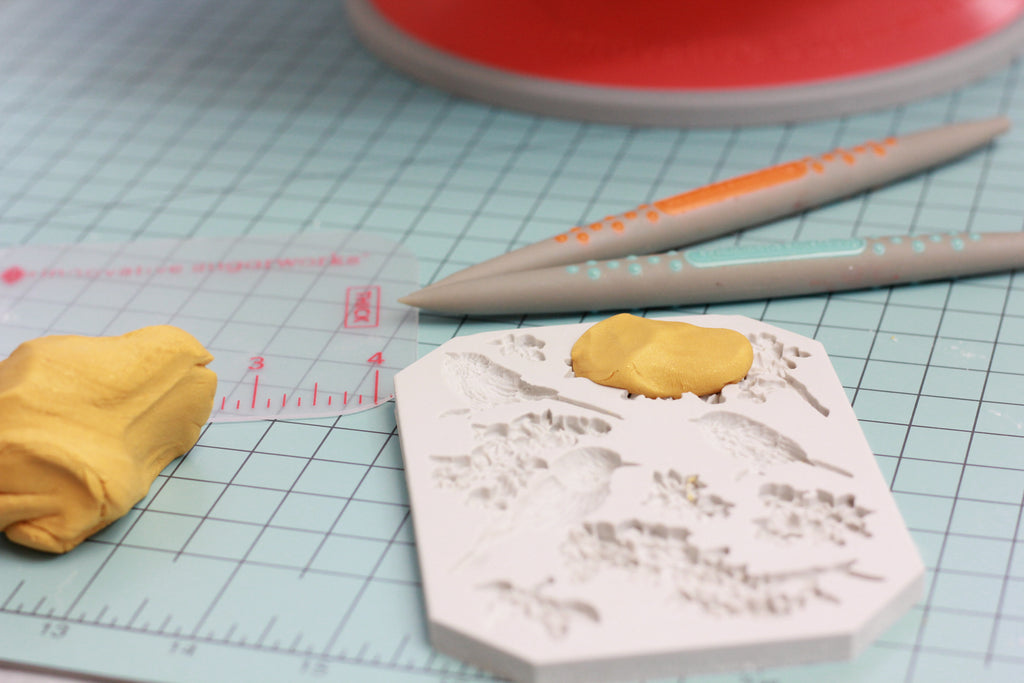
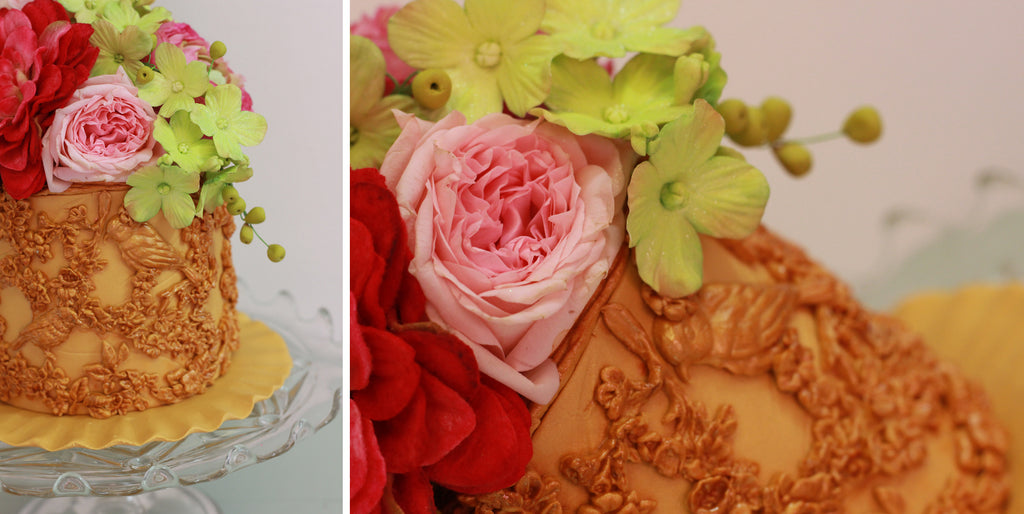
I have used a mold to create the details of the cake, filling the mold cavity with the same color fondant that is on the base cake and using Sugar Shapers to push in the fondant to get all the details.
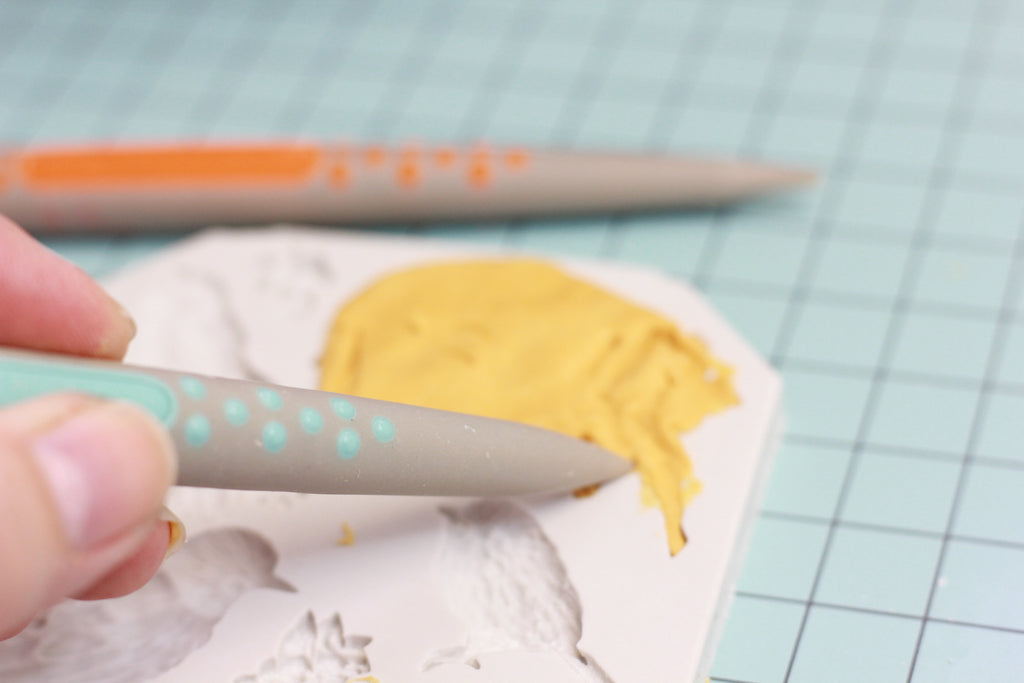
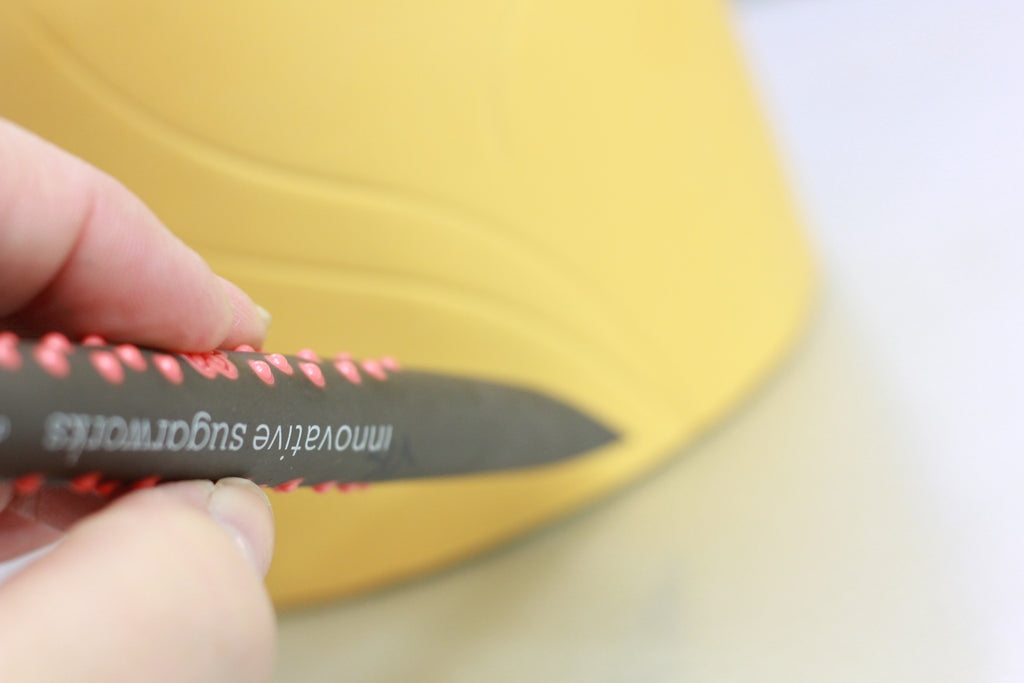
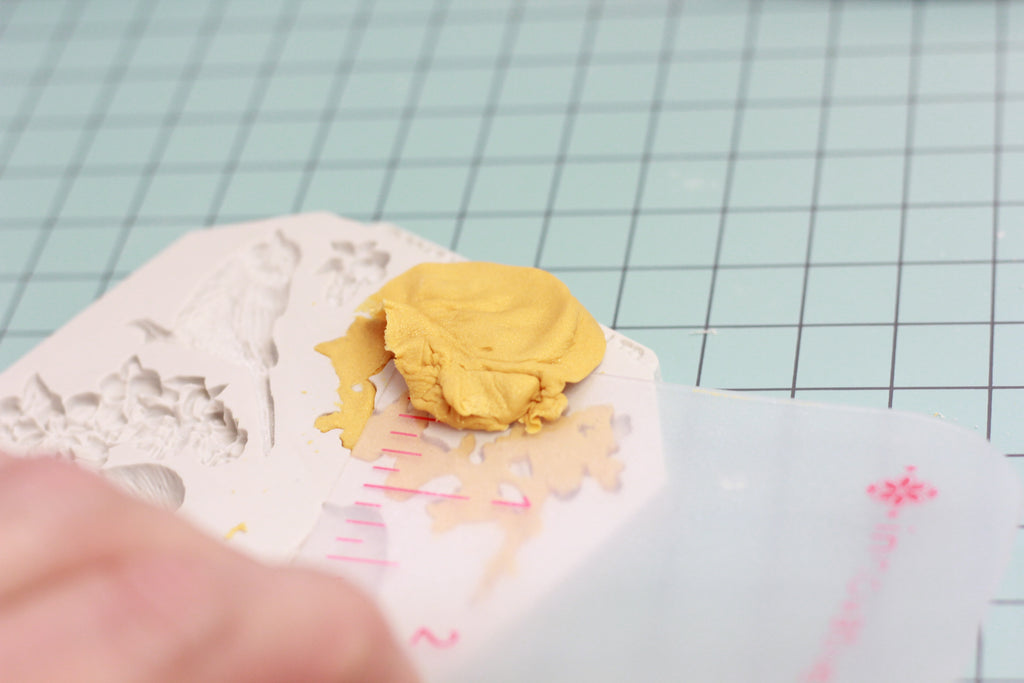
The thicker of your Sugarworks Sugar Smoothers is a great tool to scrape off any extra fondant from your mold. Then just pop out and adhere to the cake with water or sugar glue.
Use a soft brush to make sure your appliqué pieces are firmly attached.
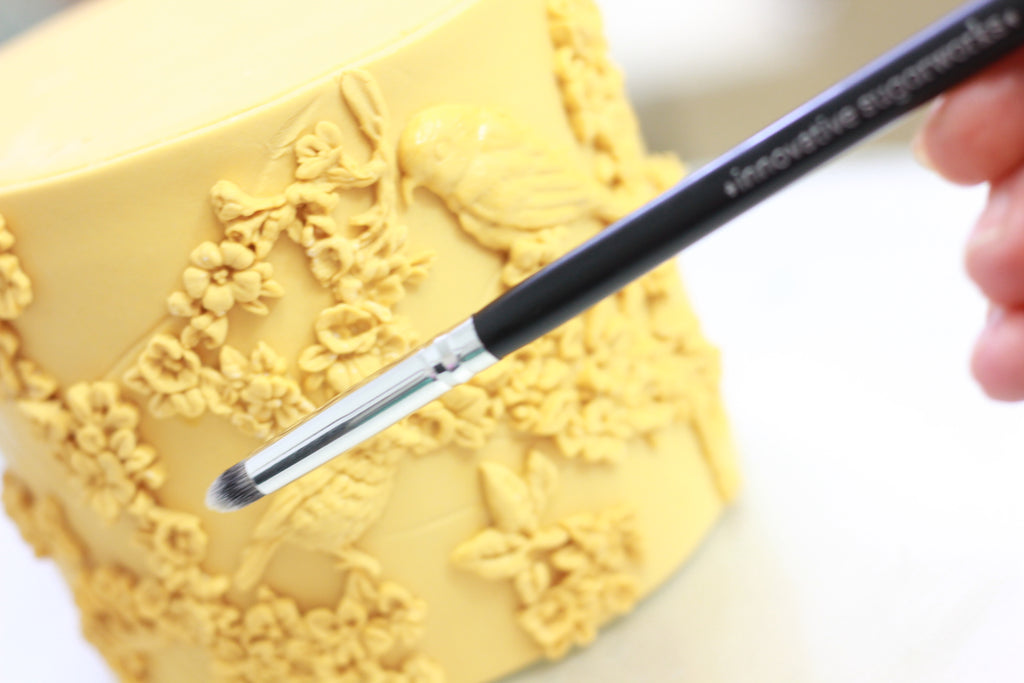
Then paint over the appliqué pieces to create more depth in your cake design.
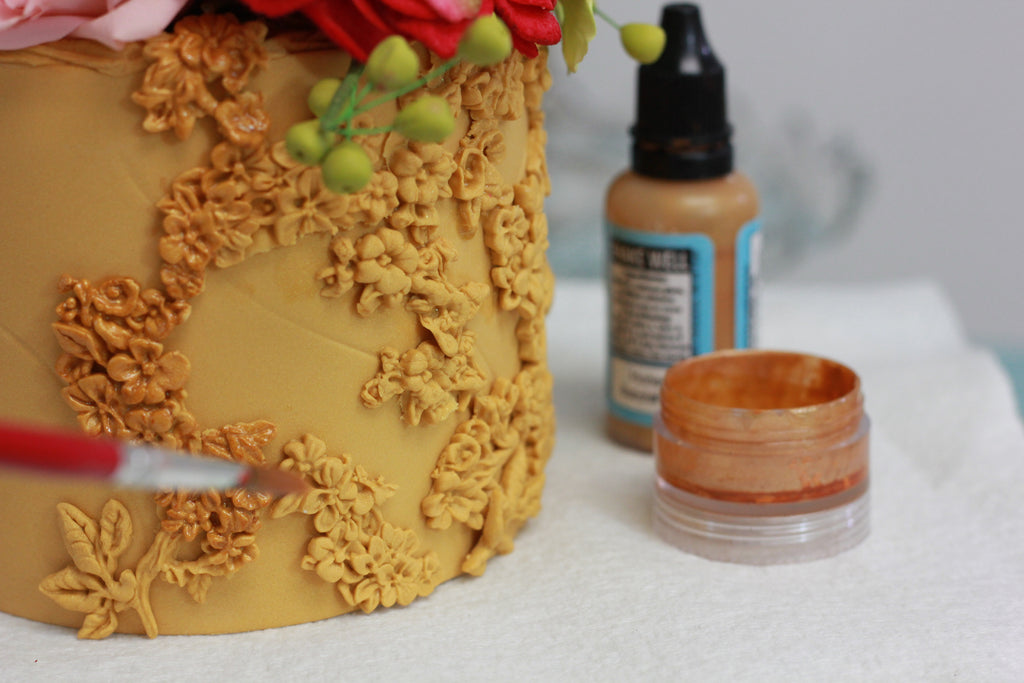
Once that has dried attach your flowers to the top.
You may have noticed that I have used both fresh and sugar flowers… yes, I am a rebel that way! I like to keep them guessing and I love to mix mediums on my cakes.
As you can see this addition can be done in a short amount of time but will leave the recipient with a lasting sweet memory. Mother of the Bride or even Father of the Brides cake, now this is a tradition I can get on board with.
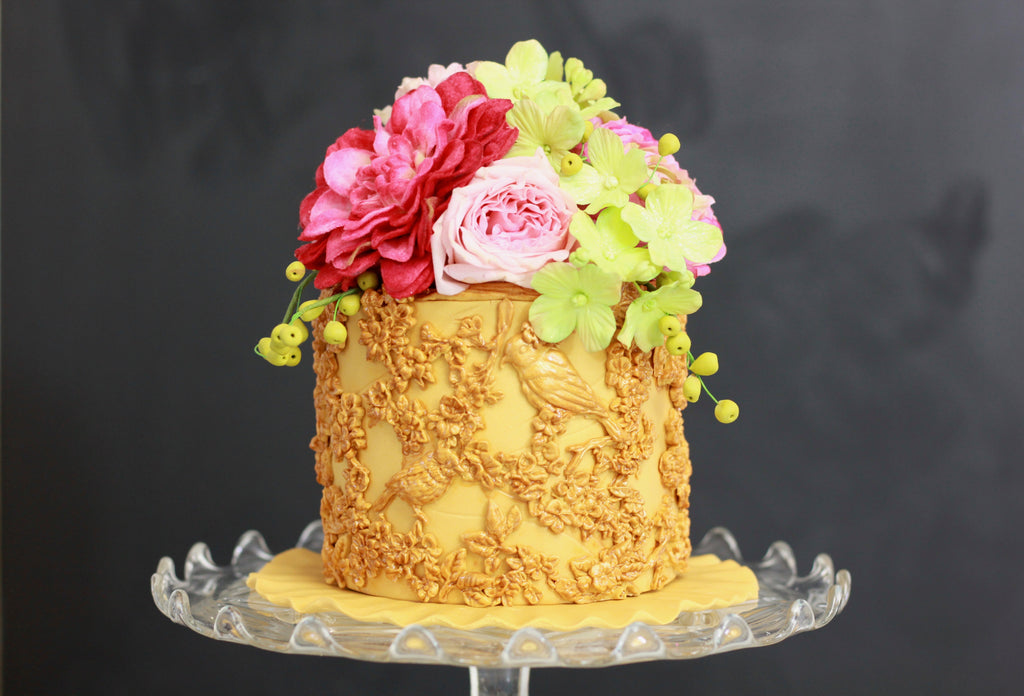
And there you have Reva's new addition to the Big Day- a personal cake for mom (or dad!) to say Thank You for all they do to help make the day magical (or just keep the couple sane during the run-up to the event!) If you're a wedding cake designer, considering offering your next couple a package that includes a personal Mother of the Bride cake option!
And if you want to keep up with all of Reva's new ideas and gorgeous cakes, find her online:
Web: Merci Beaucoup Cakes
Facebook: /MerciBeaucoupCakes
Instagram: @mercicakes
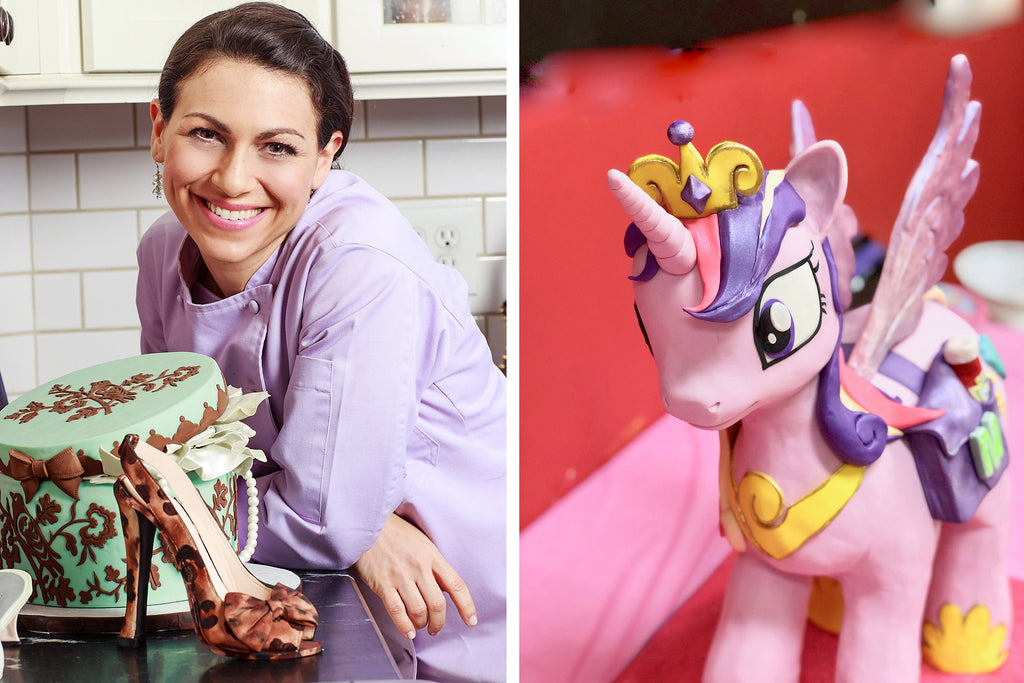
Sugar Structures in the Field - an Interview with Elisa Strauss
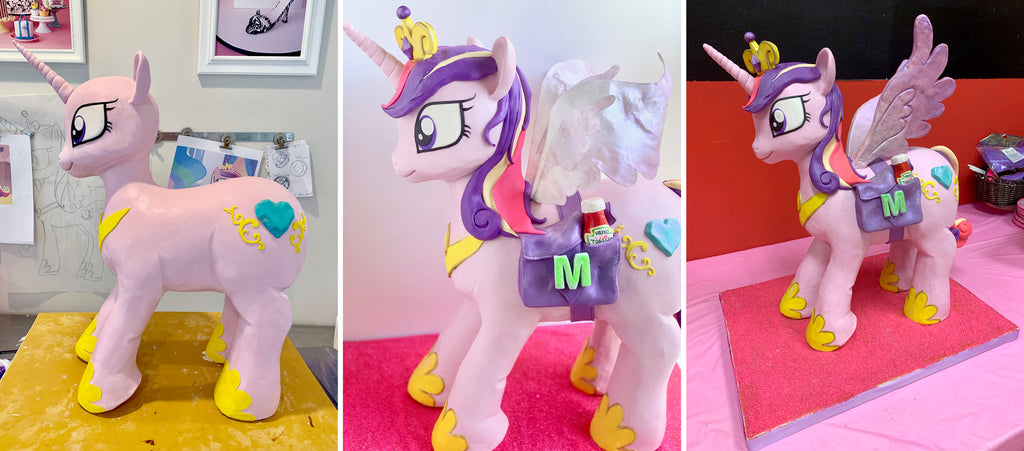
We recently caught up with Elisa Strauss of Confetti Cakes. Elisa's My Little Pony Alicorn cake lit up the social media cakesphere last month, and when we heard she used Sugar Structures to support it, we had to ask how it went! Read our interview with Elisa and see what a cake pro has to say about using Sugar Structures for a sculpted cake armature!
What's your past experience with structured or sculpted cakes?
I’ve been making sculpted cakes for the last 20 years!
What made you want to try Sugar Structures?
I was tired of having the feeling of crossing my fingers every time I made a sculpted cake- hoping (praying!) that the stars aligned and my cake wasn’t going to come apart while delivering it.
When I knew I was making a pony (ahem, ALICORN…not a UNICORN, not a PEGASUS…an ALICORN people!) I remembered seeing Kaysie Lackey’s Craftsy/BluPrint class and had a feeling the Sugar Structure would make my life way easier…and it did!
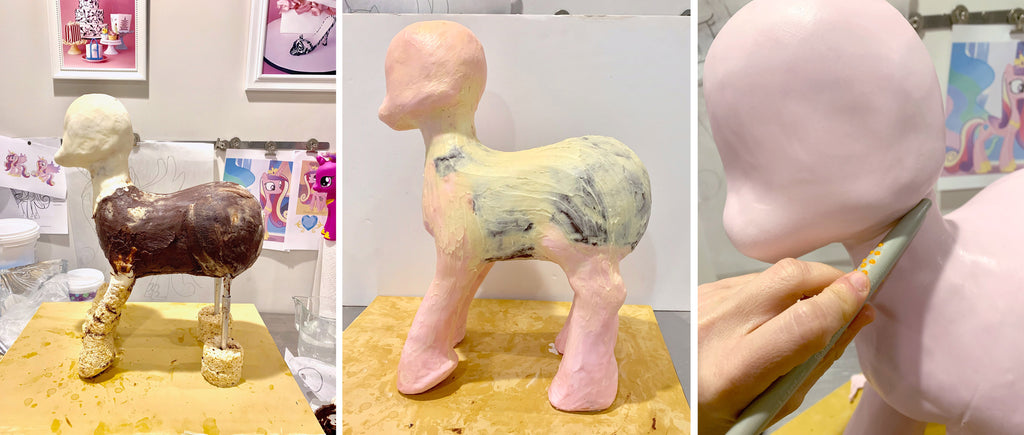
How did you customize your Sugar Structure kit to make the design you needed? And what planning/preparation did this involve?
I bought the 4-legged Standing kit but once I started my “practice” run I realized that the character I was making had much higher legs then a cow does. So luckily I also had the 2-legged Standing kit and the extra parts in that kit enabled me to extend the legs. Once I extended the legs I was enjoying the ability to customize by combining the two kits based on the template I made! It was liberating!

How was it working with Sugar Structures? Can you describe the process?
I have to say- the entire time I kept worrying that at some point something was going to go wrong. Let’s just say I am a cup-half-empty girl when I’m working on massive sculpted cakes…and years of experience being stressed. :-)
But I couldn’t believe how easy it was!
The hardest part, honestly, was figuring out where to put the back-hind leg so I could stabilize that part of the kit with 3 holes and drill the screws in. After that, putting the pieces together were pretty easy as I worked against my template. (And I suggest before starting every cake like this that you make a life-sized template.) Every once in a while I needed to get out a wrench to help me screw something extra tight in order to face a part in the correct direction based upon my design.
I also used Zoe’s Fancy Cakes' Unicorn YouTube video and Kaysie Lackey's Sculpting Magic Craftsy tutorial for guidance.
Do you have any advice or someone making their first sculpted cake?
MAKE A PLAN! Whether you are using dowels or a Sugar Structure from Innovative Sugarworks, or building your own- don’t just start doing without a plan. You wouldn’t want to live in a house that an architect just threw together would you??
Would you recommend Sugar Structures to another cake artist?
ABSOLUTELY…in fact I just did! One of my friends was making a cake of a character that is standing on two legs but it is very top heavy. In the olden days I would construct something out of dowels, hot glue, and foam core…now I don’t have to. :-)
Keep your eyes peeled for more fantastic cakes from Elisa by following her online:
Facebook: @elisastraussofconfetticakes
Youtube: /ConfettiCakes
Web: http://elisastrauss.com
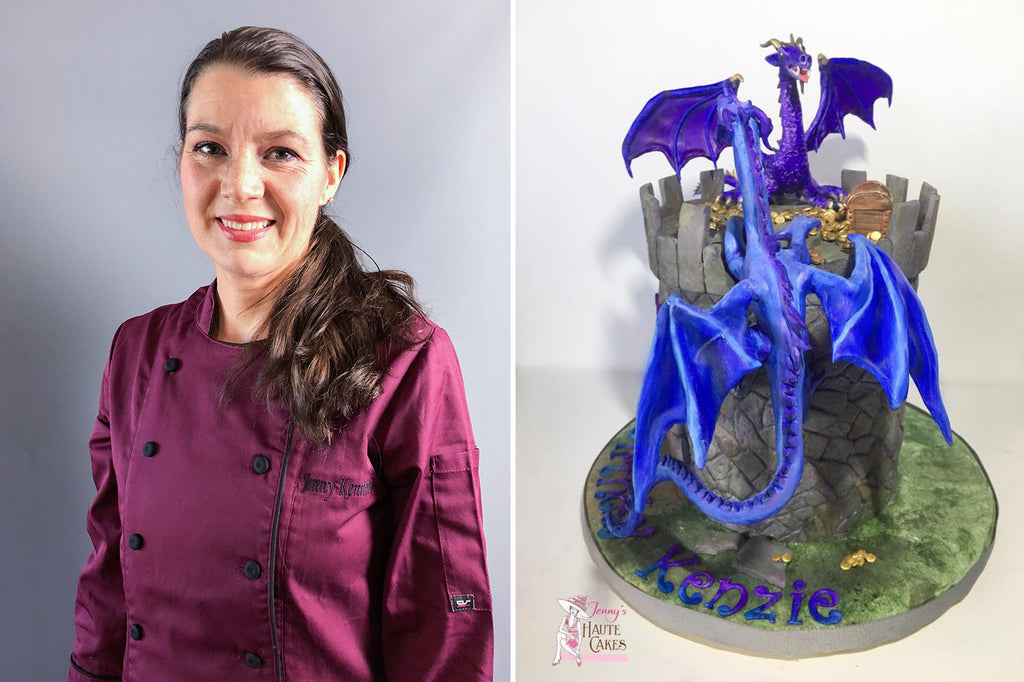
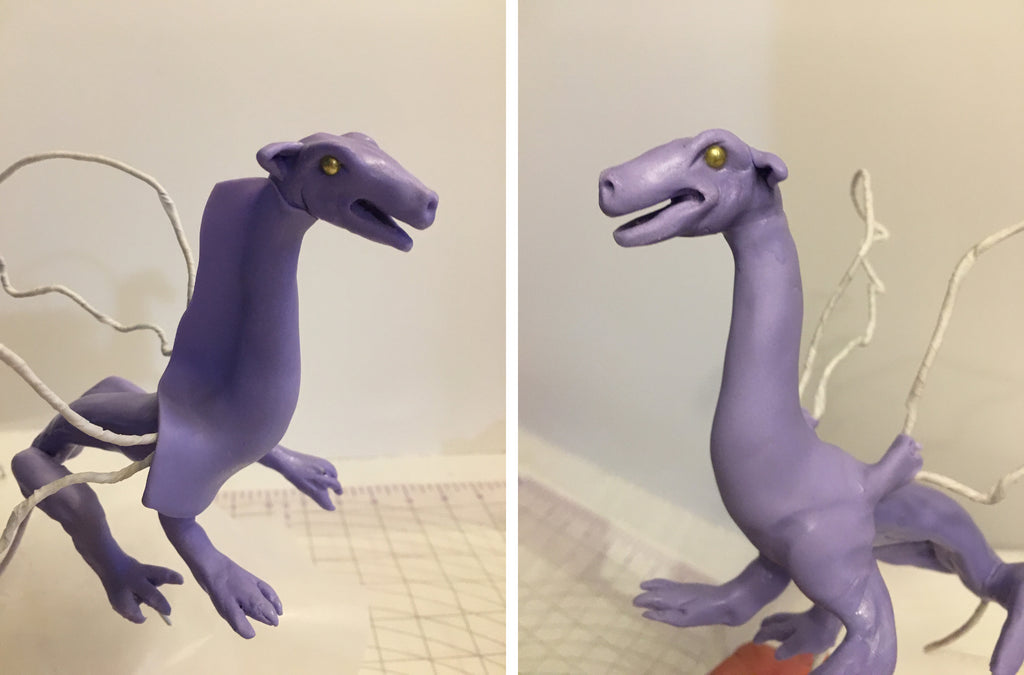
Jenny's Haute Dragon
This month we are pleased to welcome Jennifer Kennedy to the Sugarworks blog! Jennifer is the owner and cake designer of Jenny's Haute Cakes outside Denver, CO. What began as a hobby seven years ago has grown into an incredible professional career! Jenny is most famous for her amazing sculpted and celebration cakes and has been featured in multiple magazines around the world.
Today, Jenny is teaching how to make a dragon cake topper using modeling chocolate and Sugar Shapers!
In this tutorial you will learn how to mold a dragon cake topper.
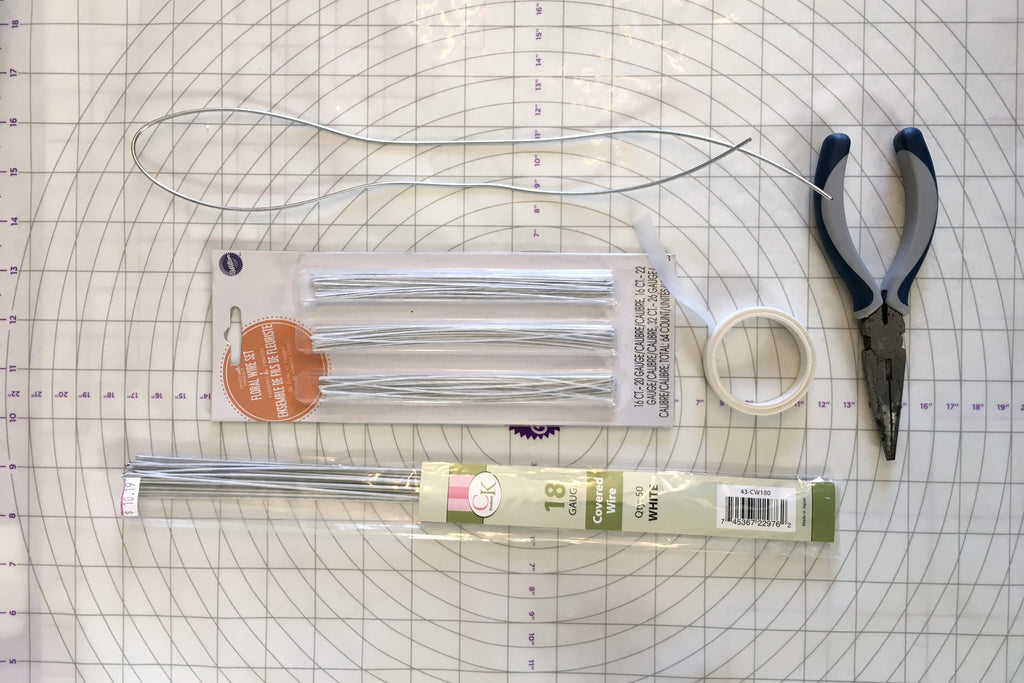
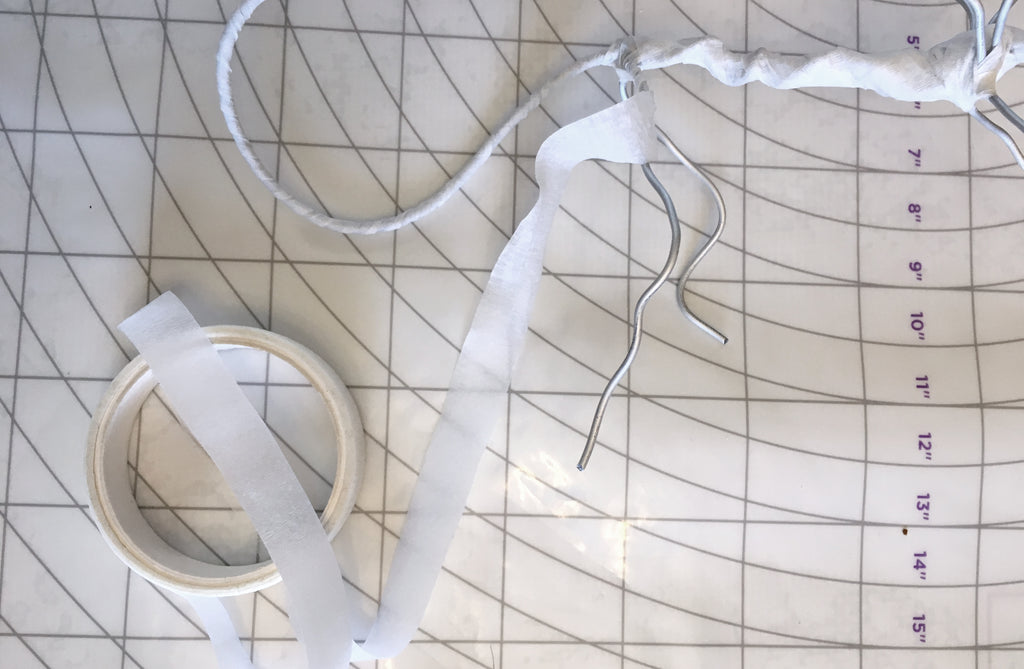
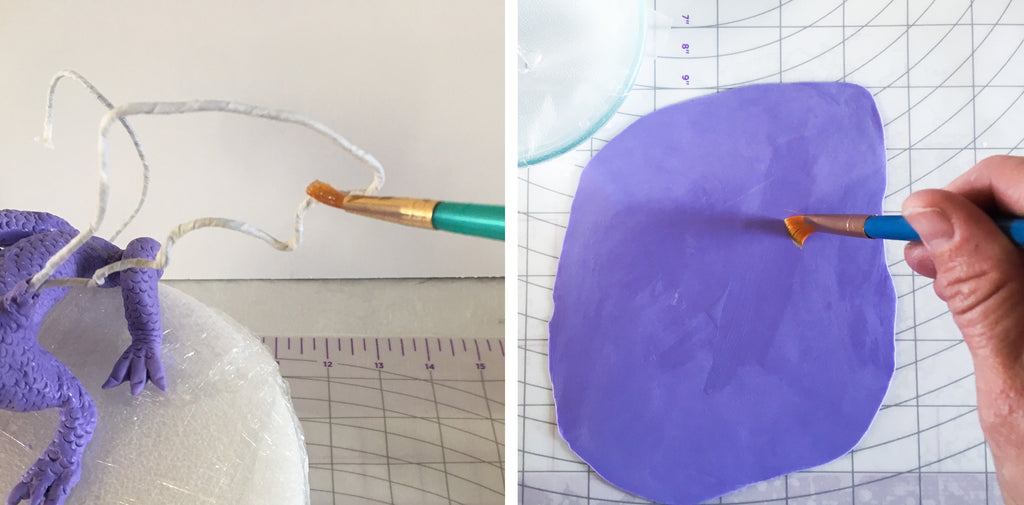
First we will create a structure for the dragon. For the structure you will need:
- 2 pieces of 18 gauge wire (approximately 12” long)
- approximately 28” of armature wire
- white floral tape
- needle nose pliers.
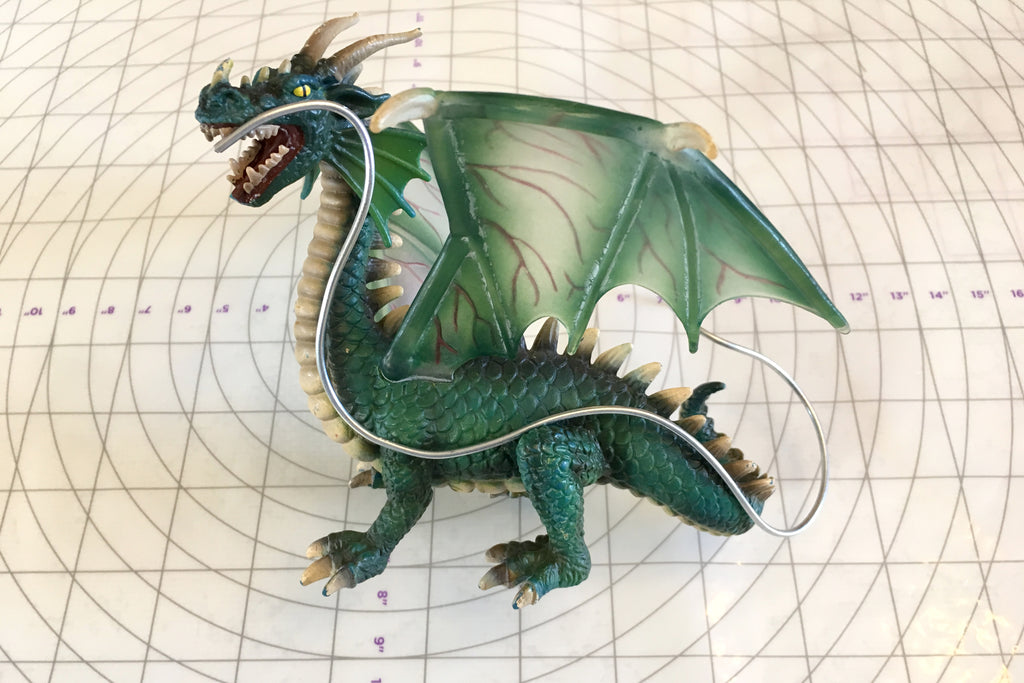
With three boys in the house I have accumulated quite a collection of plastic dragons over the years. If you can lay your hands on one, they are a fantastic reference for model making. They are not, however, necessary. You can Google search “dragon model image” and find 241,000,000 (yes, that’s MILLION) references. I prefer 3D references for modeling over 2D images. A photo of a 3D image is a great compromise. You can even use multiple references and pick and choose the parts of each you like best. Print the picture in color and enlarge it to the size you want the cake model to be.

I chose this plastic dragon because it is sitting in a position that is pretty close to the one I want for the dragon on my cake.

Now, Let's get to it!
Step 1:
Take the armature wire and, holding it up to your plastic model or to your photo, follow the curve of the body from head to tail. Trim the wire with the pliers.
Step 2a:
Take a second piece of armature wire with the head and begin wrapping it around the neck of the dragon, until you come to the shoulder area. Then bend the wire and follow the outline of one wing, then the other.
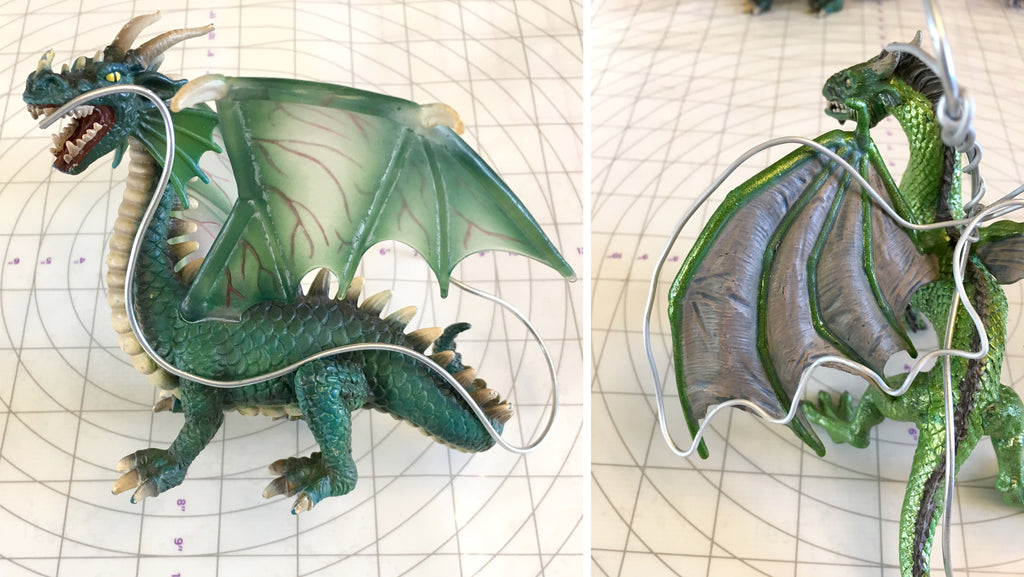
Step 2b:
Take a piece of 18 gauge wire and wrap it around the body in the middle just behind the wings. Repeat with the back legs. Leave the legs too long. You can use the extra length to secure the dragon to your cake, and to stick into Styrofoam as you are building the model.
Step 3:
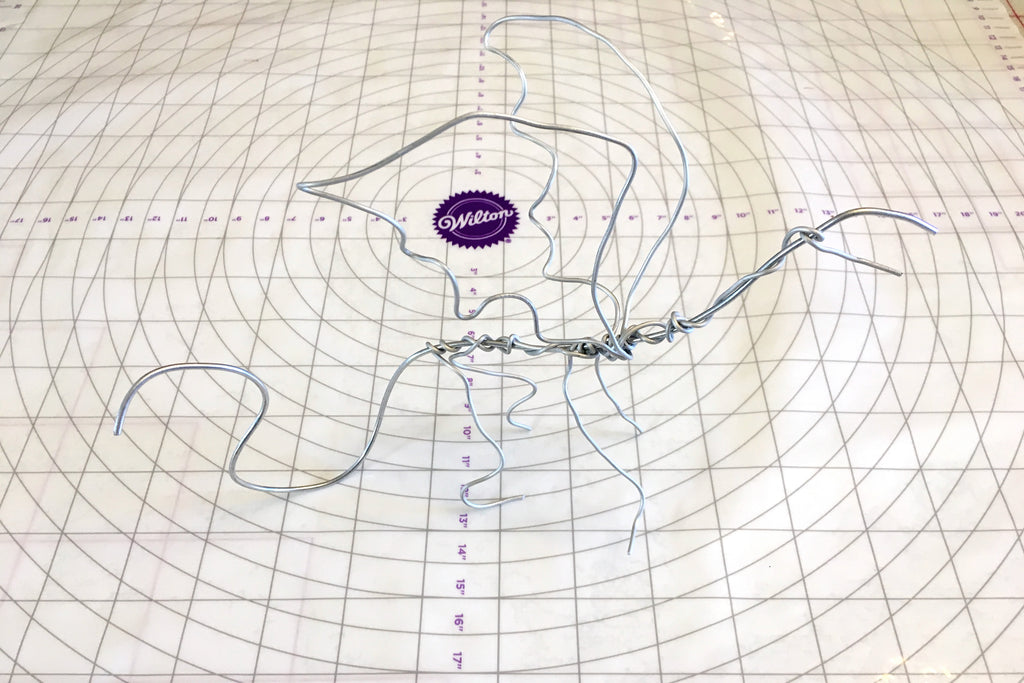
Wrap the entire structure with white floral tape
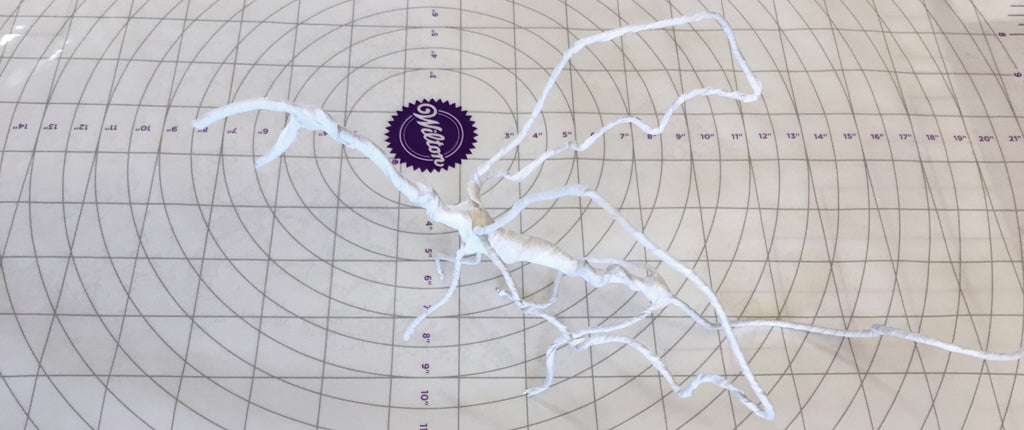
Now for the fun part – let’s make a dragon!
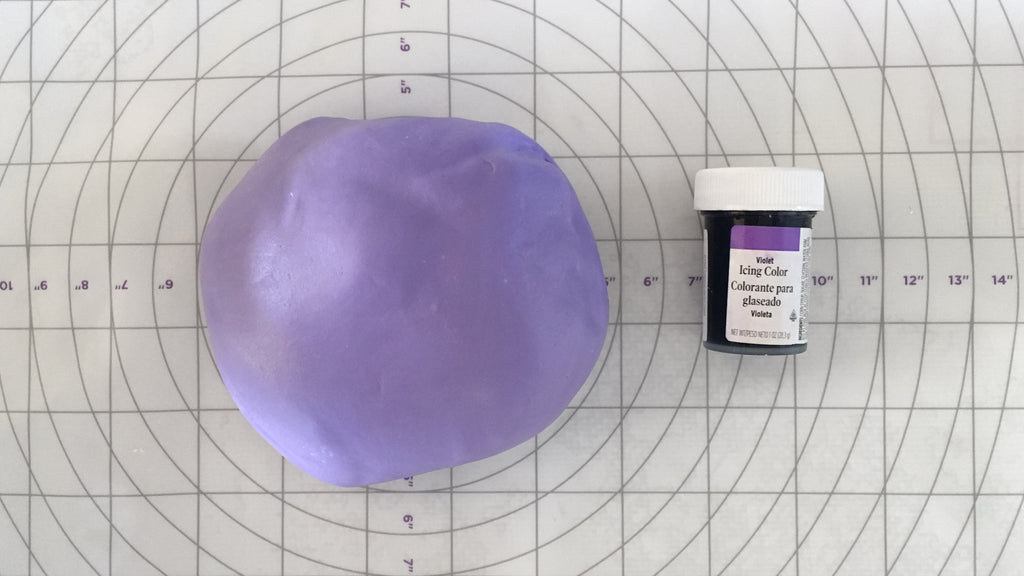
First you will need about ½ pound of modeling chocolate and food color. I prefer to use Hot Hands Modeling Chocolate for two reasons: First, it doesn’t melt in my hands when I am sculpting, and second I can color it with regular gel food color. How cool is that?
You will also need:
- Mini-Tip Sugar Shapers, soft
- Piping gel
- 9” rolling pin
- Tylose powder
- Paint brushes
- 3mm gold dragees
- Black fondant
- Knife or scalpel
- Coffee straw
- Black food color pen
- Rounded stainless cuticle scissors (dedicated for food and sterilized in the dishwasher)
- 1 ½" ball of black fondant
- 1" ball of white fondant
- 1" ball of red fondant
Step 4:
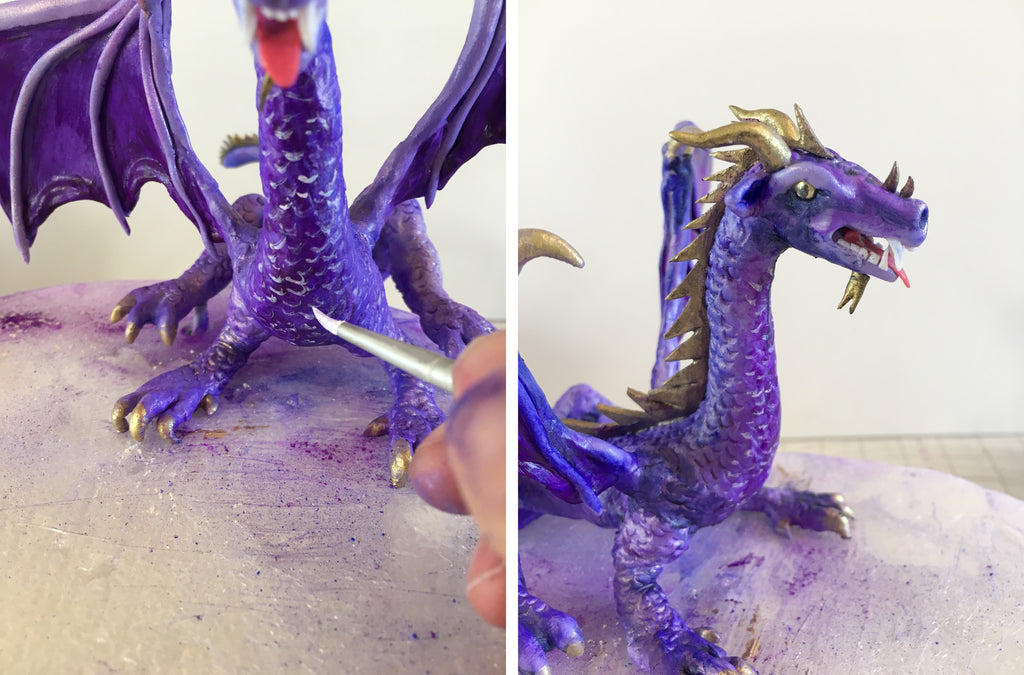
Color your modeling chocolate with gel food color. I'm making a purple dragon, but since these are fantasy animals- any color will work. I recommend wearing gloves to keep your hands from matching your dragon.
Step 5:
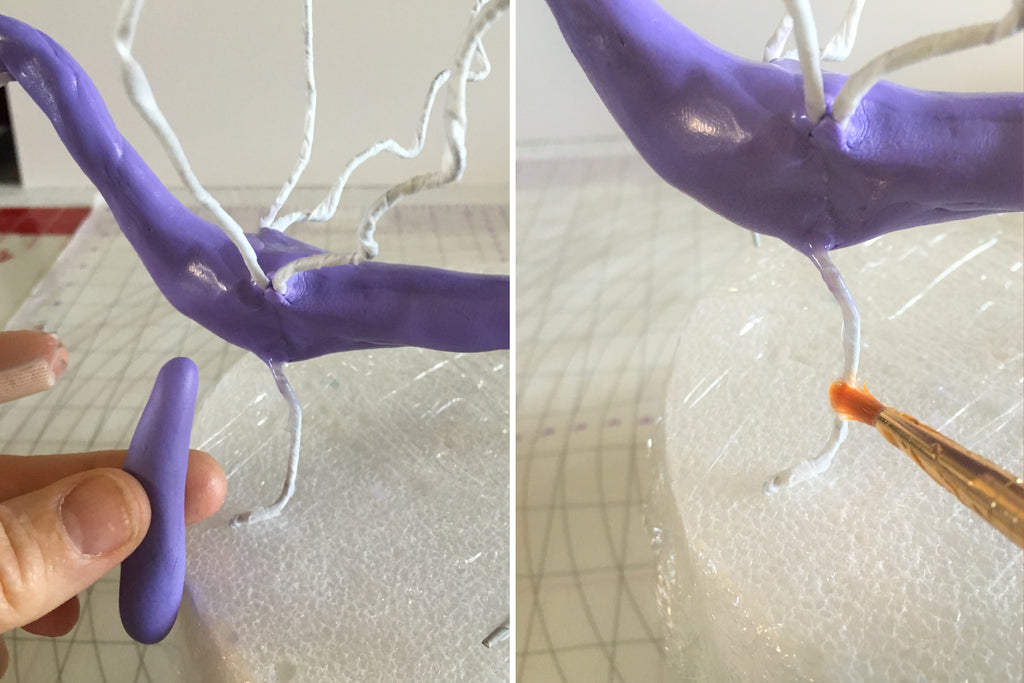
Begin covering all parts of the dragon body (except the wings and tail) with snakes of modeling chocolate. Make the snake for the chest area thicker. Also, make the back legs thicker than the front legs. If the modeling chocolate isn’t sticking to the wire you can paint a little bit of piping gel on the wire first.
Why aren’t we covering the tail yet? Because it gives you something to hold on to!
Step 6:
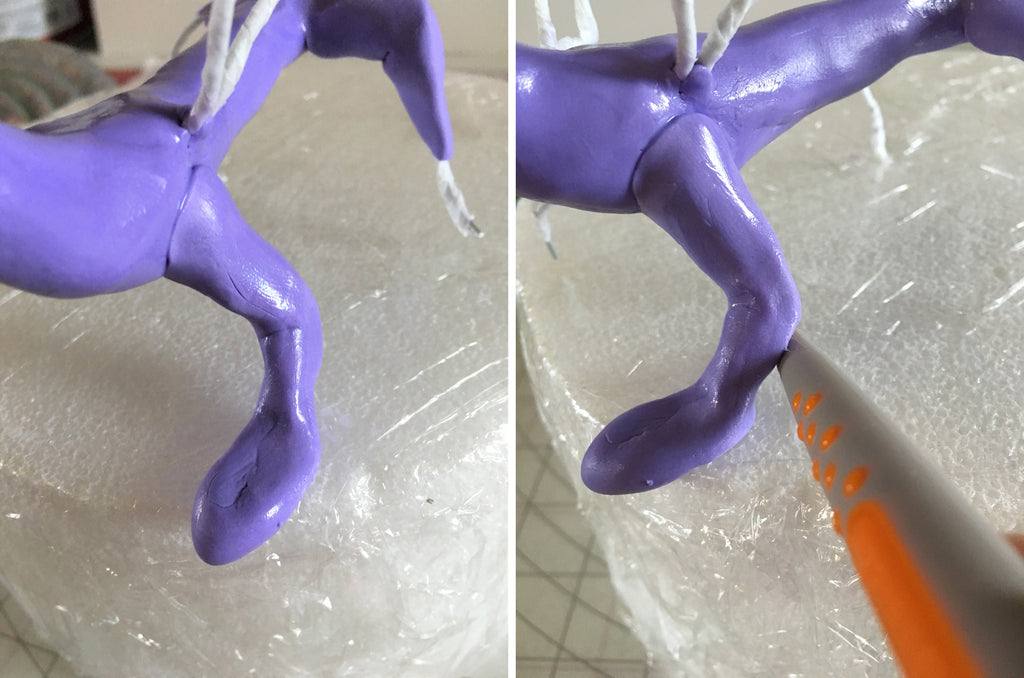
Smooth out the seams with the smooth side of your Sugar Shaper. Then use your red Sugar Shaper to create a crease at the back of the knees on the back legs and the front of the knee on the front leg (the front leg joints bend in the opposite direction). Pinch the back knee to give it shape, and use the small end of the orange Sugar Shaper to create a definition line in the leg muscle.
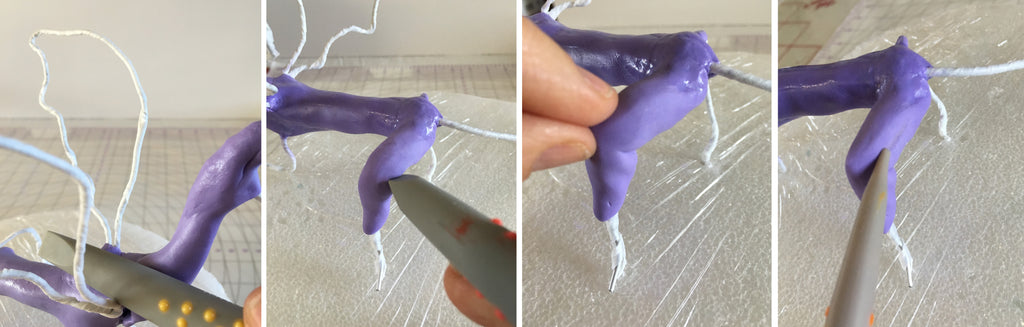
Step 7:
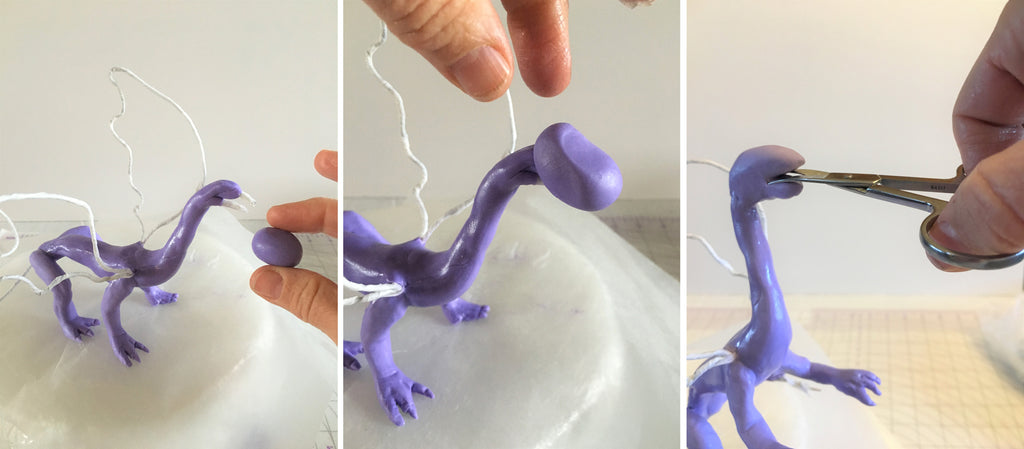
Add a ball of modeling chocolate on the leg to create a foot. Flatten the ball with your finger.
Note: Leave the wire longer than the leg on one front leg and one back leg. You will want a couple of inches extra to secure your dragon to the cake.
Push that extra wire into the Styrofoam and then create the foot where the wire meets the Styrofoam. Use your small orange Sugar Shaper to create an indentation at the ankle.
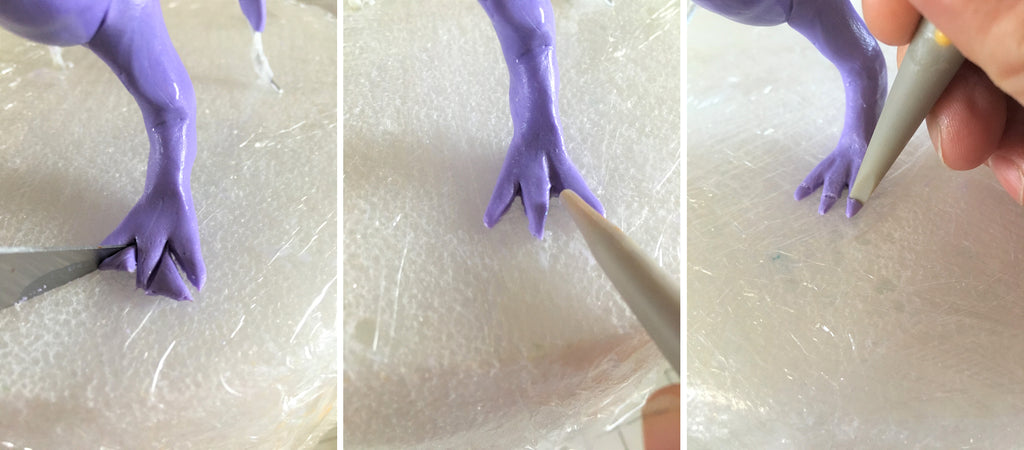
Step 8:
Cut triangles out of the foot to create three toes. Then, use the orange Sugar Shaper to smooth between the toes and create an impression on top of the foot from between the toes across the top of the foot. Now use the small side of the yellow sugar shaper to create a crease at the end of each toe to create a claw.
Step 9:
Using the orange Sugar Shaper, smooth the seams from the leg to the body and create a crease. You can add a little water at the seam to help smooth it.
Now we get to move on to the head!
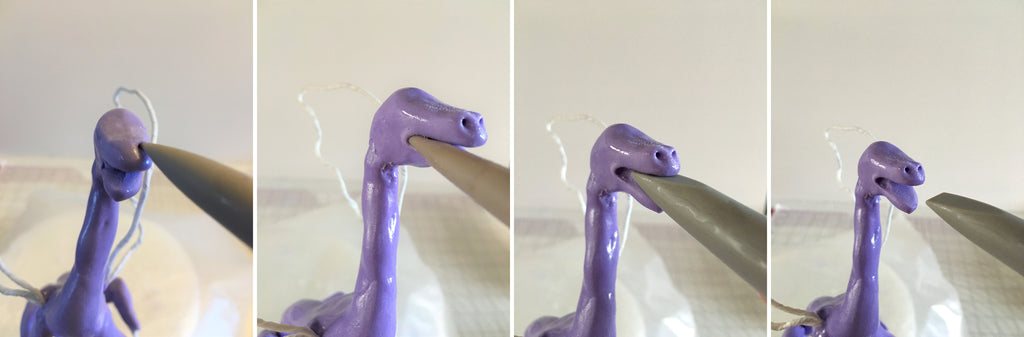
Step 10:
Roll a ball of modeling chocolate for the head. Mold the ball around the head wires with your fingers. Now cut the fondant between the top and bottom wire to make a mouth.
Step 11:
Using the small end of the aqua Sugar Shaper poke a small hole into the top of the head above the mouth to create nostrils. Pull up slightly to give the nostril shape. Next, use the big end of the orange Sugar Shaper to pull out the corner of the mouth. Then insert the big end of the yellow Sugar Shaper into the mouth and gently pull down to make the mouth open wider. We want room to add teeth!
Step 12:
Use the big end of the green Sugar Shaper to make a curved indentation along the jaw line. Then roll the side of the orange Sugar Shaper along the top of the head to create an indentation between the nostrils and what will become the tops of the eyes.
Step 13:
Make an eye socket by pressing the big end of the orange Sugar Shaper into the side of the head. Push in and up to create a brow area.

Step 14:
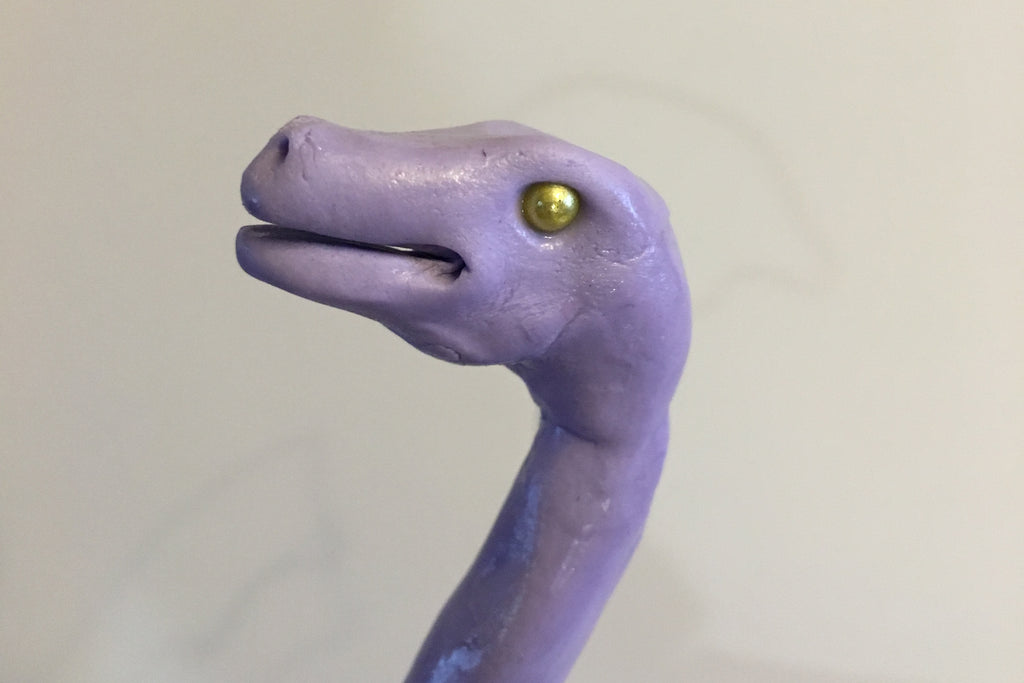
Paint a dot of piping gel in the eye socket and press in a gold dragee.
Time to make the ears!
Step 15:
Roll a snake of modeling chocolate approximately one inch long. Cut it in half. Roll the big end of the orange sugar shaper on each piece to flatten it and cup the ear. Do not roll the sugar shaper out over the sides. Pinch top of ears so they come to a point. Attach the ears to the back of the head about eye level. Smooth seam with orange sugar shaper.
Step 16:
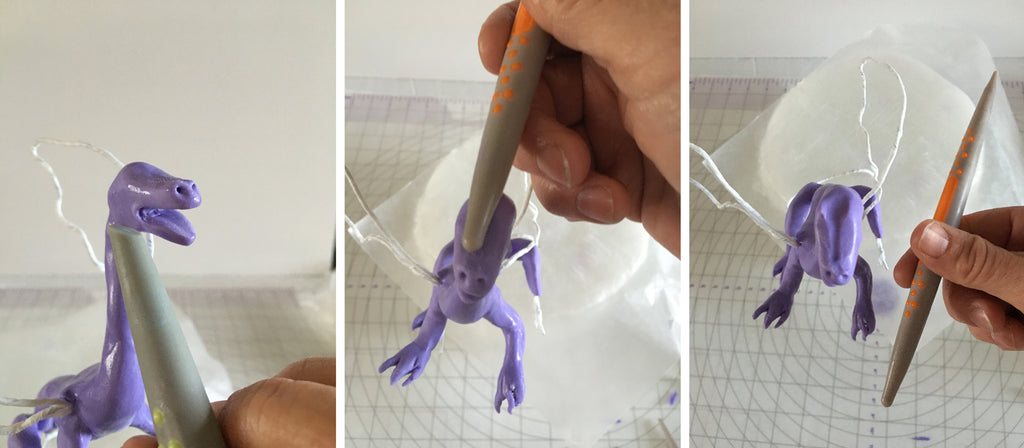
Create a vertical line in the middle of the upper part of the mouth below and centered between the nostrils using the small end of the yellow sugar shaper. Then make horizontal lines up the snout using the large end of the red sugar shaper.
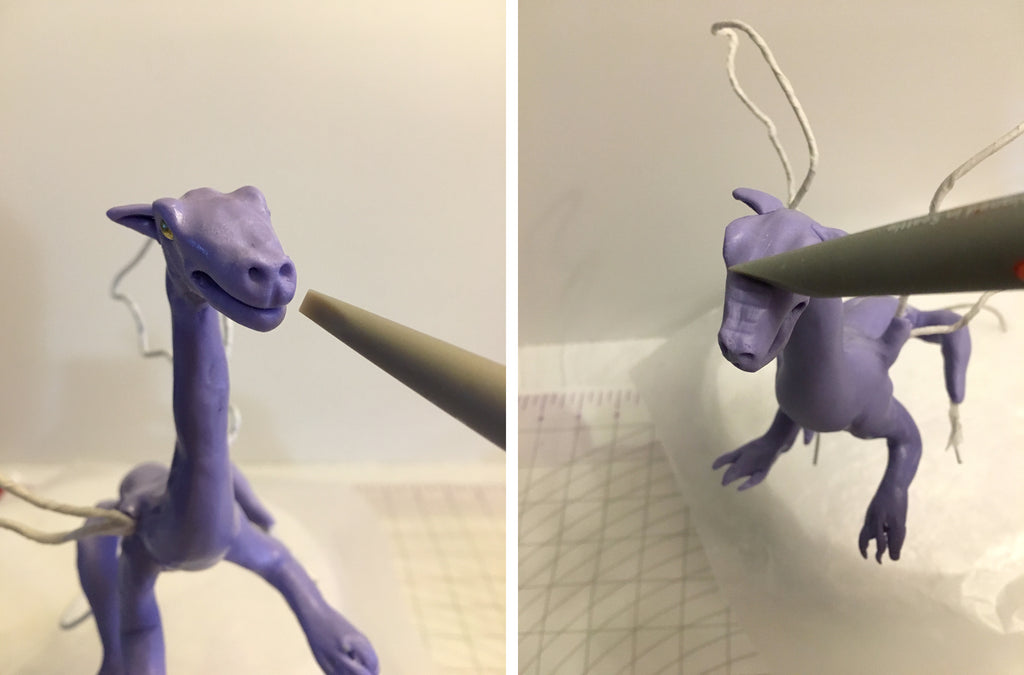
Step 17:
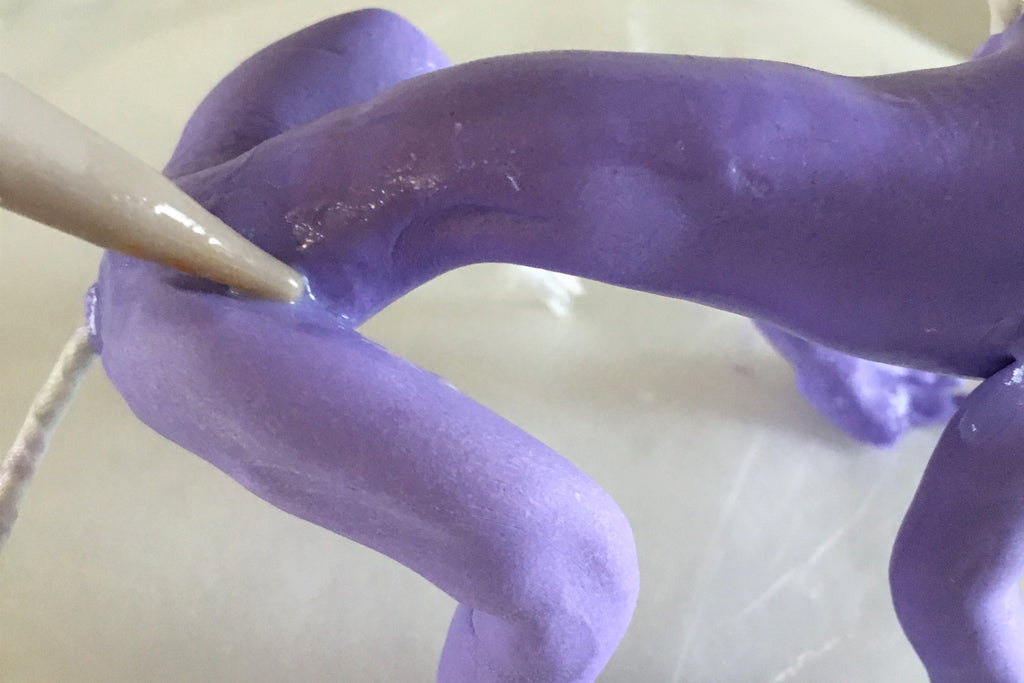
After working on the head I decided my dragon’s neck and chest were too skinny. It is always a good idea to periodically step back and look at your dragon and at the model and make any adjustments. If you made yours big enough to begin with, you can skip this step. But if you think you need more body, continue along.
Wrap the modeling chocolate around the neck, creating a seam at the back of the neck. It will be easy to hide here when we add the spines down the back. Trim off the excess modeling chocolate and smooth the seams with the side of your orange Sugar Shaper.
How about a little magic?
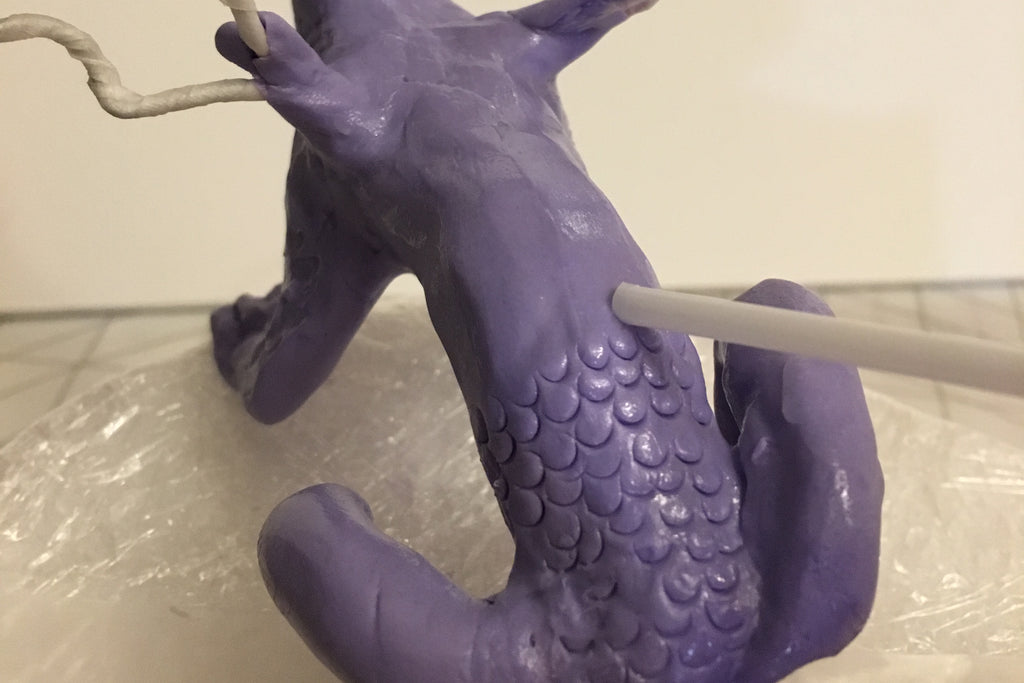
Step 18:
Use the big end of the blue Sugar Shaper to create scales on the dragon’s tummy. Start from the bottom and work upwards. Align each scale between the ones beneath it – like laying bricks.
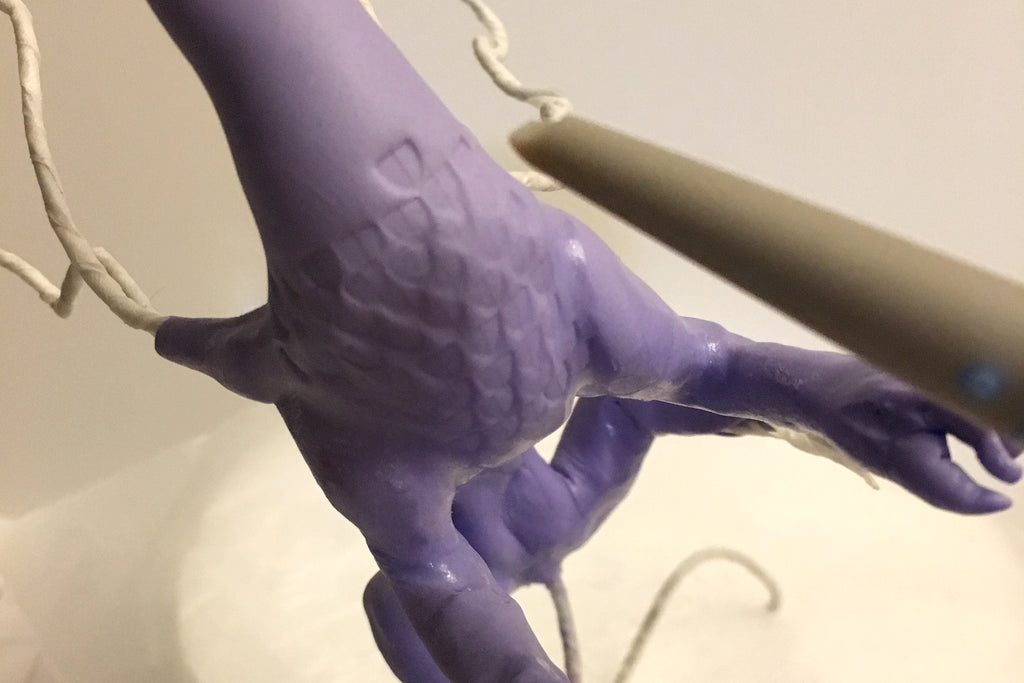
Step 19:
I want to make the scales on the back of the dragon look a little different and more defined than the ones on the tummy, so I will use a different method. Press the end of a coffee straw into the modeling chocolate to make a half circle. Make rows that are misaligned working from the tail to the top of the head, and then along the legs and feet.
Now on to the wings!
Step 20:
Roll out modeling chocolate at least twice the size of the wing. Paint the wire with piping gel. Then paint the back of the modeling chocolate with piping gel. Why do I do this when modeling chocolate sticks to itself? Well, I want to make sure it does and I want to be sure I don’t have any air bubbles.
Step 21:
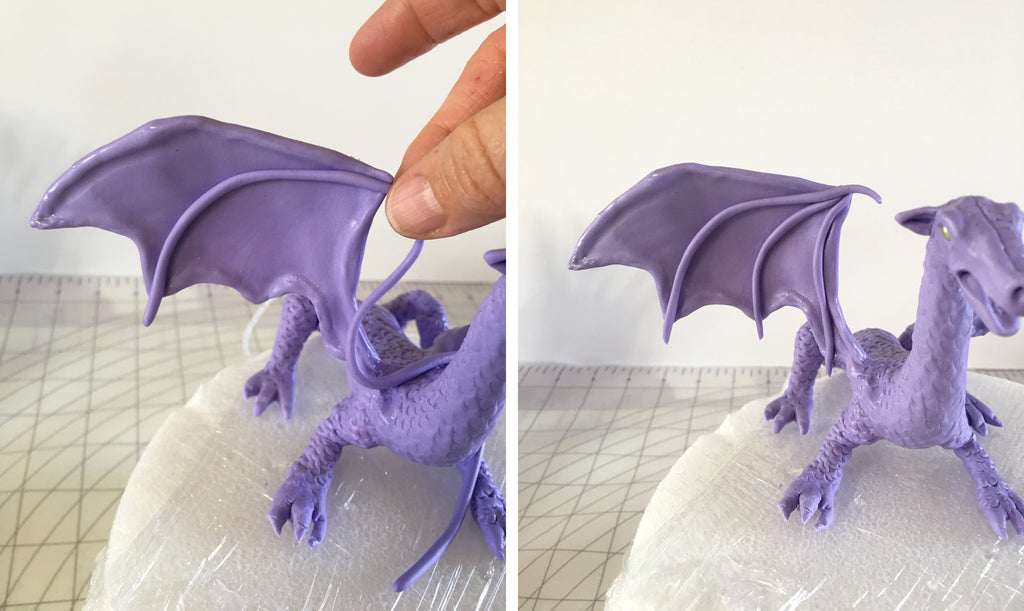
Align the middle of the modeling chocolate with the top of the wing and fold it over the wing. Pinch the middle together around the wings. Trim off the excess modeling chocolate around the wire.
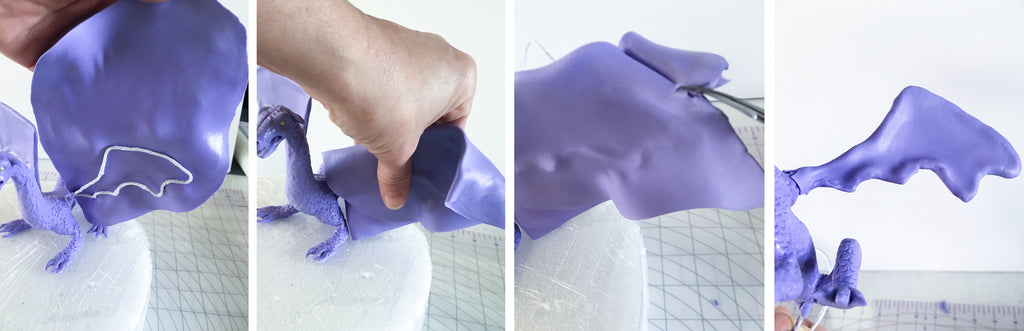
Then smooth the seam where the wings attach to the body using the big end of the orange Sugar Shaper. Gently run the large end of the orange sugar shaper along the wing inside the wire to define the bone structure of the dragon's wing.
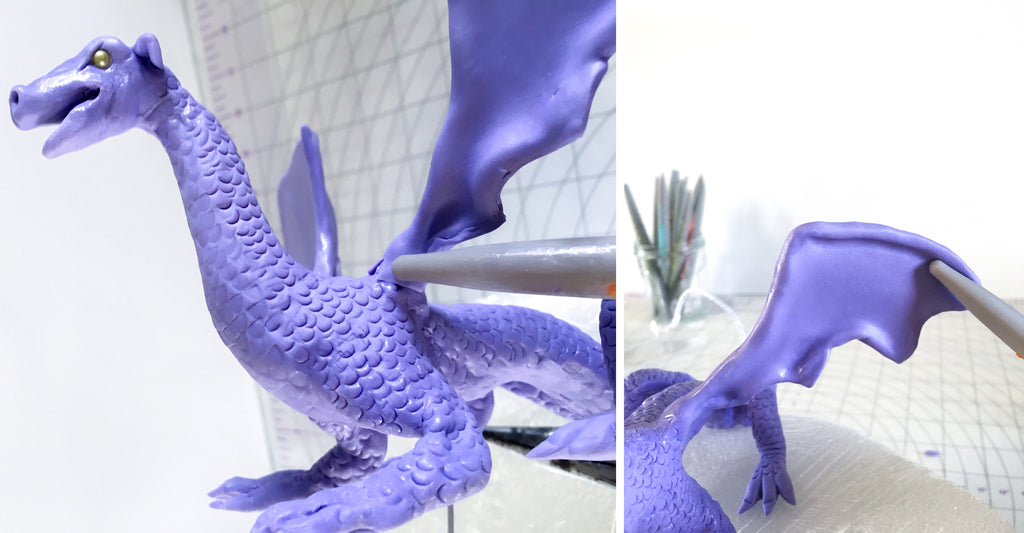
Step 22:
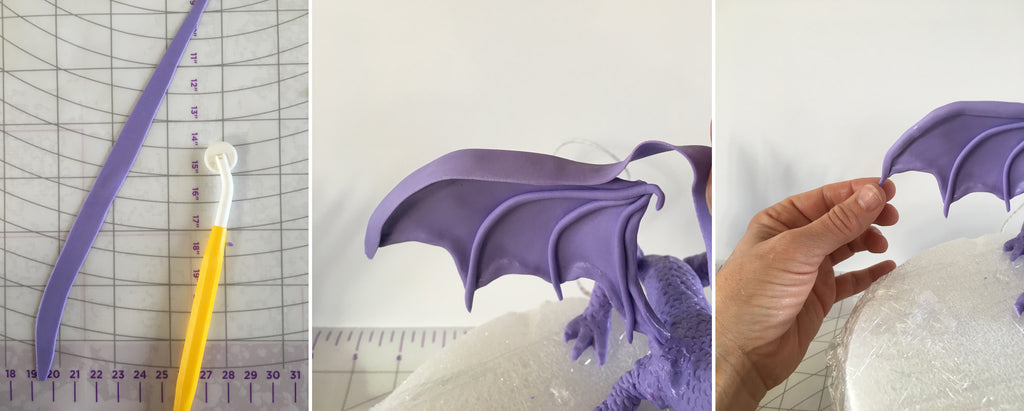
Roll a long thin snake in modeling chocolate and attach it to the wings to create fingers. Make the top finger extend beyond the top of the wing to create a claw.
Step 23:
To enhance the shape of the wings, I decided to add a thin strip of modeling chocolate along the top of the wing. First I rolled out the fondant, then attached it. I rolled the bottom tip to a point.
Step 24:
Now it’s time to pump this dragon’s biceps up! Make a small snake and use the orange sugar shaper to thin the edges, leaving the middle thick. Now attach that bicep and smooth seams 3with orange sugar shaper.
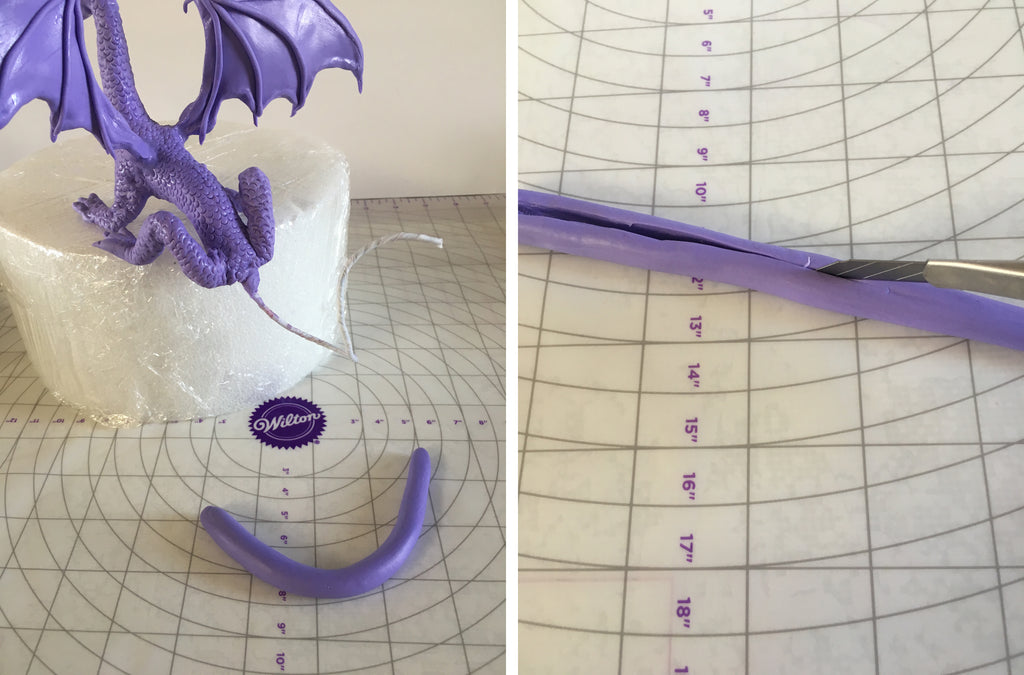
Now on to the tail!
Step 25:
Roll a snake the length of the tail. Make an incision half way into the snake. You may see where I am going with this and wonder why I am not just threading the snake onto the tail. Well, here is why. The armature wire is hard to bend and so I would have to thread the snake along the curve of the tail which is a pain. Since we are putting spines all the way down the tale, I don’t have to worry about hiding a seam.
Step 26:
Paint inside the modeling chocolate with piping gel. Then wrap the modeling chocolate snake around the tail wire making sure the seam is at the top (so it will be covered by the spines). Now smooth the seam where the tail attaches to the trunk of the body and pinch the tip of the tail to make it come to a sharp point.

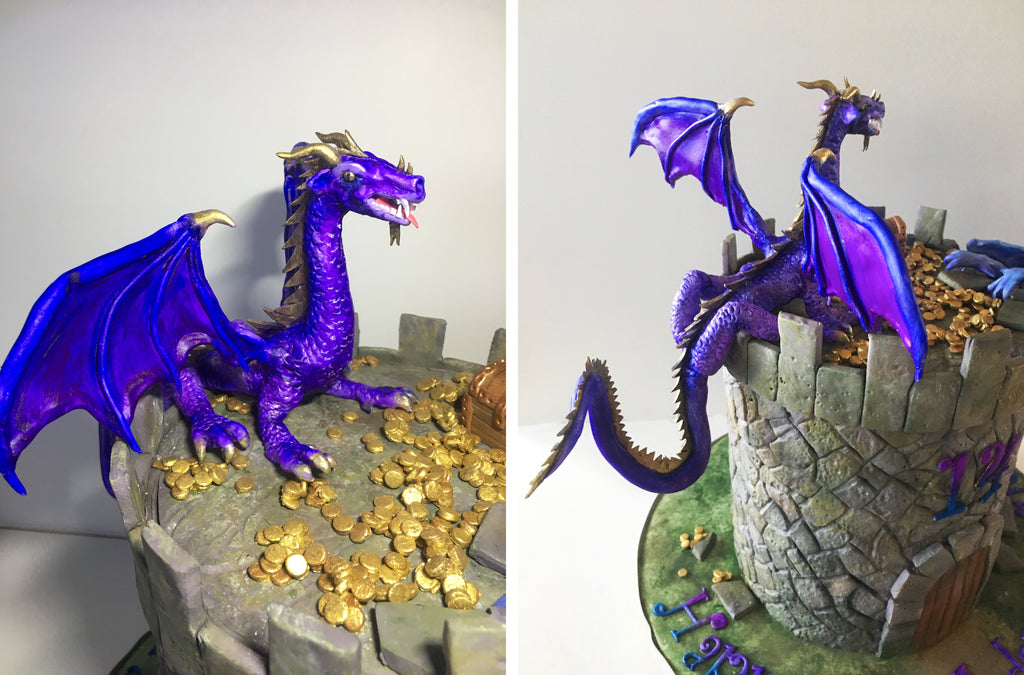
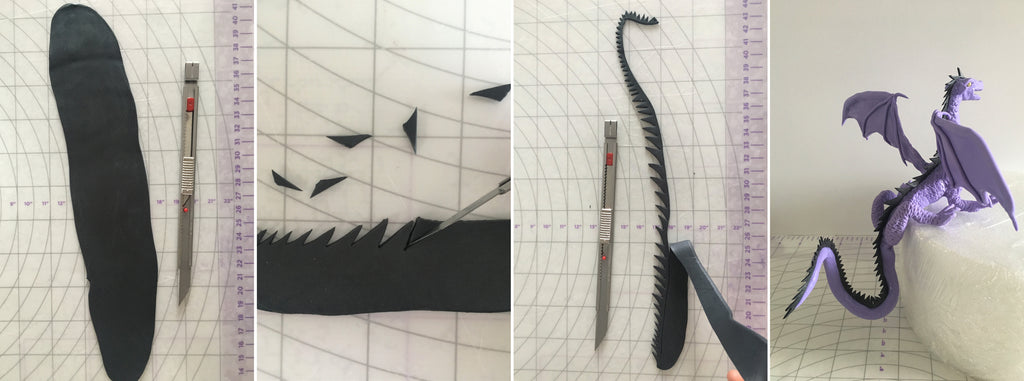
Next we will create the spines that run down the back of the dragon. I use black because I want to paint the spines gold and metallic paint shows up better on dark colors. For gold you can also use brown fondant. If you want to make the spines silver, definitely use black!
Step 27:
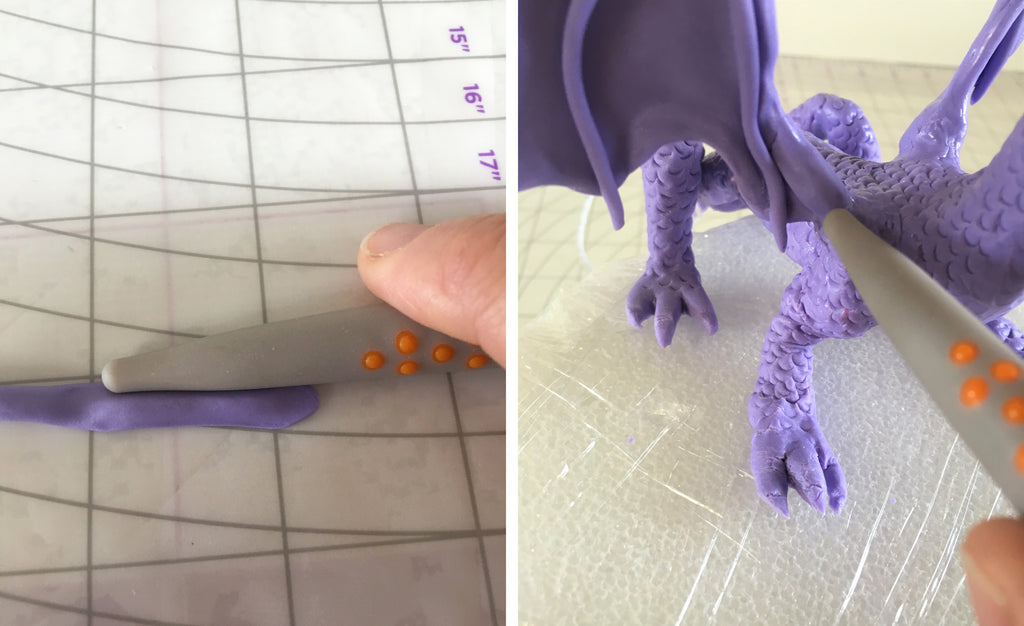
First you will need black fondant. Mix the fondant with approximately 1/8 tsp tylose powder. Roll out the fondant the length of the top of the head to the tip of the tail. Then cut out triangles along one side of the fondant.
They should begin small (for the tail) and get increasingly larger as you go up the back. The spines should then decrease in size until they are small again as they go up the neck to the top of the head. Cut the excess fondant from the side that will attach to the back of the dragon. Paint along the flat side of the spine with piping gel and attach it to the dragon body. If it is too floppy still, let it sit for a bit for it to dry enough to stand up.
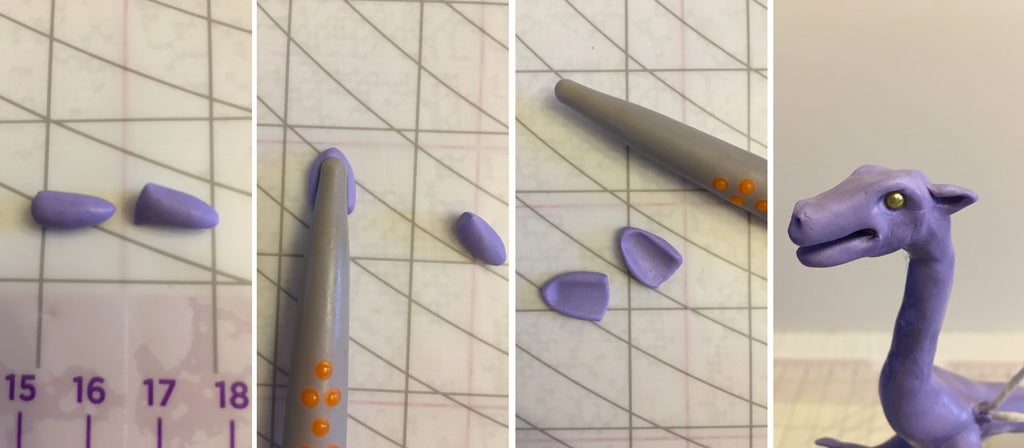
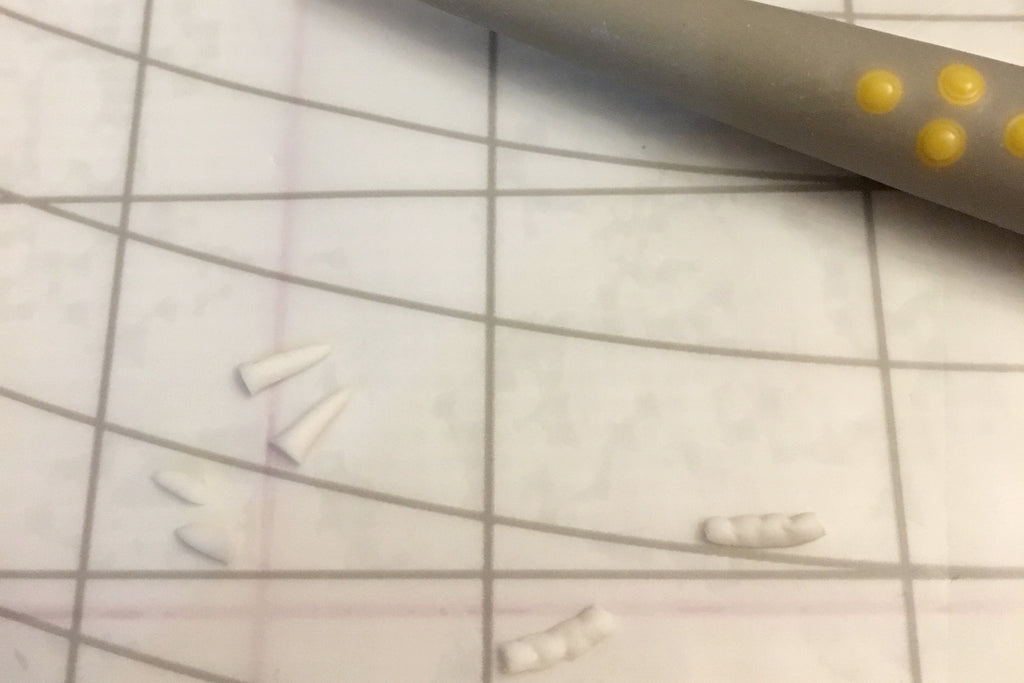
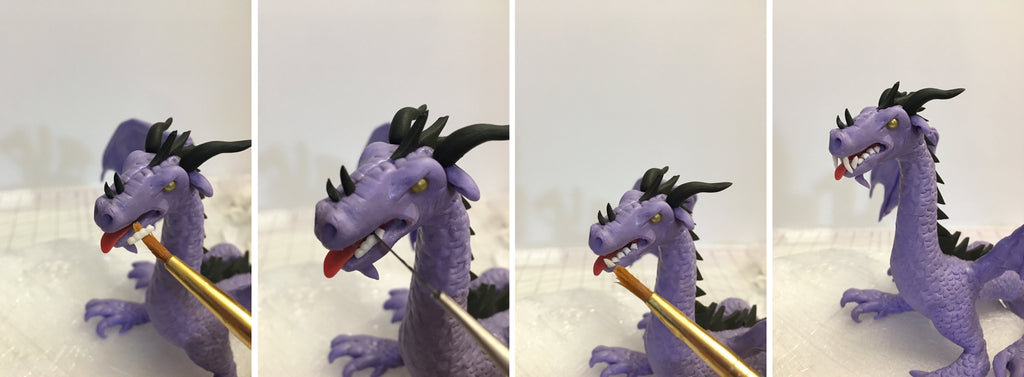
Now let’s give our dragon some horns!
Step 28:
Roll a snake of black fondant with tylose powder into a snake about 1 inch long. Taper the snake at the ends and cut the snake in half. Then use your fingers to roll the horns thinner so that each half is approximately an inch long.
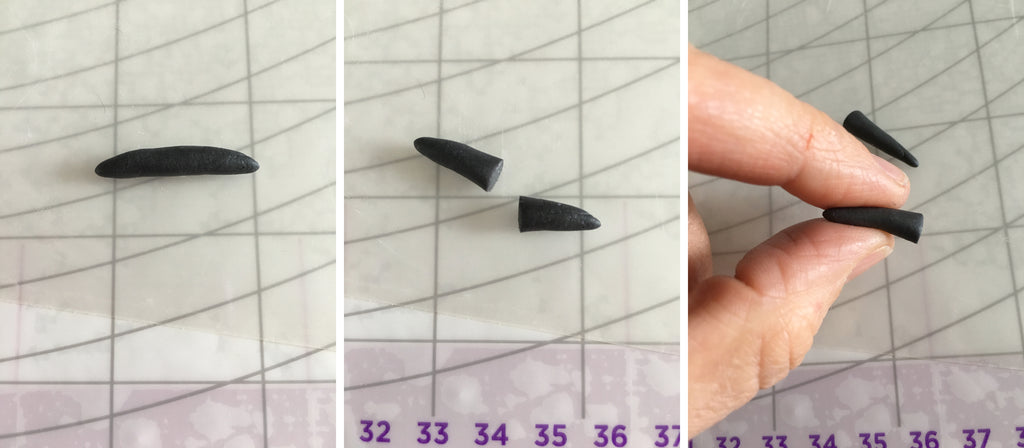
Step 29:
Use the red Sugar Shaper to make grooves on the horns to give them some texture. Curve the horns as shown in the photo and set them aside to set up so they hold their shape. Once they've set, attach the horns to the head above and between the eye and ear.
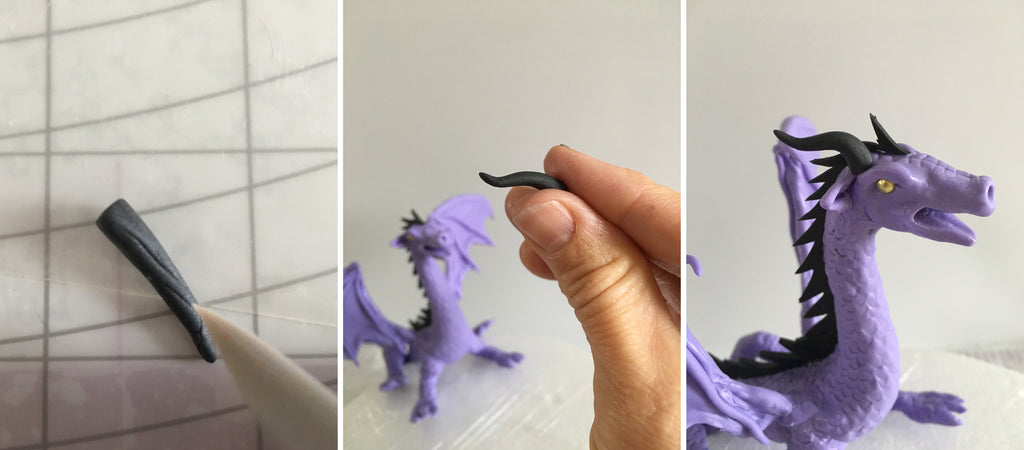
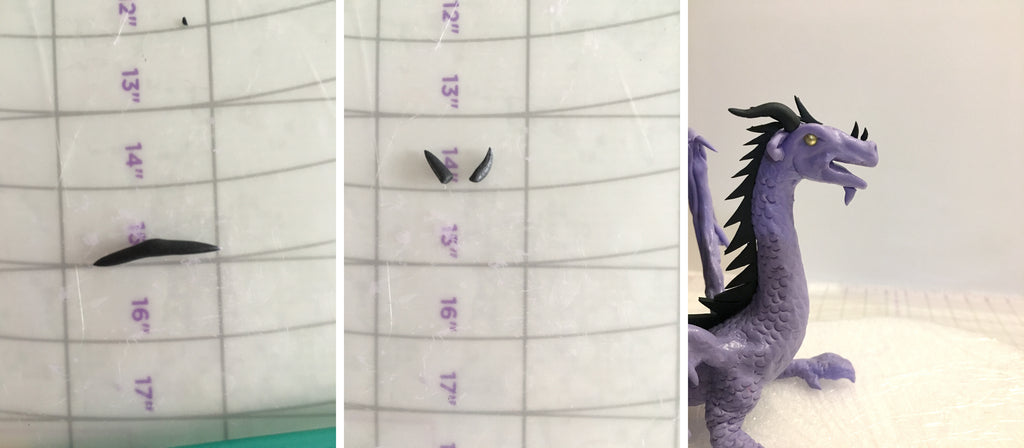
Step 30:
Roll a thin snake approximately ¾” long. This will become little horns on the snout. Cut the snake in half. You will want to cut them again so one half is bigger than the other. Then glue the horns to the snout with piping gel. Put the smaller horn in the front and the larger one in the back.
Now let's give this dragon a tongue!
Step 31:
Mix a small ball of red and white fondant to make pink. Use the side of your yellow Sugar Shaper to roll out an oval long enough to cover the inside of the mouth and have about 1/8” - 1/4” extending over the edge of the mouth. The part that sticks out will need to be a little narrower than the part that is inside the mouth. This is so it will fit between the teeth.
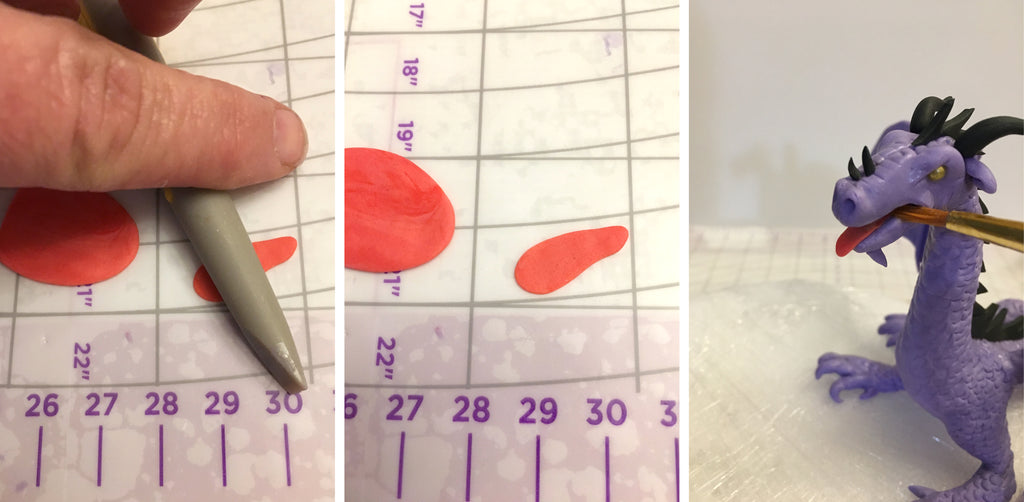
No dragon is complete without some dangerous fangs, so let's give him some teeth!
Step 32:
Roll a thin snake of fondant approximate 1 ¼ ” long. Cut that into 5 equal parts, approximately ¼ ” long. Then cut one of the pieces in half. Taper the ends of the two smallest pieces and two of the larger pieces. These will be the top and bottom fangs. Square off the ends of the two remaining pieces. These will be molars. Use the small end of the yellow sugar shaper to make small indentations diving the snake into 4 equal parts.
Step 33:
Glue the molar snake onto each side of the mouth at the bottom. Then use a knife to cut along the indentations you made to separate the teeth. Glue on the small fangs in front of the molars with piping gel, and the long fangs to the top of the mouth. They should be in front of the bottom fangs.
Now let's give him a little beard.
Step 34:
Get a small piece of black fondant. You will then roll this into a thin snake. Cut one end of the snake vertically (it will look a bit like a forked tongue). Then cut the fondant horizontally just below the fork so it is about ¼” long. Glue it to the bottom of the mouth toward the end.
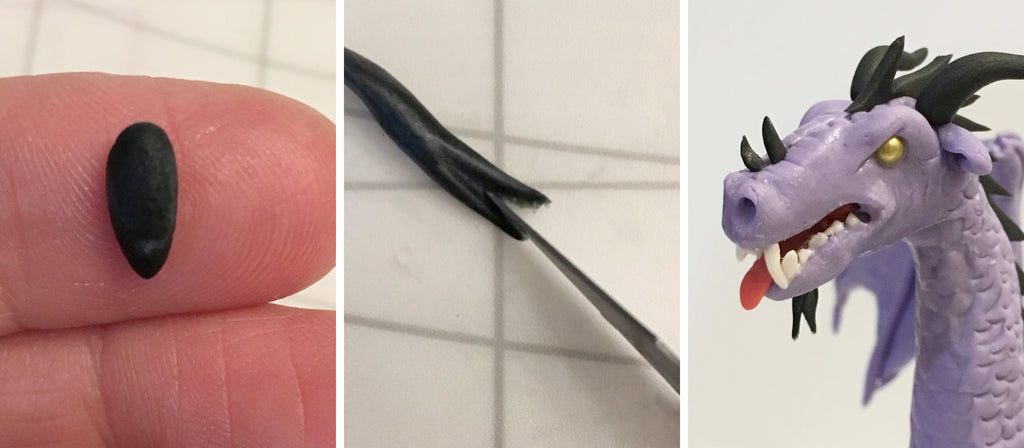
Step 35:
Add a claw at the top of the wing using a cone of purple modeling chocolate. Blend the claw into the wing using the orange Sugar Shaper.

Your dragon is now ready for color! For this you will need:
- Purple and blue powdered food color (several shades of each)
- Metallic gold luster dust
- Vodka
- A small paint brush for each color
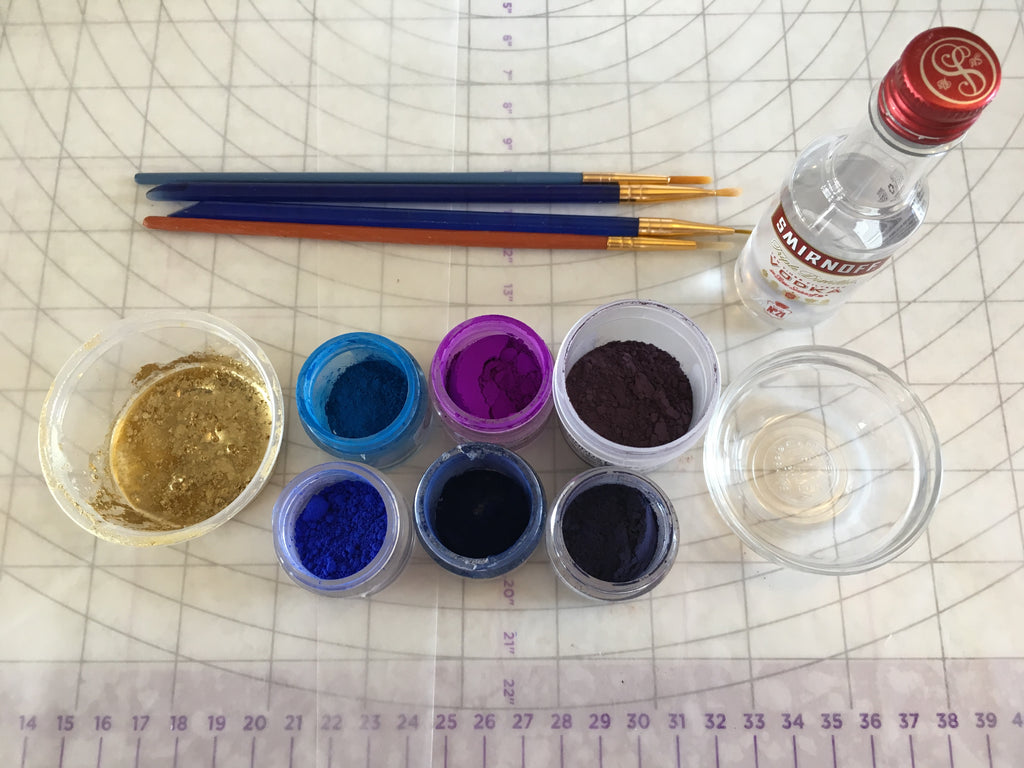
Step 36:
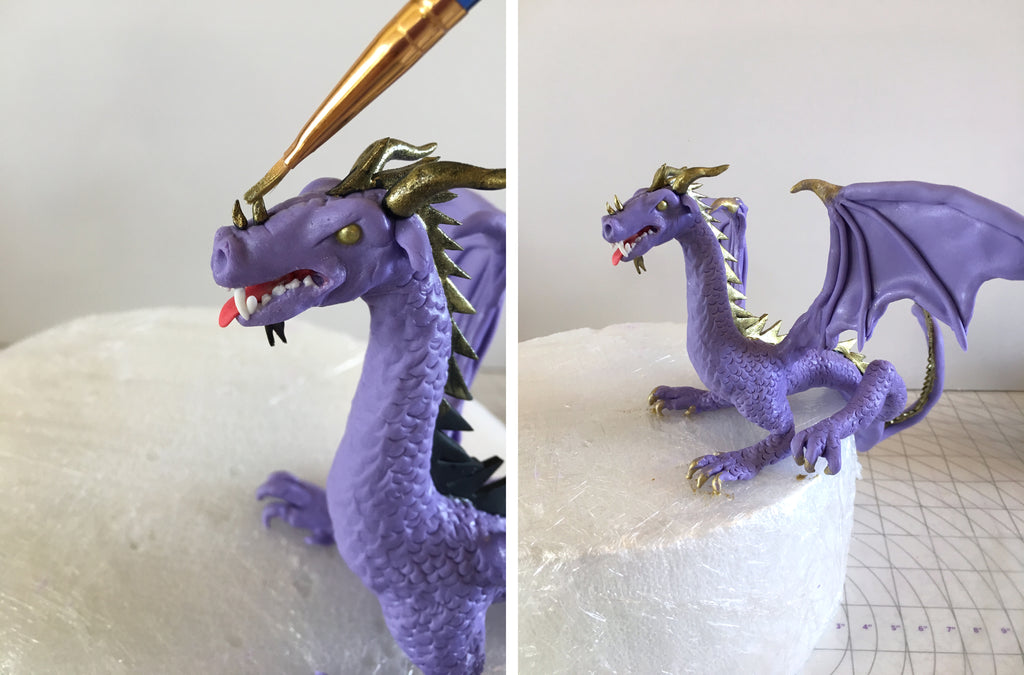
Mix the gold with some vodka and paint the spines, horns, claws and talons and beard gold.
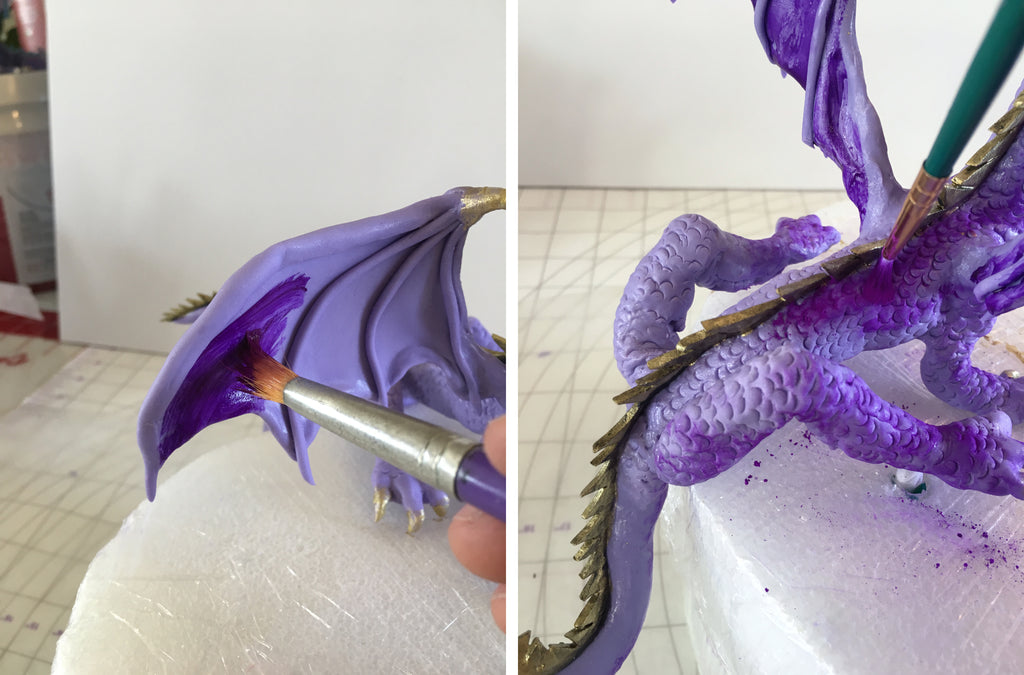
Step 37:
Paint the space between the fingers on the wings dark purple using vodka and powdered food color. Then shade the top of the back near the spine, behind the knees, and other creases with dry dark purple dust.
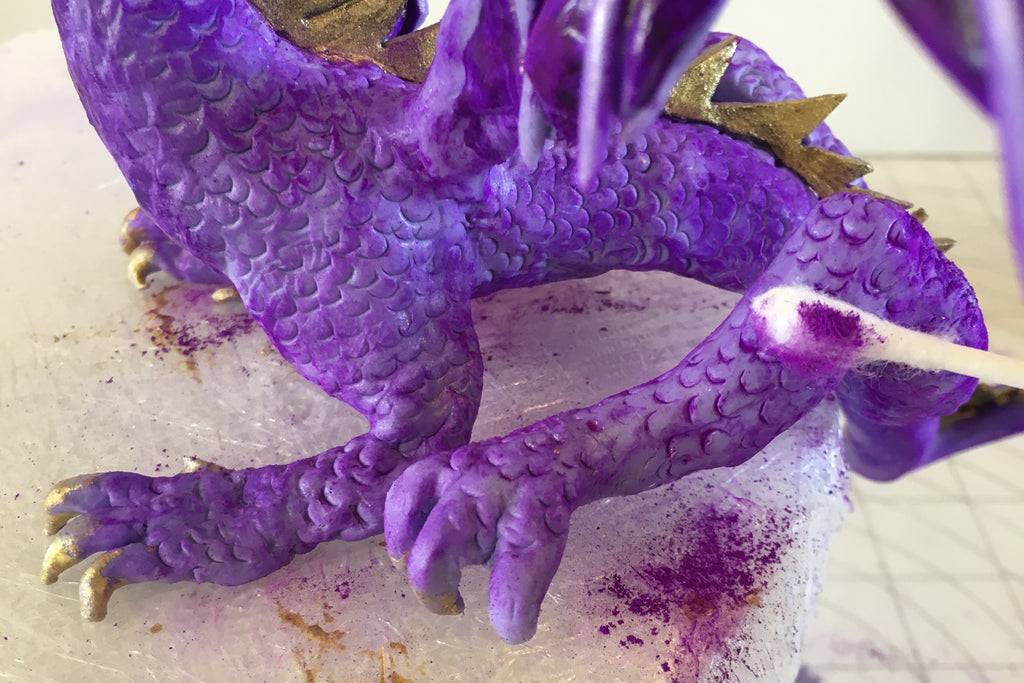
Step 38:
Using the same purple (or a different shade if you want to get fancy), dust the back sides of the back and legs and neck. Then take a cotton swab and wipe off the dust in the direction the scales face. This will leave the dust only where the scales are cut into the body and will give them more definition.
Step 39:
You can add highlights on the front/tummy scales by painting along the bottom arc of some of them with white powdered food color mixed with vodka. You will need to make the paint thick. As a final touch, use the black food color pen to draw a vertical line on the eye to make a pupil.
Voila!
That’s it! The dragon model is finished and ready to place on your cake!
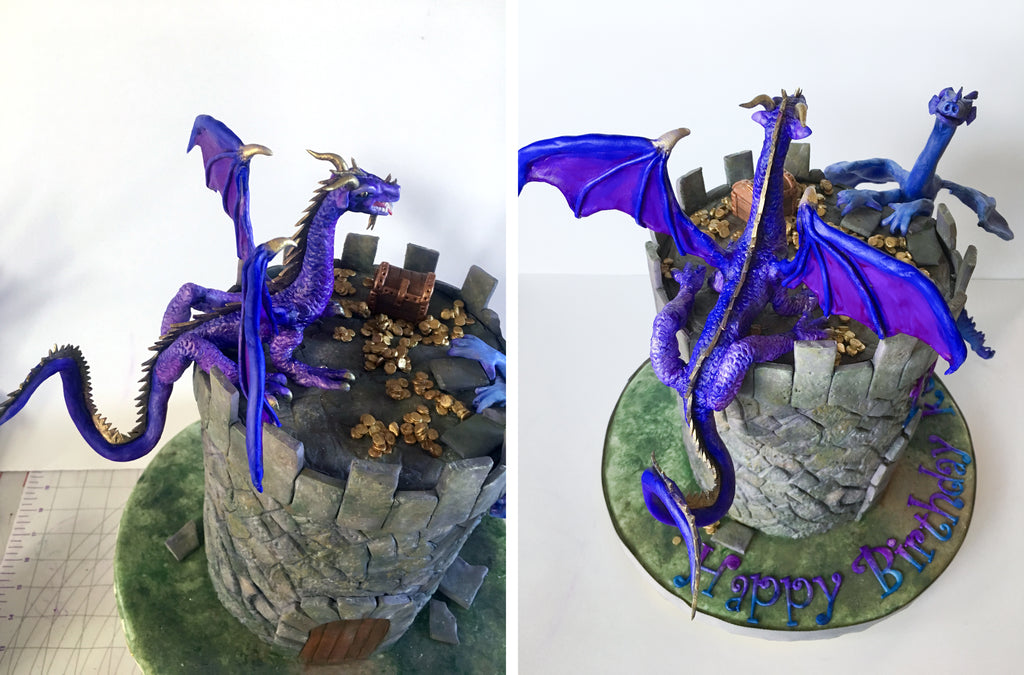
We hope you enjoyed this wonderful tutorial, and we look forward to seeing all the dragons it inspires!
You can find more of Jennifer Kennedy's work online:
Facebook: Jenny's Haute Cakes
Instagram: @jennys_haute_cakes

Learning Sculpted Cake with Phil Jensen and Ruby the Hippo
This month, we are pleased to welcome Christine and Phil Jensen of Peboryon in the UK as our featured guest artists. Christine and Phil are renowned for their stunning wedding cakes, outrageous sculpted cakes, and for their regular appearances on the hit TV show Extreme Cake Makers. Today they're going to teach us the ins and outs of sculpted cake making using their beloved Ruby the Hippo cake.
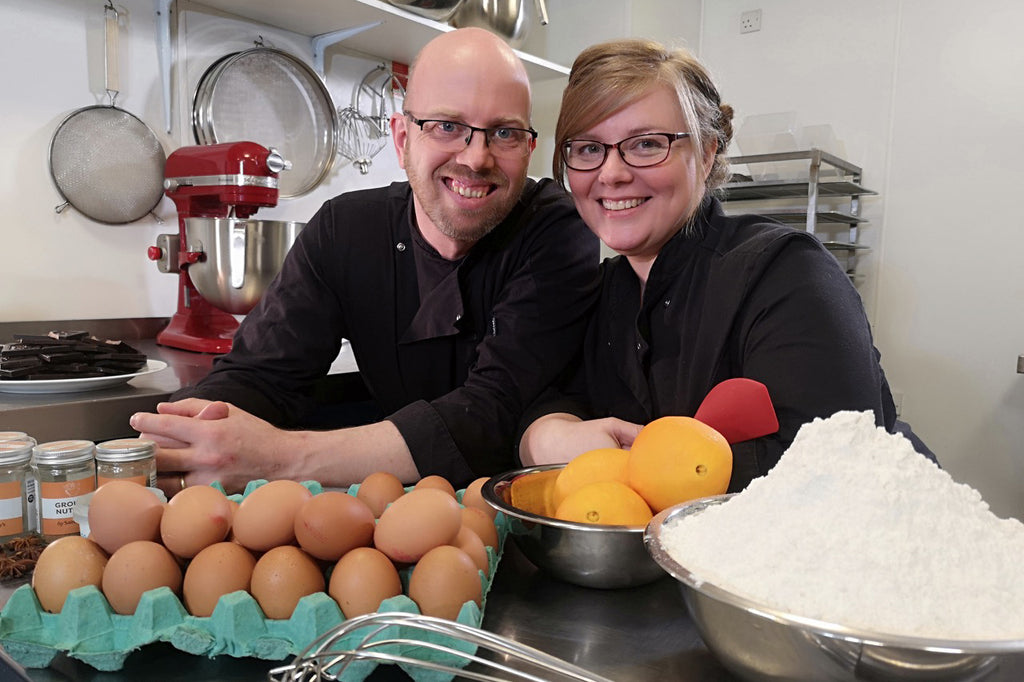
A bit about us
Our cake design studio is based in Penzance in Cornwall in the UK. (Yes, it’s where Poldark is set and filmed). It’s a stunning, out of the way, rugged, coastal place to live, and just about the furthest point from anywhere else in the UK! Saying that, it’s an incredibly creative place for artists, craftsmen and designers who have gathered from across the globe. We make a living from Cornwall, using fabulous local ingredients and delivering our large sculpted cakes and wedding cakes all over the UK and sometimes internationally. In 2017 we were invited to become part of Channel 4’s Extreme Cake Makers show and are now filming series 4. The cake adventure continues.
Ruby The Hippo
Having created hundreds of sculpted cakes we’ve developed our own way of doing things. So, we thought it would be fun to share what goes into each step. The cake we’ve chosen is a real commission that was created for a client in the summer of 2018. The version in this video is half the size of the original Ruby the Hippo.
Step 1: Designing your cake (time: as long as you want!)
The most important part of creating a carved cake is the bit before you start. A great cake starts off as with great design. Each aspect has to have been thought through, from the overall shape, line, look and structural considerations, to the finishing details.
Step 2: Carving and the first layer of ganache (time: 4 hours)
This is the messy part. Cake everywhere and then the ganache comes out. They key to this stage is getting the cake carved accurately and that’s where templates can play a huge part. Getting that first layer of ganache on, is an art in itself. Good tools help enormously.
Step 3: Finishing the ganache and covering the cake (time: 6 hours)
The first layer of ganache is the foundation and goes on the cake quite quickly. The second layer of ganache and the smoothing can take quite a while, but it is such an important step. The shape of the ganache will be the shape the fondant takes. If the ganache is right the fondant layer will be right too. Then it’s time to cover the amazingly complicated shape you’ve just made! Quick hands and patience are the keys to getting a wrinkle free finish.
Step 4: Finishing touches (time: 2 hours)
The finishing touches are where your cake goes from good to great. It is the observation of a well painted eye, a shiny highlight on painted toes, the curl and colour of the lash. It’s when you get to enjoy your cake, and maybe fall a little bit in love with your work!
We hope you enjoyed this sculpted cake tutorial and that you learned a lot! If you want to see more of Phil and Christine's work, find them online at these links:
Web: www.peboryon.com
Facebook: Peboryon
Instagram: @peboryon
Now go get sculpting and try out what you learned today!
Untidying Up: Bringing yesterday's joy back into the kitchen
By now I'm sure you've all heard about the Netflix sensation Tidying Up with Marie Kondo, wherein Ms. Kondo helps us all organize and declutter our lives by letting go of objects that no longer spark joy. And while most of us these days can certainly use a little less clutter in our lives, there's a glorious byproduct of all this tidying up for those of us with a love of retro/vintage gear-
The thrift stores are overflowing with everyone's tidied-out gear!
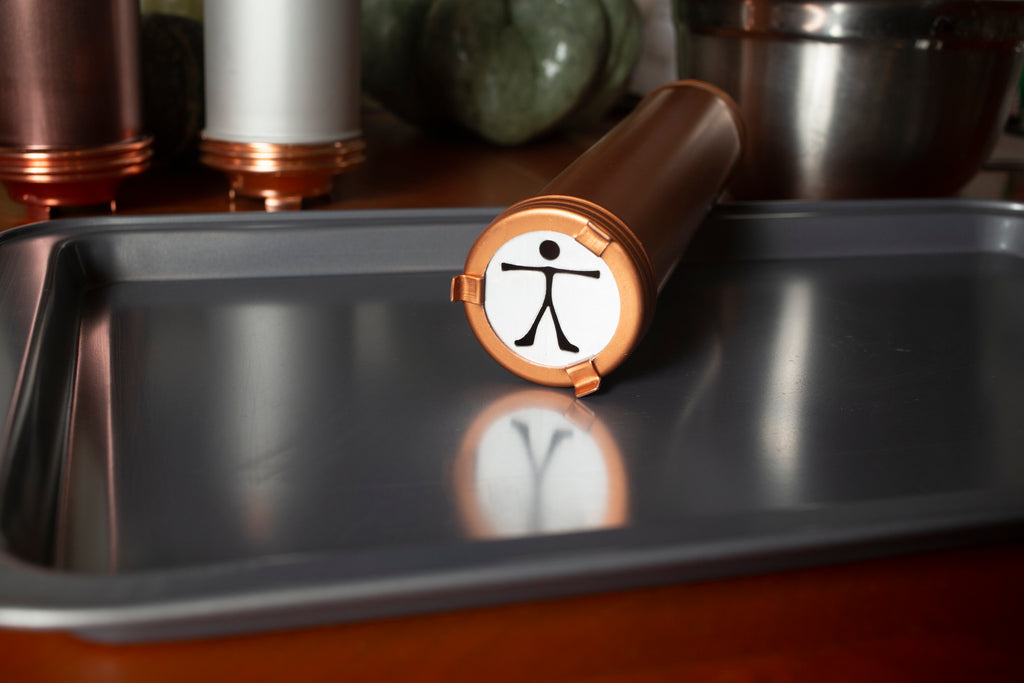
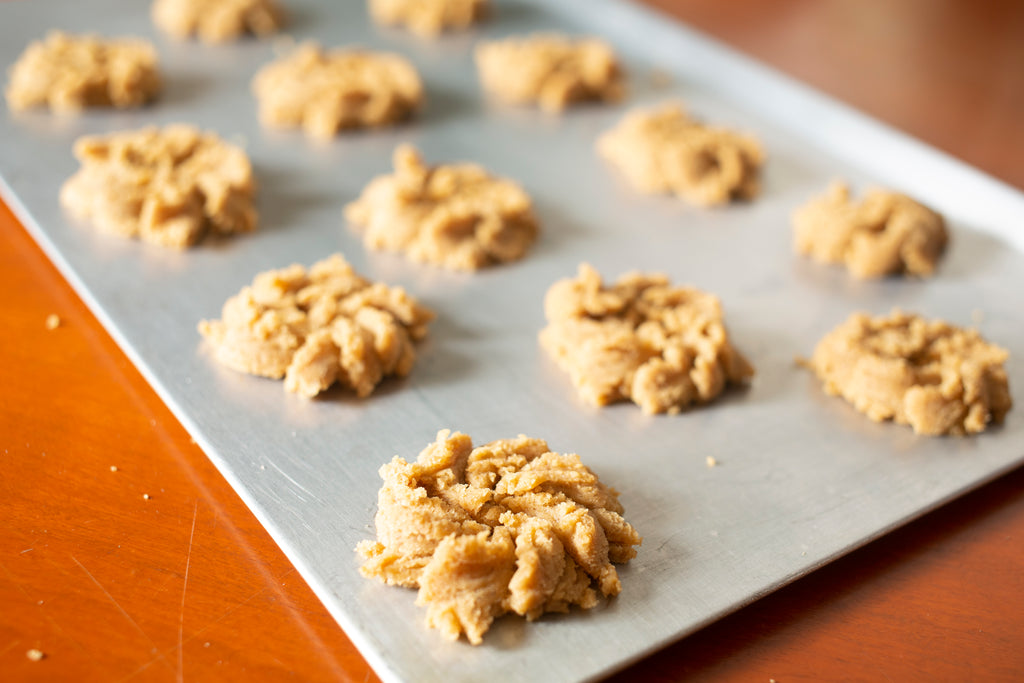
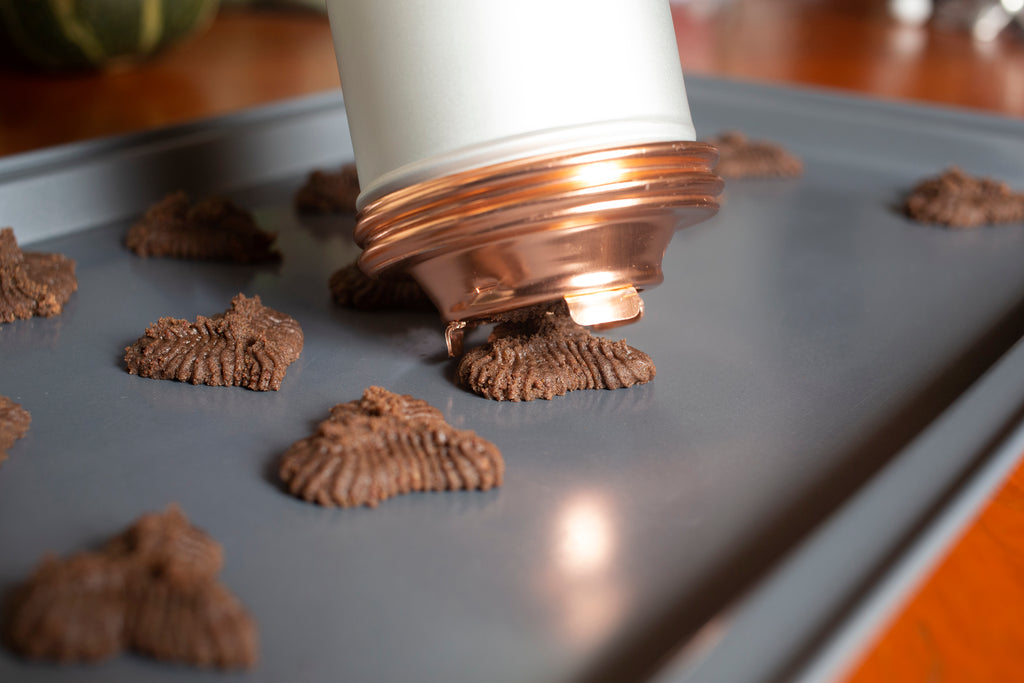
Now, those of us of a certain age probably grew up with a Mirro Cooky Press in our homes. (Most of my pals I've shown this to have lit up and exclaimed "Hey! My mom had one of those when I was a kid!" Everyone's mom had one of these...) In fact, my mom still had one of these... until 2 months ago, when it finally broke.
But this thing lasted 40 years in my mom's kitchen! And that was 40 years of wear and tear- we made spritz cookies with this press every Christmas my entire life (including this last one), we made them at Easter, for school bake sales, for birthdays, and just when we were bored and wanted cookies. We put a lot of miles on this thing and I was super bummed when it finally broke.
Now, I don't want to give the impression that I'm so sentimental I won't replace a broken tool- the fact is you can't get these anymore. Not new, anyway. I feel old just typing this- but they literally don't make them like they used to. Mirro stopped making these around the late 70s / early 80s. Modern presses use a little different design and all the ones I've seen have at least some component of plastic to them. Maybe I'm just a stodgy old curmudgeon, but I just can't imagine the new presses I've seen lasting 40+ years.
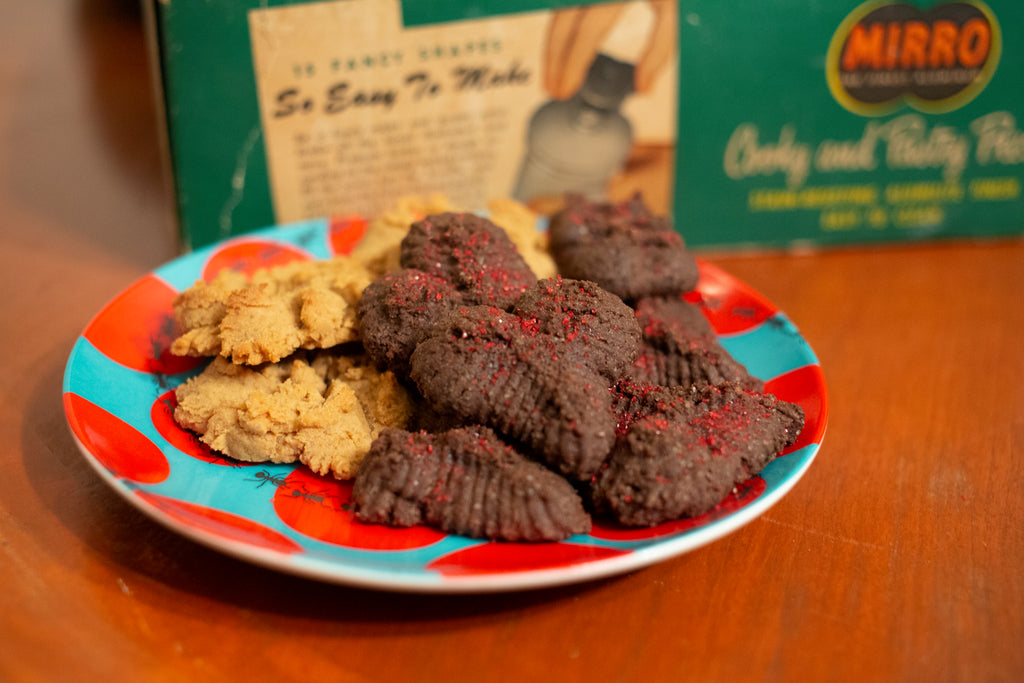
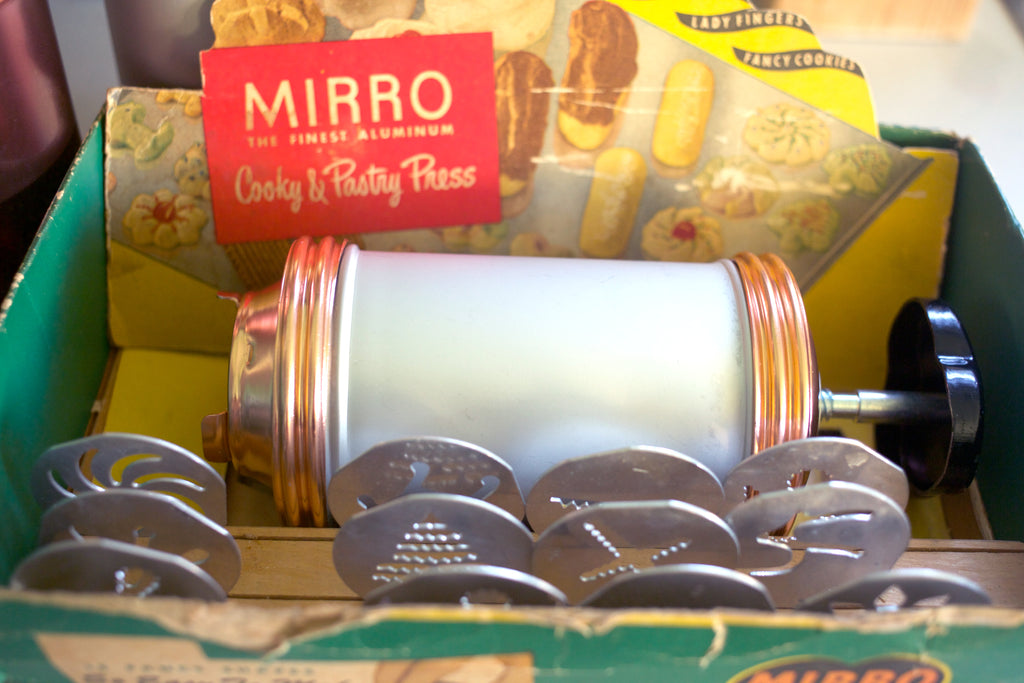
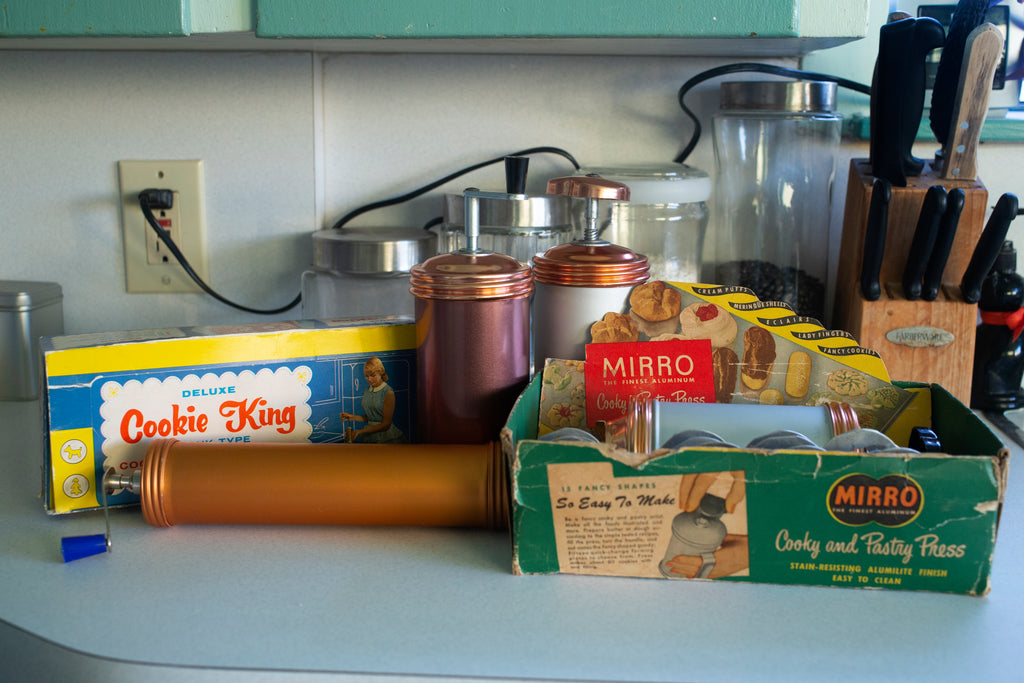
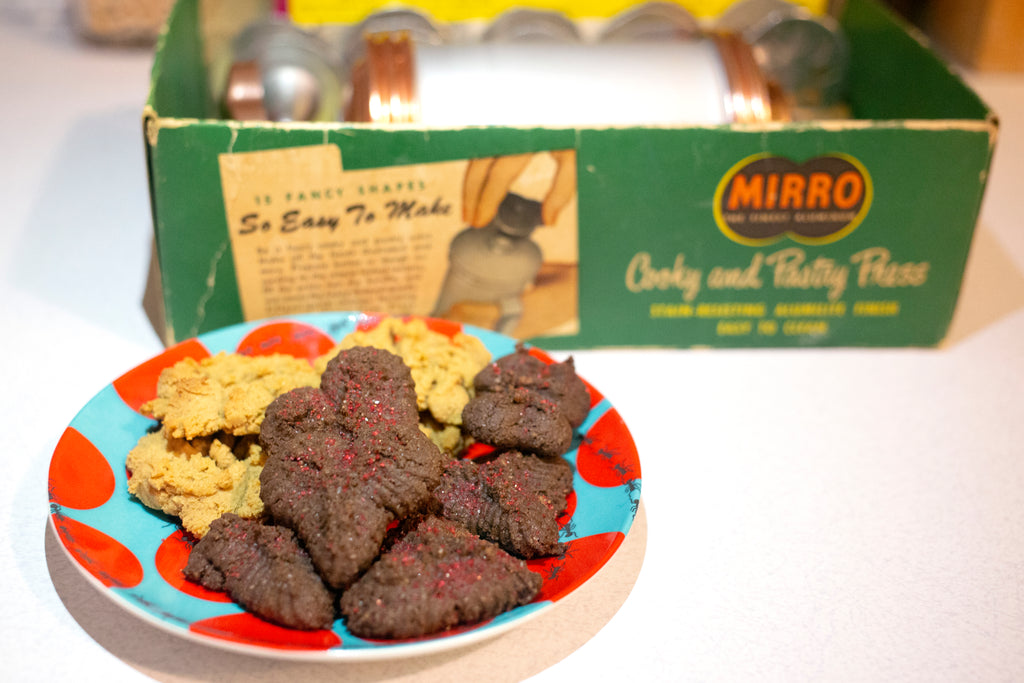
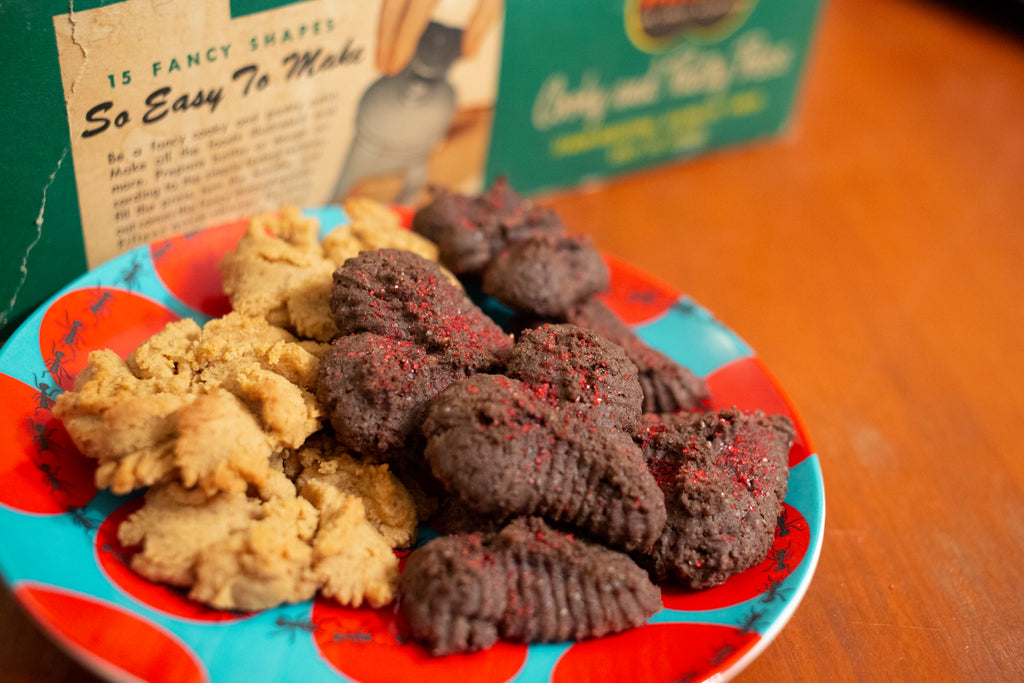
Which brings us back to the thrift store. There, on the shelf, still in its decades-old cardboard box, was a pristine Mirro Cooky Press, just like Mom's! Why yes, this DOES spark joy!! (To be clear- the press was in pristine condition, the box was battered as heck.)
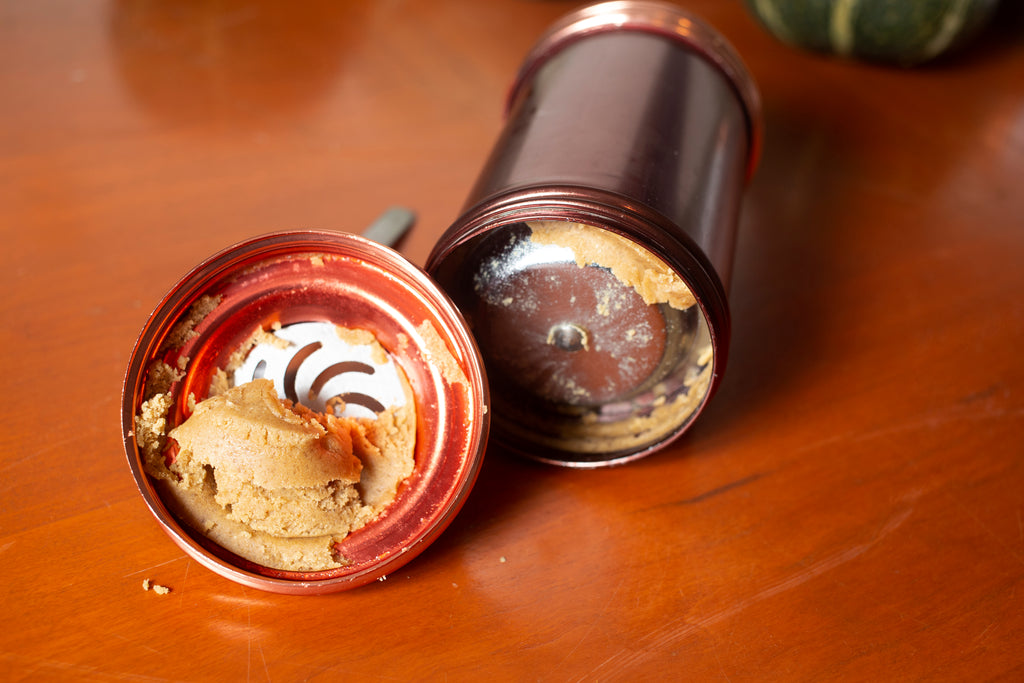
But wait- there's more! A little further down the aisle, another cookie press! Clearly a Mirro, but not in its box. This one was in a plastic bag, but included all of its shape plates and nozzles. And, get this- it had a crank-handle top. I'd never seen a Mirror with that! For $5 a piece, I totally snagged both. (You gotta try all the options, right?)
But wait, there's more. Further still down the aisle, another vintage cookie press! This one wasn't a Mirro; it's called Cookie King and was apparently made by Nordic Ware. It's narrower than the Mirro and uses a crank-handle, but still all aluminum and definitely from the same era. This one, also, was still in it's original box. Another $5, another cookie press.
And now, home to test them all.
The Mirro that was in its box even still had the little recipe book that came with it. There are tons of different press cookie recipes you can make, but I made my own recipe to cater to our food-sensitive household. Here's what I did:
Vegan Gluten-Free Peanut Butter Press Cookies
- 1/2 cup Earth Balance vegan spread
- 1/2 cup creamy natural peanut butter
- 1 cup organic brown sugar
- 1/2 cup organic powdered sugar
- 1 tbsp molasses
- 2 tbsp agave nectar
- 1 tsp salt
- 1/2 tsp baking soda
- 1/4 cup vanilla soymilk
- 2 1/4 cup gluten-free 1:1 baking flour
- **optional** 4 tbsp cocoa (for chocolate peanut butter cookies)
I tried out the Cookie King first. It came with 10 shape plates. Most of them were clearly derived from the Mirro set, but it had a few unique pieces so I opted for those. I tried out the snowman and the person.
The press worked pretty well. The hand-crank felt less intuitive to use than the knob of the Mirro I grew up with, but it worked. The dough didn't seem to come away from the press as easily as the Mirror I was used to, but I wasn't sure at this point if that was a mark of the press, or the dough recipe I'd used. I used a knife to help it out a little.
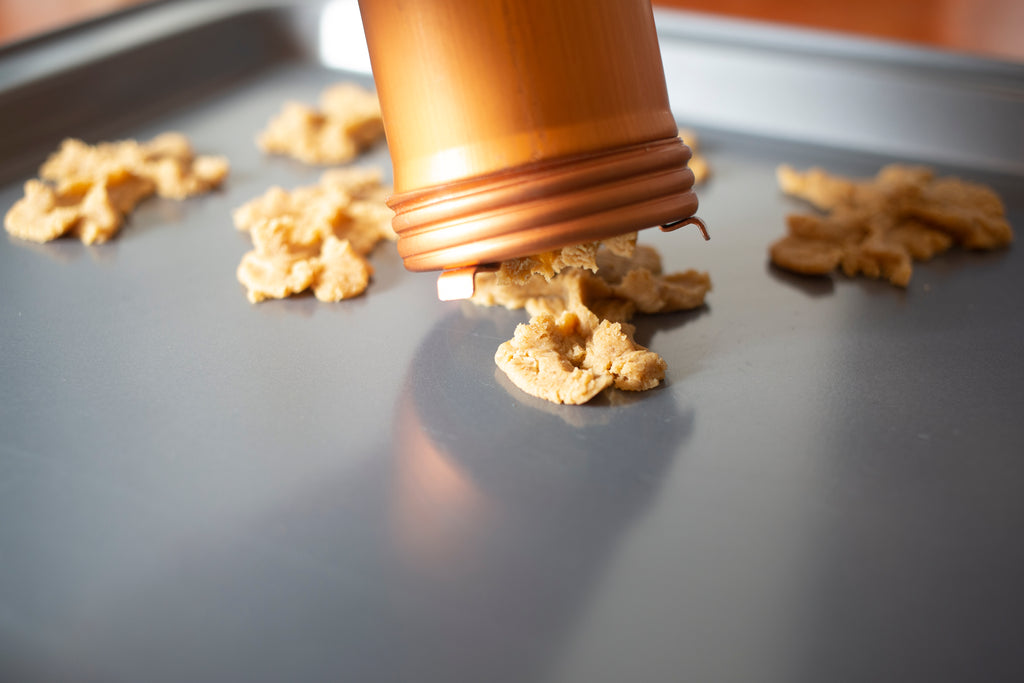
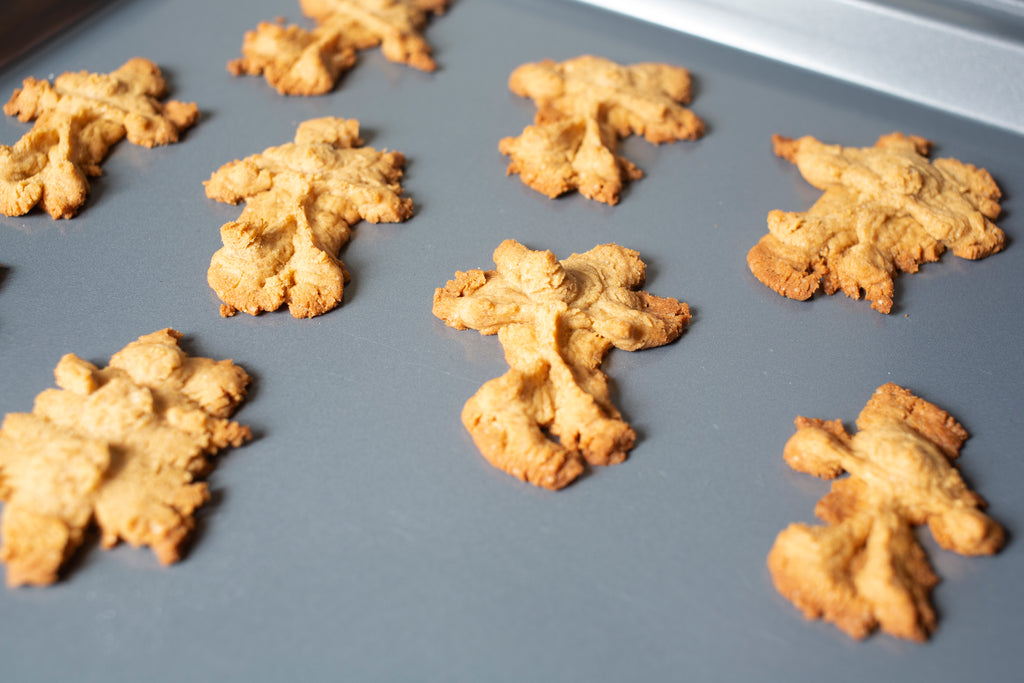
The cookies wound up looking a bit rough. To be fair, I think I chose the 2 hardest shapes to get nice looking cookies with. But I definitely don't recommend this for cute holiday snowmen cookies.
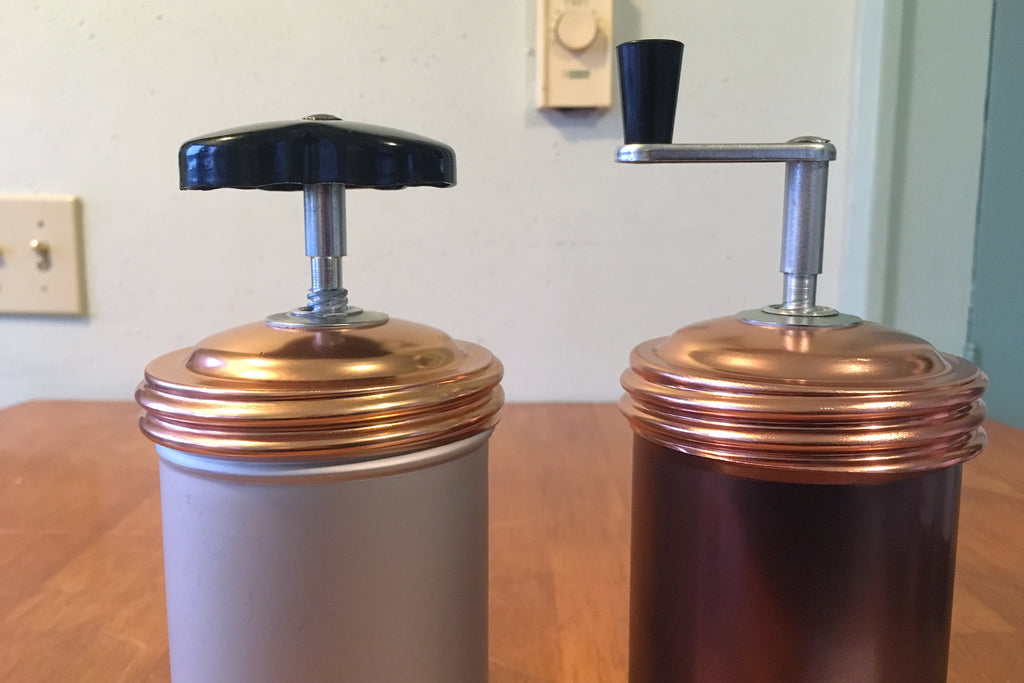
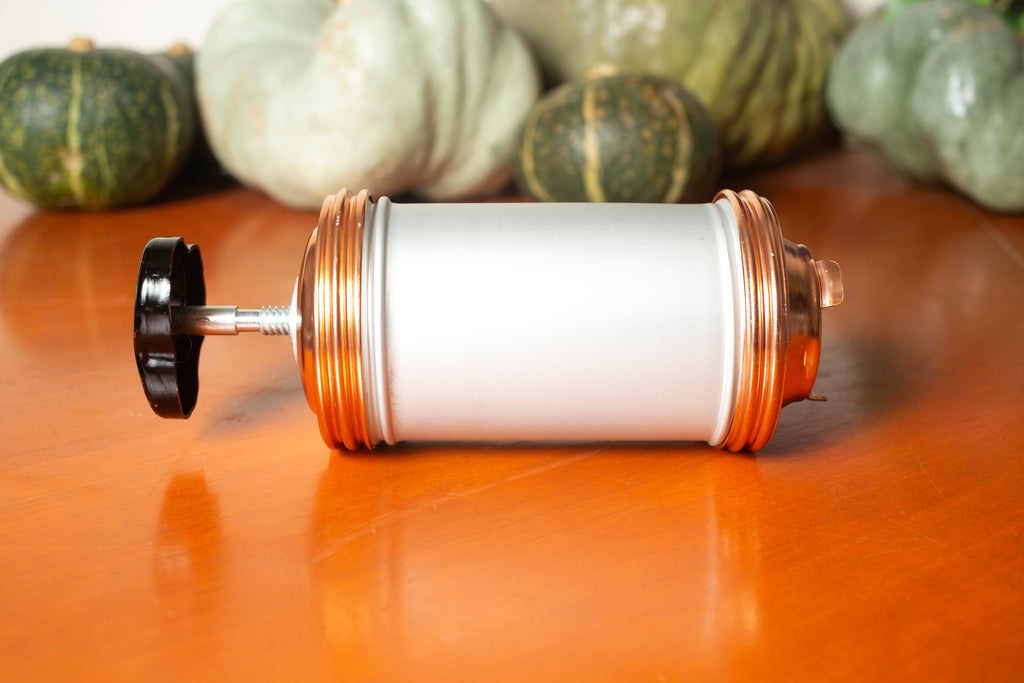
Next up, I went with the Mirro with the hand-crank. This was the worst design innovation Mirro ever did. The crank top worked out OK with the Cookie King, but possibly because the Mirro is wider and you're pressing more dough with a broader surface, it was just a pain. It was hard to turn, and kind of killed the fun of pressing out cookies.
I stuck with the classic pinwheel shape for this one. When I got the right amount of dough pushed through, it came away nice and clean, but the crank required so much force that I kept picking up the press too early so the cookies got a bit sloppy.
As with all cookie presses, a bit of dough is left in the press at the end of the batch. Because of the wider design of the Mirro, you get a lot more leftover dough in their press. I suspect Nordic Ware deliberately designed their for less waste, but personally... I live for that leftover dough! This alone could keep me in the Mirro camp.
Last but not least, the clear winner- the classic Mirro knob-topped press. Easy to turn, easy to use, and super fun.
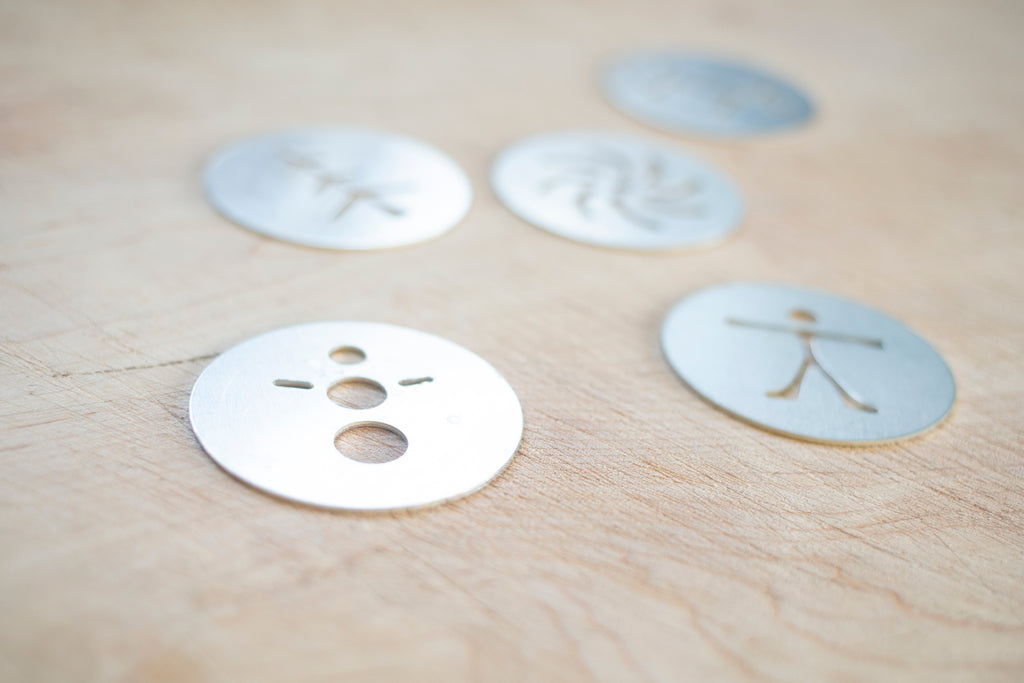
Growing up, we mostly used the pinwheel, flower, and Christmas tree plates. Some of the others I've always kind of wondered about. Like this one.
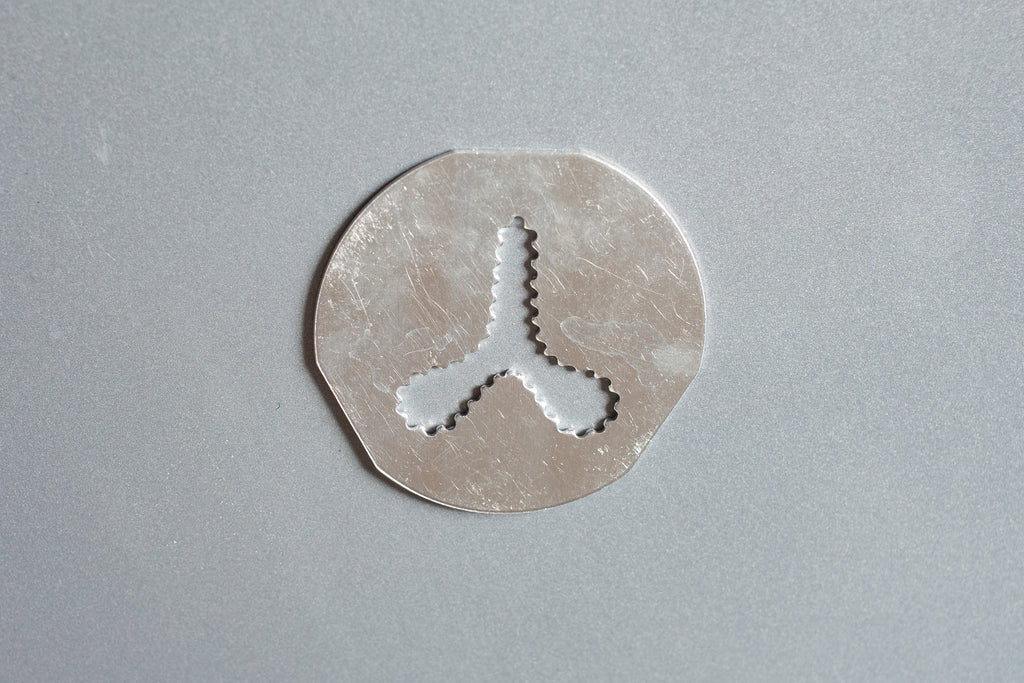
It's not exactly obvious, is it? But I had to know...
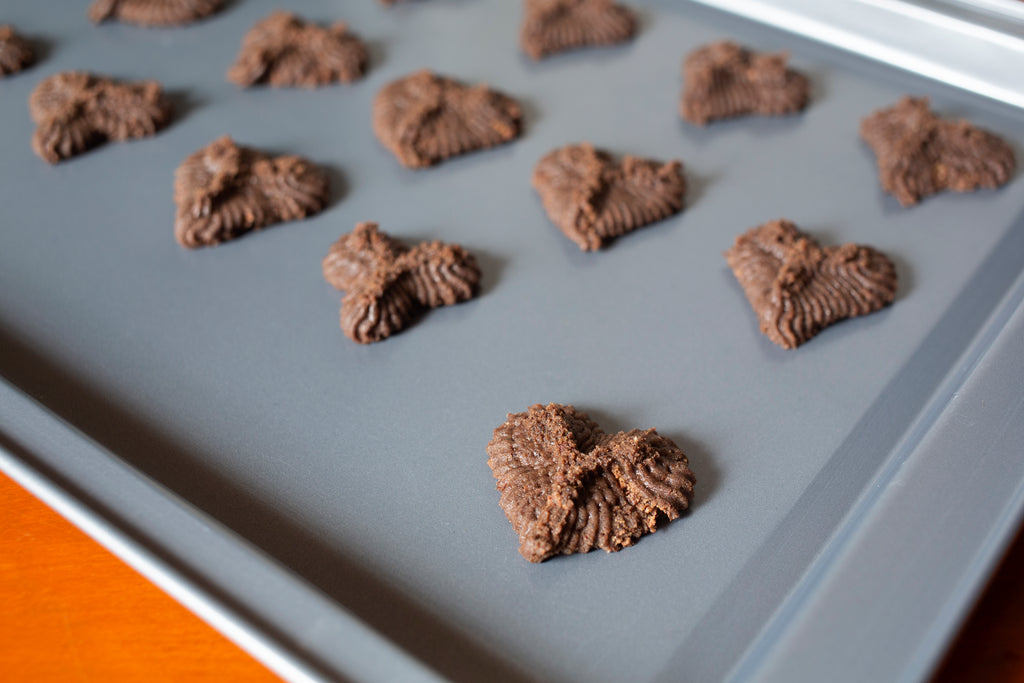
It's a heart, you guys! It's totally a heart!
Now, why didn't I see that right from the start?
So, the verdict is- the vintage Mirro Cooky Press with the knob top is still the best cookie press that ever lived. It is now nestled in my baking accessory drawer where it will hopefully continue to spark joy for decades to come. The other Mirro and the Cookie King are on display above my refrigerator in all their vintage-packaged glory, sparking a different type of joy.
Thanks, Marie Kondo!
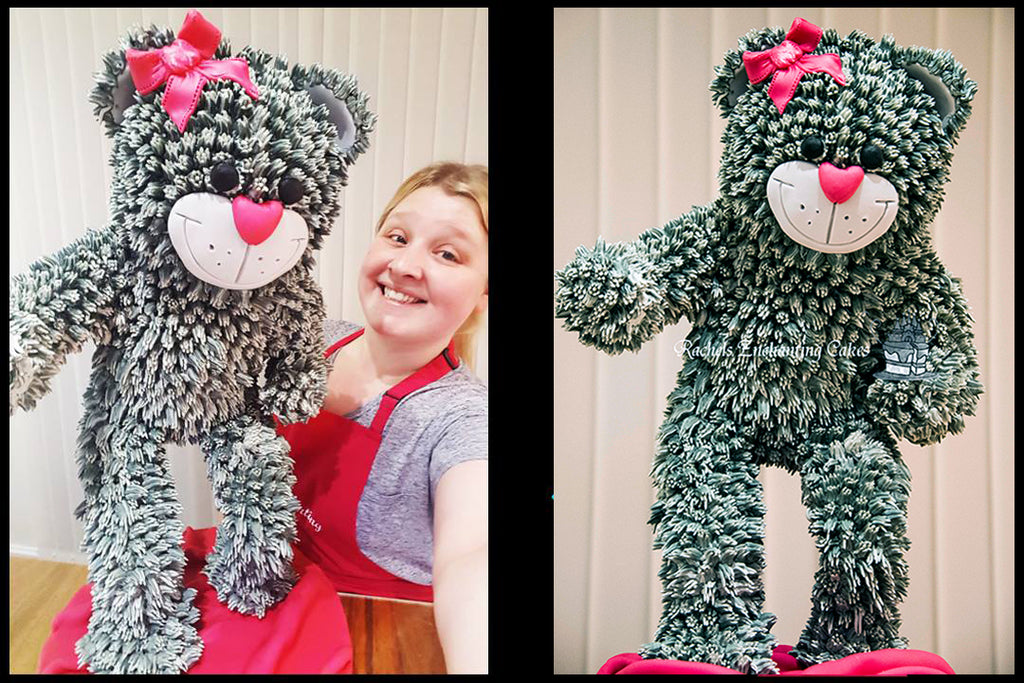
Rachel's Enchanted Teddy Bear
Rachel of Rachel's Enchanting Cakes in Chesterfield, UK recently got her hands on a Sugar Structure cake armature. She dropped us a line to tell us how much she loved working with Sugar Structures, and how easy it was to use. Don't take our word for it; listen to what she has to say!
"I am from the UK and recently purchased the Two legged Running Kit from you at Cake International.
Its absolutely AMAZING. I have fallen in love with it and making it my mission to open peoples eyes at just how innovative and amazing this product is!
I have literally just published this [video] to promote your product and show people just how easy it is to use."
Here's the video! Watch how easy it is to use a Sugar Structure and see this amazing Teddy Bear cake come to life!
If you're not following Rachel yet, you definitely should be! She makes incredible cakes and has a YouTube channel full of great tutorials showing you how to do it, too! Find her at these links:
Website: www.rachelsenchantingcakes.com
Facebook: @rachelsenchantingcakes
Instagram: @rachelsenchantingcakes
Twitter: @RachelsEnchant1
YouTube: Rachel's Enchanting Cakes
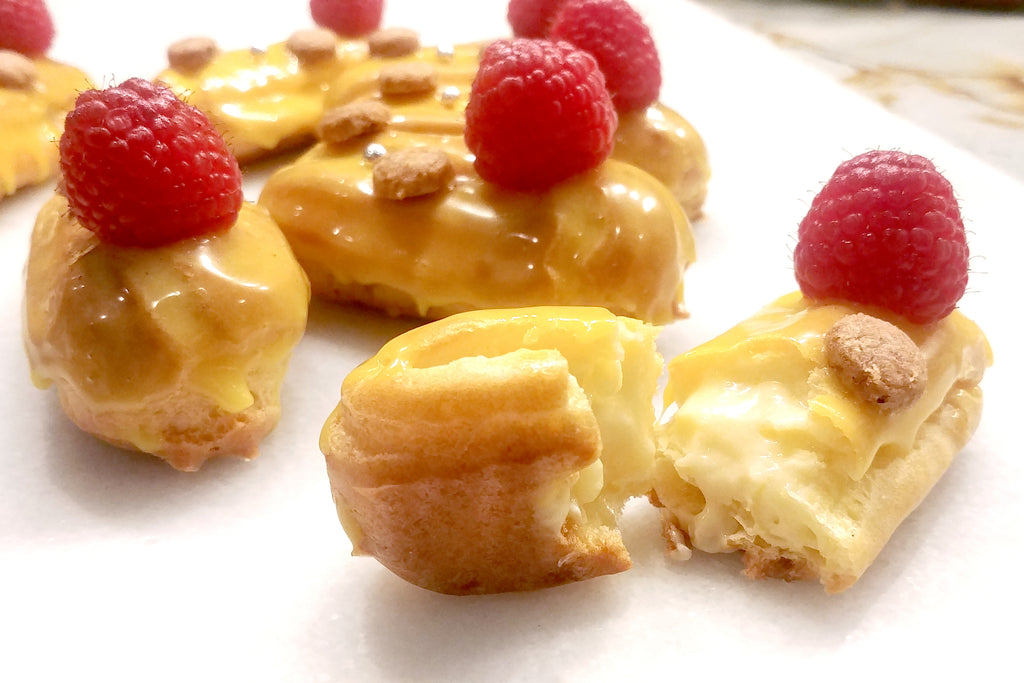
SugarNova's Lemon Cream Eclairs
New year, new kitchen!
Sugarnova Cakes, founded by Sugarworks' US ambassador Jamie Louks just put the final, finishing touches on their sizzling new kitchen! Jamie celebrated the completion by breaking in her new set-up with a batch of Lemon Cream Eclairs topped with Hazelnut Streusel Buttons and fresh Raspberries!
These eclairs use a vanilla pâte à choux, tart lemon cream, and a white chocolate glaze. If you've never made pâte à choux, check out the time-lapse video below. Recipe at the bottom!
Pâte à Choux
- 150ml Water
- 150ml Whole Milk
- 160g Unsalted Butter
- 8ml Vanilla Extract
- 7ml Granulated Sugar
- 3ml Salt
- 160g All-Purpose Flour
- 5 Eggs
These eclairs were as delicious as they look! But don't just take our word on it; give 'em a try!
And if you want to keep up with SugarNova's newest creations, follow them online:
Facebook: SugarNova Cakes
Instagram: @jamienicolecakes
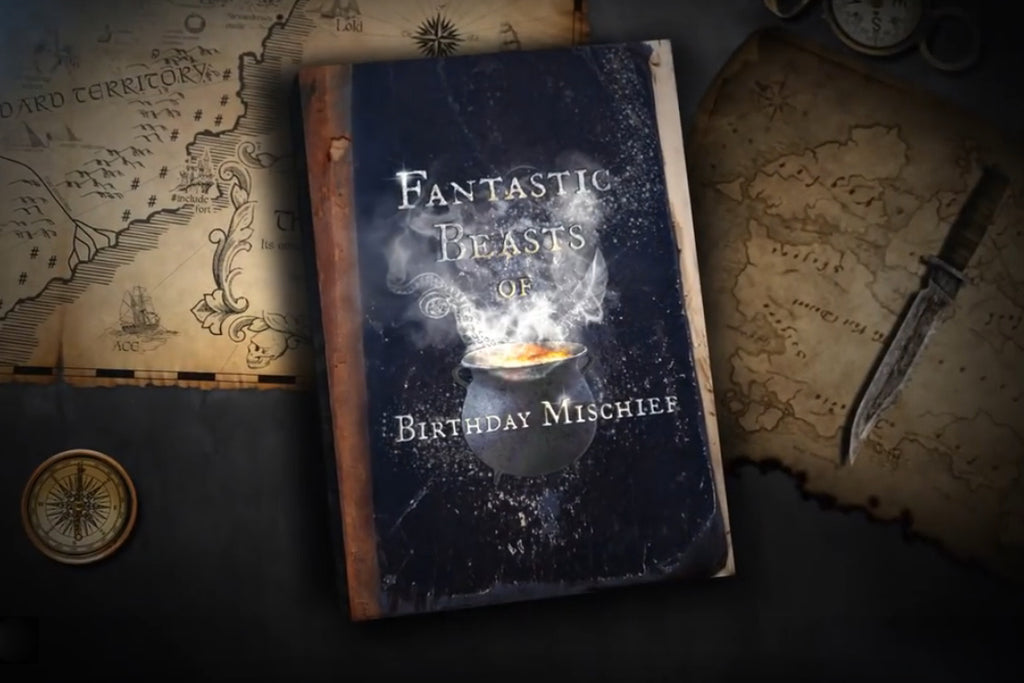
Fantastic Sweets: The Cakes of Grindelwald
The Harry Potter fans among our ranks will know that today is the release date of the newest film Fantastic Beasts: The Crimes of Grindelwald. What better way to celebrate an exciting new magical yarn than with cake?
Birthday Mischief Managed is a Wizarding World inspired collaborative cake project founded in July 2014 by Chef Mitchie of Mitchie's Munchies. Generally timing their annual reveals to coincide with Harry's (and author JK Rowling's) birthday, the project brings together talented artists from around the world who share a passion for all things Magic.
This year, to mark the highly anticipated new movie, the group has shifted their reveal from HP's birthday to the film's release. Likewise, this year's cakes all draw inspiration from the Fantastic Beasts and Where to Find Them franchise.
Here at Sugarworks, we are HUGE wizarding dorks. So naturally we were super stoked to learn that many of the artists involved used our tools in the creation of their magical masterpieces! Take a look at some of what's in store!
Laura of Dalton Cupcakes in New South Wales created a cake demonstrating what might happen if someone other than Newt Scamander opened his suitcase!
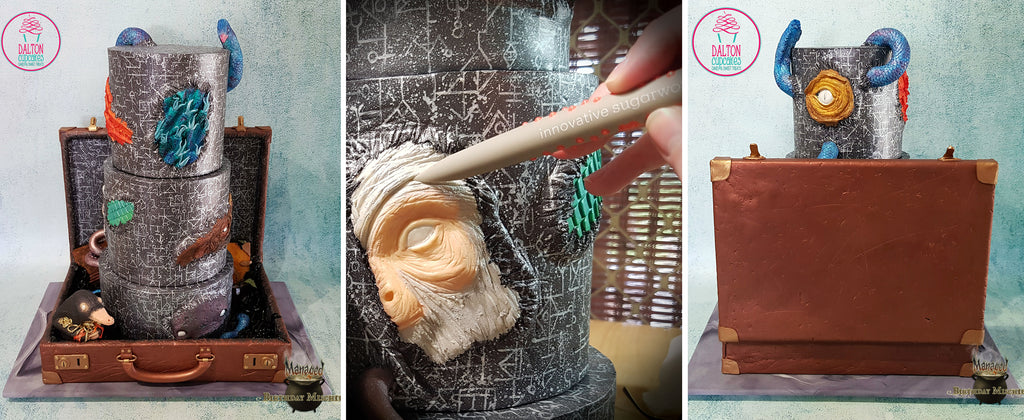
"Sugar Shapers are very versatile with a variety of mediums, I've used them with fondant, gumpaste and modelling chocolate. The silicone texture doesn't snag like regular hard plastic fondant tools and the variety of different tips/sizes/firmness means there's one for pretty much any job. Plus, they're comfortable to use."
★
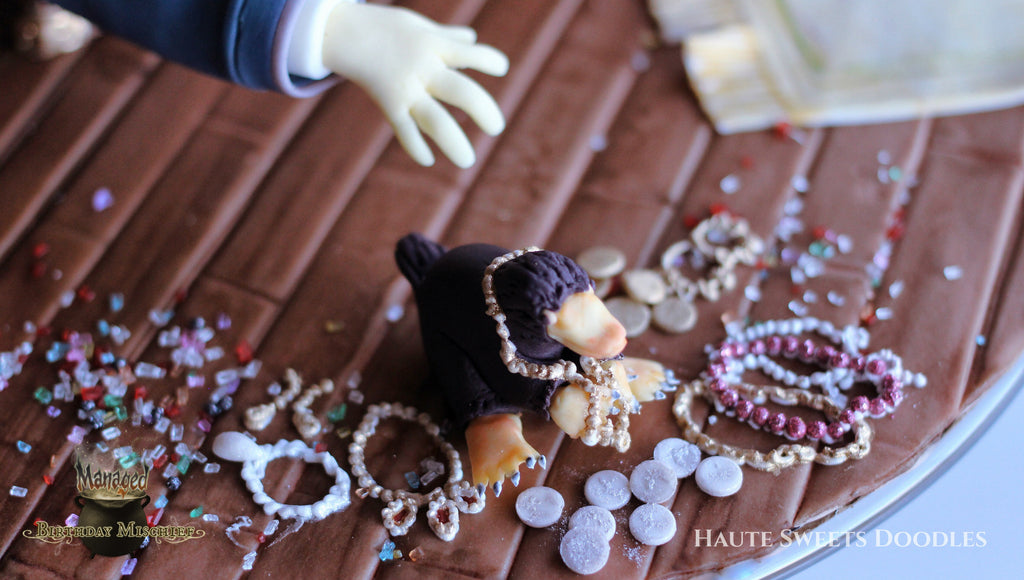
Hiromi of Haute Sweets Doodles used her Mini-Tip Sugar Shapers to sculpt Newt emerging from his suitcase while a niffler rummages through a scattering of shiny objects.
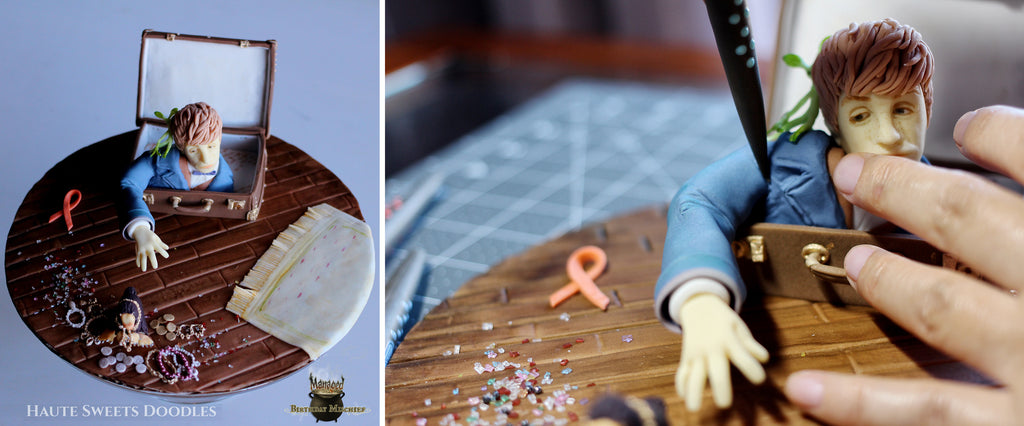
Hiromi's tiny, intricate details call for a closer look. Check out those teeny necklaces and the texture in the niffler's fur!
"My Sugar Shapers are an invaluable tool to my work! They’re perfect for making detailed sugar pieces!"
★
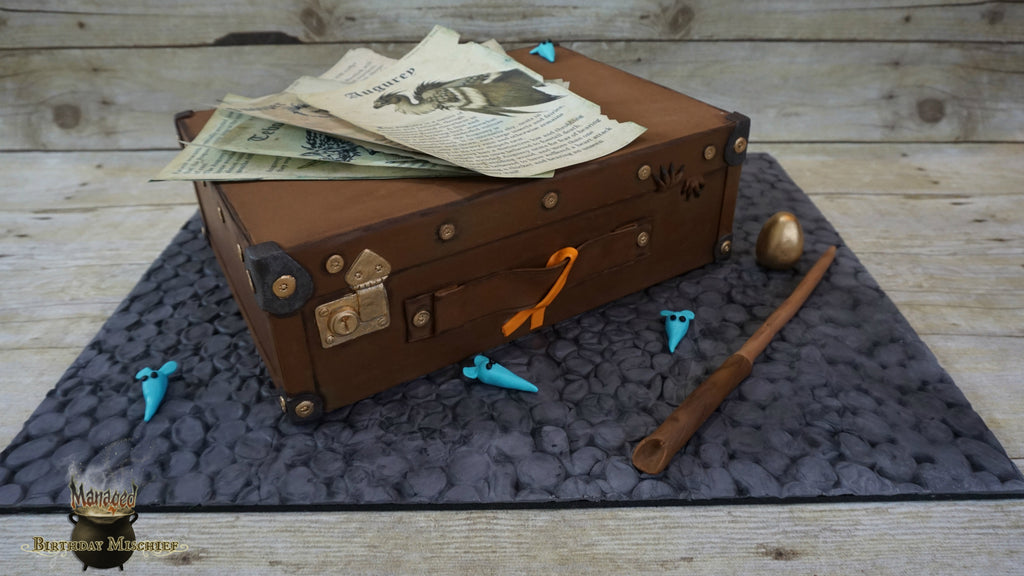
For those of you smart enough not to open that suitcase, check out the work of Hailey from Hailey's Sweet Temptations in Virginia! Hailey used Sugar Shapers to model this realistic (and safely latched!) suitcase.
★
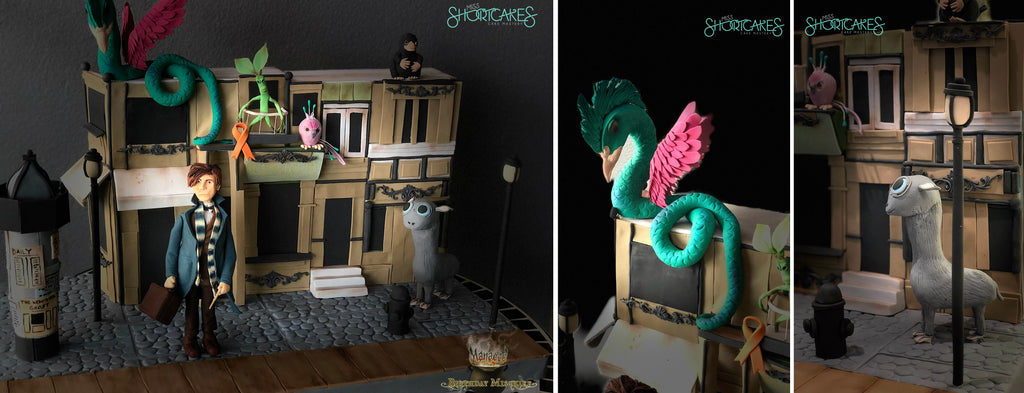
Jessica of Miss Shortcakes in Malaysia took a step back and used her Sugar Shapers to model a NYC facade with fantastic beasts spilling out of the windows onto the street below and the roof above!
★
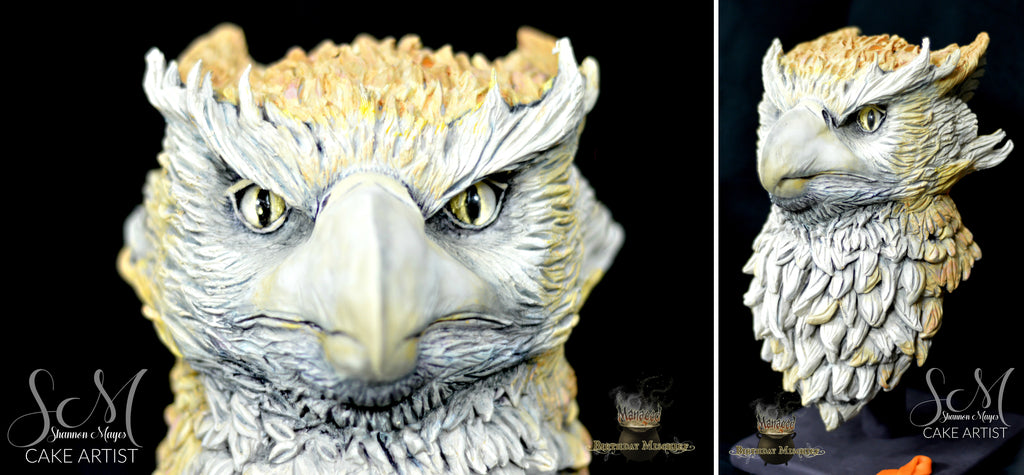
Other artists chose to focus in on just one beast. Check out this amazing thunderbird by Shannon of Sweet Art Cake Company.
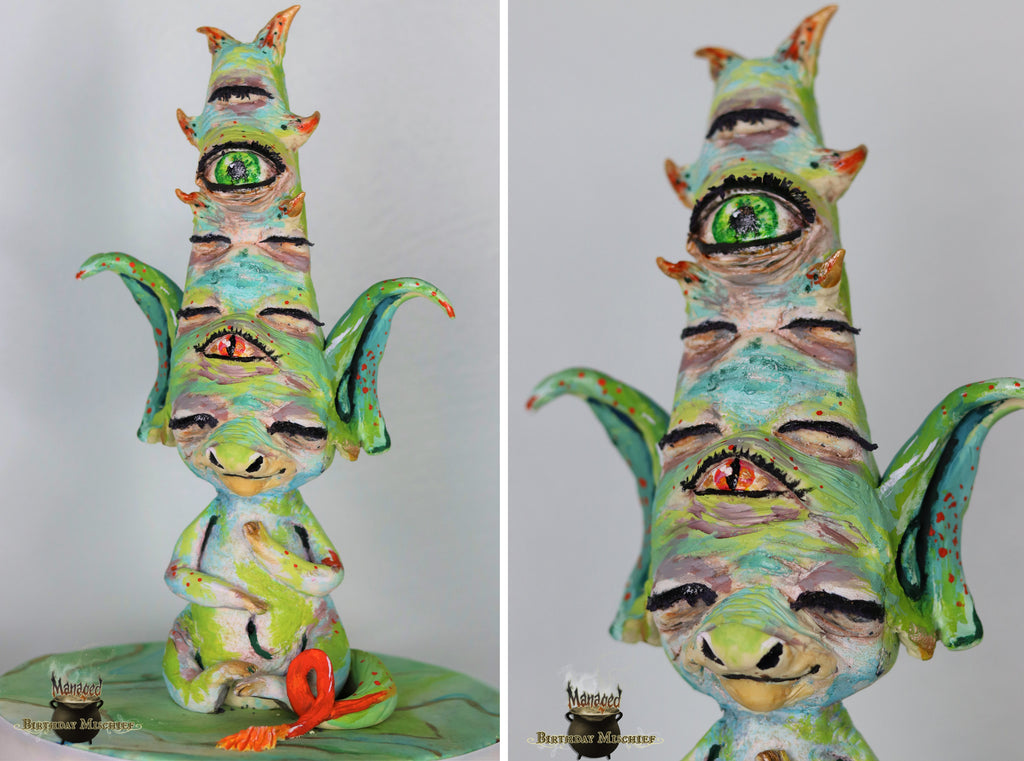
Or this zen-like creature that Liz of Liz's Cake Art dreamed up!
Chef Mitchie herself always contributes to the Birthday Mischief Managed projects. Check out her bowtruckle, Pickett among the potion bottles!
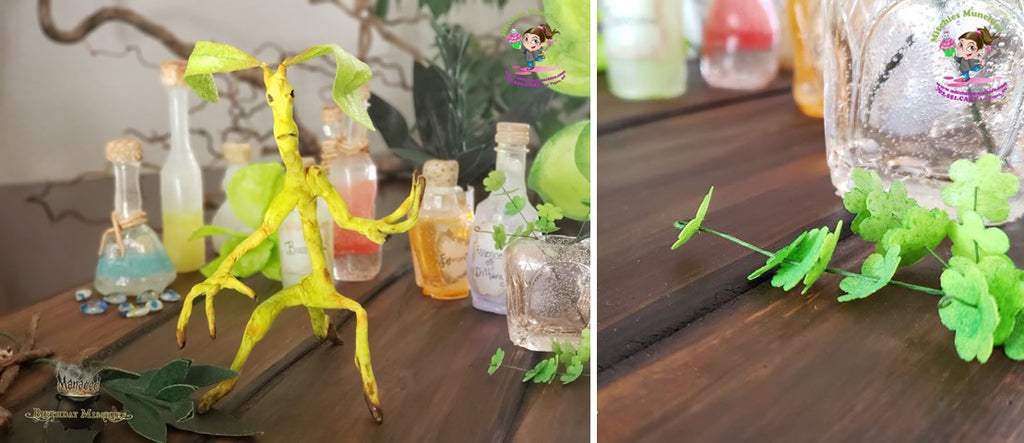
She's also made a little video showing exactly how she used Sugar Shapers and Sugarworks' Artists' Brushes to get that perfect wood grain for her base.
"Sugar Shapers are my sidekicks when I'm working on projects that require details that need to look legit. I'm especially fond of their ability to make wood grain out of soft mediums like fondant and modeling chocolate. And the Artists Brush set?! I have several! I love them so much, they don't shed, keep their shape, and don't rust. The larger brushes are fantastic for wider coverage, which were perfect for painting the 'wood plank' on my project. I also used the smaller brushes to shade the wafer foliage and detail bottles. And I gave my turntable a good workout on this project; good thing I have the expander!"
★
If you want to see the full line-up of magical mischief, check out the Birthday Mischief Managed website, Facebook, and Instagram! The big reveal is today, so you can feast your eyes on magical cakes before setting out to the theater for Fantastic Beasts: The Crimes of Grindelwald!
‘We do not need magic to transform our world. We carry all of the power we need inside ourselves already: we have the power to imagine better.’ -Joanne Rowling

Cake Porters have been Wiki-ed!
The folks over at Wiki.ezvid.com have compiled a list of the Top 10 Best Cake Carriers and our Cake Porter systems made the list!
Not only did our Cake Porters earn a 4-out-of-5 star rating and the title "Best High End", but they are the only carrier to make the list capable of handling large, multi-tiered cakes!
This is what they had to say about the Porters:
"An excellent option for professional bakers, the Sugarworks Porter can hold towering tiered creations, and it comes with an insulated cover to keep out light, heat and humidity. The sturdy, food-grade, corrugated plastic is easy to clean and folds flat for compact storage."
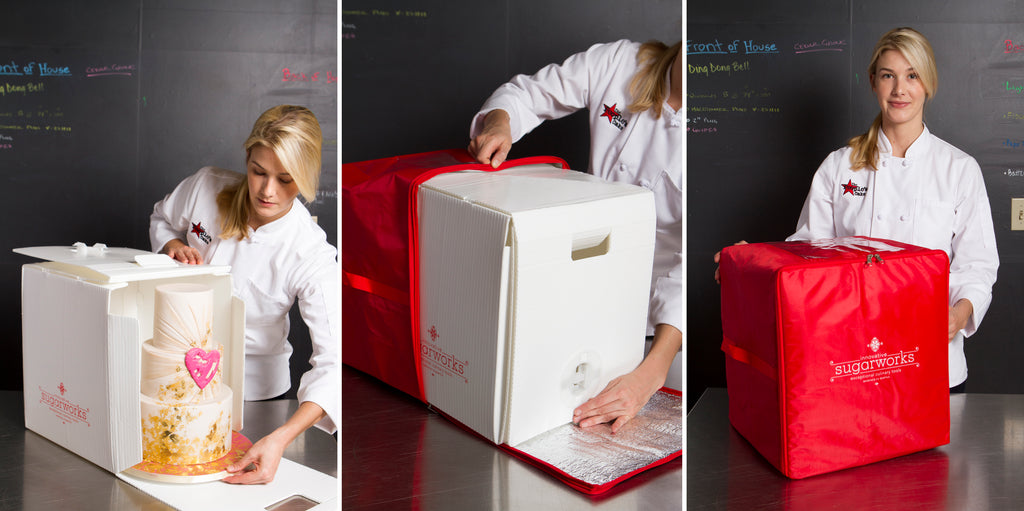
Our Cake Porters come in 2 sizes- a small size for 1-3 tiers of cake (14"x14"x16") and a medium size for 3-5 tiers of cake (18"x18"x28"). You can buy them individually, or together as a set if you want to save a few bucks. We also offer box set inserts for our small porters that allow you to transport fragile tiers separately for assembly at your destination. The boxes are also great for cupcakes and smaller dessert bar items like cookies, tarts, truffles, pies, etc.
So, check 'em out! If you want "an excellent option for professional bakers", or just a really fantastic way to transport your not-necessarily-professional cake creations, this is the carrier you want!
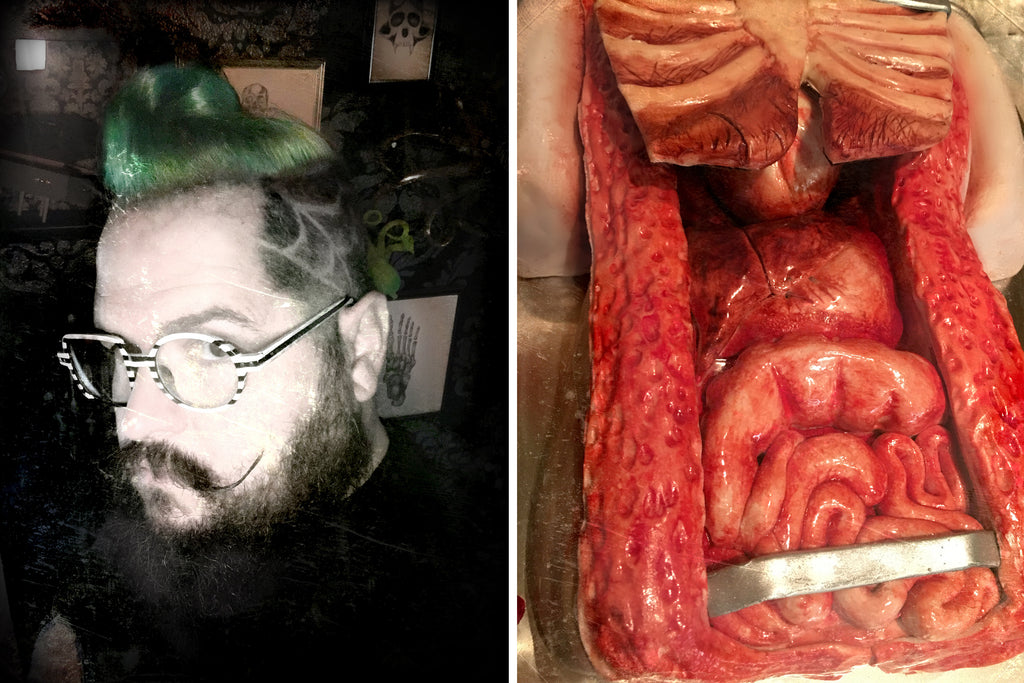
Blood, guts, and red velvet cake: Halloween with Andrew Fuller
Last year we took Halloween as the opportunity to spotlight a new, up-and-coming cake artist with a ton of skill, a ton of potential, and a real knack for making really gruesome edible horror-art. Well, the past year has been epic for Andrew Fuller of Guy Meets Cake, so we invited him back to defend his reigning title as King of Halloween!
By now you've probably heard the name Guy Meets Cake, whether from his viral "People Pot Pies" featured on sites like Atlas Obscura and Mashable, from his appearance on this year's Halloween Baking Championship, or just from seeing his bizarre cakes circulating the Internet (realistic placenta cake commissioned for a hospital party? hmmm...) Today, Andrew is going to show you how he made a dissectable anatomy cake, complete with organs that "bleed" when you cut into them.
Well, here we are boils and ghouls! A year has passed and the spooks over at Innovative Sugarworks were insane enough to invite me back for this year's October guest feature. I DO BELIEVE they get credit for being the first to call me the King of Halloween, and now it is my obligation to defend the worthiness of that title.
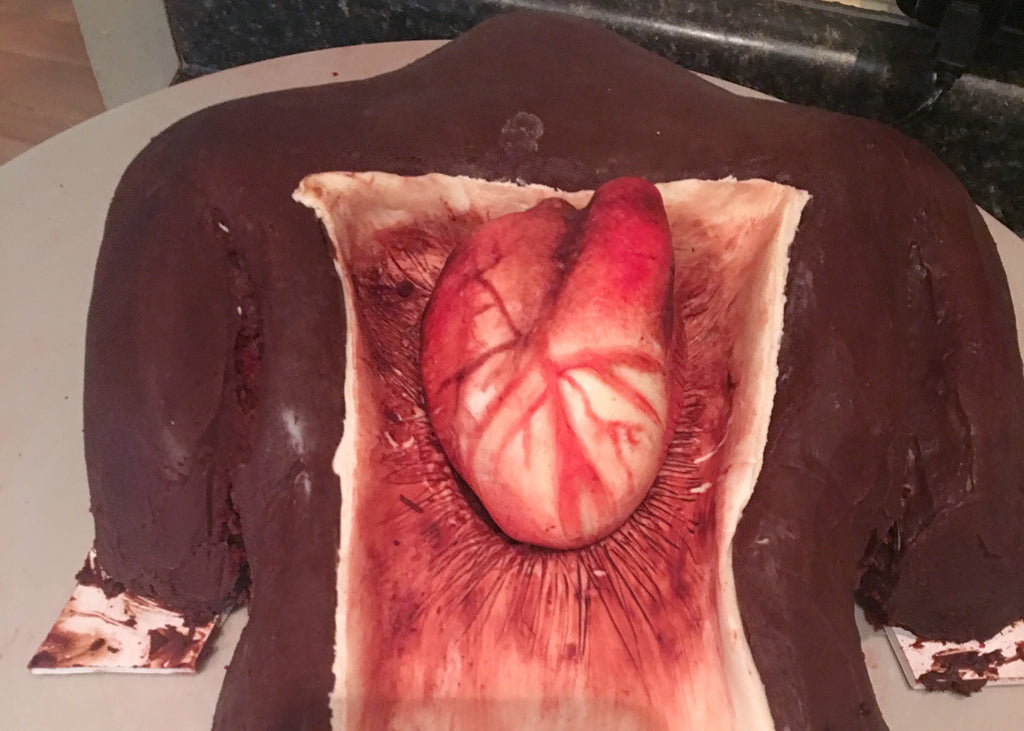
So what have I conjured up this Halloween? It only feels right to really freak them out. Give them a cake they aren't sure if they have the guts to cut into. I have decided to share with you a step-by-step on how I created this realistic anatomy cake with a set of ribs and lungs that lift off to reveal a removable bleeding heart, and modeling chocolate guts.
ON WITH IT!!
First thing's first, we need to bake some cakes! For this project, I baked two quarter sheet cakes of Red Velvet and one quarter sheet of Devil's Food. You can find my Devil's Food Cake recipe on another Innovative Sugarworks blog.
For the Red Velvet, I like to use this recipe that I found in a dusty old recipe box belonging to my mother, who may have gotten it from my great-grandmother, a great inspiration to my love for baking. I also use vanilla bean sugar, which is basically splitting a vanilla bean or two lengthwise and storing them in an appropriate container of sugar. It adds that something extra to the outcome of your cake and the longer you keep it, the more intense the sugar becomes.
You will need:
- 3 cups cake flour, sifted
- 3 cups vanilla bean sugar (or you can use regular granulated sugar)
- 1/2 cup dutch process cocoa powder
- 1 tbsp instant espresso powder (optional)
- 1/2 cup corn starch
- 1 1/2 tsp pink Himalayan sea salt
- 1 1/2 tsp baking powder
- 1 tbsp baking soda
- 1 1/2 tsp white vinegar
- 4 large eggs
- 1/2 cup unsalted butter, melted
- 1 1/2 cups buttermilk
- 1 cup milk
- 2 tsp vanilla extract
- 1 tbsp Flaming Sword Elite Color Dusts by The Sugar Art
- 1 tbsp Americolor Super Red gel food coloring
Treat a quarter sheet pan with GOOP (equal parts shortening, vegetable oil, and flour) and line 2 with parchment.
In a stand mixer, combine all dry ingredients and mix on low until combined. Add eggs, melted butter, buttermilk, milk, vinegar, vanilla and food colorings, and mix at a medium speed until completely smooth, roughly 2-3 minutes.
Pour the batter into the pans, filling 2/3rd of the way to the top. Bake at 325 for 38-44 minutes or until an inserted toothpick comes out clean.
Cool on a wire rack for 10-20 minutes before turning onto a sheet of plastic wrap. Cover completely while still warm and refrigerate to keep cake moist. Chill completely.
The best laid plans...
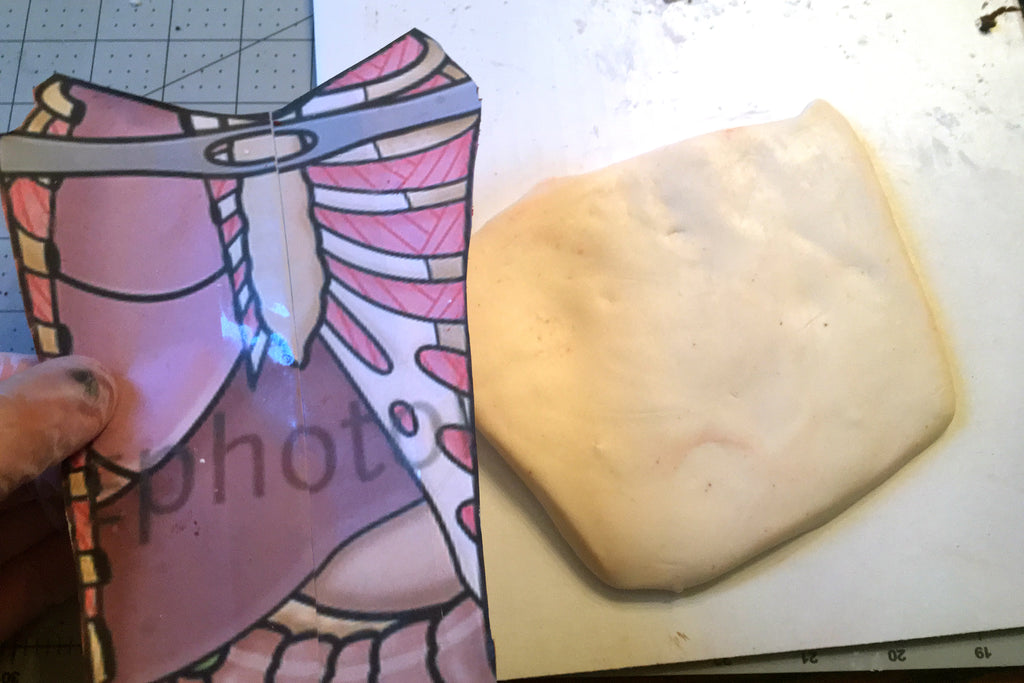
Now it's time to map out the cake! I searched a lot of images online, found a design i liked, and enlarged it enough to span 4 standard 8/12"x 11" sheets of paper. I cut them out and lined them up with each other, taping them together. There's my template!
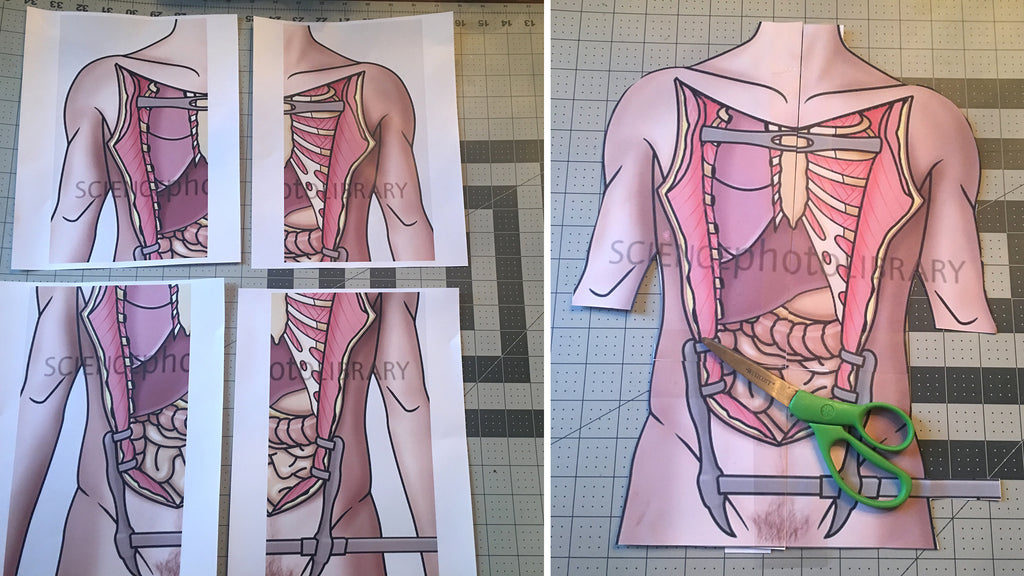
Lay your template on a piece of 1/4" foam board and cut out a board for your sheet cakes. Now place your chilled cakes onto the board, lay the stencil on top and cut out the basic shape of your design. The colder your cakes are, the easier it will be to carve them without any breaking or crumbling. And because this guy is a big cake, I'm using my Turntable Expander. He fits pretty nicely on there and otherwise I'd be balancing boards on my turntable.
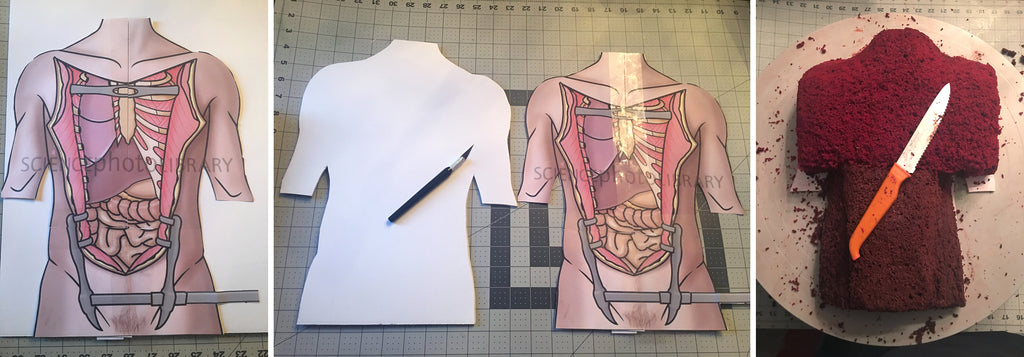
Carving out the flesh
Slowly, with a serrated bread knife, start carving some shape and dimension to your cake, being careful not to take away too much cake. Round out the shoulders, take off the edges on torso and carve in your neck and chest. When you're happy with your shape, remove the top layer.
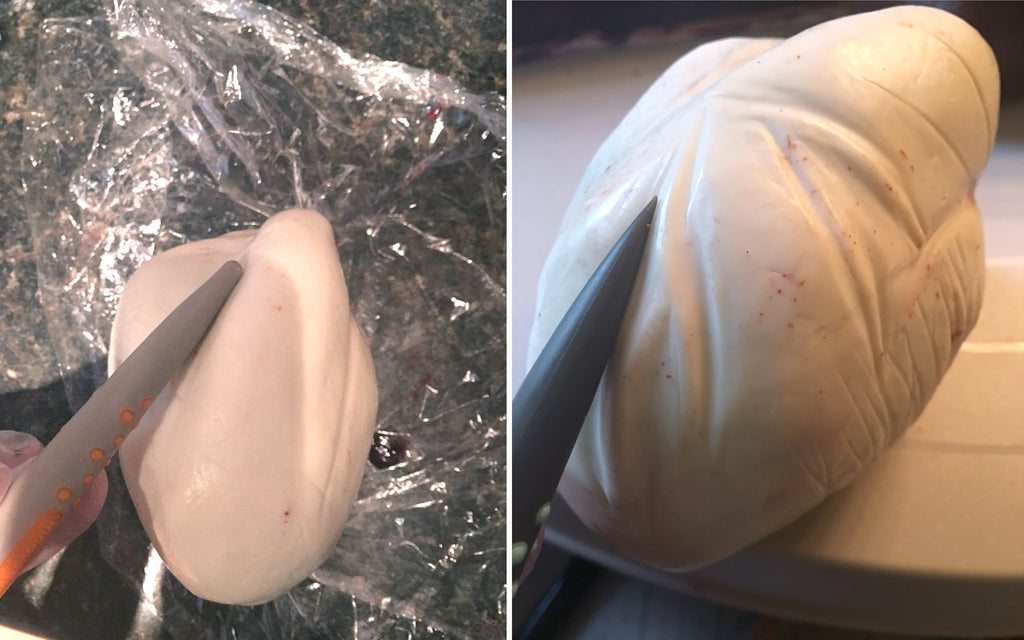
On a clean cake board, take your top layer and cut out the "good stuff" (the GUTS!) from the template and carefully carve out the cavity. SAVE THOSE CAKE SCRAPS! You'll be using them to make the heart.

Line up your first layer of red velvet, ice with ganache or buttercream, and carefully slide the top layer of cake from the board you carved it on in its place. IF you break any pieces, it's cool. Just glue them back together with your ganache or buttercream. If, like me, you're using devil's food for the bottom half, do the same here. Ice the entire cake with a light crumb coat and chill. For the second coat, use a Sugar Smoother to get those smooth rounded out curves and if you need to, use warm water and gloved hand to smooth it out. Return to refrigerator to chill.
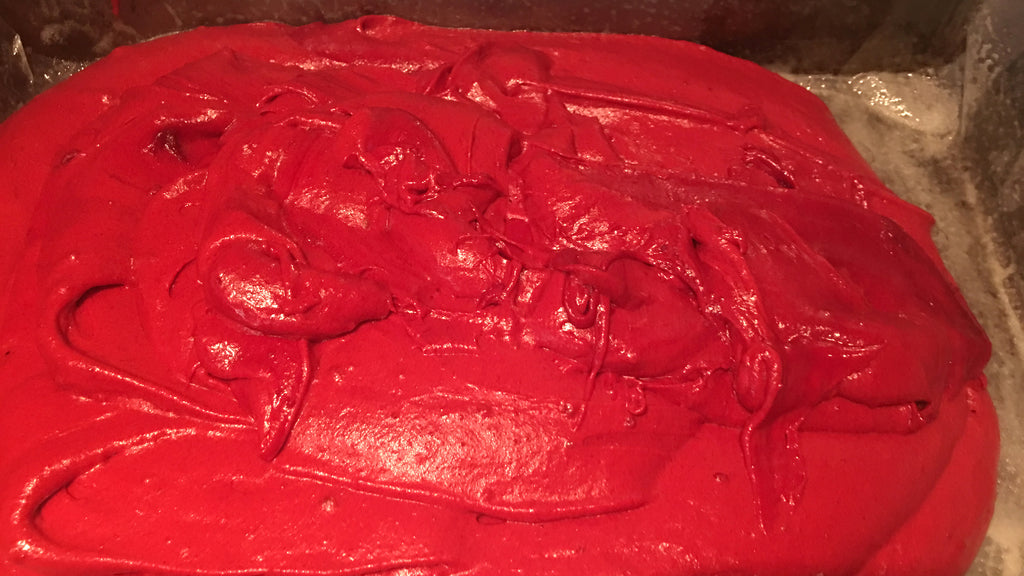
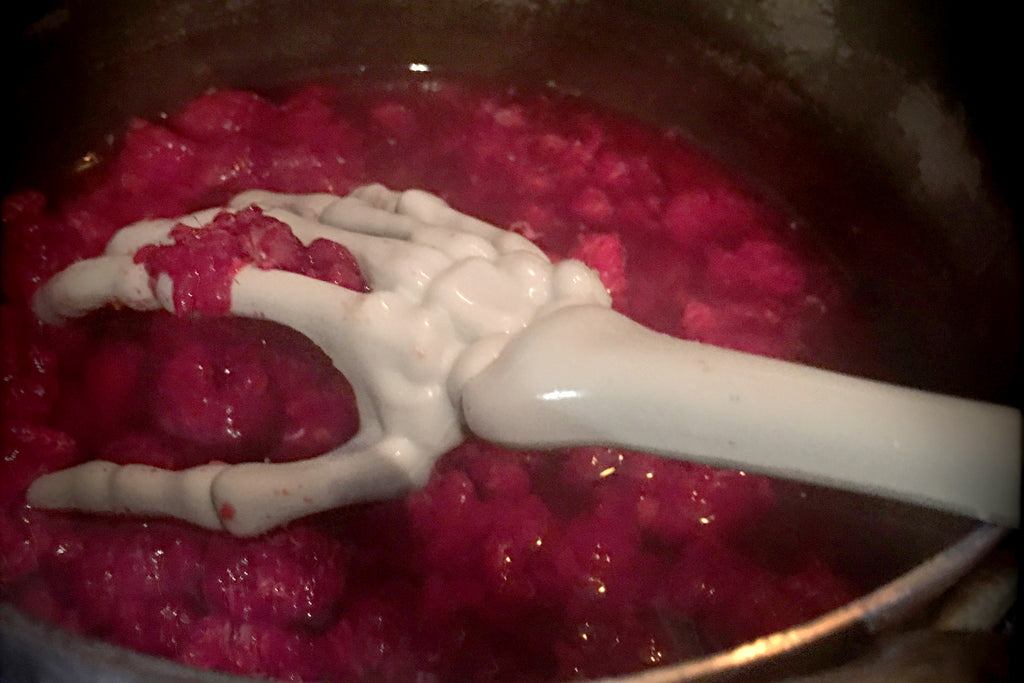
A bloody delight
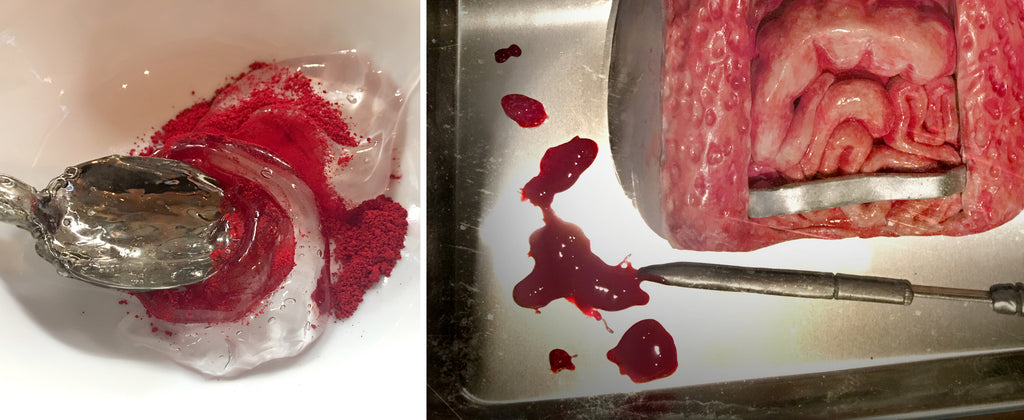
Time to make a little blood! (For the bleeding heart, of course.) In a small saucepan, combine 1 cup fresh or frozen raspberries, 1/4 cup granulated sugar, 2 tbsp water, and 1 tbsp of fresh squeezed lemon juice. Simmer until raspberries have broken down and sugar is completely dissolved. Press through a chinois or fine mesh strainer, and chill completely.
Be still my heart...
To make the heart, add ganache to some scraps of cake and combine with gloved hands until you achieve a clay like consistency. I'm never precise with this, so I would say add a tablespoon of ganache at a time until you get there.
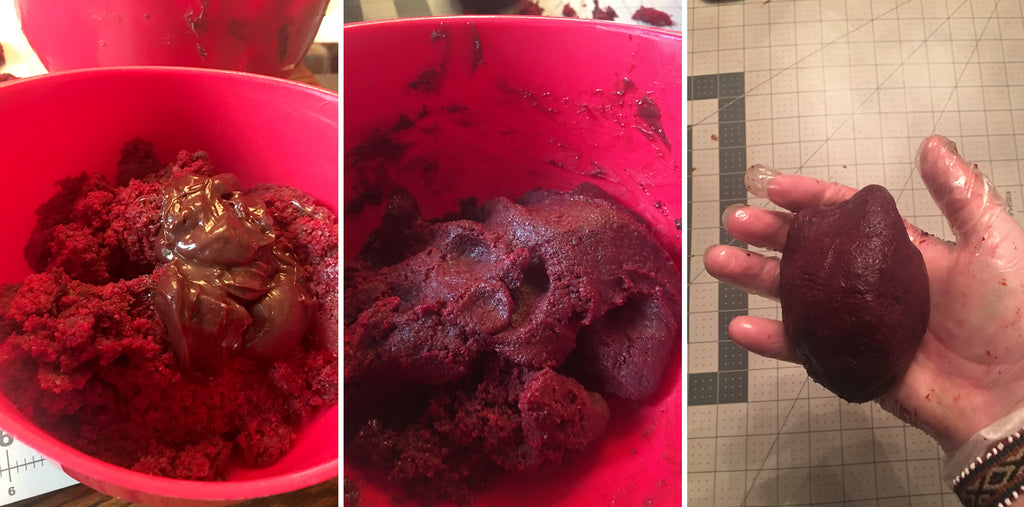
Let chill for 15 minutes. Take out a ball of your cake clay about the size of a tennis ball and roughly shape out a heart. Wrap it in plastic wrap and place in the freezer for 10-15 minutes.
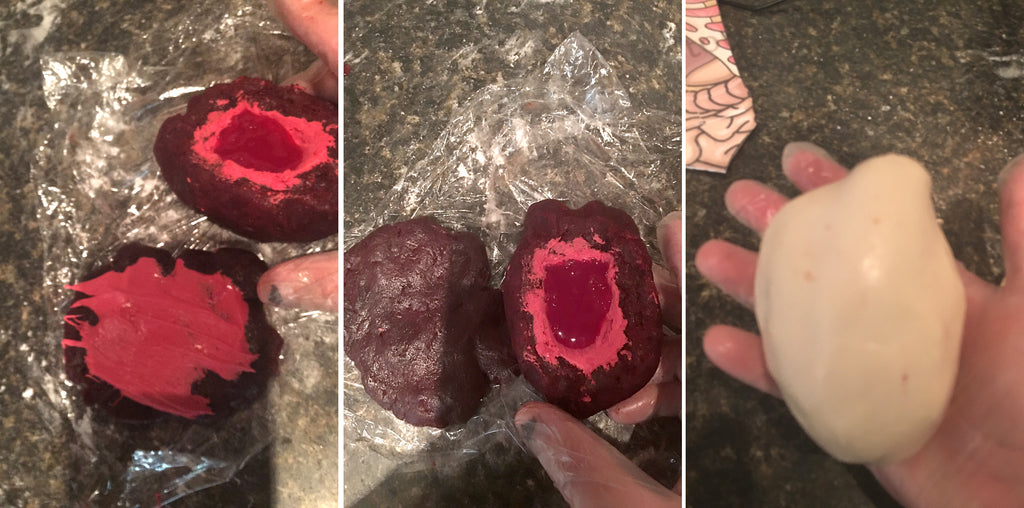
Now we add the raspberry "blood" that will ooze out when you cut into it.
Make a well in your chilled heart for the sauce. I melted some coating chocolate, tinted it with some Flaming Sword Elite Color dust, and painted the well, making sure there were no open spots.

Let that harden in the freezer for a couple of minutes, and then fill 3/4 of the way with your sauce. Normally, I cut off enough of the TOP of the heart to create my well, then I paint the underside of that top piece with more coating chocolate and while it's still melted, secure it back in place. This time, I tried it from the underside of the heart. I think slicing off the top is easier, but both work. You do what works best for you. Now you have a barrier insider your heart that keeps it from seeping into the cake clay before you cut it. Allow to chill for a few minutes, then cover with modeling chocolate.
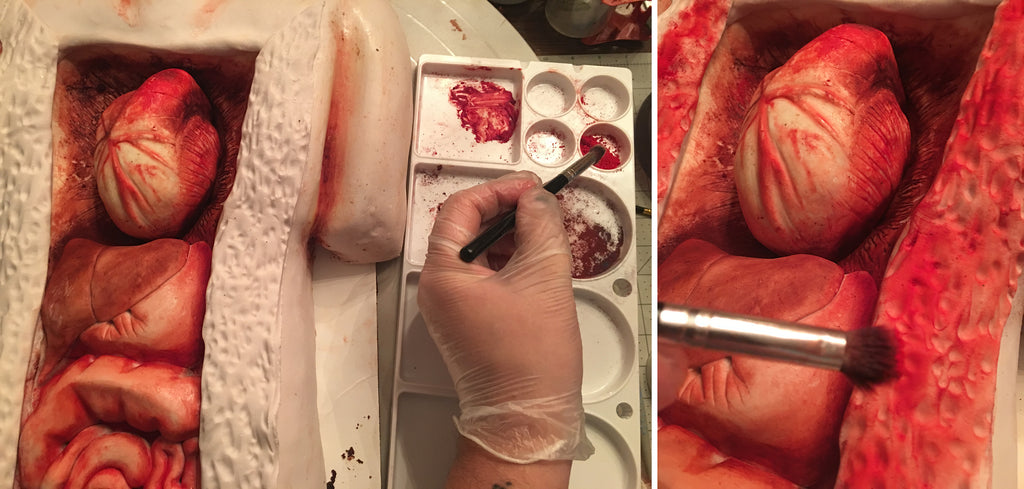
I used the firm pointed chisel Mini-Tip Sugar Shaper to create lines for texture and muscle fibers and the soft bone chisel Mini-Tip Sugar Shaper (that's the orange one) to sculpt in some arteries and define the chambers of the heart.
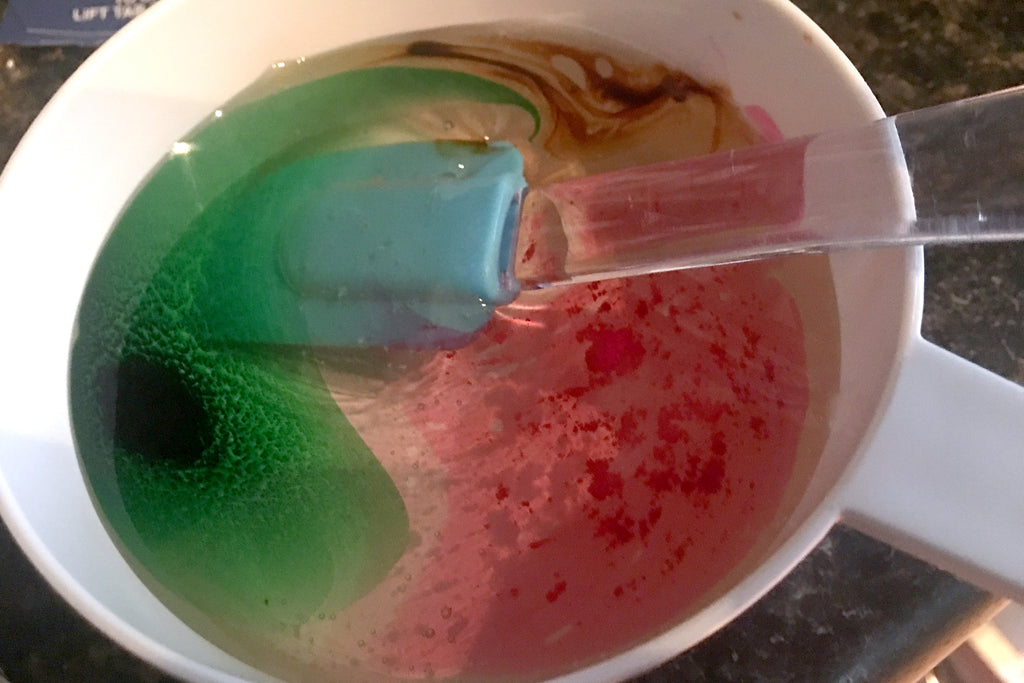
To color the heart, I used Sugarworks' Artists' Brushes to dry brush the arteries, the chambers, and along the perimeter of the heart using some more Flaming Sword Elite Color dust. Then I used a fine tip brush to add in some smaller veining. I mixed together some of the Flaming Sword and Ice Blue Elite Color dusts until I got a deeper shade of a reddish purple and went back in around the perimeter, blending it with the red to add some depth and dimension, as well as hitting spots with creases or crevices.
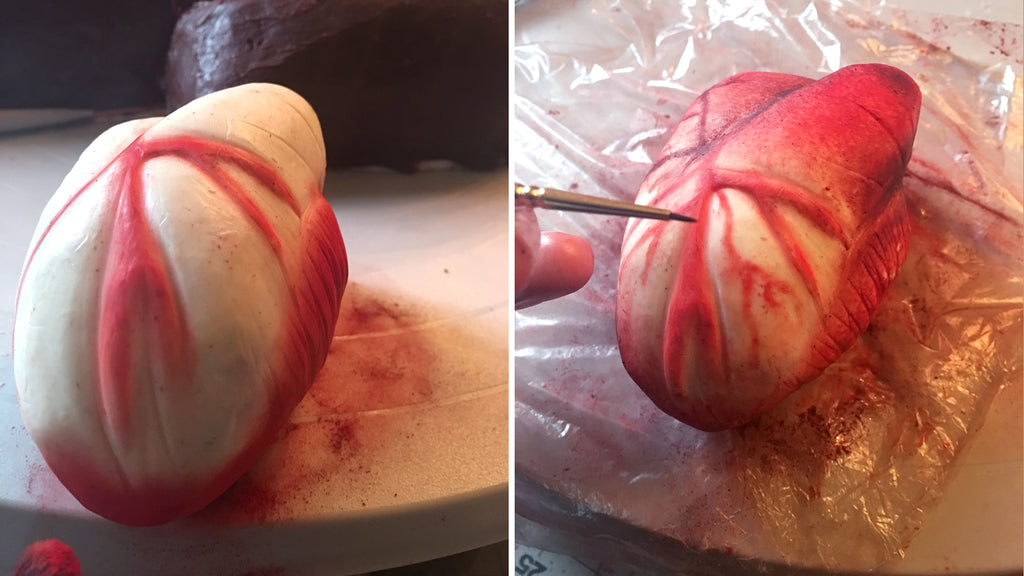
As an added option, you can also mix a bit of color dusts with vegetable shortening to create a paint. Then you can stipple on even more more color with a piece of paper towel. If you make any mistakes or add too much color, just use a clean piece of paper towel and some vegetable shortening to buff it away.
A place to keep my heart...
OK! Use your heart to figure out how much space you need to take out of your torso cake. Once you carve that out, it's time to cover! I decided to do this in two steps. First, I used white modeling chocolate to cover the cavity that all the goodies will be squished into.
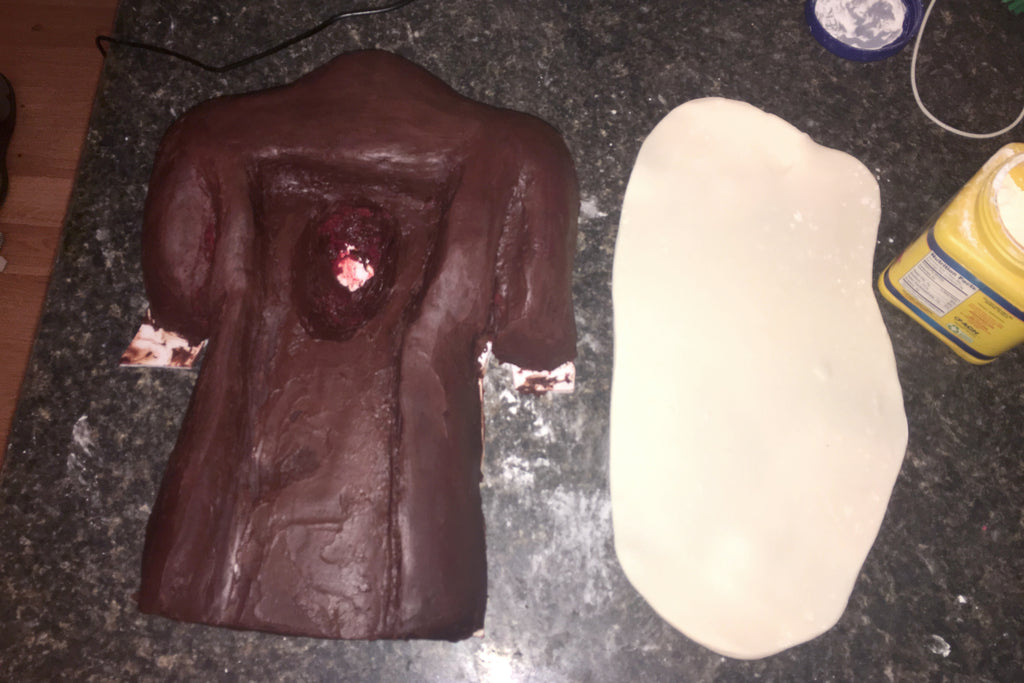
Pressing it into the hole I created for the heart, I then take the firm mini pointed tip Sugar Shaper to carve in some muscle fibers. You don't necessarily have to do this, but I wanted the cake to look cool even after the heart was ripped out. Using the same dusting and wiping away techniques as I did with the heart, I color the hole and texture I just took the time to carve in.
Check your work and see if the heart fits into its hole. Remove the heart.
Now for skin
We're going for corpse skin here, so I'm going to make my own modeling chocolate using a color combination for creepy, dead-ish skin that I've perfected with much practice:
Melt 5 cups of white candy melts in the microwave in 30 second increments. To get the "sort of dead looking, but maybe a little freshly dead" skin color with a slight translucent effect, add 2 drops of soft pink, 1 drop of leaf green, and just a toothpick dip of ivory gel colors to 1 cup of light corn syrup and heat in microwave for 20 seconds, just enough to make it runny and not so cold it shocks the melted candy.
Fold the corn syrup into the melted candy JUST UNTIL it is fully mixed and the consistency changes to a soft ice cream consistency. Turn onto a cookie sheet covered in cling film. Spread out your mixture and cover with more cling film. Leave it to cool for at least an hour.
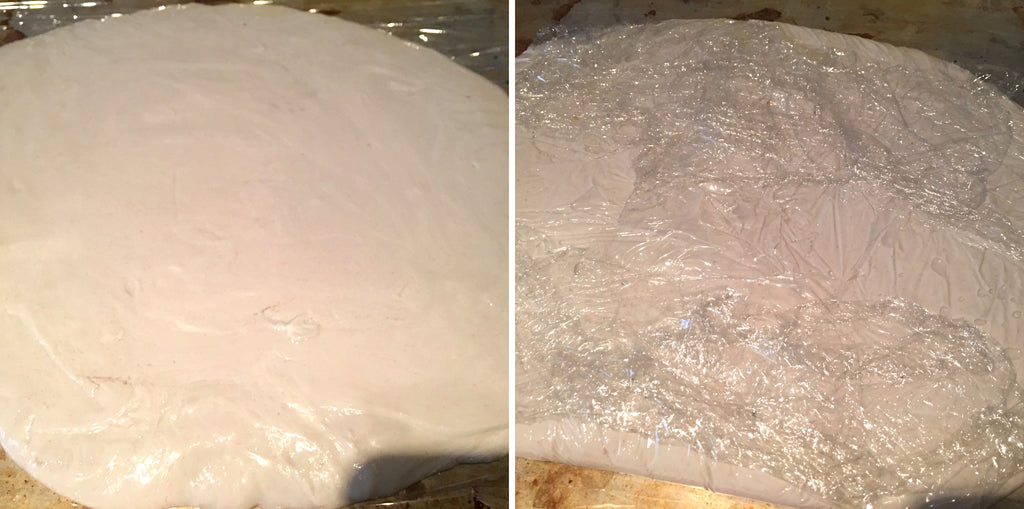
After an hour, unwrap and knead the chocolate (it will be firm) until it becomes smooth and pliable with no lumps. If you have lumps, you can pop it in the microwave for 5 seconds at a time and knead them out. Now that you have your modeling chocolate in the perfectly creepy and lifeless greyish-pink shade, knead it together with equal portions modeling chocolate to fondant until fully combined. I used Renshaw Ivory fondant.
If you used ganache to cover your cake, lightly coat the surface of the cake with vegetable shortening. On a clean surface dusted with a blend of cornstarch and confectioner's sugar, roll out your fondant/modeling chocolate to about an 1/8".
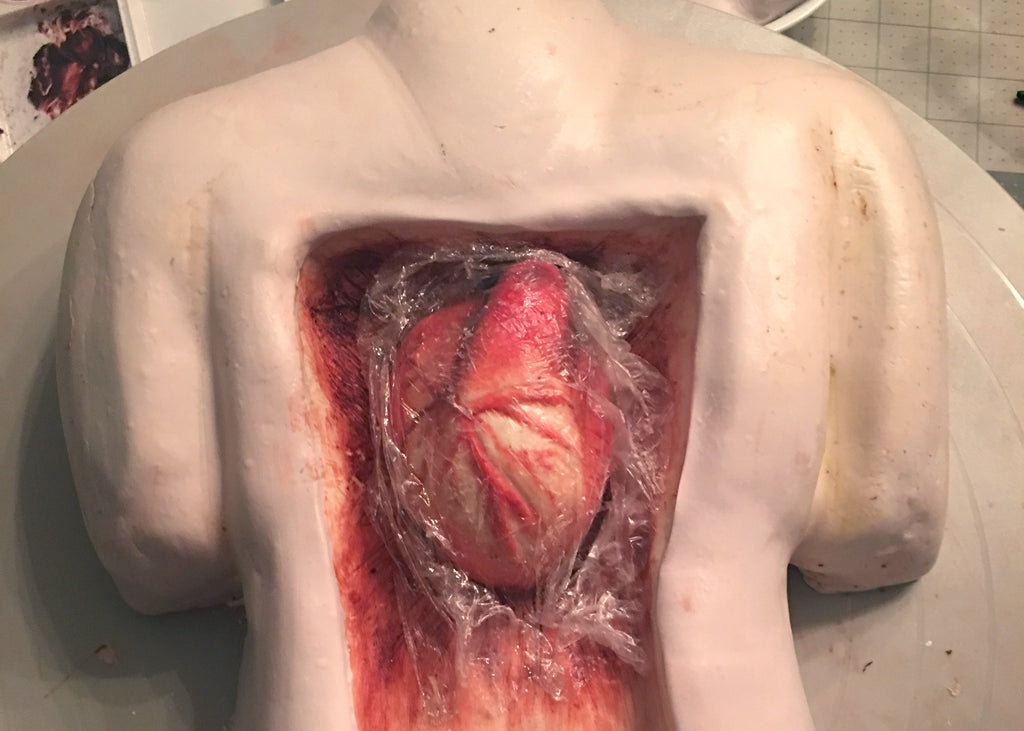
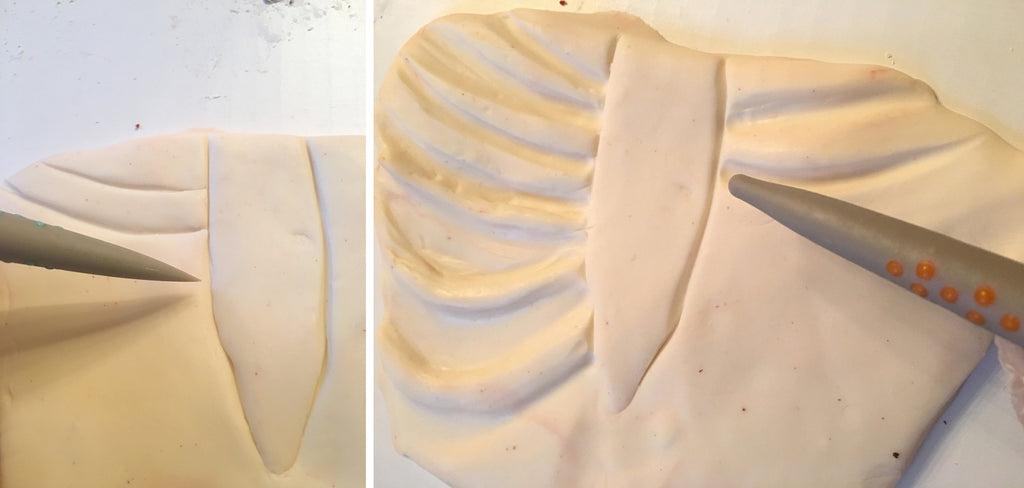
If you have the Sugarworks Artists' Turntable and Turntable Expander, this next part is SO MUCH easier. Roll your chocolate onto a dusted rolling pin and quickly cover the cake. Ensure all areas are covered and smoothed down quickly. Then, using the SOFT large bone tip Sugar Shaper, start creating the definitions of crevices in the neck, arms, etc. until it's nice, smooth, and well defined. Cut away the section that was already covered earlier for the cavity.
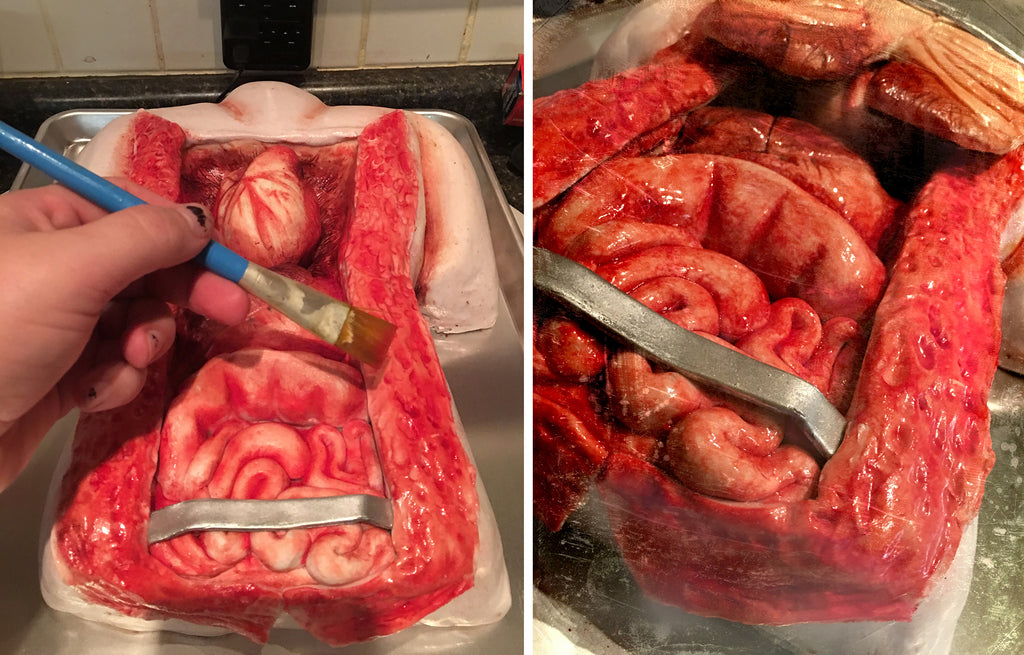
The guts of the matter
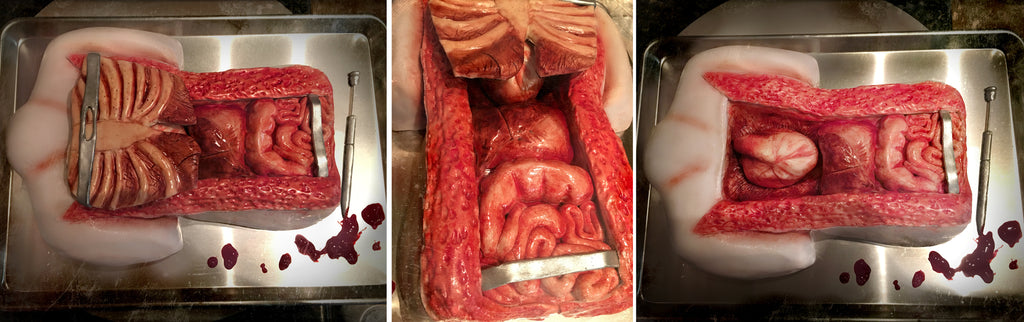
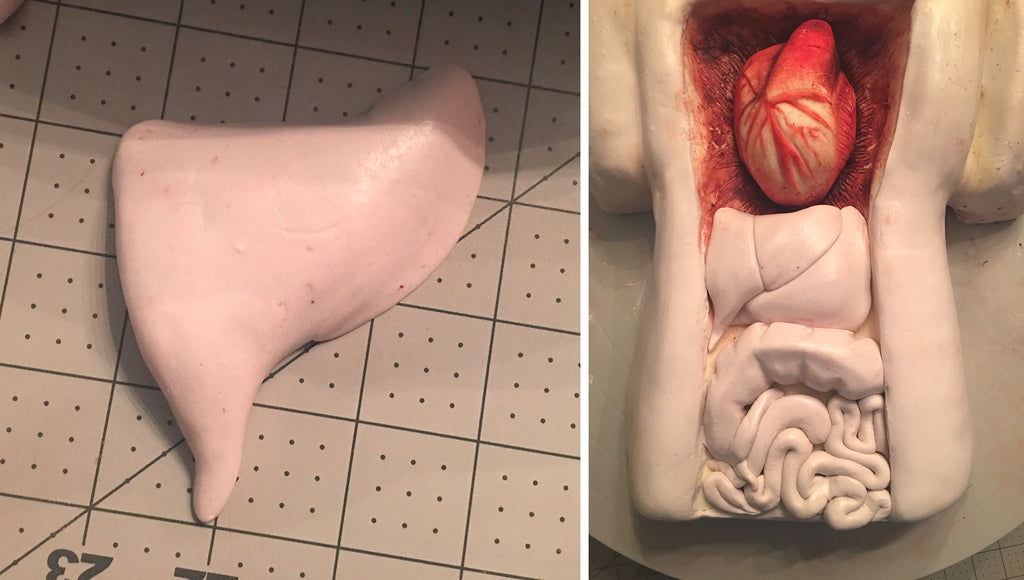
TIME FOR THE GOOD STUFF!! My client wanted the guest of honor to be able remove the heart and cut into it. But anatomically speaking, the heart is obscured by the lungs and ribs.
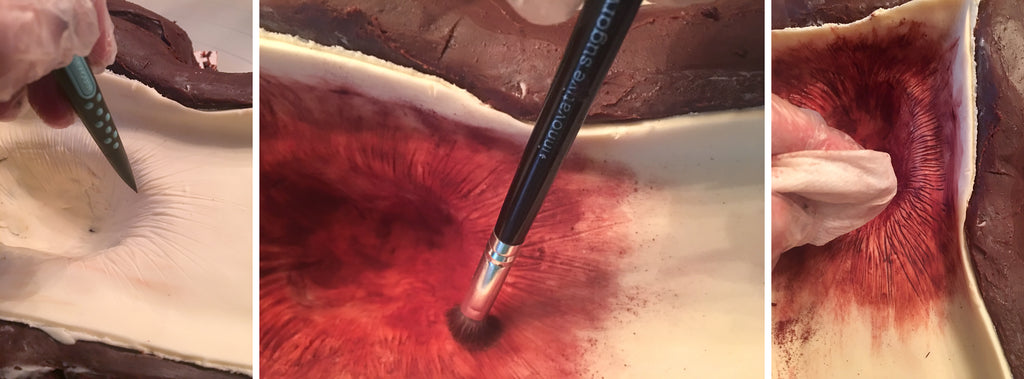
So first thing's first. Using the template AND your covered cake for reference, cut out a piece of cake board and cover with modeling chocolate for the lungs/ribs.
I defined the sternum and ribs with the soft bone chisel Mini-Tip Sugar Shaper. And I gave texture to the lungs and added little porous textures to the bones with the mini soft tip pointed chisel.
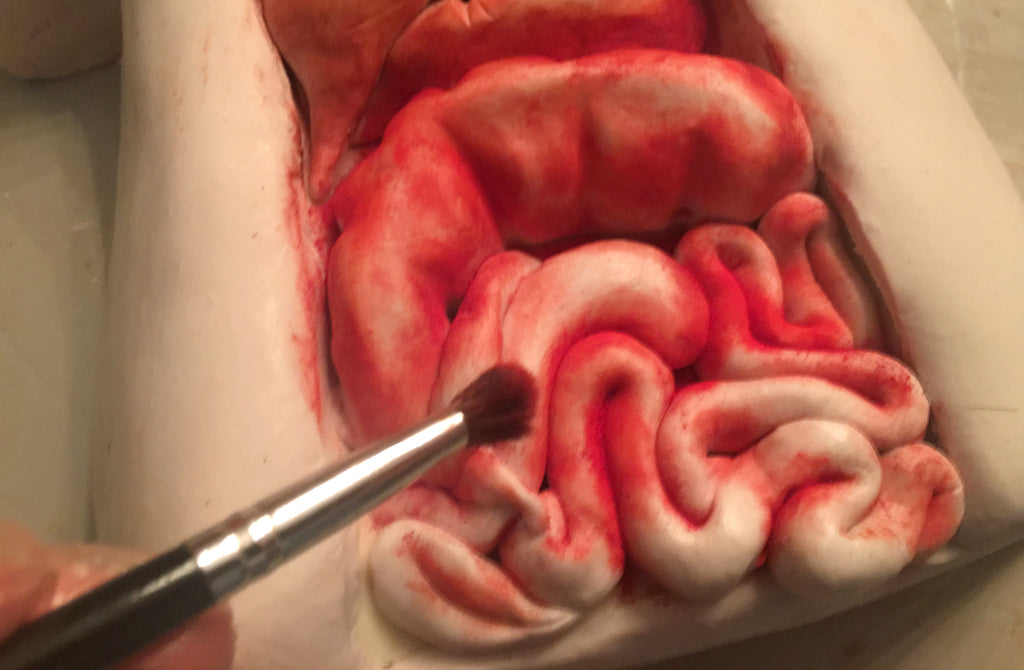
I painted the lungs with the reddish purple color dust blend i created earlier and wiped it away with some shortening and a paper towel so it just stained the chocolate and stayed in the crevices. I did this same thing with the ribs and a bit of cocoa powder mixed with corn starch.
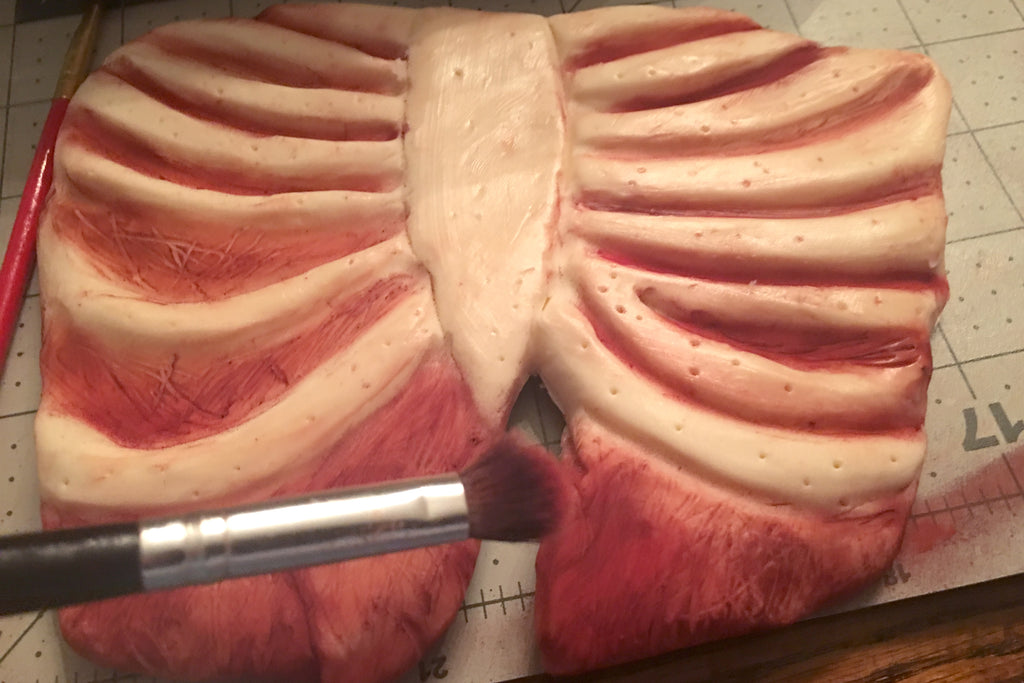
Because it is on a cake board, if the heart sits up a little, you can gently bend the board to create an arched effect of the ribs, which also add a little extra realism and dimension. Set aside.
I created my organs all from the fondant chocolate blend that I created earlier, in the order they fit into the body. In other words, some organs are on top of and/or obscure others. Once they are in, they are in. So take that into account, pull out your old anatomy textbooks, (or, you know- Google it because it's 2018...) and save yourself a headache.
For me, I put the heart in place, and started with the stomach, creating a general shape and adding a few wrinkles and creases. Next up, the large intestine. I hand shaped a piece to fit that was roughly a banana and placed it in the cavity under the stomach.

I then shaped the large intestine using the soft tip bone chisel Sugar Shaper to get the shape I wanted.
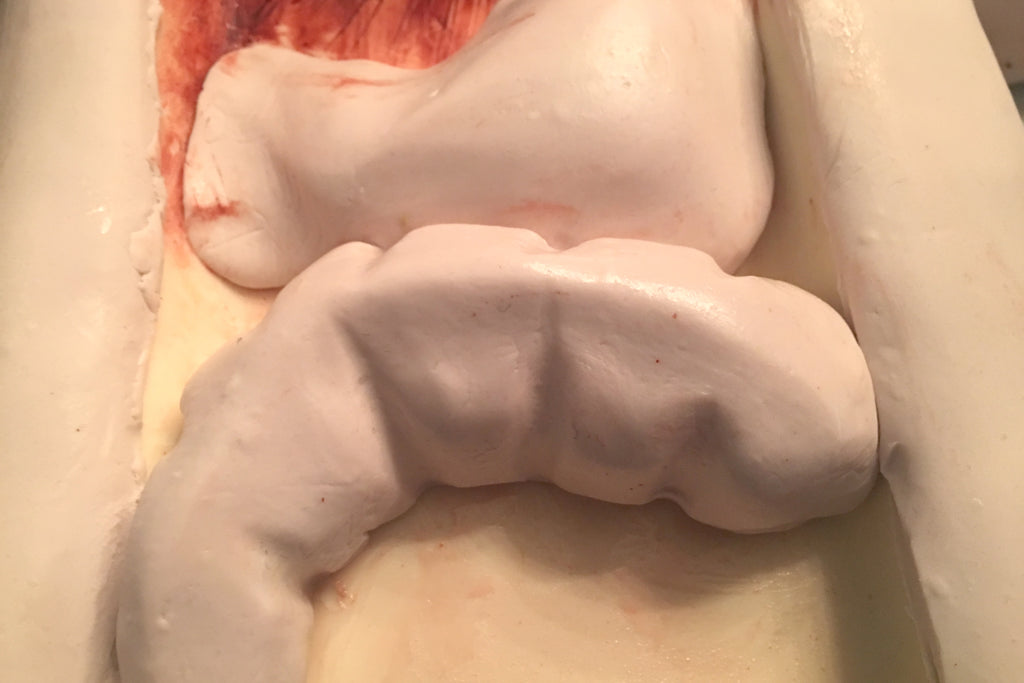
For the small intestines, roll out a long tube of chocolate slightly thicker than a pencil. I found it easier to cut that into sections and just kind of work them into their rightful home, watching the curves and turns I saw in the template.
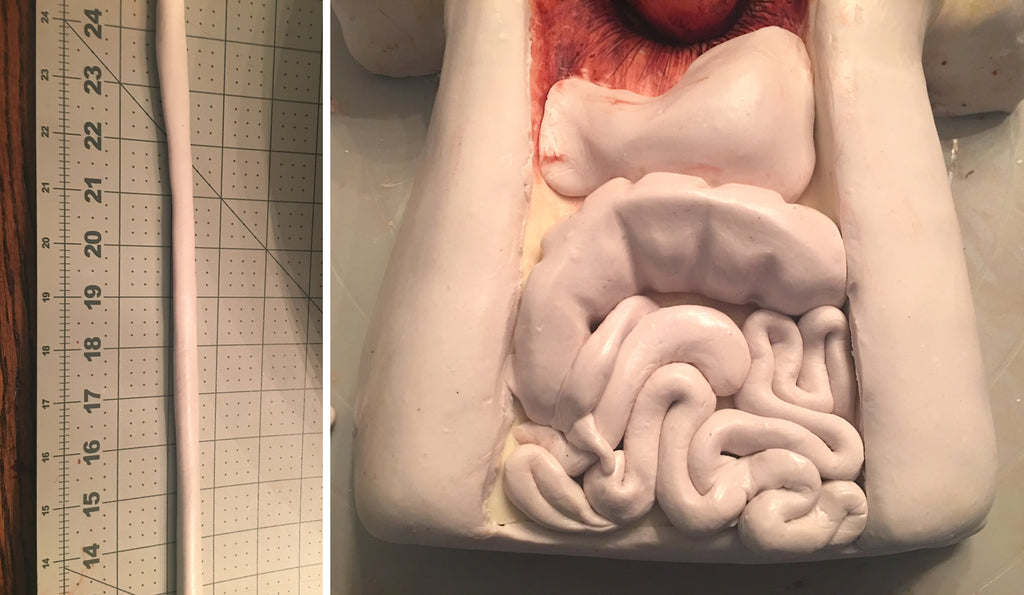
For the liver, I essentially paid attention to the template and created what I felt best resembled a liver....and maybe a chicken breast, going back to check and see that it fit it neatly under the heart, above the large intestine, and slightly overlapping the stomach.
I painted everything with the same techniques and color palette as earlier with the heart. The liver was exclusively the purple color, while the rest had a little of both the purple and the red.

After checking to see that the ribs and lungs fit nicely once everything was added in, I used some remaining pieces of the homemade modeling chocolate to create the skin that had to be cut away to reveal the organs. To give it that gnarled fatty look of the skin tissue, I used both ends of the firm regular AND Mini-Tip Sugar Shapers bone chisels.

Cut them to size and secure with a bit of water. Once again, I used the dust and wipe technique here.
Finishing touches
I created the clamps that hold open the chest and abdomen by tinting some modeling chocolate to a pewter color, then cut them out with sharp blade and dusted with metallic silver color dust.
And because the devil is in the details, (and this IS the season for devils!) I used a skewer and more of the pewter chocolate to create a trocar. A trocar is a surgical instrument with a three-sided cutting point enclosed in a tube, used for withdrawing fluid from a body cavity. I had one on hand and, what can I say? It inspired me.
By adding a touch of Flaming Sword Elite Color dust to some clear piping gel, I made a little blood to spatter on the cake board. After conferring with my client and to add to the realism, I decided the best option for a cake board was to use a stainless steel tray.
For that final creepy effect, I SPARINGLY and methodically used an alternation of vegetable oil and confectioner's glaze to give all of the organs and the ribcage that wet, freshly splayed open look.
THERE YOU HAVE IT. This cake was fun, challenging, and most definitely wowed the crowd. If you're looking to up your Halloween game this year, this should do the trick.
Oh, and HEY....catch me on season 4 of Food Network's Halloween Baking Championship and watch me compete against other talented bakers for $25,000, airing Monday nights at 9/8C.
HAPPY HALLOWEEN!!!!
Yours CRUELLY,
King of Halloween.....I mean....Andrew Fuller.
We hope you were super grossed out by this dissectable anatomy cake! And we hope you're now inspired to make something ghastly yourself this Halloween! If you want to see more of Andrew's weird, kooky, creepy, and gruesome edibles, here's where you can find him:
Facebook: @guymeetscake
Instagram: @guymeetscake
And check out his new collaborative project, Sugar Freakshow!
And if you want to see the cutting of that bleeding heart, you can watch the video his client shot on Facebook!
The Giving of Baking with Viki Kane
Viki Kane is the owner of SugarKane Cakes & Confections in Encinitas, CA. Since opening in 2012, she has proven herself to be not only a talented baker, but a skilled decorator as well. Along with running her business, Viki has appeared in numerous wedding blogs and cake publications, as well as television appearances on several Food Network shows. She was the first 2x Cake Wars winner and most recently, winner of Wedding Cake Championship. She has also been featured on the series, Ridiculous Cakes.
Television craziness aside, Viki enjoys sharing her talents through teaching and involvement in community programs like Icing Smiles and Depressed Cake Shop. Inspiring others to embrace their own creativity and try something new is something she finds immensely gratifying.
Today Viki is going to talk to us about the giving nature of bakers and the importance of good planning in executing the magic of a perfect cake.
As a baker and decorator, it’s always nice to be able to give in such a unique way to family and friends on special occasions. It’s a lovely reminder as to why I do what I do and always brings me back to why I originally began baking so many years ago. Bakers are, by nature, givers and nothing makes us happier than seeing the joy in the faces of the recipients of our creations.
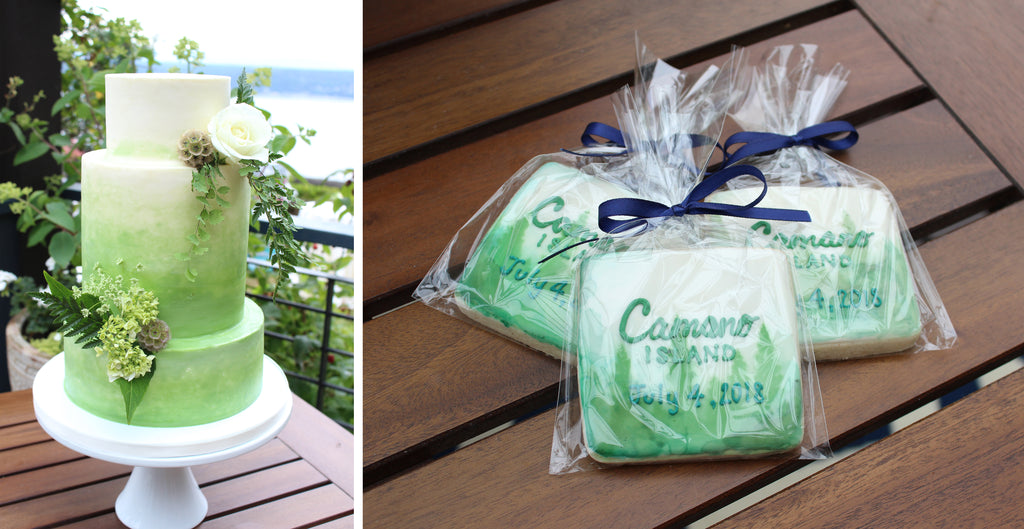
When Michael and Paul asked me to be a part of their 4th of July wedding celebration, there wasn’t much deciding to do. The wedding would be held on Camano Island, about an hour north of Seattle, and is absolutely gorgeous during the summer. I’ll be at the wedding anyway- of course I’ll make the cake! Oh, and while I’m at it, why not make some custom shortbread cookies for all the guests too! Oh Lord….what have I gotten myself into!?!
Since I live in southern California, I had to figure out the logistics of how to make all of this happen. Baking away from the comfort of your own kitchen always presents challenges, often ones you don’t realize until you are in the middle of it all. Proper planning is crucial, especially when working in unfamiliar territory. You need to make sure you have all the proper tools, ingredients, baking equipment, adequate work space, adequate storage space, and know how to transport the finished product safely and effectively.
Fortunately, we bakers are a close-knit community and always willing to help each other out when duty calls. A good friend of mine who lives in Seattle was planning to be out of town the same week we were planning to visit. How’s that for luck? She, of course, kindly offered up her home, kitchen, and any tools and supplies I may need to complete my cake. I knew she would have all the same quality supplies I’m used to in my own kitchen, so that meant less I had to pack. Woohooo!
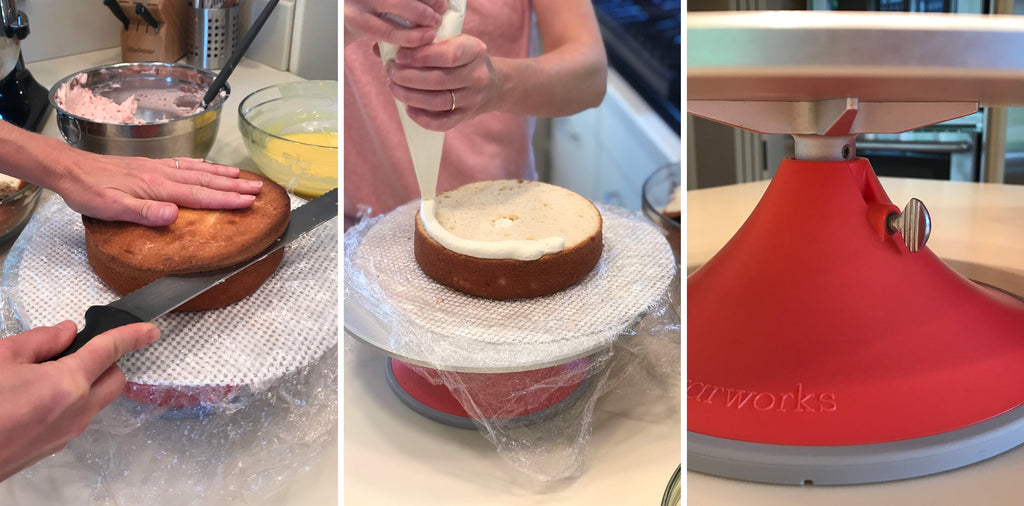
I arrived 3 days early to allow plenty of time to shop for ingredients, bake all the cakes, make the fillings and buttercream, decorate, and allow for any hiccups along the way. Baking day had arrived, and the weather was absolutely gorgeous. I opened up the windows, turned on some tunes, and set to work. In between bakes, I had time to check out the stunning view from the back deck. Not a bad day in the kitchen, not bad at all.

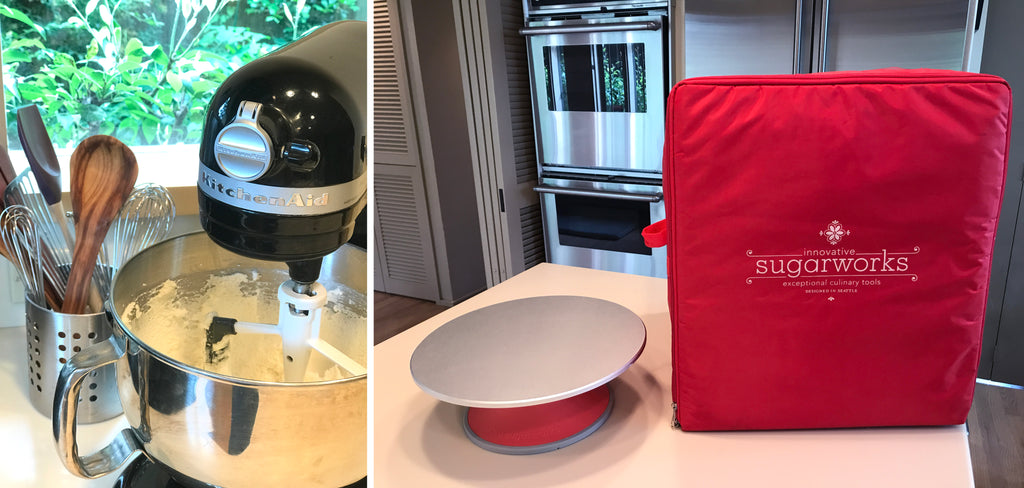
Cakes baked, buttercream made, lemon curd set…..time to start assembling! Having an Innovative Sugarworks Artists' Turntable handy was such a huge help. I absolutely love mine at home, but wasn’t looking forward to traveling with it. Even though it’s pretty lightweight, the less I had to bring, the better. This thing is a workhorse! It’s sturdy, level, has a non-slip base, and has a clever locking mechanism on the side for those times when you just need your cake to stay put.
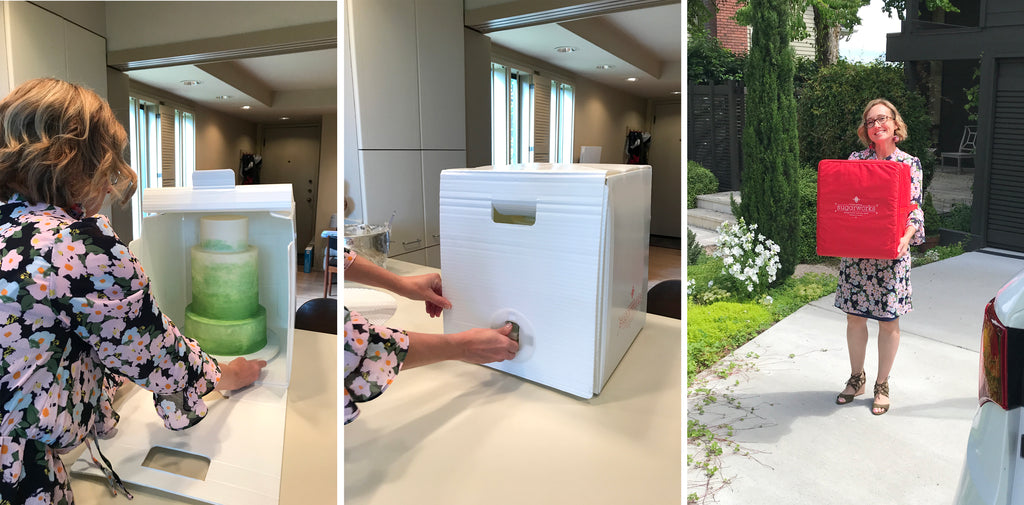
It’s the morning of the wedding; the cake is all put together, perfectly chilled, and ready for transport! I was thrilled to have access to yet another handy Innovative Sugarworks product, the Cake Porter! My cake fit perfectly inside the medium sized model. All I needed was a little non-slip mat on the bottom, just for extra assurance, and we were good to go. And with the clever insulated cover, the cake stayed nice and cool during the long ride to the wedding. The cake and cookies all arrived safe and sound!
I just needed to place a few fresh flowers on the cake and wait for show time. To make things a little easier on myself, I baked, decorated, and packaged the cookies ahead of time and brought them onto the flight as carry on….one less thing to worry about.
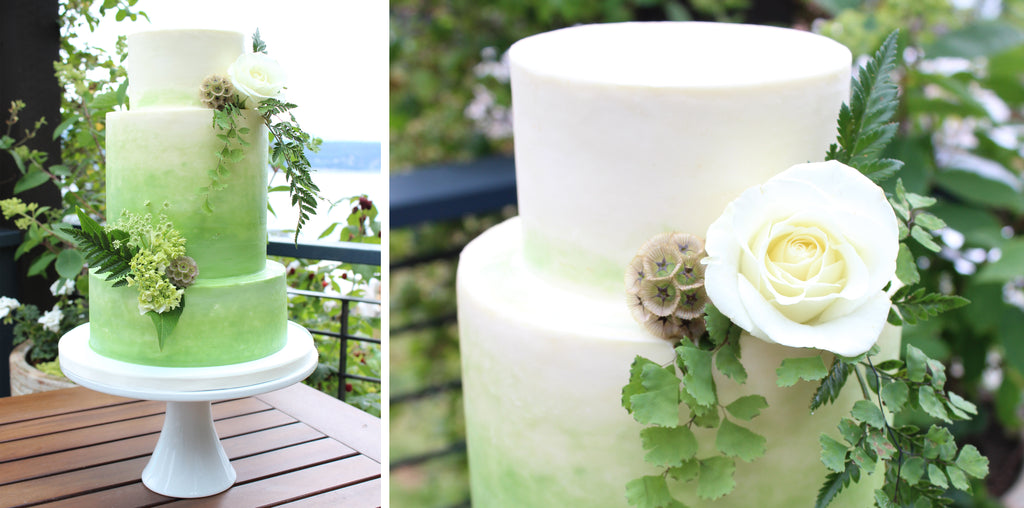
The ceremony was incredibly lovely and touching, with absolutely gorgeous weather and scenery to top it off. Can’t think of anything that could have made it better….oh wait! A surprise polka band coming through the forest to get the dancing started! And if that wasn’t perfect enough, the beautiful firework display over the water after the sun set was stunning. What an incredible day and night! Congratulations to a truly amazing couple that I am so proud to call friends…..may you have many love and laughter filled years together!
We hope you've enjoyed this uplifting journey along with Viki as she used her incredible talents to give her friends a breathtaking cake for their special day! Truly a memorable piece for their memorable day!
If you want to keep up with Viki, follow Sugar Kane Cakes and Confections on social media:
Facebook: Sugar Kane Cake and Confections
Instagram: @sugar_kane