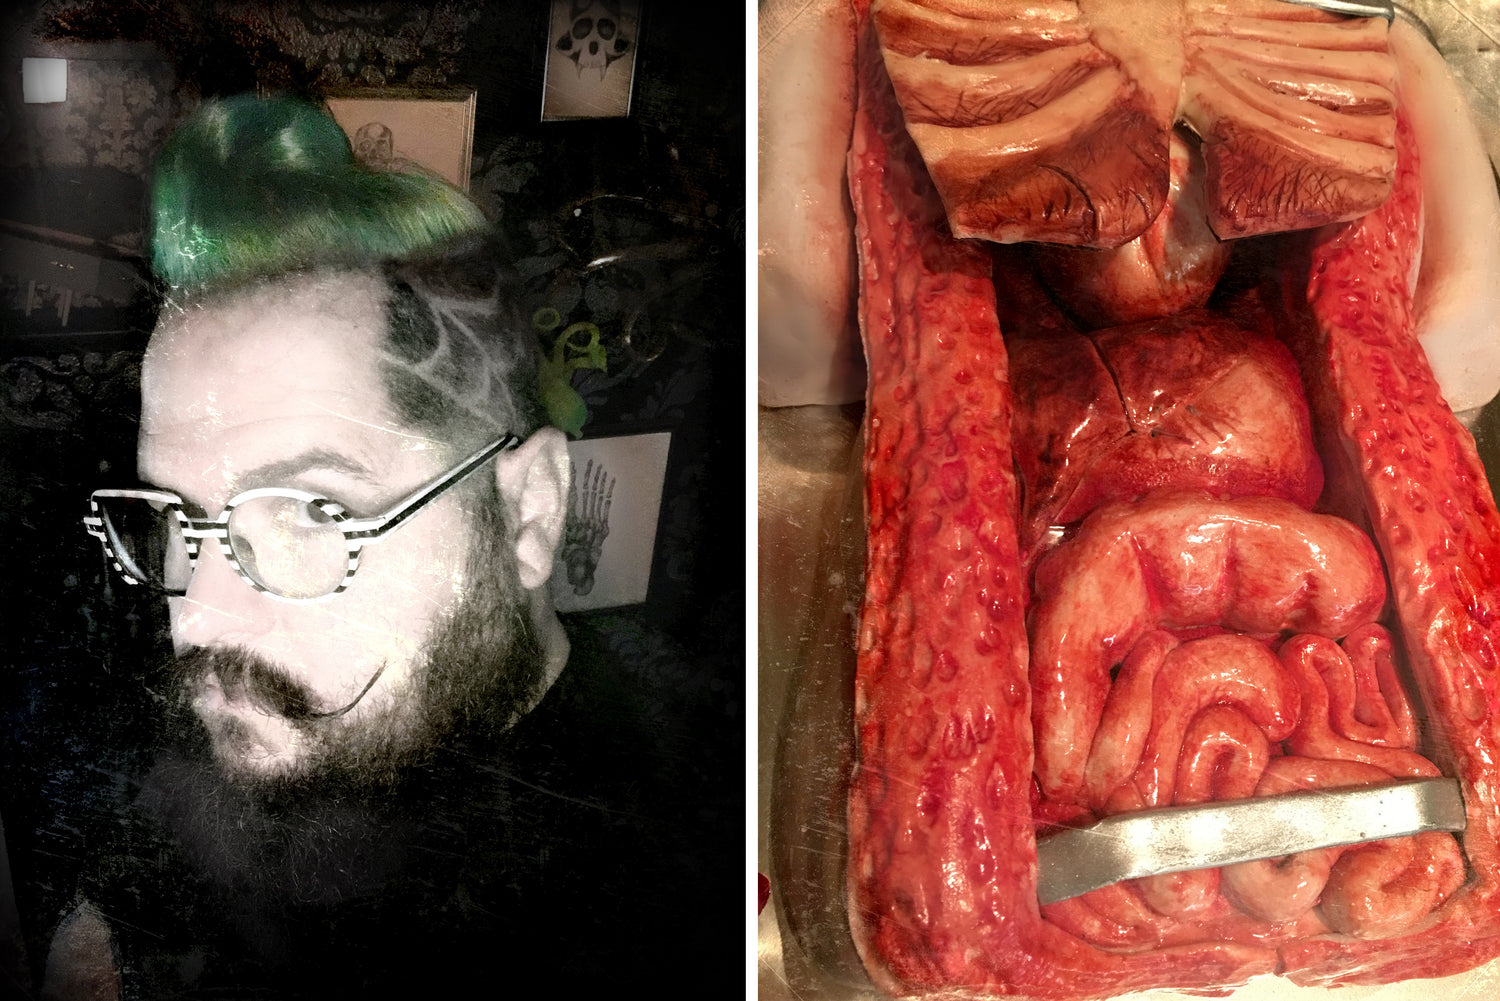
Last year we took Halloween as the opportunity to spotlight a new, up-and-coming cake artist with a ton of skill, a ton of potential, and a real knack for making really gruesome edible horror-art. Well, the past year has been epic for Andrew Fuller of Guy Meets Cake, so we invited him back to defend his reigning title as King of Halloween!
By now you've probably heard the name Guy Meets Cake, whether from his viral "People Pot Pies" featured on sites like Atlas Obscura and Mashable, from his appearance on this year's Halloween Baking Championship, or just from seeing his bizarre cakes circulating the Internet (realistic placenta cake commissioned for a hospital party? hmmm...) Today, Andrew is going to show you how he made a dissectable anatomy cake, complete with organs that "bleed" when you cut into them.
Well, here we are boils and ghouls! A year has passed and the spooks over at Innovative Sugarworks were insane enough to invite me back for this year's October guest feature. I DO BELIEVE they get credit for being the first to call me the King of Halloween, and now it is my obligation to defend the worthiness of that title.
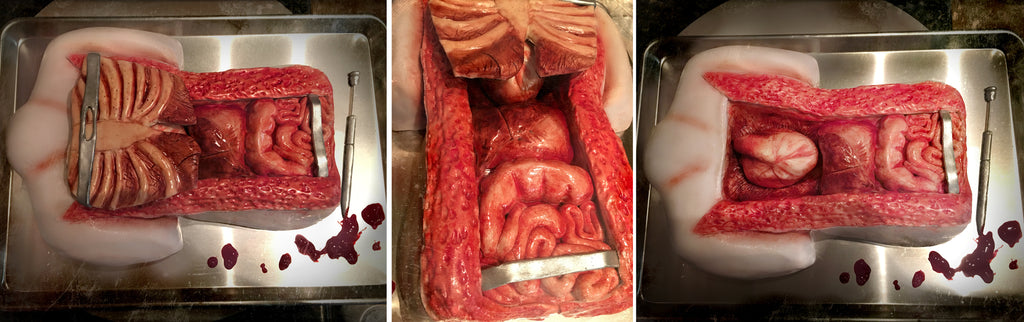
So what have I conjured up this Halloween? It only feels right to really freak them out. Give them a cake they aren't sure if they have the guts to cut into. I have decided to share with you a step-by-step on how I created this realistic anatomy cake with a set of ribs and lungs that lift off to reveal a removable bleeding heart, and modeling chocolate guts.
ON WITH IT!!
First thing's first, we need to bake some cakes! For this project, I baked two quarter sheet cakes of Red Velvet and one quarter sheet of Devil's Food. You can find my Devil's Food Cake recipe on another Innovative Sugarworks blog.
For the Red Velvet, I like to use this recipe that I found in a dusty old recipe box belonging to my mother, who may have gotten it from my great-grandmother, a great inspiration to my love for baking. I also use vanilla bean sugar, which is basically splitting a vanilla bean or two lengthwise and storing them in an appropriate container of sugar. It adds that something extra to the outcome of your cake and the longer you keep it, the more intense the sugar becomes.
You will need:
- 3 cups cake flour, sifted
- 3 cups vanilla bean sugar (or you can use regular granulated sugar)
- 1/2 cup dutch process cocoa powder
- 1 tbsp instant espresso powder (optional)
- 1/2 cup corn starch
- 1 1/2 tsp pink Himalayan sea salt
- 1 1/2 tsp baking powder
- 1 tbsp baking soda
- 1 1/2 tsp white vinegar
- 4 large eggs
- 1/2 cup unsalted butter, melted
- 1 1/2 cups buttermilk
- 1 cup milk
- 2 tsp vanilla extract
- 1 tbsp Flaming Sword Elite Color Dusts by The Sugar Art
- 1 tbsp Americolor Super Red gel food coloring
Treat a quarter sheet pan with GOOP (equal parts shortening, vegetable oil, and flour) and line 2 with parchment.
In a stand mixer, combine all dry ingredients and mix on low until combined. Add eggs, melted butter, buttermilk, milk, vinegar, vanilla and food colorings, and mix at a medium speed until completely smooth, roughly 2-3 minutes.
Pour the batter into the pans, filling 2/3rd of the way to the top. Bake at 325 for 38-44 minutes or until an inserted toothpick comes out clean.
Cool on a wire rack for 10-20 minutes before turning onto a sheet of plastic wrap. Cover completely while still warm and refrigerate to keep cake moist. Chill completely.
The best laid plans...
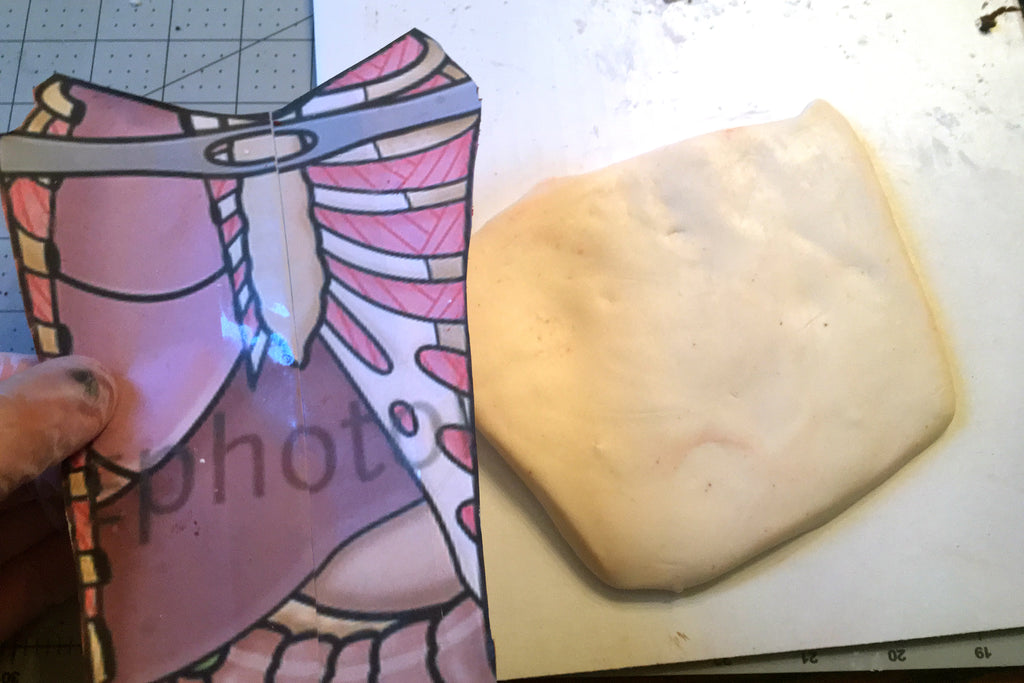
Now it's time to map out the cake! I searched a lot of images online, found a design i liked, and enlarged it enough to span 4 standard 8/12"x 11" sheets of paper. I cut them out and lined them up with each other, taping them together. There's my template!
Lay your template on a piece of 1/4" foam board and cut out a board for your sheet cakes. Now place your chilled cakes onto the board, lay the stencil on top and cut out the basic shape of your design. The colder your cakes are, the easier it will be to carve them without any breaking or crumbling. And because this guy is a big cake, I'm using my Turntable Expander. He fits pretty nicely on there and otherwise I'd be balancing boards on my turntable.
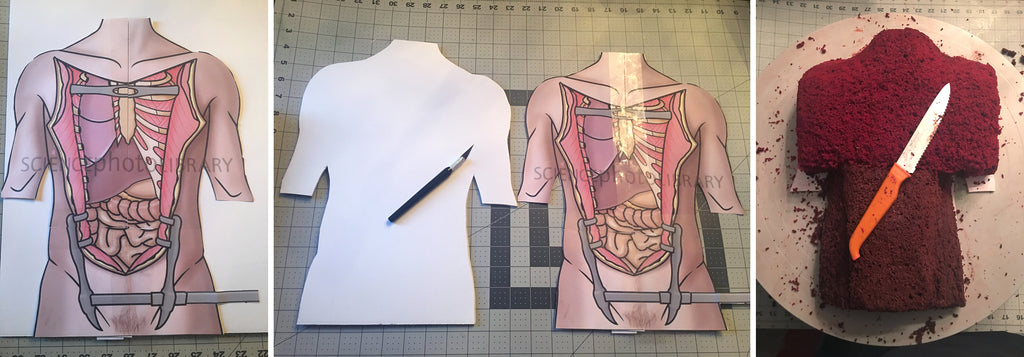
Carving out the flesh
Slowly, with a serrated bread knife, start carving some shape and dimension to your cake, being careful not to take away too much cake. Round out the shoulders, take off the edges on torso and carve in your neck and chest. When you're happy with your shape, remove the top layer.
On a clean cake board, take your top layer and cut out the "good stuff" (the GUTS!) from the template and carefully carve out the cavity. SAVE THOSE CAKE SCRAPS! You'll be using them to make the heart.

Line up your first layer of red velvet, ice with ganache or buttercream, and carefully slide the top layer of cake from the board you carved it on in its place. IF you break any pieces, it's cool. Just glue them back together with your ganache or buttercream. If, like me, you're using devil's food for the bottom half, do the same here. Ice the entire cake with a light crumb coat and chill. For the second coat, use a Sugar Smoother to get those smooth rounded out curves and if you need to, use warm water and gloved hand to smooth it out. Return to refrigerator to chill.
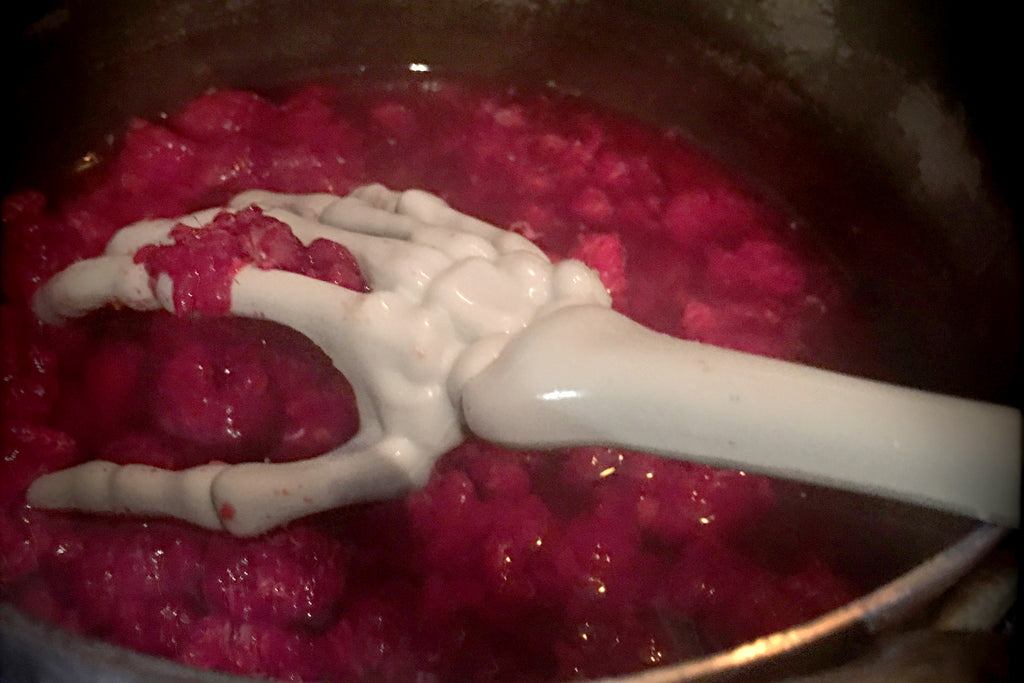
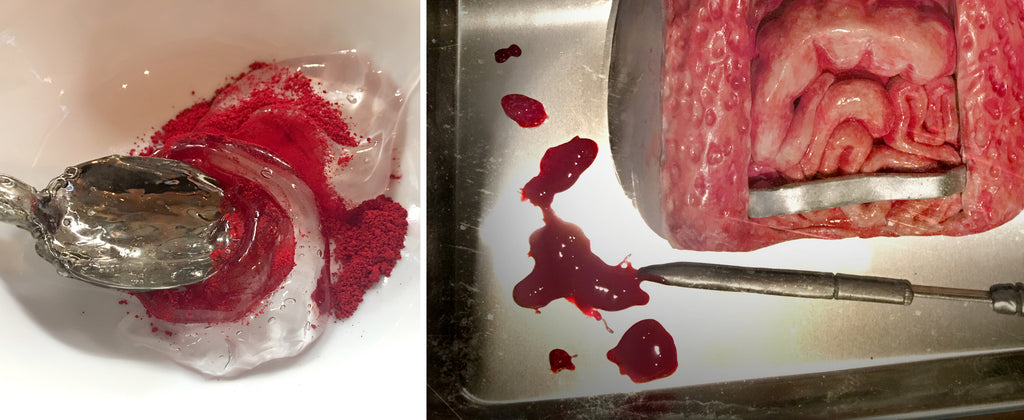
A bloody delight
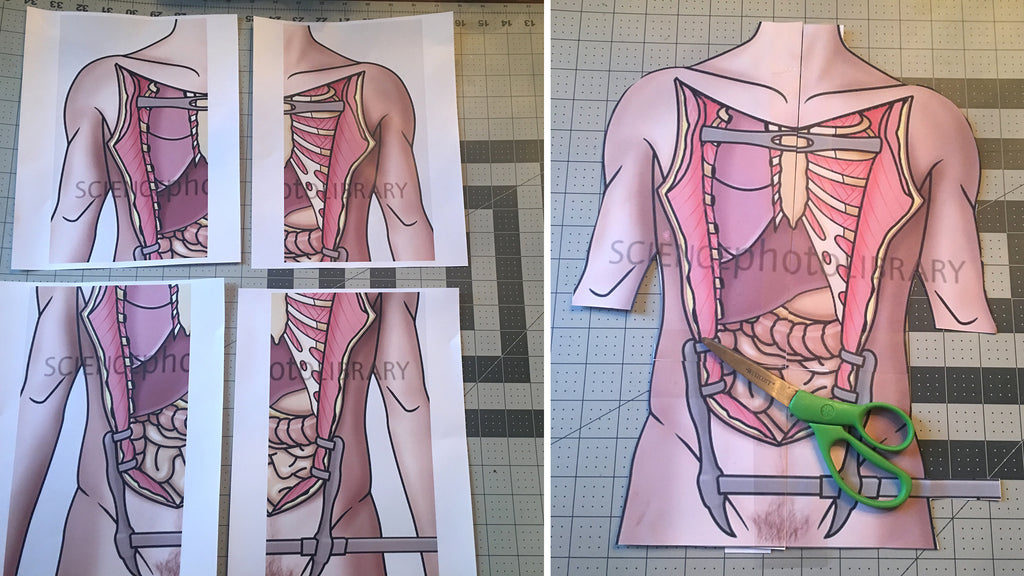
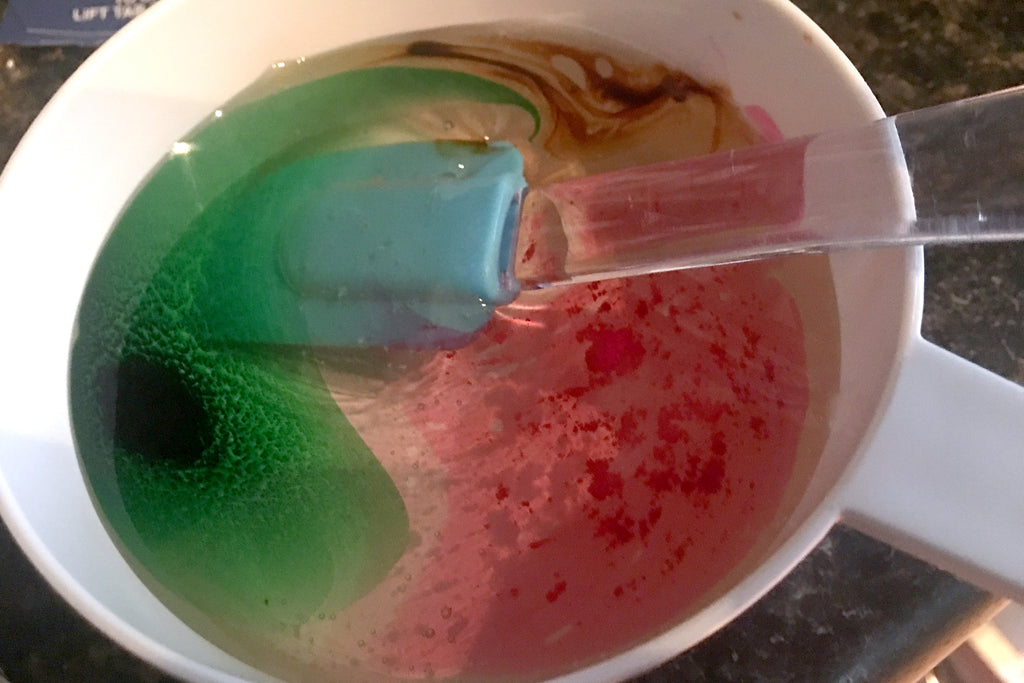
Time to make a little blood! (For the bleeding heart, of course.) In a small saucepan, combine 1 cup fresh or frozen raspberries, 1/4 cup granulated sugar, 2 tbsp water, and 1 tbsp of fresh squeezed lemon juice. Simmer until raspberries have broken down and sugar is completely dissolved. Press through a chinois or fine mesh strainer, and chill completely.
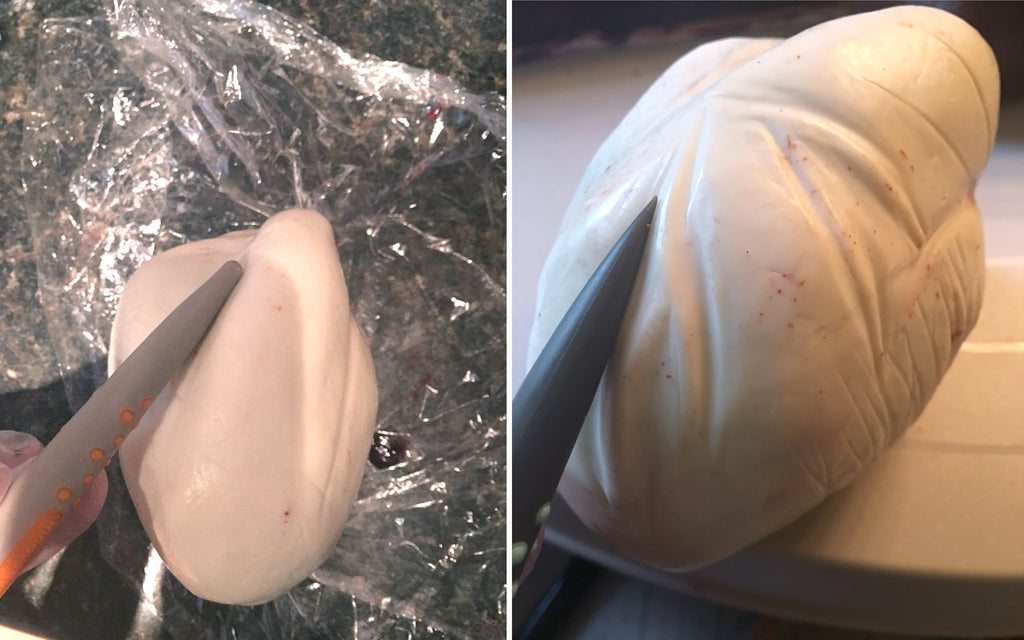
Be still my heart...
To make the heart, add ganache to some scraps of cake and combine with gloved hands until you achieve a clay like consistency. I'm never precise with this, so I would say add a tablespoon of ganache at a time until you get there.
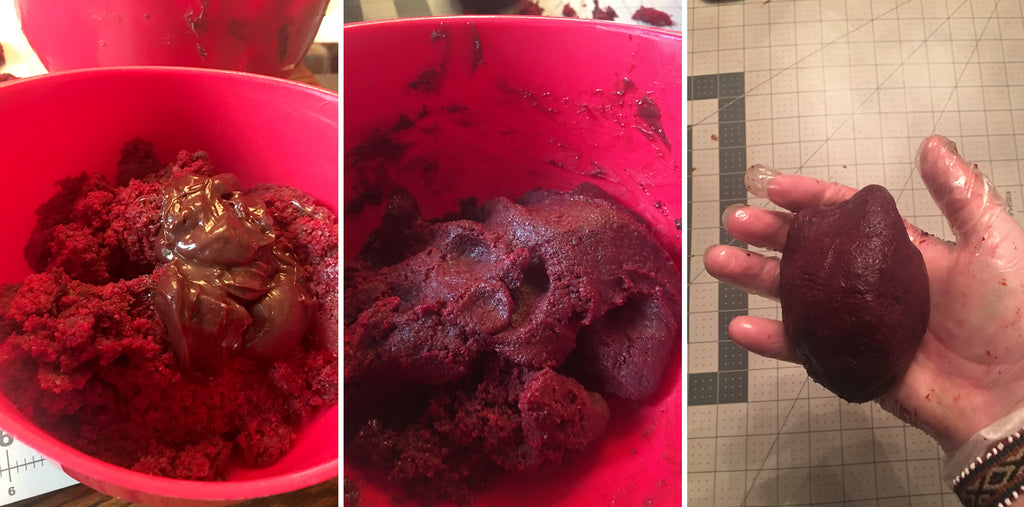
Let chill for 15 minutes. Take out a ball of your cake clay about the size of a tennis ball and roughly shape out a heart. Wrap it in plastic wrap and place in the freezer for 10-15 minutes.
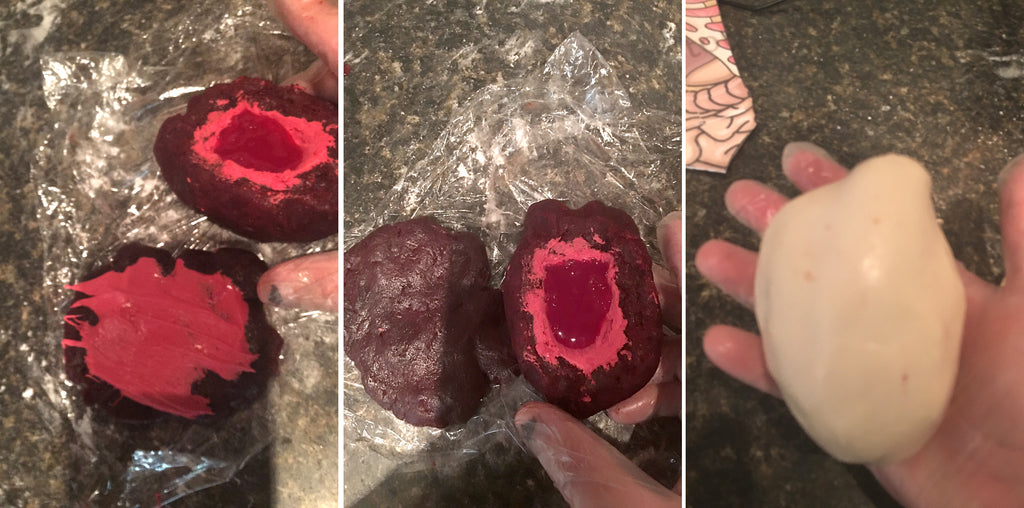
Now we add the raspberry "blood" that will ooze out when you cut into it.
Make a well in your chilled heart for the sauce. I melted some coating chocolate, tinted it with some Flaming Sword Elite Color dust, and painted the well, making sure there were no open spots.

Let that harden in the freezer for a couple of minutes, and then fill 3/4 of the way with your sauce. Normally, I cut off enough of the TOP of the heart to create my well, then I paint the underside of that top piece with more coating chocolate and while it's still melted, secure it back in place. This time, I tried it from the underside of the heart. I think slicing off the top is easier, but both work. You do what works best for you. Now you have a barrier insider your heart that keeps it from seeping into the cake clay before you cut it. Allow to chill for a few minutes, then cover with modeling chocolate.
I used the firm pointed chisel Mini-Tip Sugar Shaper to create lines for texture and muscle fibers and the soft bone chisel Mini-Tip Sugar Shaper (that's the orange one) to sculpt in some arteries and define the chambers of the heart.
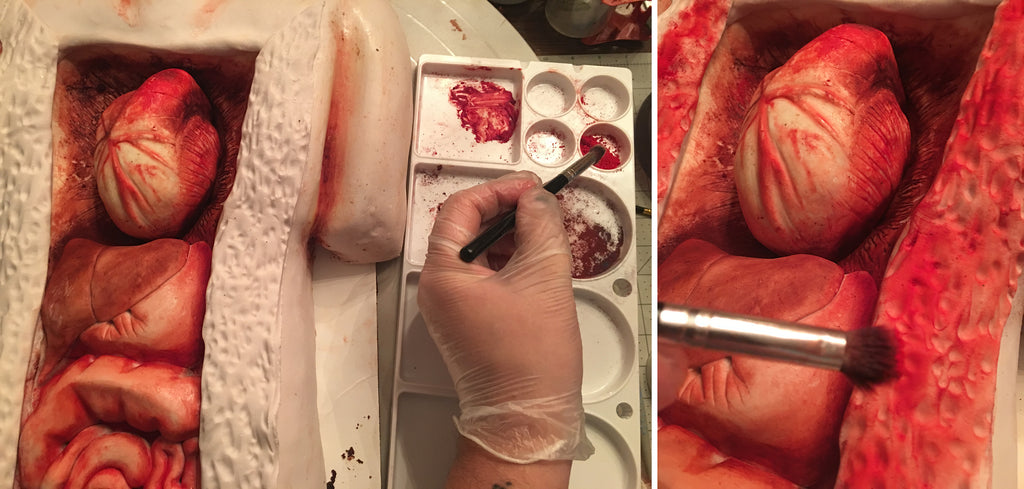
To color the heart, I used Sugarworks' Artists' Brushes to dry brush the arteries, the chambers, and along the perimeter of the heart using some more Flaming Sword Elite Color dust. Then I used a fine tip brush to add in some smaller veining. I mixed together some of the Flaming Sword and Ice Blue Elite Color dusts until I got a deeper shade of a reddish purple and went back in around the perimeter, blending it with the red to add some depth and dimension, as well as hitting spots with creases or crevices.
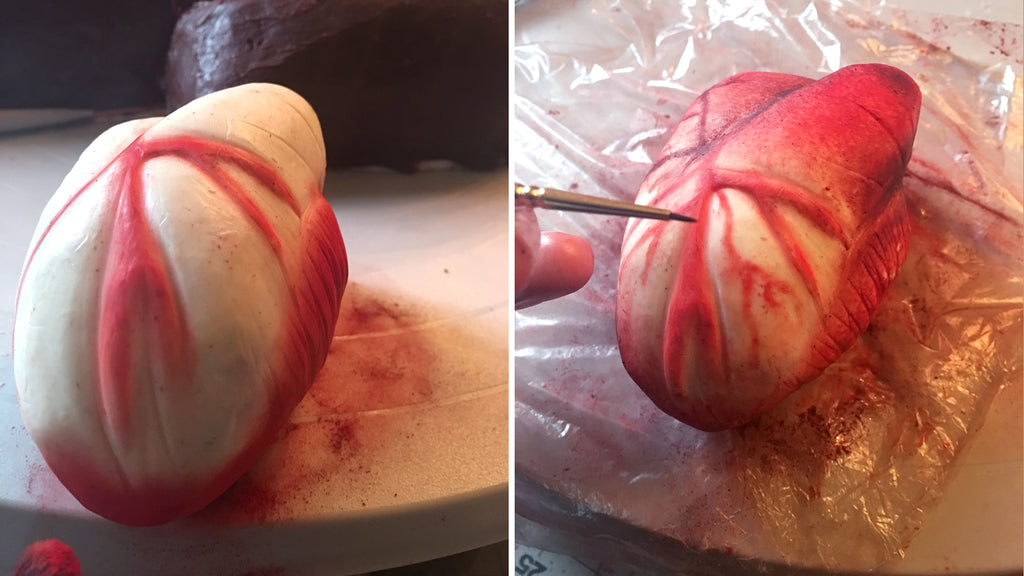
As an added option, you can also mix a bit of color dusts with vegetable shortening to create a paint. Then you can stipple on even more more color with a piece of paper towel. If you make any mistakes or add too much color, just use a clean piece of paper towel and some vegetable shortening to buff it away.
A place to keep my heart...
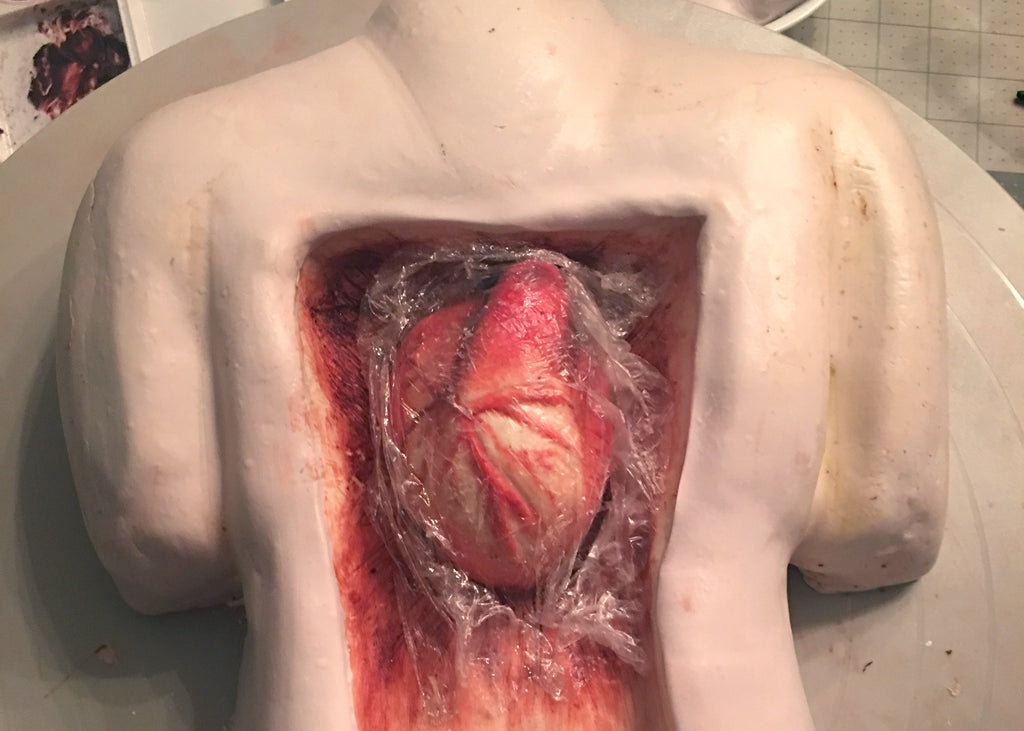
OK! Use your heart to figure out how much space you need to take out of your torso cake. Once you carve that out, it's time to cover! I decided to do this in two steps. First, I used white modeling chocolate to cover the cavity that all the goodies will be squished into.
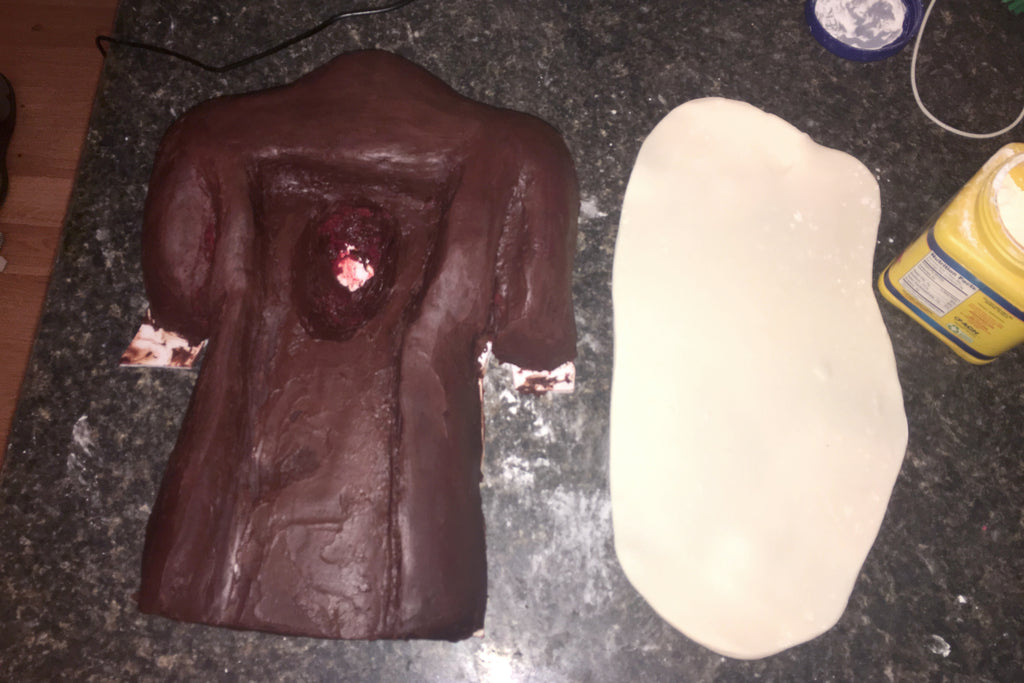
Pressing it into the hole I created for the heart, I then take the firm mini pointed tip Sugar Shaper to carve in some muscle fibers. You don't necessarily have to do this, but I wanted the cake to look cool even after the heart was ripped out. Using the same dusting and wiping away techniques as I did with the heart, I color the hole and texture I just took the time to carve in.
Check your work and see if the heart fits into its hole. Remove the heart.
Now for skin
We're going for corpse skin here, so I'm going to make my own modeling chocolate using a color combination for creepy, dead-ish skin that I've perfected with much practice:
Melt 5 cups of white candy melts in the microwave in 30 second increments. To get the "sort of dead looking, but maybe a little freshly dead" skin color with a slight translucent effect, add 2 drops of soft pink, 1 drop of leaf green, and just a toothpick dip of ivory gel colors to 1 cup of light corn syrup and heat in microwave for 20 seconds, just enough to make it runny and not so cold it shocks the melted candy.
Fold the corn syrup into the melted candy JUST UNTIL it is fully mixed and the consistency changes to a soft ice cream consistency. Turn onto a cookie sheet covered in cling film. Spread out your mixture and cover with more cling film. Leave it to cool for at least an hour.
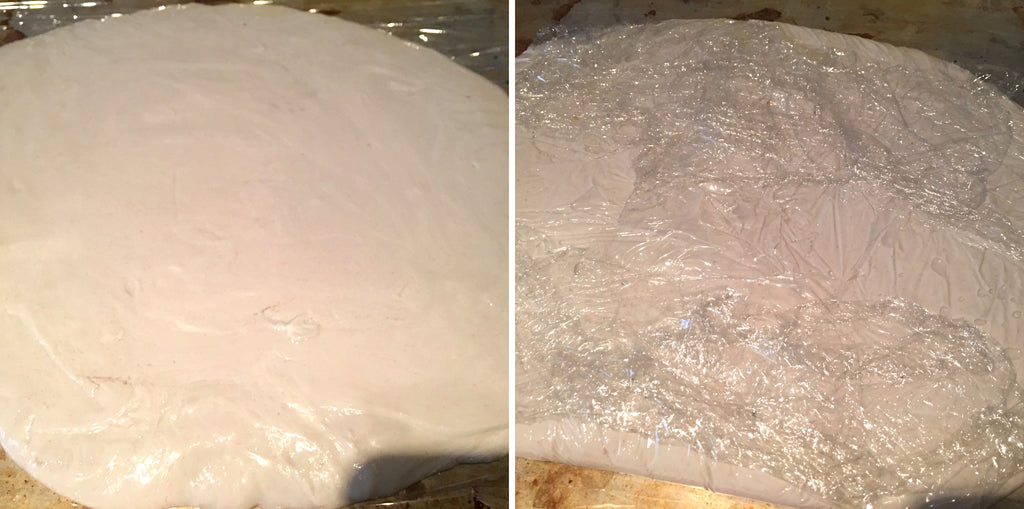
After an hour, unwrap and knead the chocolate (it will be firm) until it becomes smooth and pliable with no lumps. If you have lumps, you can pop it in the microwave for 5 seconds at a time and knead them out. Now that you have your modeling chocolate in the perfectly creepy and lifeless greyish-pink shade, knead it together with equal portions modeling chocolate to fondant until fully combined. I used Renshaw Ivory fondant.
If you used ganache to cover your cake, lightly coat the surface of the cake with vegetable shortening. On a clean surface dusted with a blend of cornstarch and confectioner's sugar, roll out your fondant/modeling chocolate to about an 1/8".
If you have the Sugarworks Artists' Turntable and Turntable Expander, this next part is SO MUCH easier. Roll your chocolate onto a dusted rolling pin and quickly cover the cake. Ensure all areas are covered and smoothed down quickly. Then, using the SOFT large bone tip Sugar Shaper, start creating the definitions of crevices in the neck, arms, etc. until it's nice, smooth, and well defined. Cut away the section that was already covered earlier for the cavity.
The guts of the matter
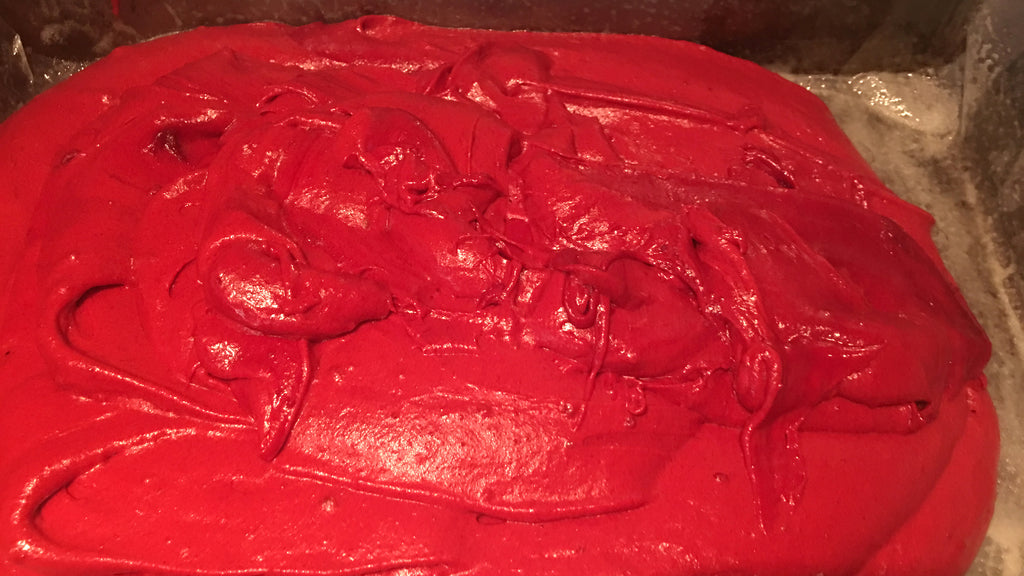
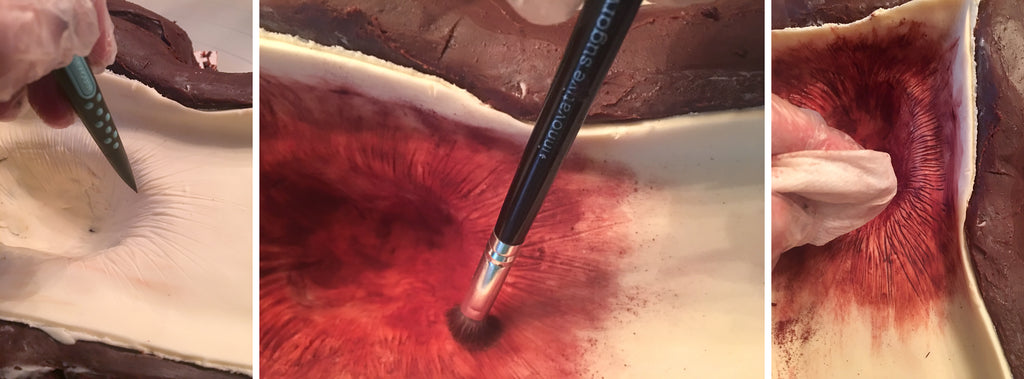
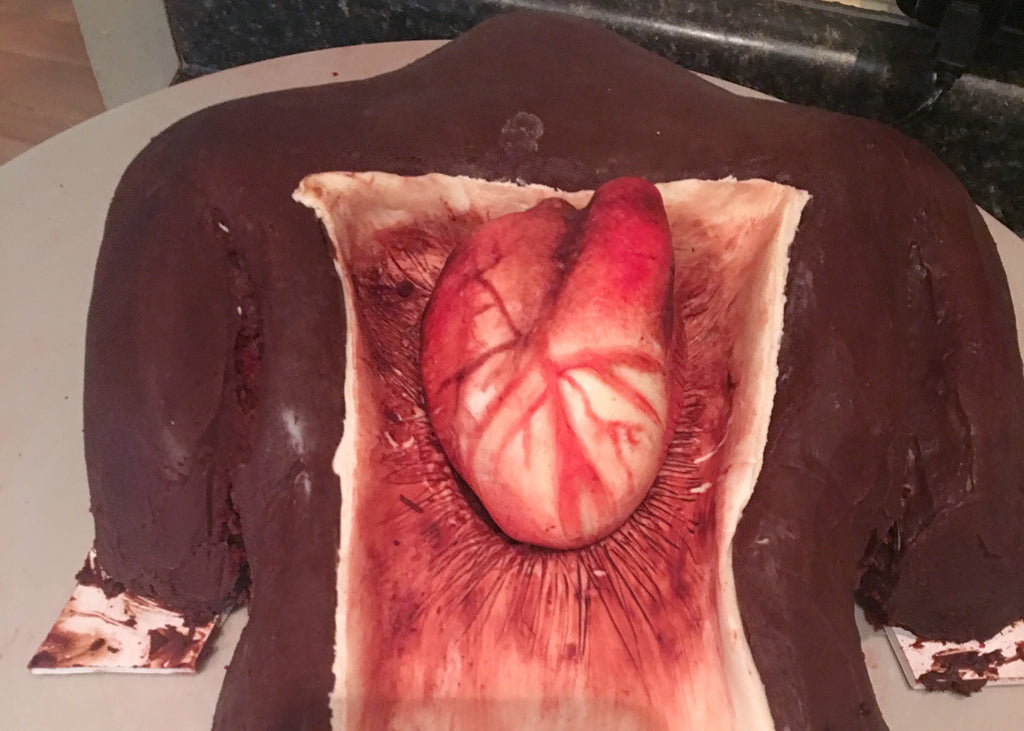
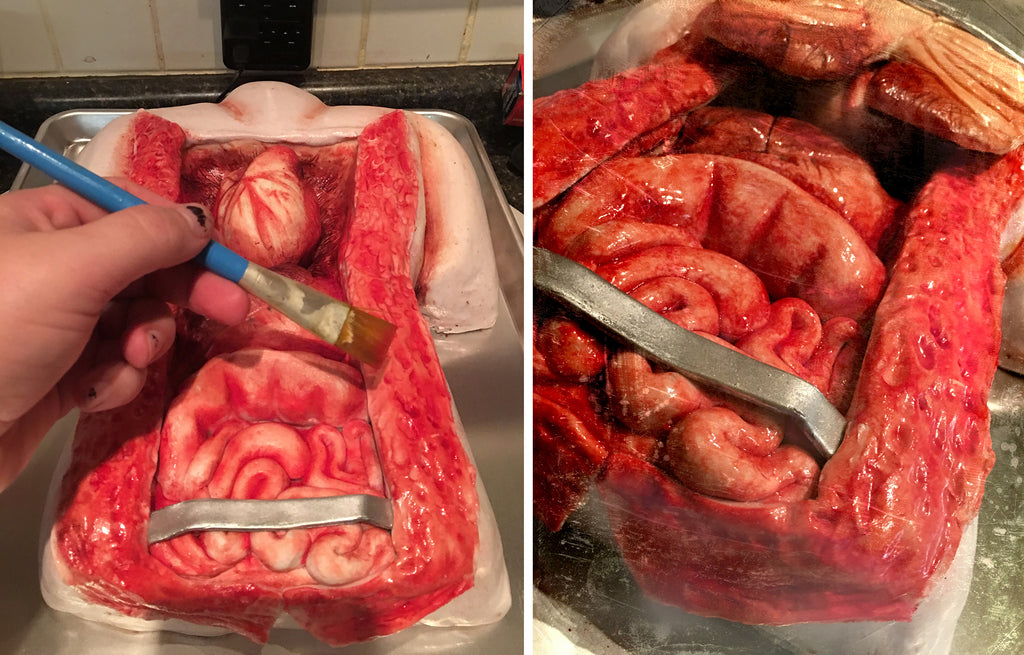
TIME FOR THE GOOD STUFF!! My client wanted the guest of honor to be able remove the heart and cut into it. But anatomically speaking, the heart is obscured by the lungs and ribs.
So first thing's first. Using the template AND your covered cake for reference, cut out a piece of cake board and cover with modeling chocolate for the lungs/ribs.
I defined the sternum and ribs with the soft bone chisel Mini-Tip Sugar Shaper. And I gave texture to the lungs and added little porous textures to the bones with the mini soft tip pointed chisel.
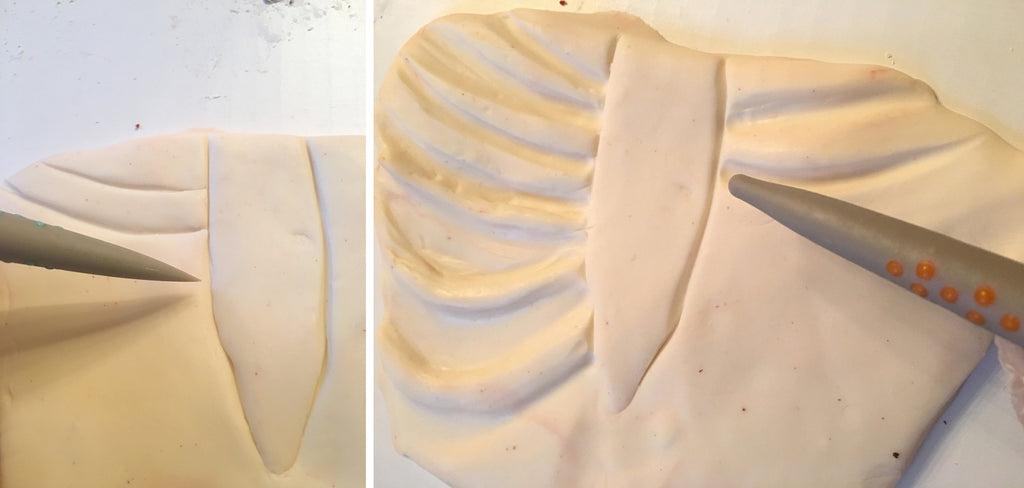
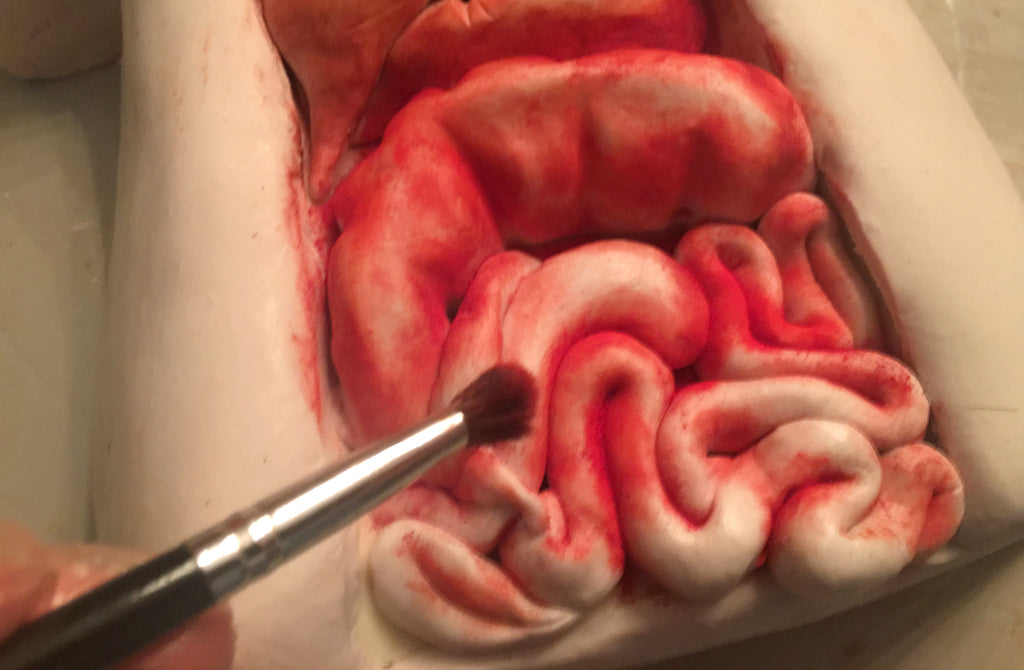
I painted the lungs with the reddish purple color dust blend i created earlier and wiped it away with some shortening and a paper towel so it just stained the chocolate and stayed in the crevices. I did this same thing with the ribs and a bit of cocoa powder mixed with corn starch.
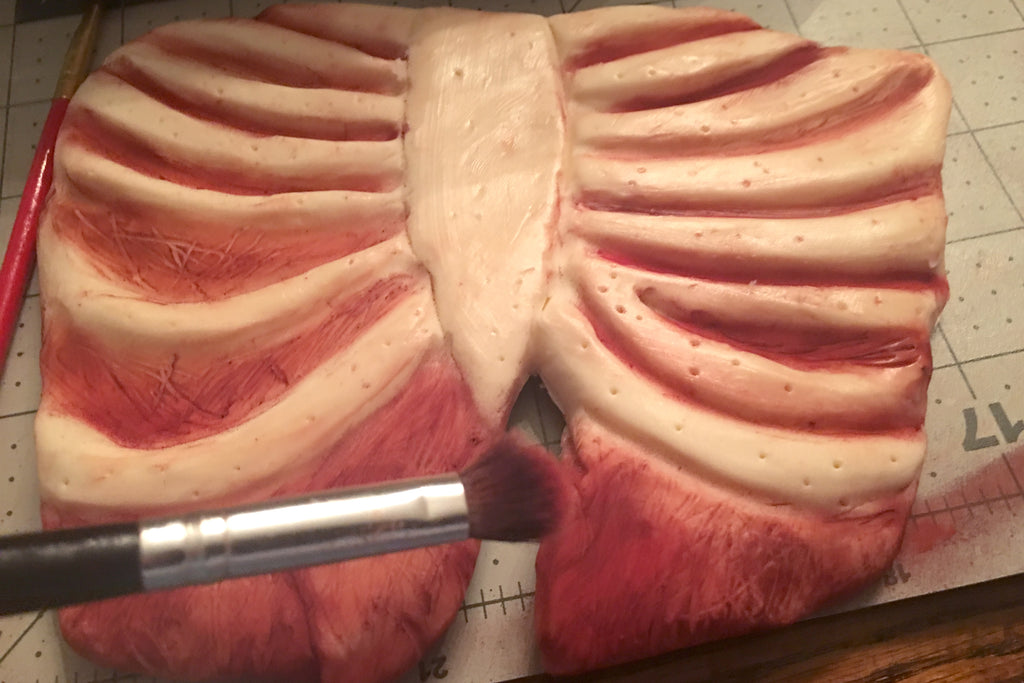
Because it is on a cake board, if the heart sits up a little, you can gently bend the board to create an arched effect of the ribs, which also add a little extra realism and dimension. Set aside.
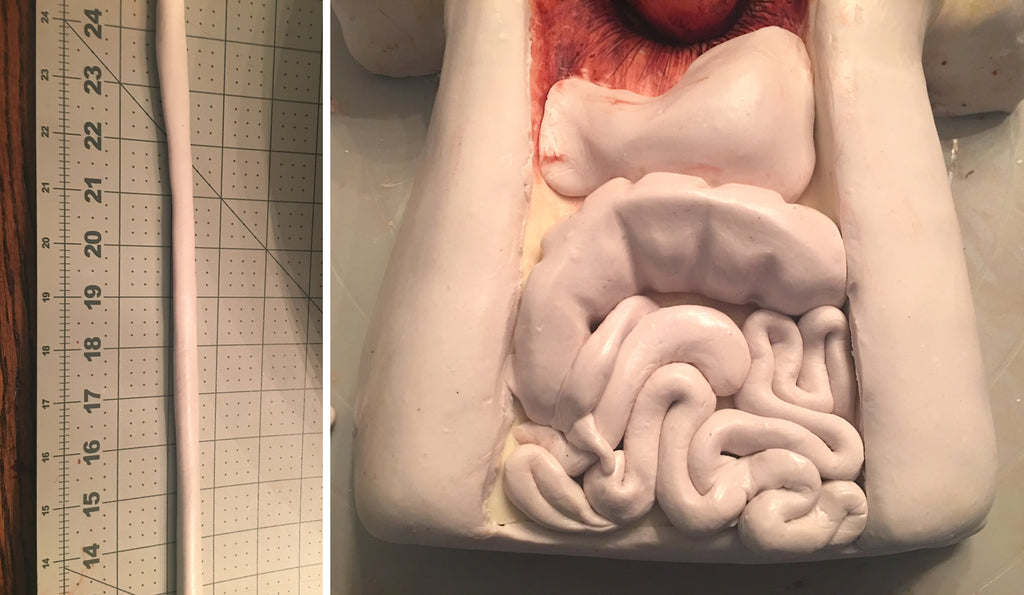
I created my organs all from the fondant chocolate blend that I created earlier, in the order they fit into the body. In other words, some organs are on top of and/or obscure others. Once they are in, they are in. So take that into account, pull out your old anatomy textbooks, (or, you know- Google it because it's 2018...) and save yourself a headache.
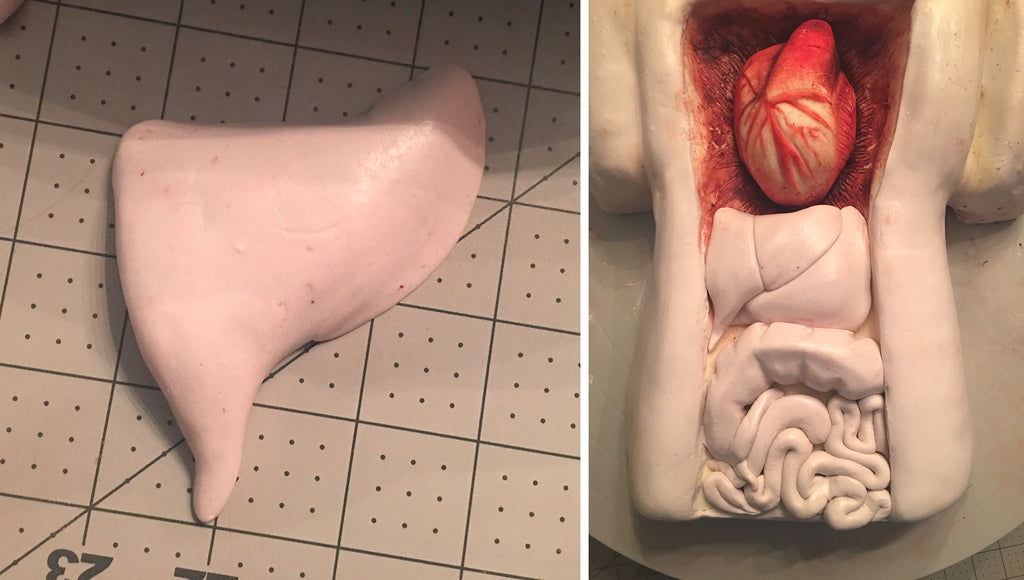
For me, I put the heart in place, and started with the stomach, creating a general shape and adding a few wrinkles and creases. Next up, the large intestine. I hand shaped a piece to fit that was roughly a banana and placed it in the cavity under the stomach.

I then shaped the large intestine using the soft tip bone chisel Sugar Shaper to get the shape I wanted.
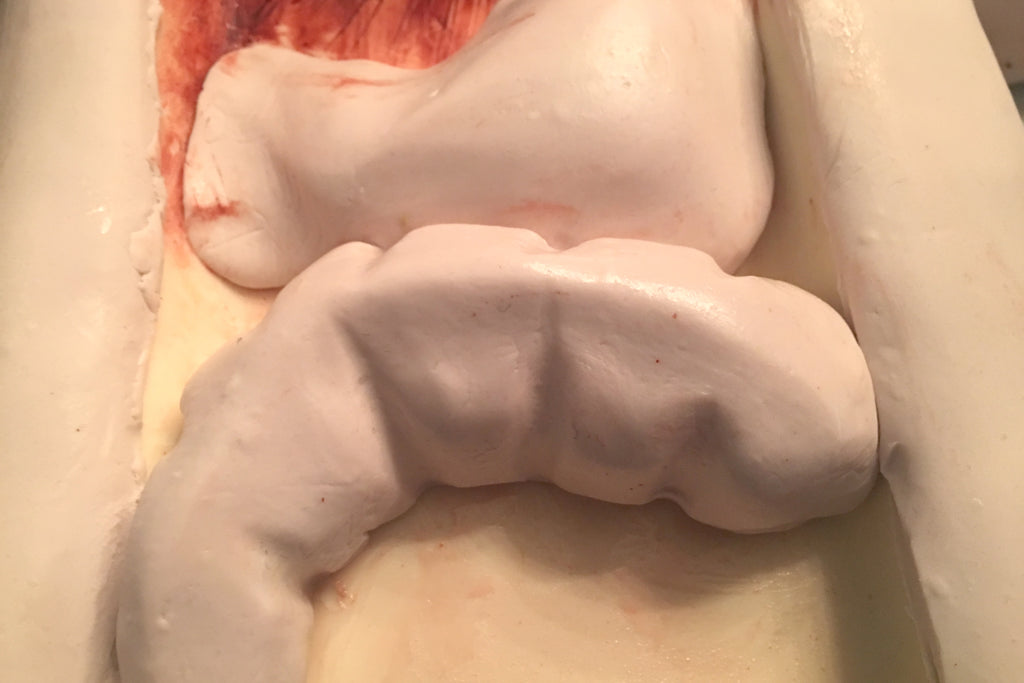
For the small intestines, roll out a long tube of chocolate slightly thicker than a pencil. I found it easier to cut that into sections and just kind of work them into their rightful home, watching the curves and turns I saw in the template.
For the liver, I essentially paid attention to the template and created what I felt best resembled a liver....and maybe a chicken breast, going back to check and see that it fit it neatly under the heart, above the large intestine, and slightly overlapping the stomach.
I painted everything with the same techniques and color palette as earlier with the heart. The liver was exclusively the purple color, while the rest had a little of both the purple and the red.

After checking to see that the ribs and lungs fit nicely once everything was added in, I used some remaining pieces of the homemade modeling chocolate to create the skin that had to be cut away to reveal the organs. To give it that gnarled fatty look of the skin tissue, I used both ends of the firm regular AND Mini-Tip Sugar Shapers bone chisels.

Cut them to size and secure with a bit of water. Once again, I used the dust and wipe technique here.
Finishing touches
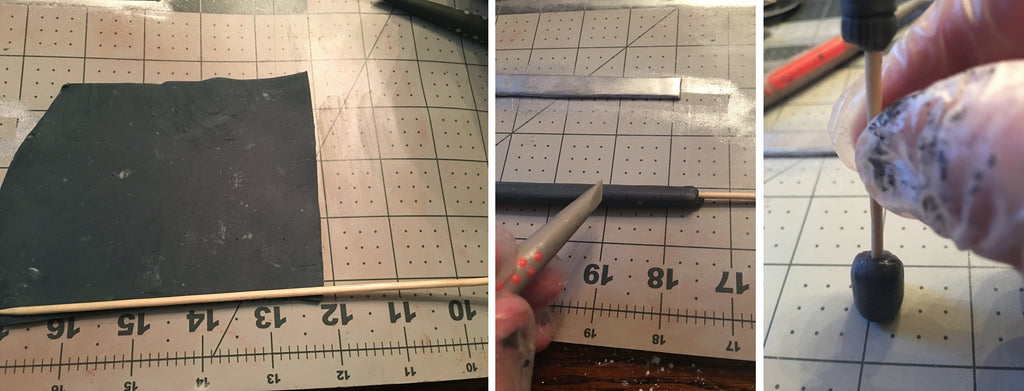
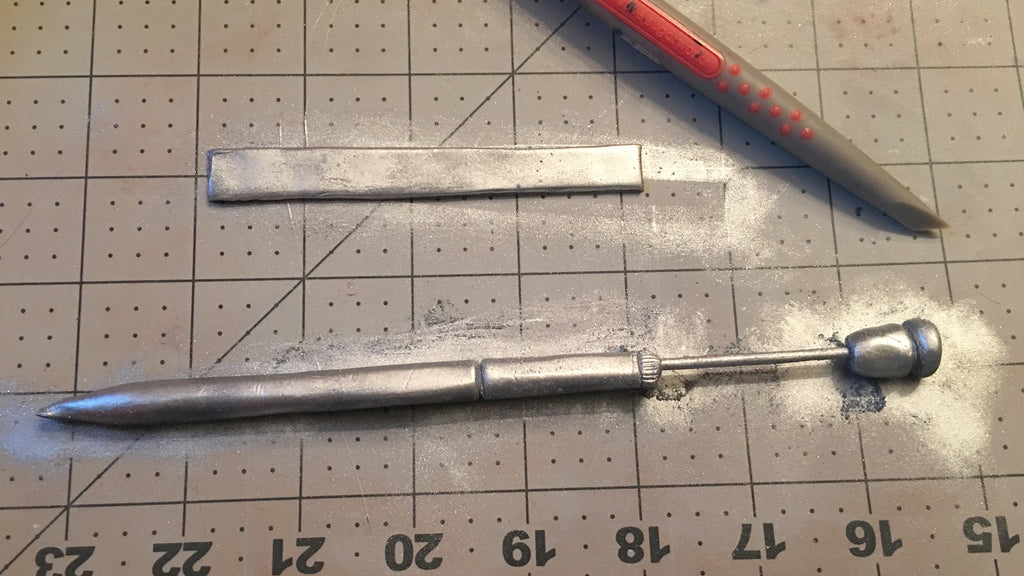
I created the clamps that hold open the chest and abdomen by tinting some modeling chocolate to a pewter color, then cut them out with sharp blade and dusted with metallic silver color dust.
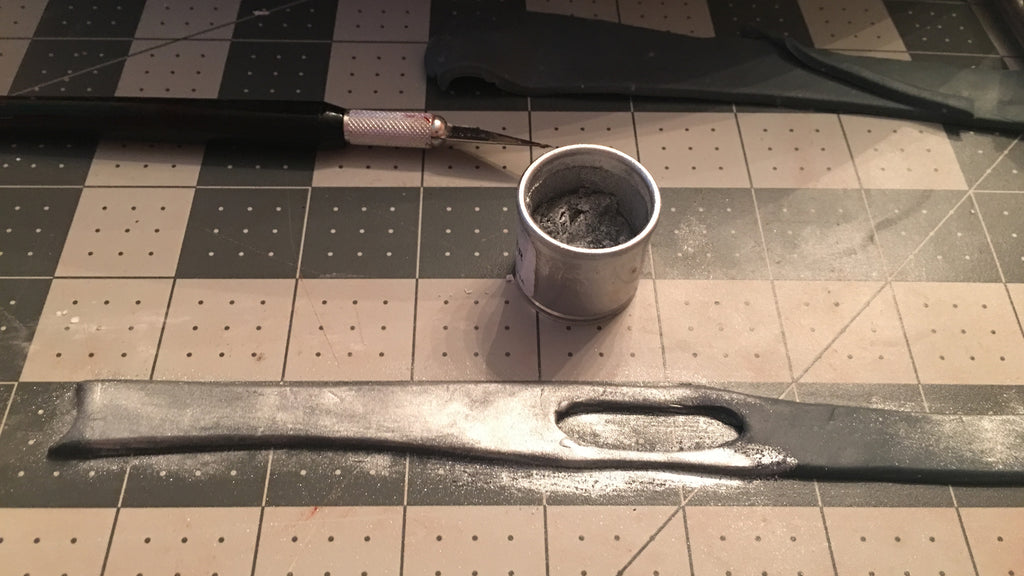
And because the devil is in the details, (and this IS the season for devils!) I used a skewer and more of the pewter chocolate to create a trocar. A trocar is a surgical instrument with a three-sided cutting point enclosed in a tube, used for withdrawing fluid from a body cavity. I had one on hand and, what can I say? It inspired me.
By adding a touch of Flaming Sword Elite Color dust to some clear piping gel, I made a little blood to spatter on the cake board. After conferring with my client and to add to the realism, I decided the best option for a cake board was to use a stainless steel tray.
For that final creepy effect, I SPARINGLY and methodically used an alternation of vegetable oil and confectioner's glaze to give all of the organs and the ribcage that wet, freshly splayed open look.
THERE YOU HAVE IT. This cake was fun, challenging, and most definitely wowed the crowd. If you're looking to up your Halloween game this year, this should do the trick.
Oh, and HEY....catch me on season 4 of Food Network's Halloween Baking Championship and watch me compete against other talented bakers for $25,000, airing Monday nights at 9/8C.
HAPPY HALLOWEEN!!!!
Yours CRUELLY,
King of Halloween.....I mean....Andrew Fuller.
We hope you were super grossed out by this dissectable anatomy cake! And we hope you're now inspired to make something ghastly yourself this Halloween! If you want to see more of Andrew's weird, kooky, creepy, and gruesome edibles, here's where you can find him:
Facebook: @guymeetscake
Instagram: @guymeetscake
And check out his new collaborative project, Sugar Freakshow!
And if you want to see the cutting of that bleeding heart, you can watch the video his client shot on Facebook!