We are super excited to host Breanna and Bonnie of Arizona's Inspired Sugar as this month's guest artists! Breanna and Bonnie love all things related to Sugar Art and are always on the lookout for fun new techniques. They're making waves with their imagination and versatility- bringing a wide range of styles, ideas, and techniques into their craft. You can watch them bringing their skills to the competition stage on Season 1, Episode 1 of Netflix’s Sugar Rush.
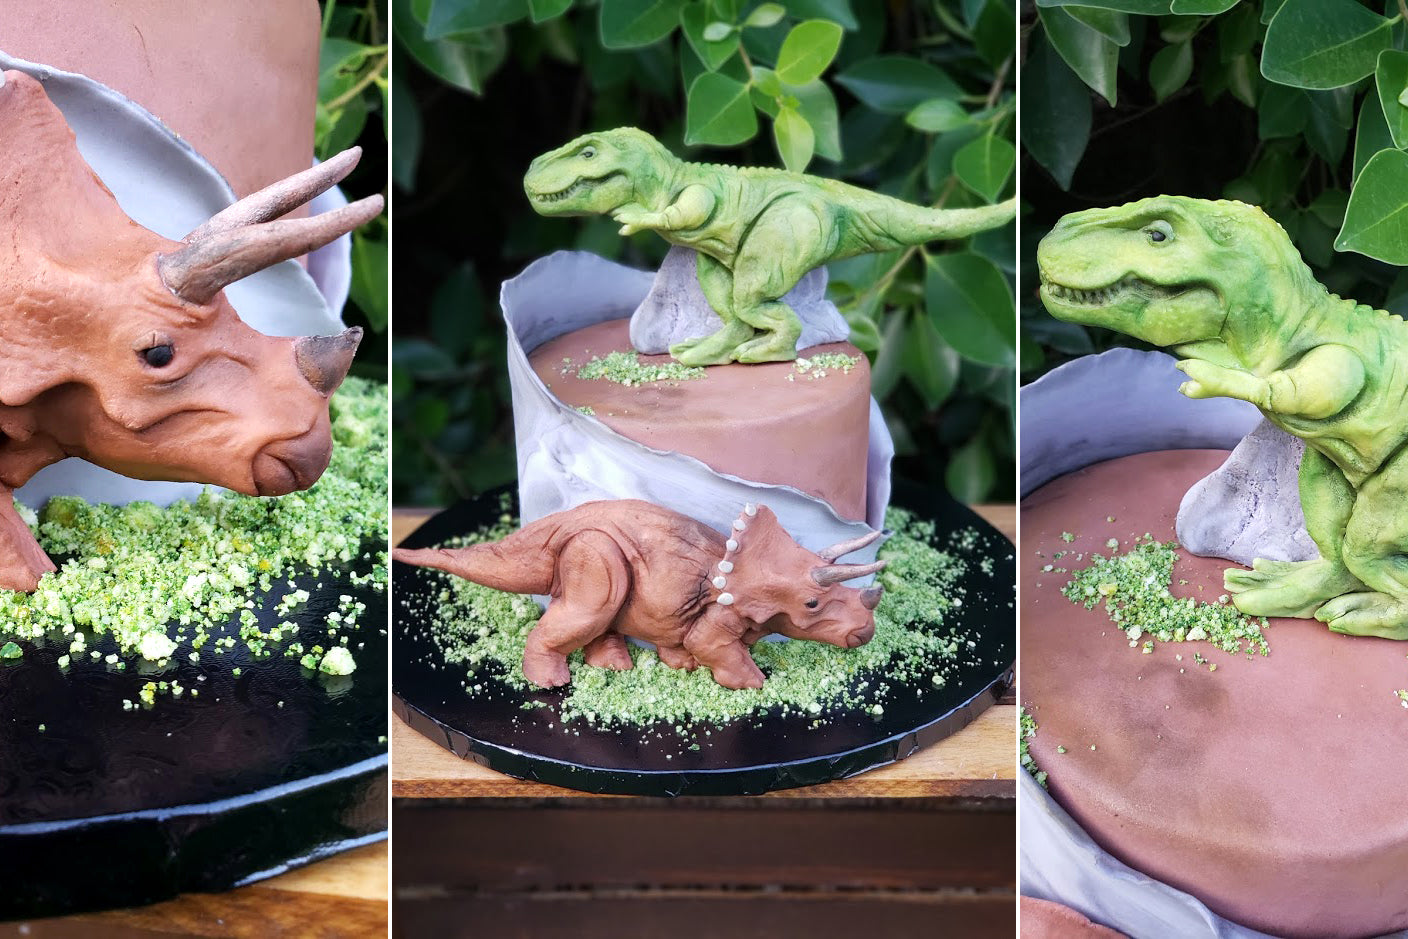
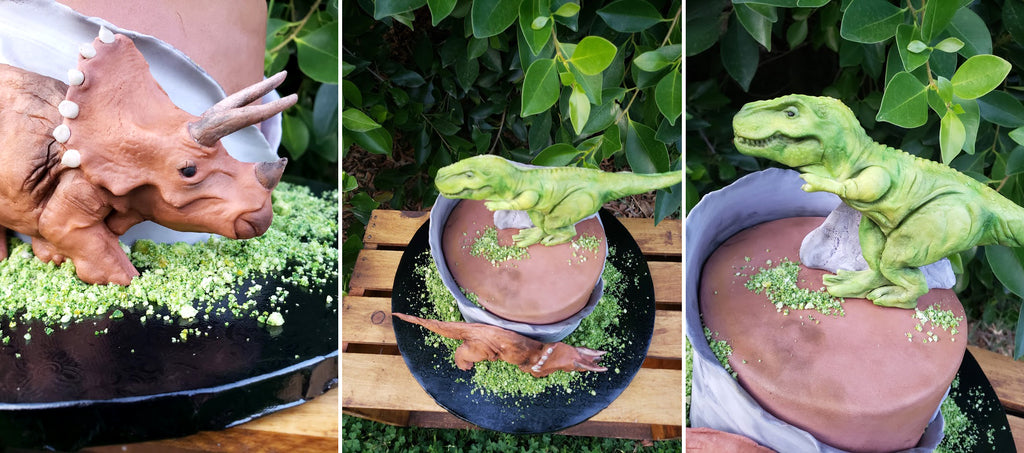
Today Breanna and Bonnie are showing us how they made a customer's dream of realistic 3d dinosaurs a reality without breaking the customer's budget. These dinos are fun, realistic, and surprisingly simple. Check it out, and give 'em a try the next time someone orders a Jurassic BDay cake!
Supplies:
- Plastic Toy Dinosaurs
- Silicone Mold Putty
- Sugar Shapers
- Utility Knife
- Fondant, Gum Paste or Modeling Chocolate
- Tylose/CMC powder (if using fondant)
- Piping Gel or Gum Glue
- Edible Dusts
- Paintbrush
We are so excited to share with you our process for making realistic Sugar Dinosaurs! We discovered this technique when we had a client who really loved the idea of having 3D elements on her cake, but needed to keep it on a 2D budget. Her son was adamant that he did not want cutesy creatures on his cake- after all he was turning 7! They also didn’t want to add plastic toys.
So, we set out to see if we could find a quick and easy way to make some awesome looking dinosaurs without spending hours and hours sculpting. Having never made our own molds before…this was an adventure that surprised us with how quick and easy it actually was!
Part of what makes these so simple is the fact that they are not 360 degrees sculpted. The are flat on the back side, which was fine by us because we knew one would be attached to the side of the cake and the other to a big rock on top. We weren’t particularly concerned with there being a “backside”- the main thing was making a cool design quickly!
Step 1
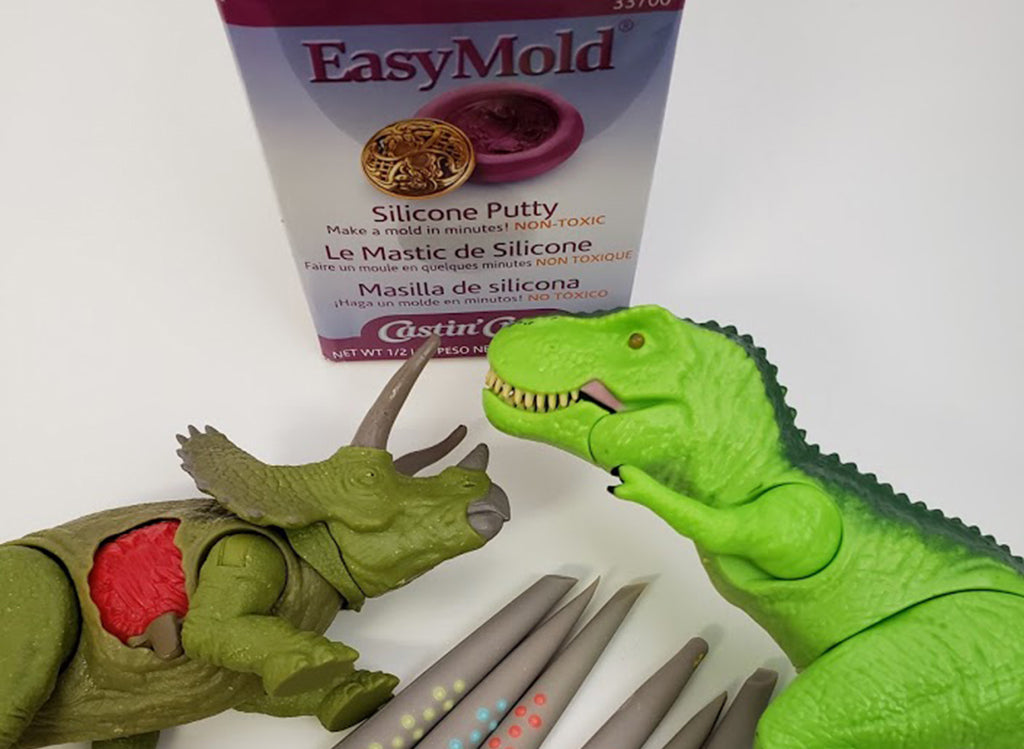
Our local craft store carries this product called Easy Mold for about $24. This product is food grade non-toxic putty and is single use- meaning once you shape it, it can’t be reshaped into something else. There are a ton of other really awesome silicone molding materials out there though, so feel free to use whichever silicone mold putty you prefer.
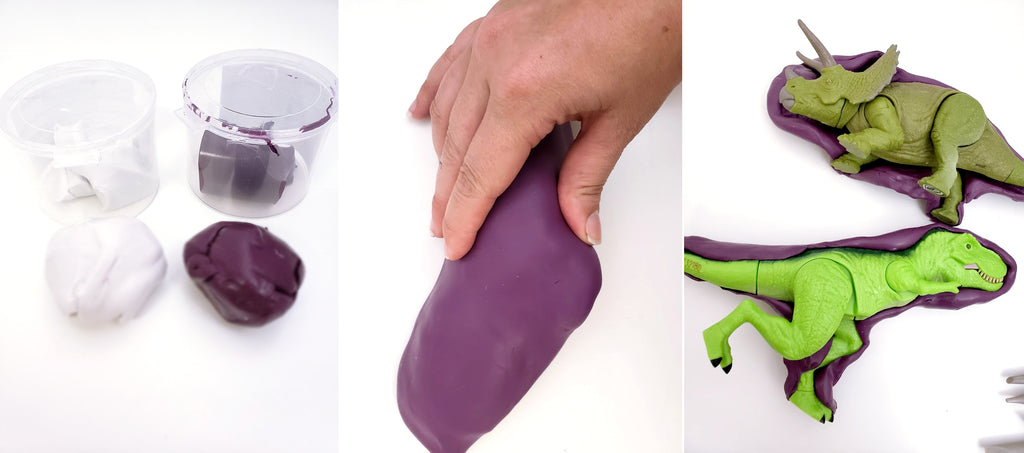
We picked up two inexpensive plastic dinosaurs from Walmart (one was $6 and one was $8). Keep in mind that the size you pick is the exact size your mold will be, so plan accordingly. Make sure to clean them and let them fully dry.
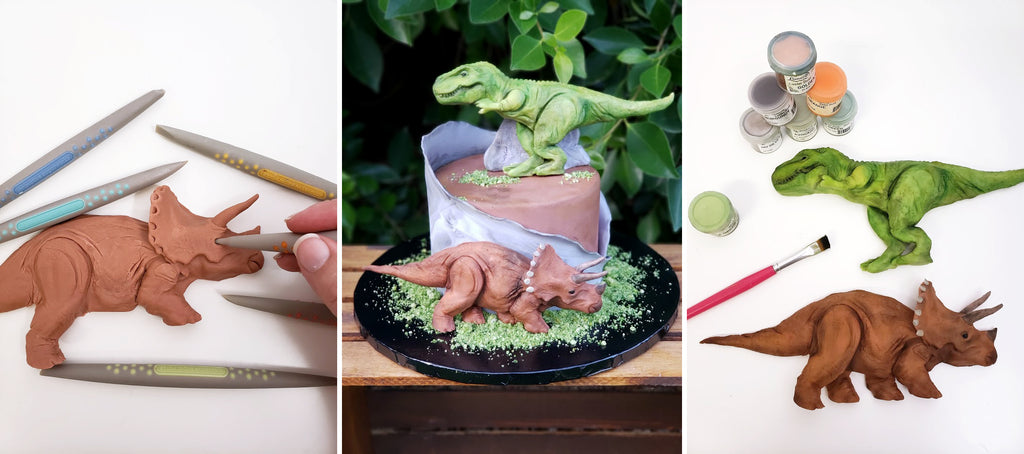
Gather up your Sugar Shapers and prepare to have a good time!
Step 2
The Easy Mold comes with ½ lb of product which is split into 2 containers- white and dark purple. Our toys were about 6-7” in length, so one box was enough for both molds.
Remove half of each color and knead together quickly. Once you start mixing them together you only have about 3 minutes to work with this before it sets, so make sure you are READY!
Roll into a log the approximate length and height of your toy, and about ¾” thick. You do not want to break it into pieces and try to add it in stages, it needs to be one solid piece of silicone. It will end up being a bit thicker around the edges. Just keep in mind that you do not want any super thin areas that could possibly tear, so if it looks thin, just work quickly to push the product in from the edges to thicken up the center.
Now, since we are only going to make one side of the Dinosaur, you don’t want to cover the entire toy. Just enough to get one arm/leg and a full body profile. Press on the putty firmly because you want to pick up all those awesome details from the toys. We wrapped around the legs a bit to make sure to get as much of the shape as possible. Just keep in mind that you need to be able to remove the toy.
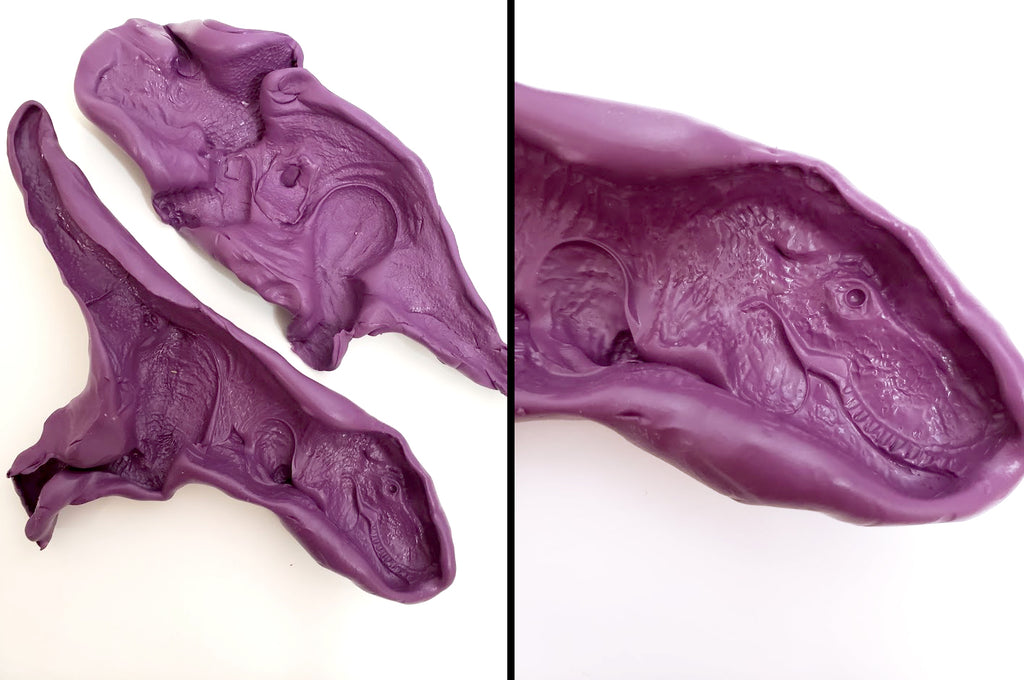
Remember- this sets in 3 minutes- so you have to be quick about it. Focus on getting the general shape. Now set it aside and don’t mess with it for 30 minutes, until it has time to set fully. Then remove your dino toy and be amazed at all the fabulous details!
Step 3
Woo! Time to mold! Feel free to use your favorite medium to create your dinos. We used fondant with about a tablespoon of Tylose added. Yeah…lots. You could also use some modeling chocolate or gum paste. The idea is that you want a very firm medium that will keep its shape as you pull it out of the mold, while allowing you to add additional detailing.
Start with a pale shade of brown or green and roll it into the general shape of your mold. Then start pressing it in. Be sure to really press it into the face, arms and legs. Don’t be surprised if small details like the T-Rex’s tiny arms don’t come out though, you can add that in later. Clean up around the edges as much as you can. We like to kind of roll the fondant back from the edge to get a softer, less blunt look.

Flip your mold over so the flat side is on your table, then pull the mold gently up and off your fondant. Voila! This is a nice starter Dino for you to work with! No long hours of molding proportions, or struggling to get the face to stop looking like Barney.

Step 4
Now for the super fun part! Get out those Sugar Shapers and start to add in extra details! Set your toy Dino in front of you to use as a guide and start to work in extra wrinkles and deepen creases. We like to press in the eye and add a small ball of black fondant and a little eyelid to make the face extra realistic.
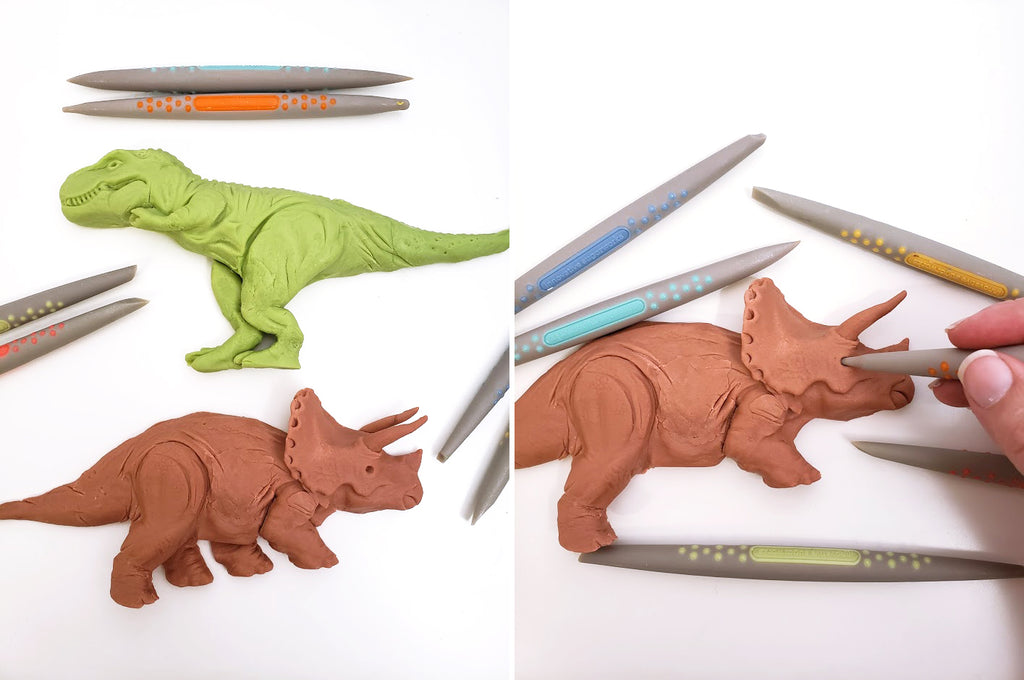
You may need to use a utility knife to cut off any extra fondant that doesn’t belong. If you take a close look at the area on the Triceratops between the font leg and the neck, you can see where there was a bit extra that didn’t get removed when we were cleaning up the edges and just needs to be cut off.
You can also see that this T-Rex’s arm did not survive the unmolding, so we had to fix it up a bit by rolling a little log and cutting the end to make a hand.
Now you are going to put your Molds to use a second time and make another set of arms, legs and horns. (We didn’t bother making a second arm for the T-Rex but you certainly can if you are feeling bad for his situation.)

Just press a bit of fondant into the molds, going up a little further than you want to show from the front. You are going to attach it to the body from behind (the flat side), with a bit of gum glue or piping gel, so you need a little extra length to work with.
Step 5
Dust with your favorite petal and luster dusts to bring out all those fabulous details!
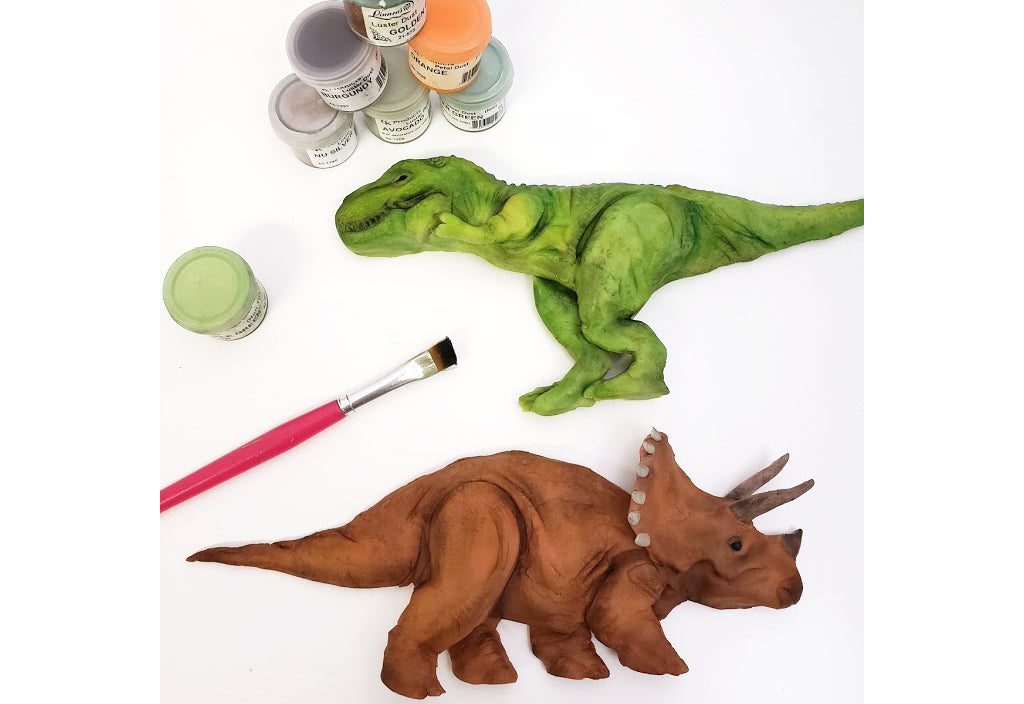
We suggest starting with your lighter, highlighting colors. For example, on T-Rex we went in with yellow first, then added in shades of green, and ended with hints of browns and finally black. The darker colors really help all the texture to pop, however you don’t want to go crazy here with them. By adding a bit of dark brown to the creases around the arms and legs, it quickly makes your creatures so much more lifelike!
We also went in and added a few gray horns to the Triceratops and made sure to shade those a bit too. Dust is magic here folks. Don’t skip this step because this is what makes all the work the Sugar Shapers did really shine!
Step 6
Let them dry until they are firm enough to attach to the cake without drooping, or if you want to be able to bend them to fit the rounded sides, then make sure to add it right away. If you’re like us…and you went a little crazy with the Tylose…maybe you can add it to the cake within the hour. We are in Arizona though, so things get dry quick here.
We attached the Triceratops to the sides with a bit of piping gel. The T-Rex looks best if he has something else hanging out on top of the cake with him. This could be a Volcano, some trees, or if you are feeling super inspired like we were- a big rock. You could make this out of rice cereal if you want to cover a lot of ground or just a bit of fondant. The important part here is to help give him something to lean against in support and it also helps cover up the fact that his backside is not 3D.
We stuck a dowel through the rock into the cake with about ½” left for him to stick onto to hold him up. You don’t want to put a lot of pressure on those little legs.
There you have it! We hope this helps you the next time you need to create a realistic dinosaur! Have fun molding and Happy Baking!
We hope you enjoyed this fantastic tutorial by Breanna and Bonnie of Inspired Sugar! And we also hope you yourself are now Inspired to try your hands at molded cake toppers!
If you want to see more of Breanna and Bonnie's excellent work, follow them online here:
Web: inspiredsugarcakes.com
Facebook: facebook.com/inspiredsugar
Instagram: @inspiredsugar