Sugarworks Blog
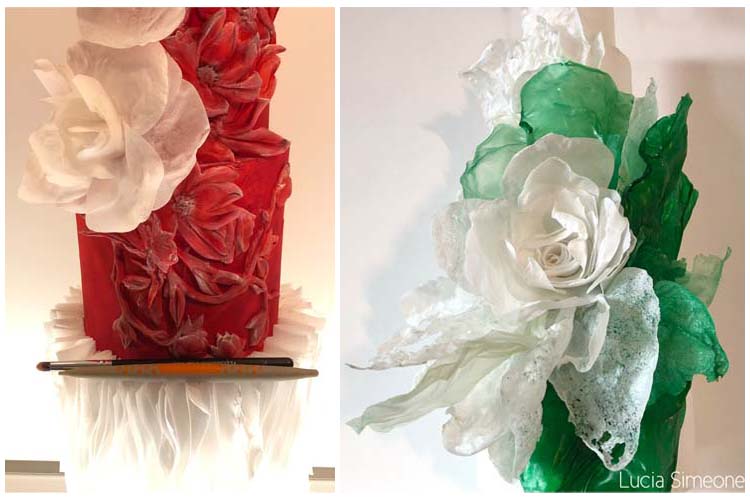
How to make a Wafer Paper Rose with Lucia Simeone
- Wafer Paper, thin 0.30 mm
- Water
- Scissors
- Spray Bottle (Vaporizer)
- Sugar Shapers, Firm
- Fine Detail Brushes


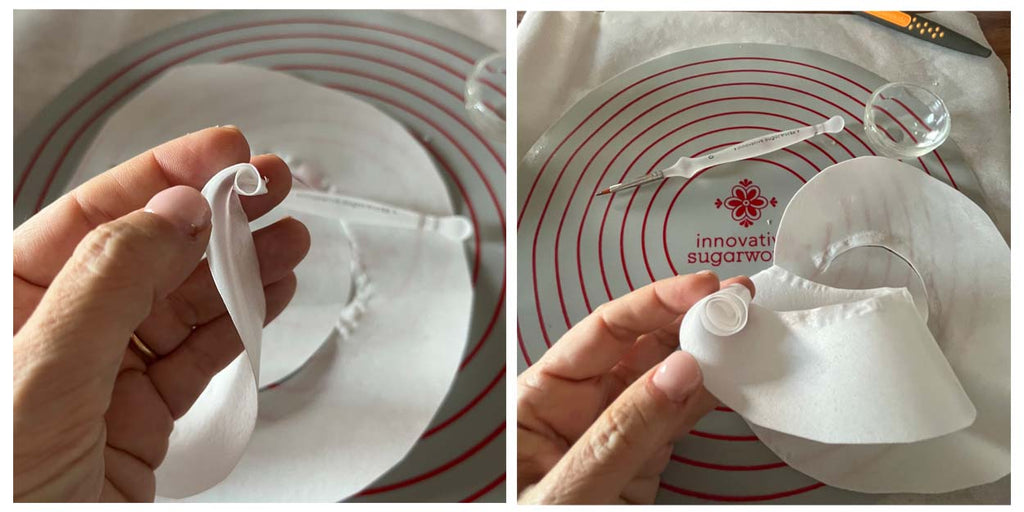


Cut a circular shape of wafer paper and use it as a base to close the rose. Let it dry very well.

I hope you enjoyed this little tutorial...see you soon, Lucia!


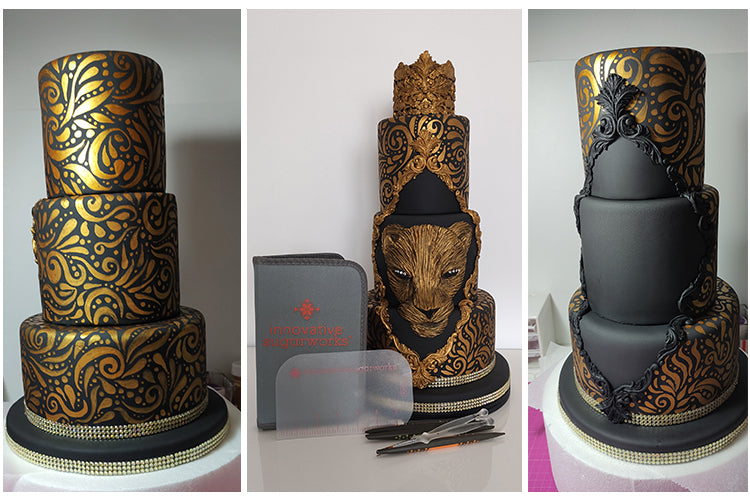
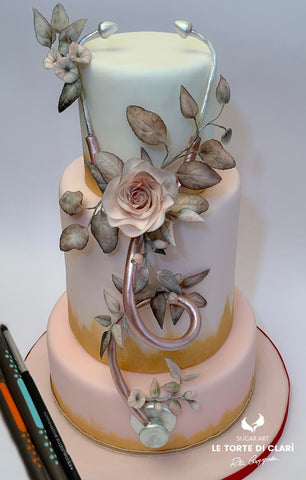
Painting Decorative Elements with Belinda Lucidi

I will also use Styrofoam bases, covering each one with black sugar paste. The large Sugar Smoothers are perfect for removing excess fondant and creating a a clean cut when covering cakes. They are excellent for curved and flat surfaces.

I will be hand painting this cake based on my chosen decoration, which is inspired by damask textures. Before I start painting, I gently mark off the space I will be leaving blank. I use pins to act as guides to help me outline the area of the central rhombus. Then making the most gentle of impressions, I trace the border where I will be embellishing with my textured sugar paste frame. Using the edible gold color, I start painting the decoration by first referencing the pattern. However, the pattern gradually becomes my own creation as I continue to fill in the spaces on the cake.

Painting free hand like this is, is a job of precision and having these wonderful brushes helps me speed it up while still being able to be very precise. These brushes are ideal for applying edible color dusts, powers, and paints.

After the intense painting session, I will add even more detail by applying different decorations modeled in black sugar paste. Same thing for the Crown!

AND THIS IS THE FINAL RESULT!!!!
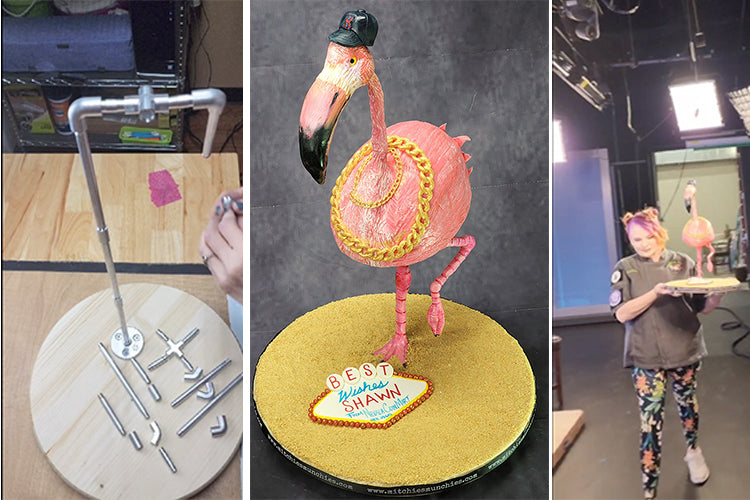
Flamingo with Chef Mitchie
How many Sugarworks products does it take to build a flamingo? Let's find out!
For this project, I used several Sugar Structure components to build the flamingo's legs and belly. I was inspired by fellow Brand Ambassador Belinda Lucidi's video tutorial, which you can check out here if you haven't seen it yet!
For my creation, I started with a wide base, made of wood, to attach the Sugar Structure flange. And placed atop my turntable extender. Even though the Sugar Structures are food safe, I did add aluminum tape for more stability.


All that gorgeous pink is a hybrid of modelling chocolate and fondant. I prefer using this mix for carved cakes so that I have more work time. Which is also great for my Sugar Shapers. I can create so much free hand detail. I tend to favor the bone chisel (orange), pointed chisel (blue), and tri-tip chisel (red) in both the mini and regular sugar shapers.

Ok, I have to pause and give praise to all of the new brushes! From the fluffy to Artist brushes, I baby them all. They are really comfortable, keep their shape, and do not shed. I am a bit of a brush fiend, see my previous blog post as evidence, but these are a total knockout!
The medium cake porter was absolutely ideal for not only keeping this structured cake safe and cool, but concealed until its television debut!

My worktop is consistently covered in Innovative Sugarworks products. I trust them wholeheartedly and they make my cake life so much easier.
Back to the Basics - Cake 101
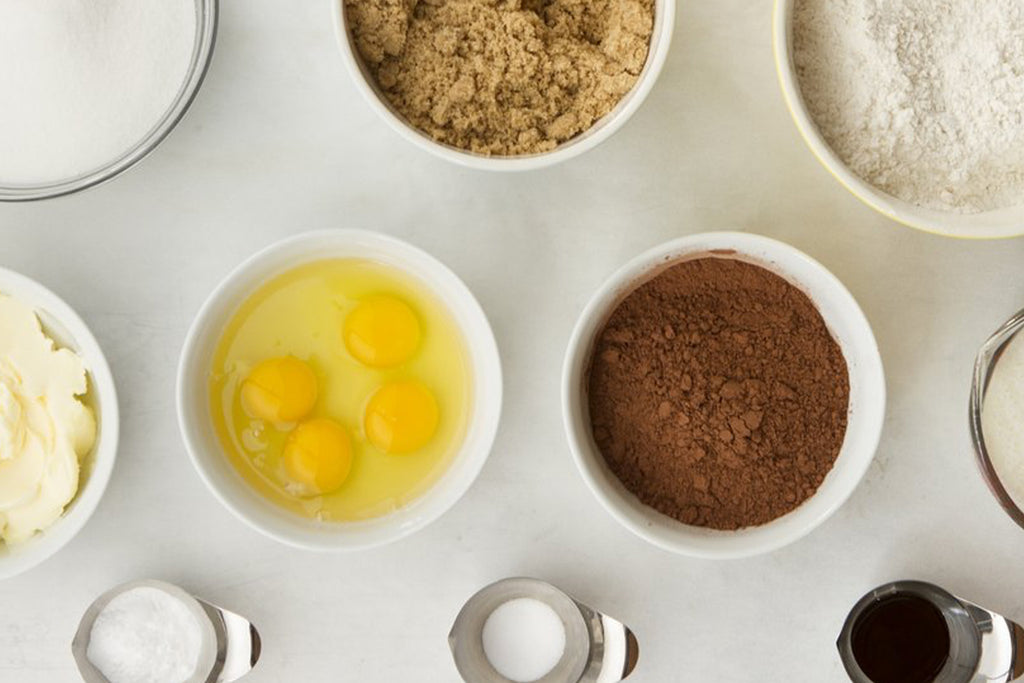
One of the amazing things about cake sculpting, is that underneath all of the artistry, is a unique combination of flavors and textures completely customizable to any given palette. However, for somebody just getting into the cake world, this can also be overwhelming at times. Below we have listed a few of our basic go to recipes that might come in handy with one of our Sugarworks Academy classes.

If you are unfamiliar with hand carving cakes, you'll want to be sure to start with a delicious, but slightly denser sponge. It is important for the cake to be able to withstand the pressures of carving and hold up to the knife. If the cake is too soft, it may collapse on you!
Chocolate Stout Cake
Ingredients:
- 1lb (454g) Butter, unsalted
- 16oz (454g) Guinness
- 1 ½ cup (170g) Cocoa Powder
- 4 Eggs (200g)
- 5 cups (624g) Sour Cream
- 2 ½ cups (255g) Cake Flour
- 2 ½ cups (255g) All Purpose Flour
- 4 cups (794g) Sugar
- 1 tsp (4g) Baking Powder
- 3 ½ tsp (15g) Baking Soda
- 1 ¾ tsp (9g) Salt
Instructions:
- Melt butter and Guinness in a sauce pot.
- Whisk in cocoa powder, let cool for 15 minutes.
- Using the whip attachment of your mixer, combine the eggs and sour cream.
- Add chocolate mixture and whip until smooth.
- Combine all dry ingredients, including the sugar, in a separate bowl.
- Add all dries to the chocolate mixture.
- Scrape bowl well and beat briefly on low.
- Fill lined pans and bake at 325º convection until done, checking at 25 minutes and every few minutes after until cooked through
Vanilla Bean Cake
Ingredients:
- 1lb (454g) Butter, unsalted
- 6 cups (1191g) Sugar
- 1 ½ tsp (8g) Salt
- 1 ½ tsp (8g)Vanilla Paste
- 1 ¼ tsp (7g) Vanilla Extract
- 15 Egg Whites (454g)
- 5 cups (454g) Cake Flour
- 4 2/3 cups (454g) All Purpose Flour
- 4 ¼ tsp (16g) Baking Powder
- 2 ¾ cup (680g) Whole Milk
Instructions:
- Cream butter and sugar until light and fluffy.
- Add salt and both vanillas
- Slowly incorporate egg whites, scraping bowl regularly
- Sift dry ingredients
- Alternate additions of dries and milk (begin and end with dries)
- Scrape well and beat on medium speed for about 20 seconds
- Fill lined pans and bake at 325º convection until done, checking at 25 minutes and every few minutes after until cooked through

Buttercream is a delicious and versatile filling to use in cakes. It can be flavored with just about anything from pastes and purees to alcohol. It is incredible smooth and easy to work with, and can provide a cake with a little extra stability as it hardens slightly when chilled. It can be stored at room temp or refrigerated.
Italian Meringue Buttercream
Ingredients:
- 4 cups (794g) Sugar #1
- 9 ½ oz (283g) Water
- 10 Egg Whites (283g)
- ¼ cup (50g) Sugar #2
- 2lbs (907g) Butter, unsalted
- 1 ¾ tsp (10g) Vanilla Extract
- 1 tsp (6g) Salt
Instructions:
- Combine sugar #1 and water in a pot. Cook to thread stage.
- Begin whipping egg whites on speed 2 when sugar reaches thread.
- Slowly add sugar #2 to the whipping egg whites.
- When cooking sugar reaches soft ball stage, remove from heat.
- Pour cooked sugar immediately into whipping egg whites.
- Continue whipping until cooled to just warm.
- Slowly add room temp butter in chunks.
- Add vanilla and salt.

Ganache is commonly used for crumb coating cakes as it easy to spread when warm but hardens in the cold. It can provide sharp edges and a perfectly smooth finish before covering with fondant. It is quick to make as it is only comprised of two vital ingredients - chocolate and cream. However because the final set of the ganache can be influenced by environmental variables and the actual ingredients used, there is not a "perfect" recipe to follow. Instead, you should use the following weight ratios as a guide.
Dark Chocolate Ganache
Typically made with chocolate containing 50%-60% cocoa solids.
You need 2 parts dark chocolate to 1 part cream:
- 1 ¾ lb (800g) Dark Chocolate
- 14 oz (400g) Heavy Cream
Milk Chocolate Ganache
Typically made with chocolate containing around 30% cocoa solids.
You need 3 parts milk chocolate to 1 part cream:
- 1 ¾ lb (800g) Milk Chocolate
- 9 oz (266g) Heavy Cream
White Chocolate Ganache
You need 3.5 - 4 parts white chocolate to 1 part cream:
- 1 ¾ lb (800g) White Chocolate
- 7 oz (200g) Heavy Cream
Instructions:
- Scald the cream
- Add the cream to the chocolate and let sit for 5 minutes
- Stir until smooth
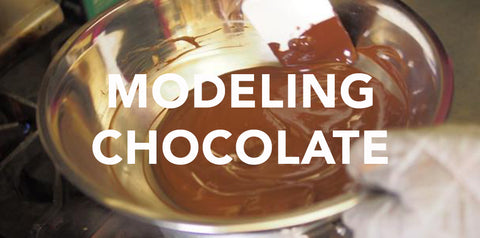
Modeling chocolate is a wonderful edible sculpting medium. It's like clay you want to eat- firm, yet malleable, capable of holding it's shape or being reworked, and also delicious. If you want to try a different medium, or are looking for a new flavor profile it can often be substituted for sugar paste or fondant when sculpting. We know of two different recipes for modeling chocolate- one that uses candy melts, and one that uses real chocolate. We're going to give you both.
Modeling Chocolate Using Candy Melts
Ingredients:
- 454g Candy Melts
- 115g corn syrup
Instructions:
- In a double boiler, heat your candy melts until they're mostly melted but a few lumps remain. (The lumps will melt out from the residual heat of the warm melted candy).
- Microwave your corn syrup for a minute and a half so that the syrup gets very warm and very thin.
- Put your melted candy melts back on the double boiler over a low heat and pour in the warm corn syrup.
- Begin stirring! And keep stirring! Stir much longer than you think you need to; if you don't stir your mixture enough, the fats will separate out during the cooling process and your modeling chocolate will wind up lumpy.
- Your modeling chocolate is ready when it's absolutely silky-smooth and shiny- no air bubbles, no "curdled" appearance, and no liquid separated out.
- Pour your warm modeling chocolate onto the lined sheet pan and spread to about 1/4" thick. Once it's cooled, you can start sculpting immediately or put it in an air-tight container for later.
Modeling Chocolate Using Real Chocolate
Ingredients:
- 500g White Chocolate (or regular chocolate if you want an all-brown figure)
- 250g Glucose
- 1 Teaspoon water
- Gel color (optional)
Instructions:
- In a double boiler, melt your chocolate over a medium heat until it is super smooth. Once your chocolate is completely smooth, take it off the double boiler and set it aside.
- Add 1 teaspoon of water to your 250g of glucose and microwave for a minute or two - until it's warm enough to be smooth, liquidy, and easy to pour.
- Put your chocolate back on the double boiler over a low heat.
- Pour the glucose-water mixture into the chocolate and begin stirring over a constant low heat. You should notice after a bit of stirring that the fat from the chocolate begins to separate out. Keep stirring! You want that fat content to be reabsorbed by the chocolate; don't stop stirring until it is. If you notice any lumping up of the chocolate- keep stirring! Eventually you will get to a stage where your chocolate is silky smooth.
- If you want to color your chocolate- this is a great time to do it! You can knead in color later when your chocolate has cooled, but it is so much easier to stir it in now while the chocolate is warm and soft.
- Pour your warm chocolate onto a sheet tray lined with plastic and smooth it out to about 1/4" thick. Once it's cool, you can use it immediately or store it in an air-tight container in a cool, dry place.
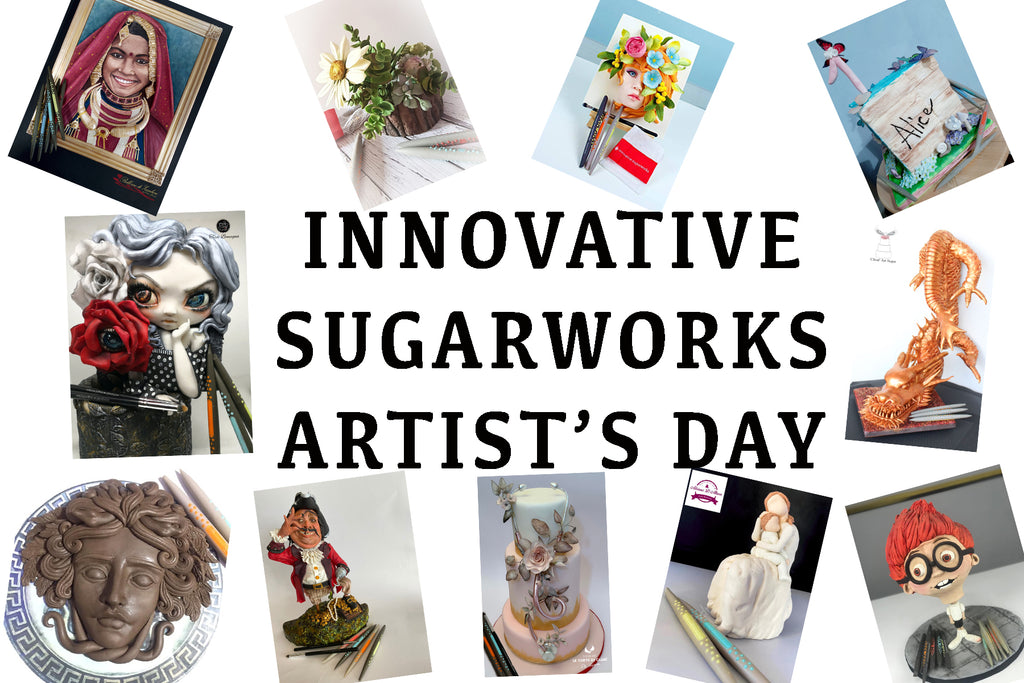
Innovative Sugarworks Artist's Day
Our community is at its best when we come together in support of one another. We are honored to be a part of this incredibly talented group of sugar artists. From the bottom of our heart, thank you for joining us today! Your continued support means the world to us, and we are excited to be able to share your wonderful creations from near and far. Please take a moment to appreciate all of these amazing Innovative Sugarworks artists shown below and see how our tools help aid in each of their unique creative processes. May they inspire you, as they do us!


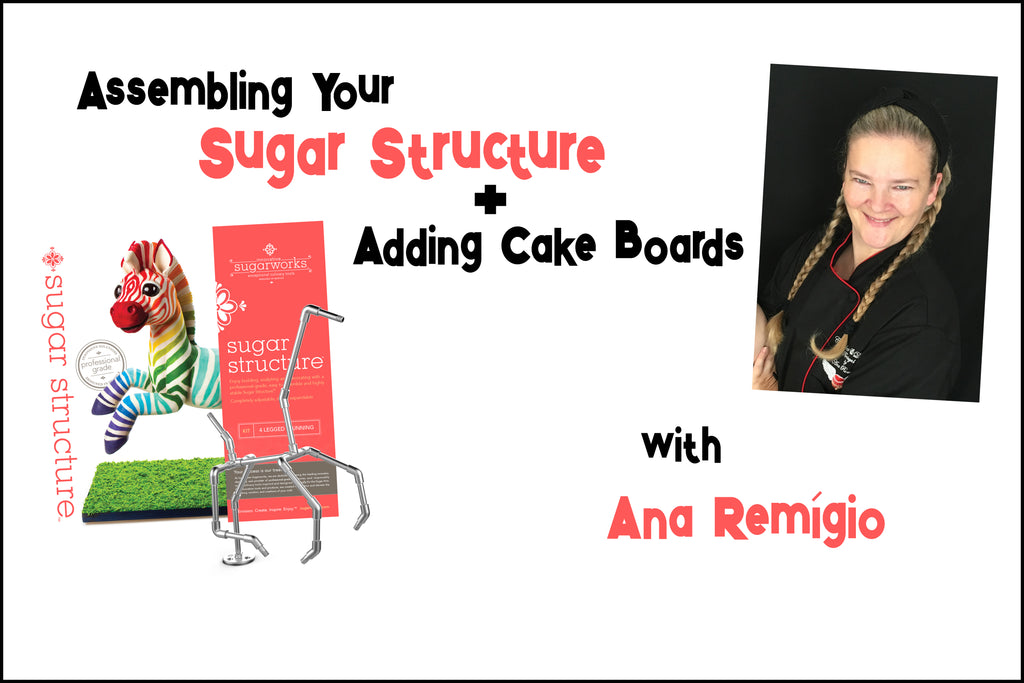
Ana Remígio Teaches Sugar Structures and Cake Boards
Sculpted cakes can be intimidating! We created our Sugar Structure product line to make building sculpted and gravity defying cakes more accessible and straightforward. But even a pre-designed kit can be overwhelming the first time you open the box. That's why we've asked our brand ambassador Ana Remígio to make this informative video going through how to put together a Running 4-Legged Sugar Structure kit. Stick with it to the end- once the structure is assembled, Ana talks about making templates and reusable custom cake boards! Check it out:
We hope you enjoyed Ana's video! Take a look at some of her work online:
Instagram: Ana Mourinho Remígio
Facebook: Cupcakes & Dreams
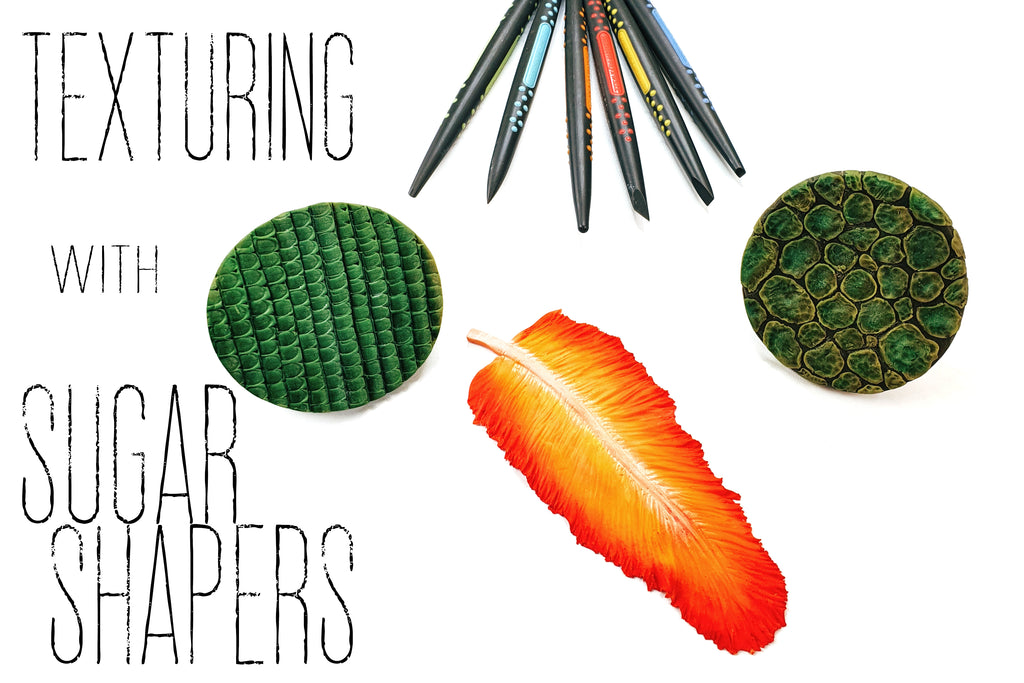
Texture Tutorial with Jennifer Holst
Are you wondering how to create the sort of realistic textures that make your sugar art really pop? Our brand ambassador, Jennifer Holst is here to teach you how to do just that! In the video below, she demonstrates how she sculpts realistic scales, snakeskin, and feathers using just her Sugar Shapers.
Check it out!
We hope you found this tutorial useful. Pattern and texture can really take a piece of art to the next level. Take a look at a few examples of Jennifer's texturing skills on completed cakes:

And if you'd like to see more of Jennifer's incredible work, follow her feeds:
Facebook: Jennifer Holst •Sugar, Cake & Chocolate•
Instagram: @jenniferholst.de
Website: jenniferholst.com/
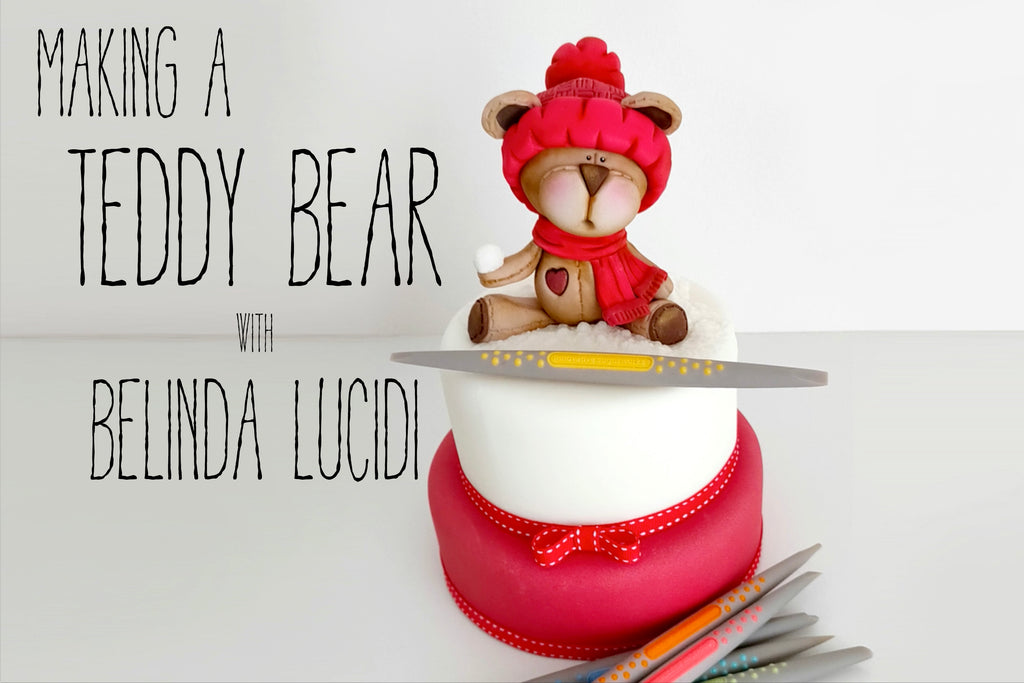
A Winter Teddy Tutorial with Belinda Lucidi
Sugarworks' Brand Ambassador Belinda Lucidi is here to teach you how to make this adorable winter teddy bear! Belinda has some great tips and techniques using her Mini-Tip Sugar Shapers to sculpt this little critter quickly and easily. Check it out in this video!
We hope you enjoyed this tutorial. If you make your own teddy bear using this tutorial, please tag us so we can see! We love see all the wonderful work you folks get up to!
And if you want to see more of Belinda's work, check her out on social media:
Facebook: La Dolce Vita - Sugar Creations
Instagram: @ladolcevitatorte
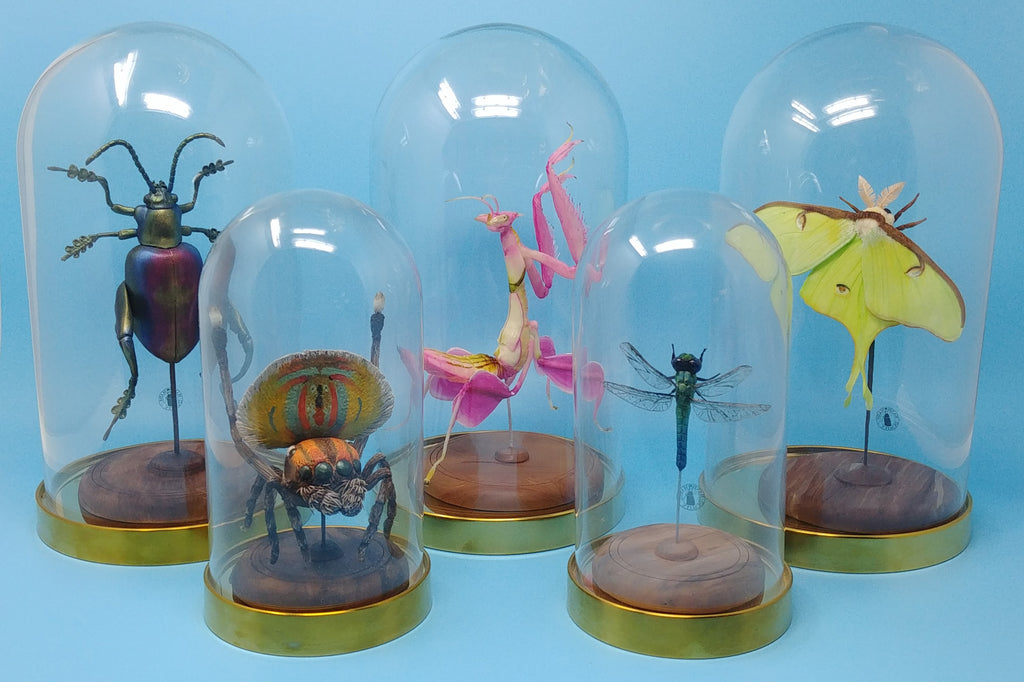
The Edible Entomology of Jamie Louks
Hello everyone! This is Jamie Louks, owner of Sugarnova in Seattle and US Ambassador for Innovative Sugarworks, and today we get to talk BUGS!
Have you ever walked into an oddities store, gazed at the taxidermy displays and thought to yourself "I should make that out of food!" No? Just me?? Well, that is exactly where the inspiration for my Edible Taxidermy Insect Collection came from. These insects are sculpted almost entirely from modeling chocolate, with some other edible accents.
As a kid, I wanted to be an entomologist (aka buggy scientist person). As time went on, I was drawn to sugar for my adult occupation, yet my love of unique, amazing, and colorful insects has stayed strong! For this collection, I wanted to showcase the incredible rainbow of colors found in the insect world. Here's the line-up:
The Frog Legged Leaf Beetle

This insect is covered in an iridescent rainbow and the males have MASSIVE hind legs for wrestling with! I created a female, which has significantly smaller hind legs. Replicating her smooth shell and iridescent coloring proved to be a challenge, but I am happy with how she turned out. The bottom of her feet are covered in almond flour to mimic the "furry" look of the beetle's feet.
The Eastern Pondhawk Dragonfly

They come in many different colors and have almost 360 degree vision. They can also eat insects or small animals their own size or bigger! This little cutie is only about 3" tall. Its wings were created by painting gelatin over a small piece of wire and gently cutting out the shape with an X-acto blade.
The Luna Moth

They look so soft and fluffy, I just wanna snuggle with it! Fun fact, adult luna moths do not have digestive systems. Weird.
 I loved making his cute little chubby body and his rice paper antennae.
The Peacock Spider

He's my FAVORITE! Do yourself a favor and watch this video of the peacock spider right now!
So cute, so tiny, and the BEST dancer! I made my spider about a billion times larger than they are in real life so I could get in all those amazing details.

The hairs on his mandibles we placed one at a time and took forever! I also had to dry him hanging upside down to make sure his legs dried securely and didn't droop.
The Orchid Mantis

This insect is almost too beautiful for words. Those colors. Those crazy lanky legs. That insatiable appetite for prey! Their body mimics the petal of an orchid and they can even gradually change colors to mimic a change in environment. She was definitely the most difficult insect to create. The shape of her head is so unusual that I remade it 3 times before I was satisfied.
My Edible Taxidermy Collection now lives on display in my kitchen and adds just that perfect level of quirk and oddity to my workspace. What will be my next strange inspiration??
If you'd like to keep up with Jamie and see exactly what her next strange inspiration produces, follow her on social media:
Facebook: @sugarnovacakesseattle
Instagram: @sugarnova_cakes
Website: Sugarnova Cakes
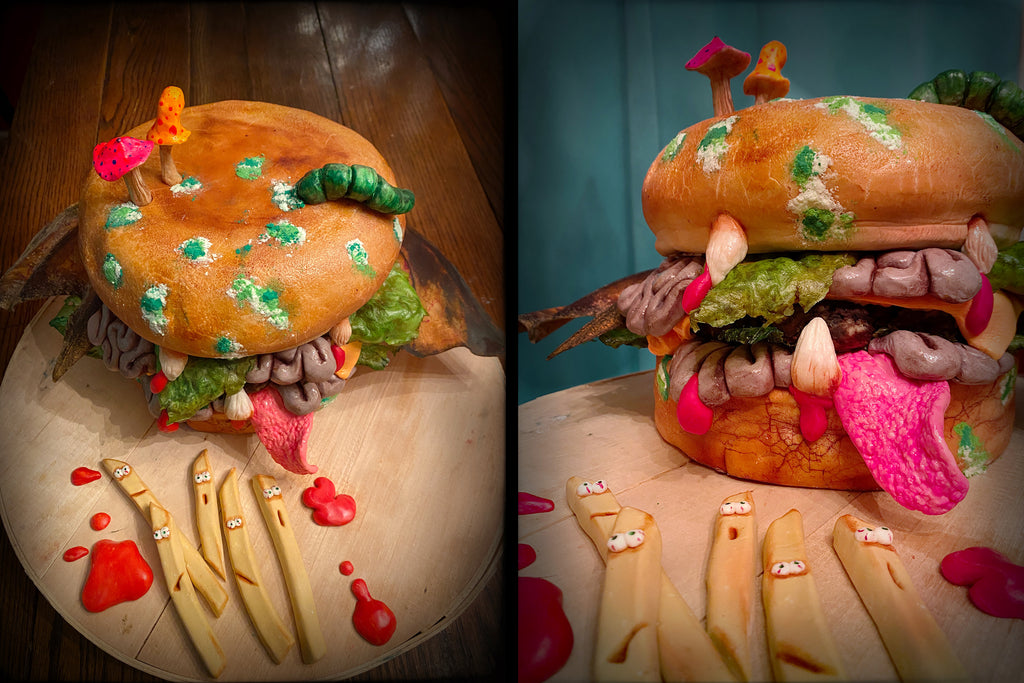
Kawaii or Kowai? Sugar Freakshow gets scary cute this Halloween!
No matter how insane the Halloween season is, when Innovative Sugarworks asks me to do a guest spot, I have to leap at the opportunity. It is ALWAYS an honor.
My inspiration this year comes from a love of three things, 80’s horror, Japan, and realism cakes! Last year, a big box on my bucket list was checked off when I visited Japan DURING HALLOWEEN! I was lovingly described as “Kawaii”....or did I hear “Kowai”? While the words SOUND the same, “kawaii” means “CUTE” and “kowai” means “SCARY”...
On Halloween night, we visited the “Kawaii Monster Cafe” in the Harajuku district, and I would say the seed of inspiration for this cake was born there. The perfect combination of cute and scary....and adding in one of my favorite things, food realism!
Since food cakes, particularly BURGER cakes, have been quite the trend, I chose a burger to be the subject for my KAWAII/KOWAI Zombie Burger Cake! So let’s get into it, creepies!
Let’s start with the cake! I chose dark chocolate cake with chocolate ganache spiced with cayenne and cinnamon (for a little kick!) for the top bun. And for reasons I’ll explain later, a classic rich butter cake for the bottom bun, also using the chocolate ganache. 
I made three 8” rounds of the chocolate and three 8” rounds of the butter cake.
To create the top bun, I used two of my 8” chocolate layers and set aside the third. Looking at photos of gourmet burgers with those beautiful golden crispy buns, I carved away until I was happy with the shape....but it’s a bun, so we aren’t looking for perfection or symmetry. DOPE! 
Move on to the bottom bun, again, reserving one layer. Make sure the top is nice and flat like the bun was cut in half. Again, don’t spend too much time here.
Once you're happy with the shape, color some fondant with a tiny bit of ivory, a bit of brown, and some yellow until you achieve the light colored part of a bun. Roll out a thicker than usual circle large enough to cover top bun and lightly hit the entire surface with a torch.
This will help give a realistic texture to the bun later.
Cover the top bun. Embrace imperfections and wrinkles. Add texture by pressing balled up foil, wax paper, or a new scrubbing cloth. Use the pointed tip Sugar Shaper to add creases and indents, as well as that ridge that goes around the edge of a bun.
Using the torch, really hit the spots that a real bun would be toastier, letting it bubble, brown and harden. 
Next, using color dust, even out the toasty color all over the bun, hit the cracks, and be sure to leave lighter colors toward the bottom part of the bun. 
When you’re happy with the color, LIGHTLY roll a small rolling pin over the surface of the edges of your bun. If you did things right, you’ll have a beautiful effect of a real, cracked, crispy buttery bun! 
Move to the lower bun, adding color, and much less torching, but enough to give more texture. Texture texture texture is what sells these things as BREAD!
Now, the reason we chose dark cake and light cake is to make a realistic and delicious burger patty. If you’ve ever made cake clay (the stuff inside a cake pop) you’re familiar with this.
Break up your reserved layer of butter cake and chocolate cake in a large bowl and add a few heaps of ganache. Using your hands, mix together until you get a sort of brown cake dough with lots of specks of lighter color in it. Don’t over mix or you’ll lose that variation. Pat the mixture down with your hands onto a piece of parchment to make a burger patty. Let it crack and break as you press it out. This adds to the realistic texture. Chill in refrigerator until firm.
Next, since this cake is a KOWAI (scary) ZOMBIE burger, we gotta make some brain slices! No worries. It’s easy, ghoul friend. I colored some modeling chocolate with a little bit of pink, a little blue, and a little black, until I achieved a grayish lavender brain matter color.
Roll out tubes of modeling chocolate and make random noodle shapes to create brain patterns. Use your Sugar Shaper with the small rounded end to refine some of the details. Once you’re happy with the look, enhance those details with a deep purple or black color dust. 
What else would be delicious on a Kowai Zombie Burger?! How about some fresh bat wings?!
Create the shape of the bones inside a bat’s wings with some floral wire. I used 18 gauge, but you do you, BOO. When you’re happy with the shape, lay out your pieces onto a piece of wafer paper. Prepare some flexique following the instructions, and brush gently onto the wafer paper, pressing the floral wires in. Move quickly because it sets up fast. Add another piece or wafer paper on top of the wire, sandwiching it between the two pieces. Brush both sides with your mixture until fully covered and allow to set for an hour. 
Next, dust the entire surface with cornstarch to remove any tackiness, flip over, and repeat. Using a small paintbrush and some red gel color mixed with vodka or an extract of your choice, add in some veins to the wings. The great thing about these wings is they have that semi-translucency letting some light pass through, so this detail adds some very cool realism. Finally, darken up the edges with some brown gel color and a stiff, dry brush. 

Next up, lettuce and cheese!
Because this burger is UNDEAD, we want lettuce that looks like it’s on its last leg...wilted, sorta greasy, and browning on the edges. Using REAL pieces of romaine lettuce, reinforced underneath with some balled up paper towels, you have a natural mold.
Wet a surface with some water tinted with green gel color and just a touch of yellow. Lay a sheet of wafer paper on top of the wet surface, and with a SOFT brush, very gently saturate the paper. It tears VERY easily and holes can form, so go slowly. Wet your romaine leaves with the same mixture, pick up the paper carefully, and lay it over the leaf. Using a saturated brush, gently brush the paper onto the leaf, trying to get the paper to hug every vein and textural element. Set aside to dry overnight.
When it’s fully dry, peel away the real lettuce. Trim away the edges. Add in color details to really make the leaf look real...I used green and brown gel color mixed with vanilla extract, NOT water, (or vodka works too). If some of your lettuce has holes, no worries! USE IT! Boil, I told you...we are going for rotting lettuce here! 
For the cheese, mix a bit of orange and just a drop of red into some yellow modeling chocolate to get that cheddar cheese look. Roll out 1/4” thick piece large enough to cover your burger and cut into a square. 
Now that we’ve created all the elements, it’s time to assemble your burger! I’ll show pics of how I put mine together, but once again, you do you.
I started with the bottom bun, some lettuce and pieces of brain, and then topped it with the burger. Then I added the cheese slice and hit the edges with a torch to make it look melted. More lettuce, more brains, and the bat wings! Add the top bun! Depending on the size of your cake, you may need to add some bubble tea straws and wooden dowels. 
To add to the rotting undead burger look, I wanted to give it some more gross details and decided to make the buns look moldy. Here’s how I made the mold: I whipped up a batch of meringues! 
Divide the meringue into three portions. Tint one with leaf green, another with leaf green and a bit of teal, and leave the other white. Dollop onto a parchment lined baking sheet and bake for 45 minutes at 200 degrees, shut off the oven, and leave the meringues in the oven for at least 30 minutes! That was wasy, right? Still, reward yourself by eating a few meringues. You won’t need that many. 
Next, using a coffee grinder, pulverize other lighter green meringues, two or three at a time, until you have a fine powder. Repeat with the darker green and then the white. This makes the white turn out a very pale green.
To create the mold, the reason I love this powdered meringue mixture, is because you can take small clumps of it and press it right onto the surface of the cake and still have that powdery look that mold creates. It’s also much tastier than a mouth full of color dust! I start with white, then the lighter green, then the darker green. Use photos for reference and have fun with it. 
For the finishing details....I decided to sculpt a couple mushrooms and a big old worm and color them with a UV reactive color. 
I used the curved chisel tip to create spots for teeth in the buns and created a few teeth out of white modeling chocolate. I also made a tongue using a custom made mold, but you can achieve some cool effects and textures with foil. I dusted the tongue with uv reactive neon pink color dust. 
Finally, with the same fondant I used for the buns I added a little yellow modeling chocolate to create a warmer golden color, made some little eyes, and dusted the edges with some brown color dust and to make a few scared French fries and ketchup to place on the cake board. 
And that’s it! Can’t you just see this monster zombie burger in an 80’s B-movie? Kowai Zombie Burger Terrorizes Tokyo!
Boils, ghouls, I hope you had fun with this one, and OF CORPSE, if you decide to make your own, PLEASE tag me in your photos! Either Sugar Freakshow on Facebook or @sugarfreakshowdsm on Instagram!
Happy Halloween!! (幸せなハロウィーン)

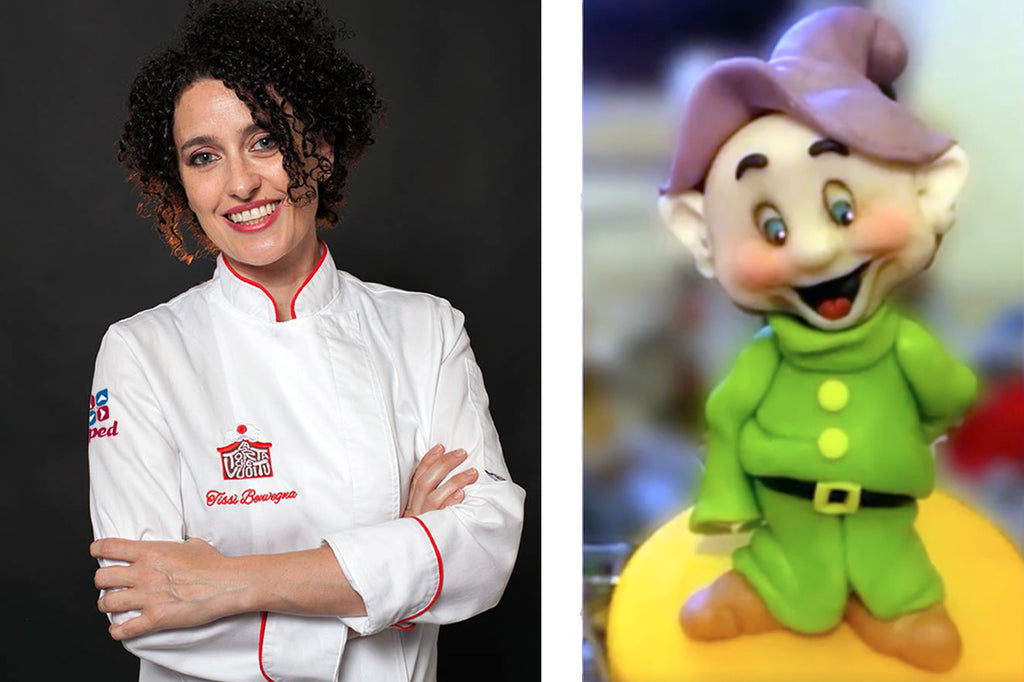
Tissi Benvegna and (two of) the Seven Dwarves
Italian cake superstar and inventor of the TLook eye sculpting tool, Tissi Benvegna has been up to some adorable shenanigans! Check out this video and learn how to model Doc and Dopey using Sugar Shapers and Tlook!
If you liked that, Tissi has loads more fun and useful videos! Keep up with her and keep learning:
Website: www.latortachevuoitu.it
Facebook: La Torta che Vuoi Tu
Instagram: @tissi.benvegna