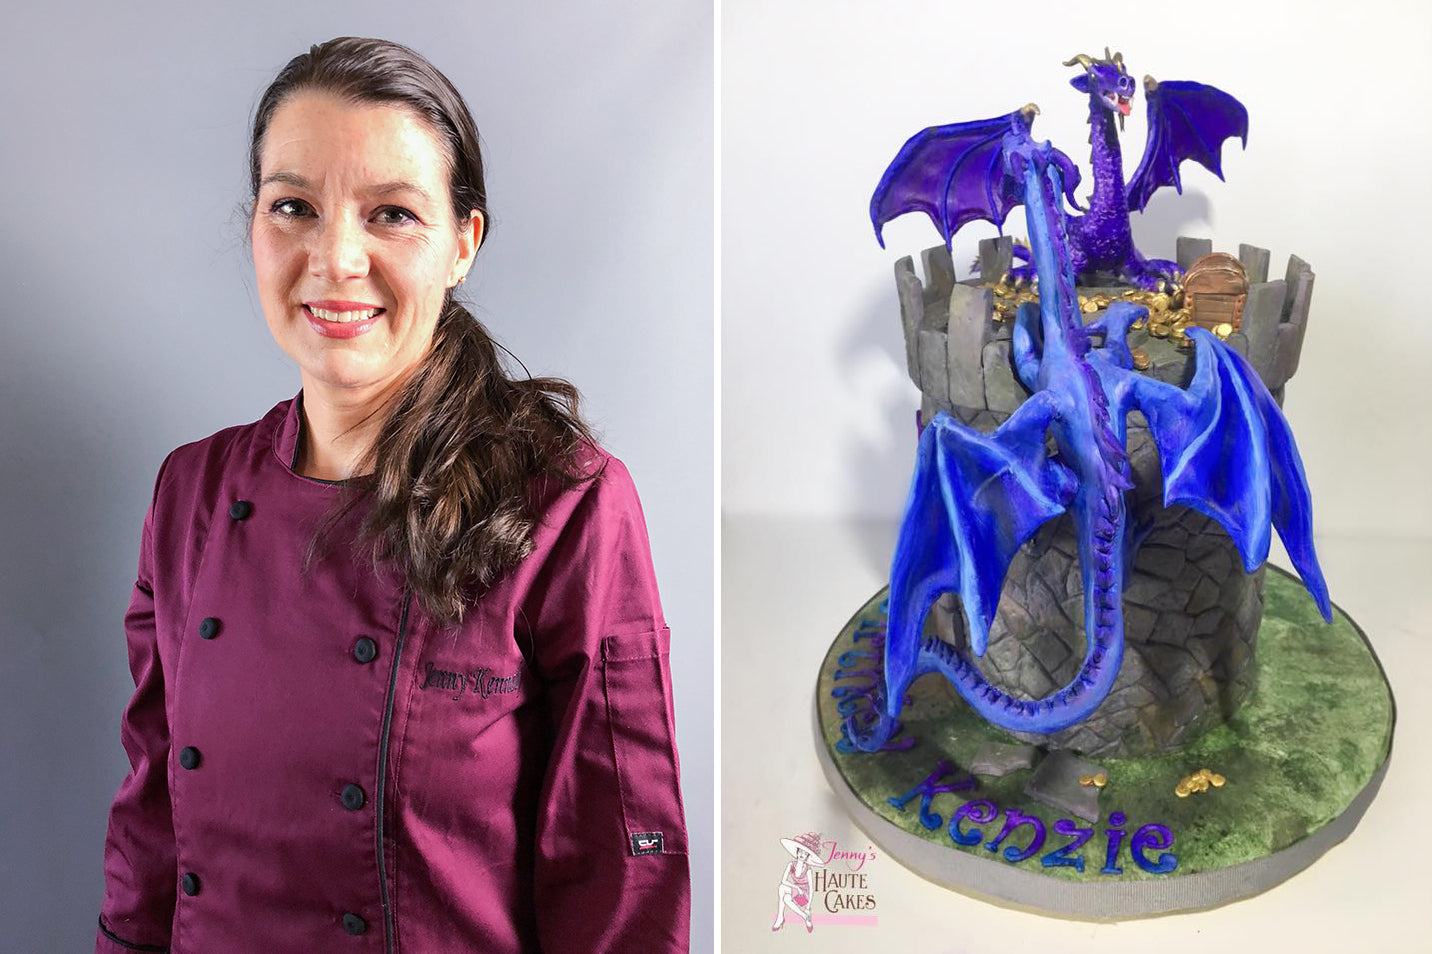
This month we are pleased to welcome Jennifer Kennedy to the Sugarworks blog! Jennifer is the owner and cake designer of Jenny's Haute Cakes outside Denver, CO. What began as a hobby seven years ago has grown into an incredible professional career! Jenny is most famous for her amazing sculpted and celebration cakes and has been featured in multiple magazines around the world.
Today, Jenny is teaching how to make a dragon cake topper using modeling chocolate and Sugar Shapers!
In this tutorial you will learn how to mold a dragon cake topper.
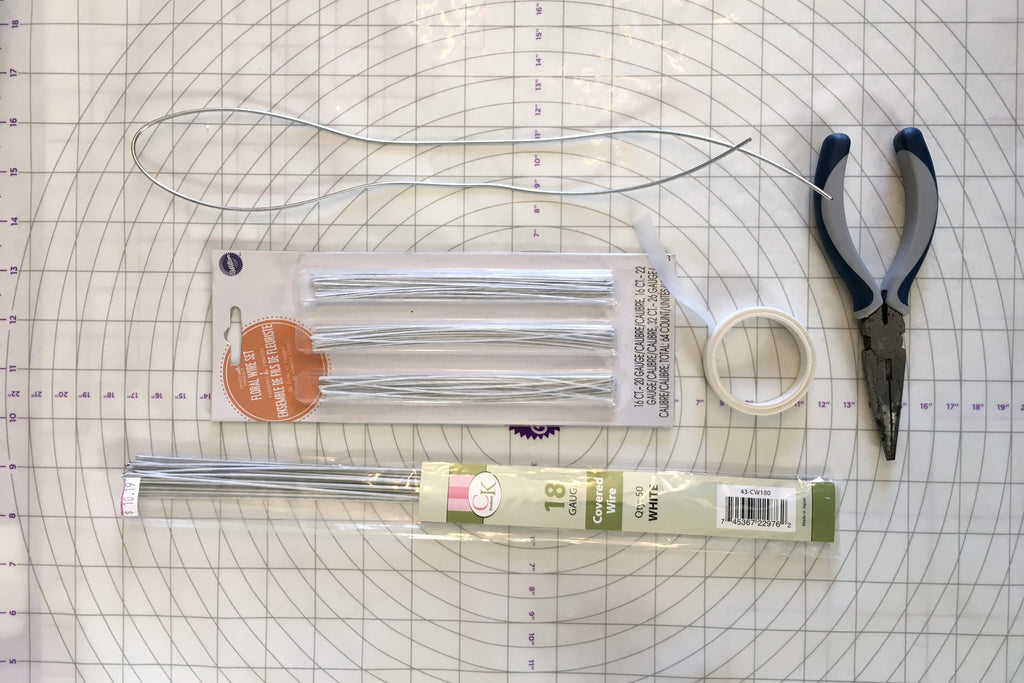
First we will create a structure for the dragon. For the structure you will need:
- 2 pieces of 18 gauge wire (approximately 12” long)
- approximately 28” of armature wire
- white floral tape
- needle nose pliers.
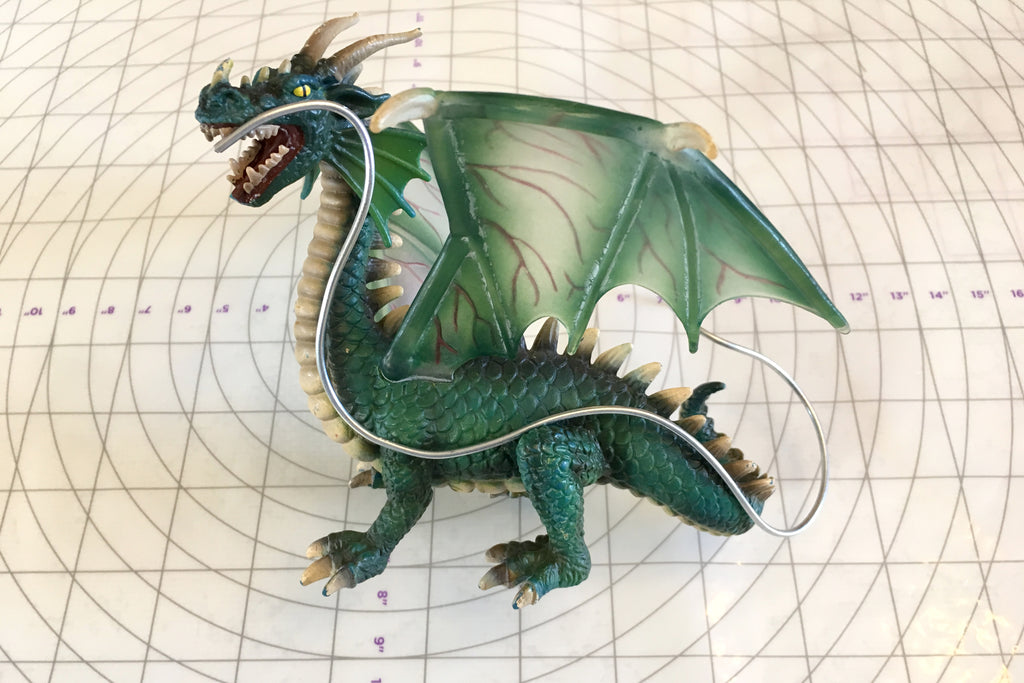
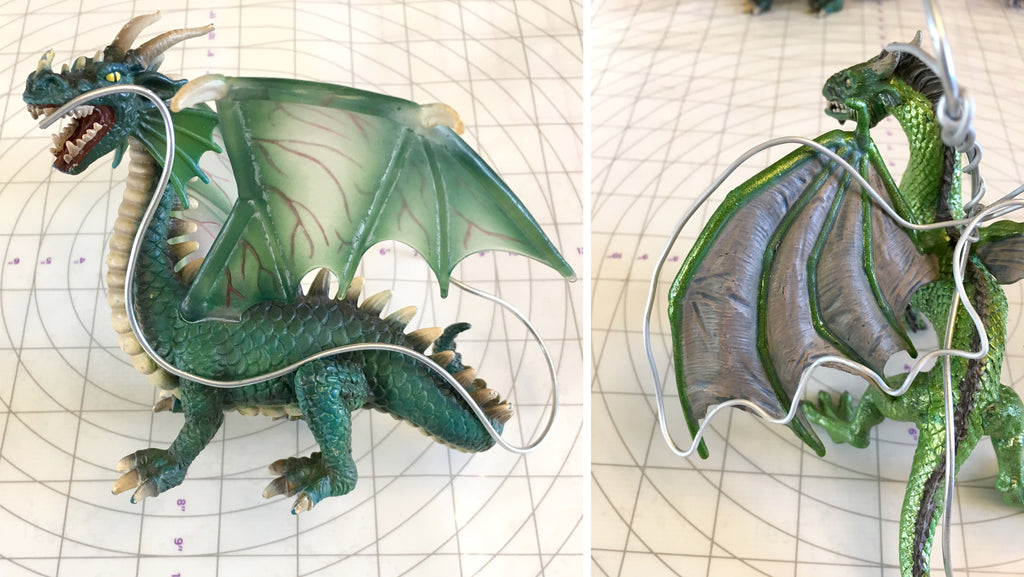
With three boys in the house I have accumulated quite a collection of plastic dragons over the years. If you can lay your hands on one, they are a fantastic reference for model making. They are not, however, necessary. You can Google search “dragon model image” and find 241,000,000 (yes, that’s MILLION) references. I prefer 3D references for modeling over 2D images. A photo of a 3D image is a great compromise. You can even use multiple references and pick and choose the parts of each you like best. Print the picture in color and enlarge it to the size you want the cake model to be.

I chose this plastic dragon because it is sitting in a position that is pretty close to the one I want for the dragon on my cake.

Now, Let's get to it!
Step 1:
Take the armature wire and, holding it up to your plastic model or to your photo, follow the curve of the body from head to tail. Trim the wire with the pliers.
Step 2a:
Take a second piece of armature wire with the head and begin wrapping it around the neck of the dragon, until you come to the shoulder area. Then bend the wire and follow the outline of one wing, then the other.
Step 2b:
Take a piece of 18 gauge wire and wrap it around the body in the middle just behind the wings. Repeat with the back legs. Leave the legs too long. You can use the extra length to secure the dragon to your cake, and to stick into Styrofoam as you are building the model.
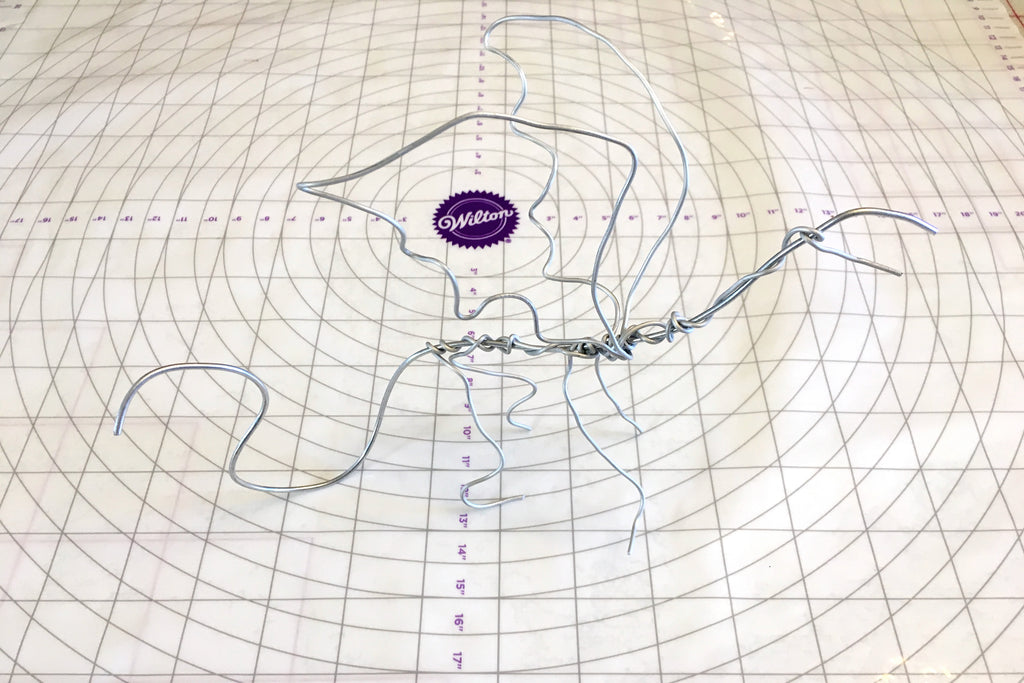
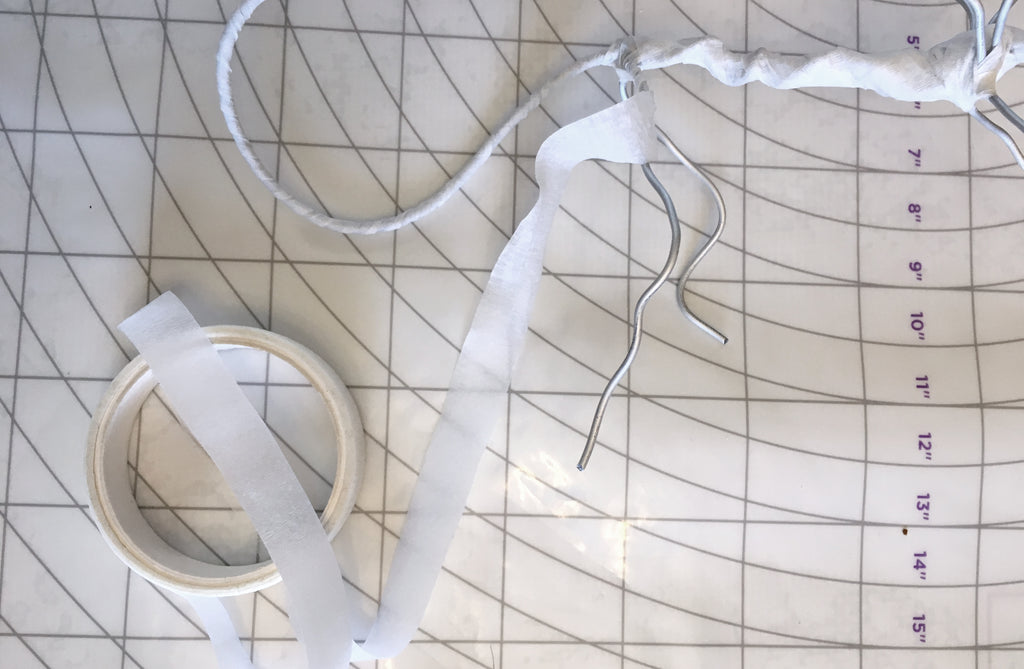
Step 3:
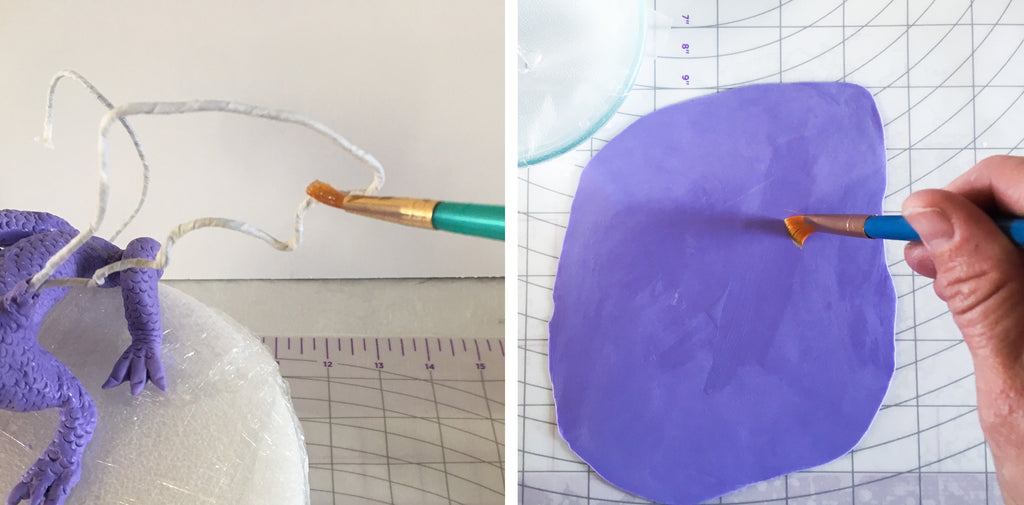
Wrap the entire structure with white floral tape
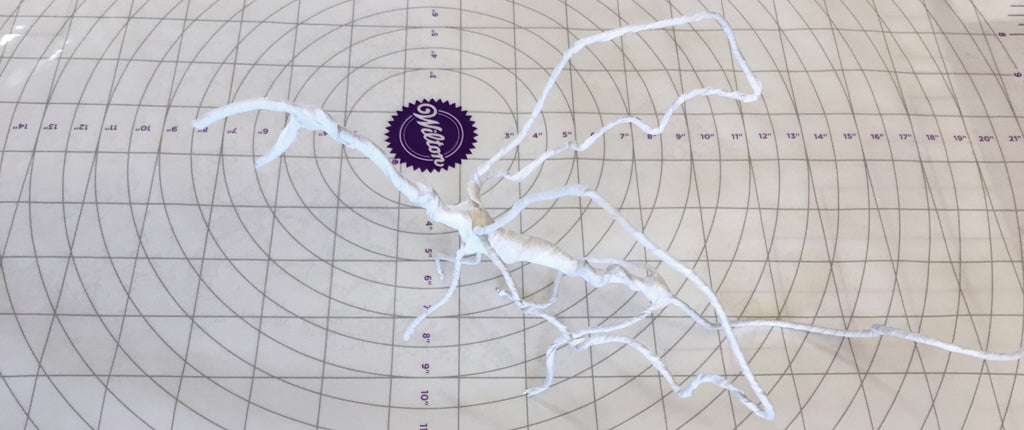
Now for the fun part – let’s make a dragon!
First you will need about ½ pound of modeling chocolate and food color. I prefer to use Hot Hands Modeling Chocolate for two reasons: First, it doesn’t melt in my hands when I am sculpting, and second I can color it with regular gel food color. How cool is that?
You will also need:
- Mini-Tip Sugar Shapers, soft
- Piping gel
- 9” rolling pin
- Tylose powder
- Paint brushes
- 3mm gold dragees
- Black fondant
- Knife or scalpel
- Coffee straw
- Black food color pen
- Rounded stainless cuticle scissors (dedicated for food and sterilized in the dishwasher)
- 1 ½" ball of black fondant
- 1" ball of white fondant
- 1" ball of red fondant
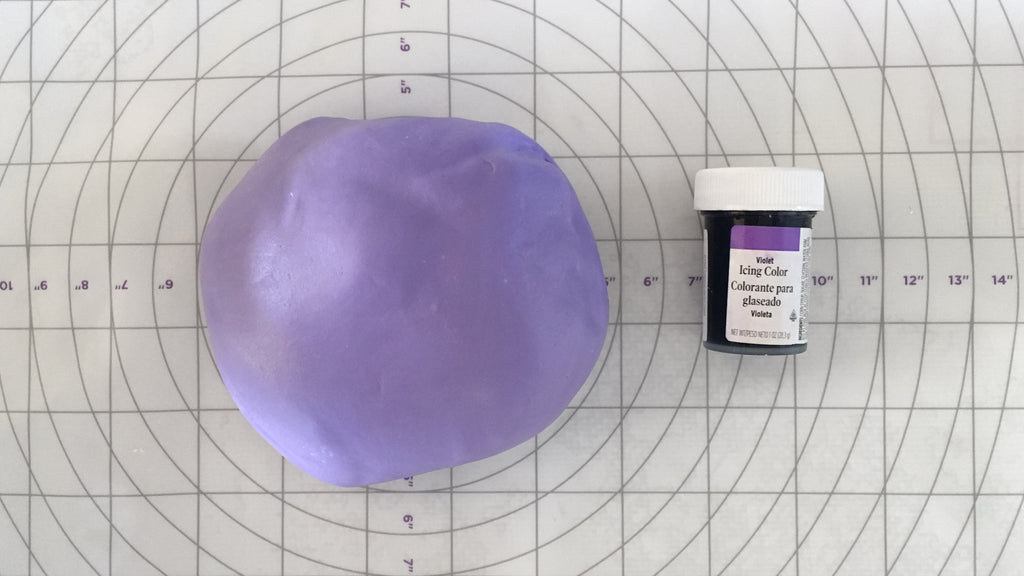
Step 4:
Color your modeling chocolate with gel food color. I'm making a purple dragon, but since these are fantasy animals- any color will work. I recommend wearing gloves to keep your hands from matching your dragon.
Step 5:
Begin covering all parts of the dragon body (except the wings and tail) with snakes of modeling chocolate. Make the snake for the chest area thicker. Also, make the back legs thicker than the front legs. If the modeling chocolate isn’t sticking to the wire you can paint a little bit of piping gel on the wire first.
Why aren’t we covering the tail yet? Because it gives you something to hold on to!
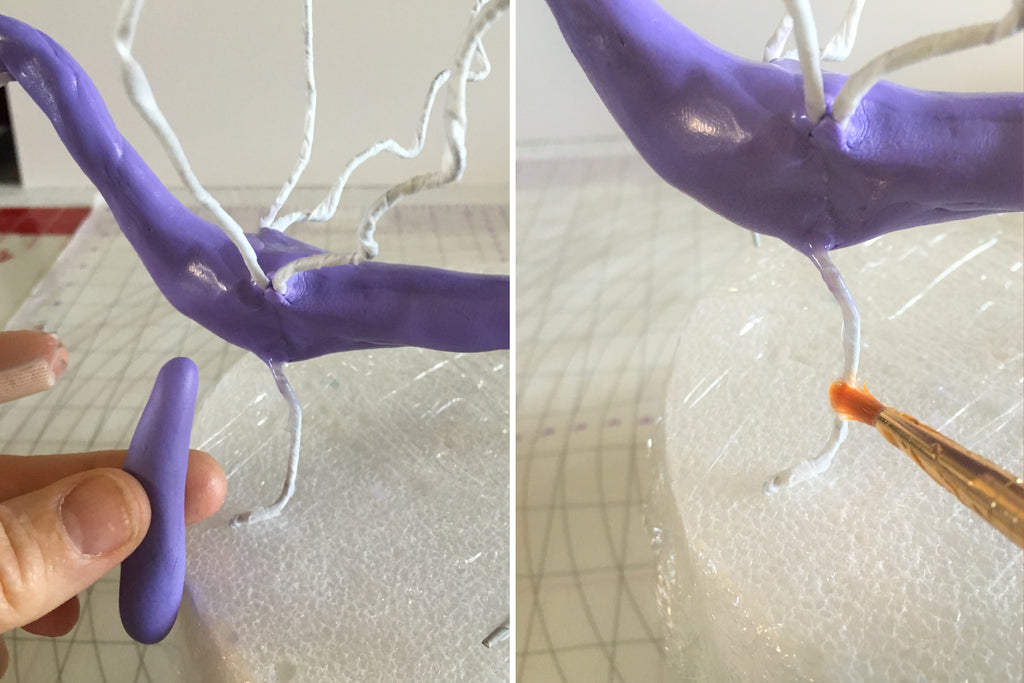
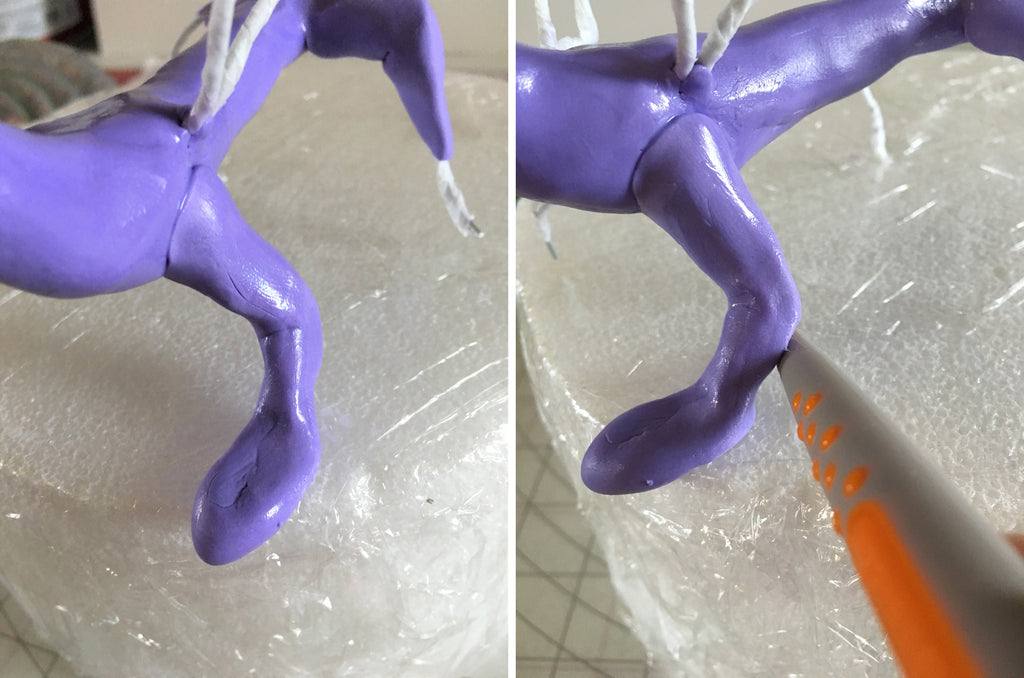
Step 6:
Smooth out the seams with the smooth side of your Sugar Shaper. Then use your red Sugar Shaper to create a crease at the back of the knees on the back legs and the front of the knee on the front leg (the front leg joints bend in the opposite direction). Pinch the back knee to give it shape, and use the small end of the orange Sugar Shaper to create a definition line in the leg muscle.
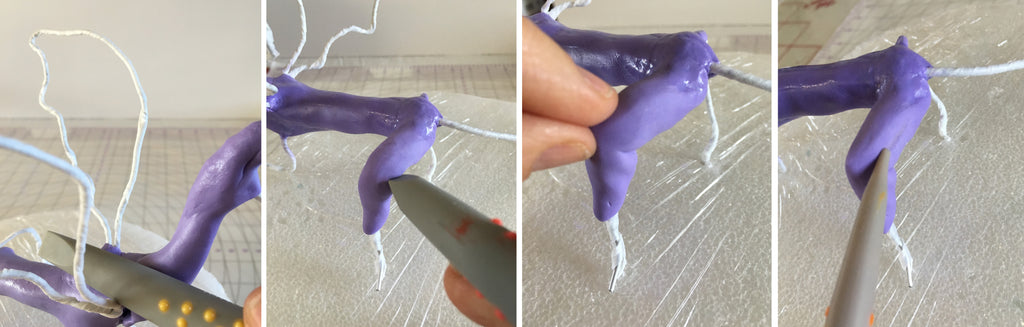
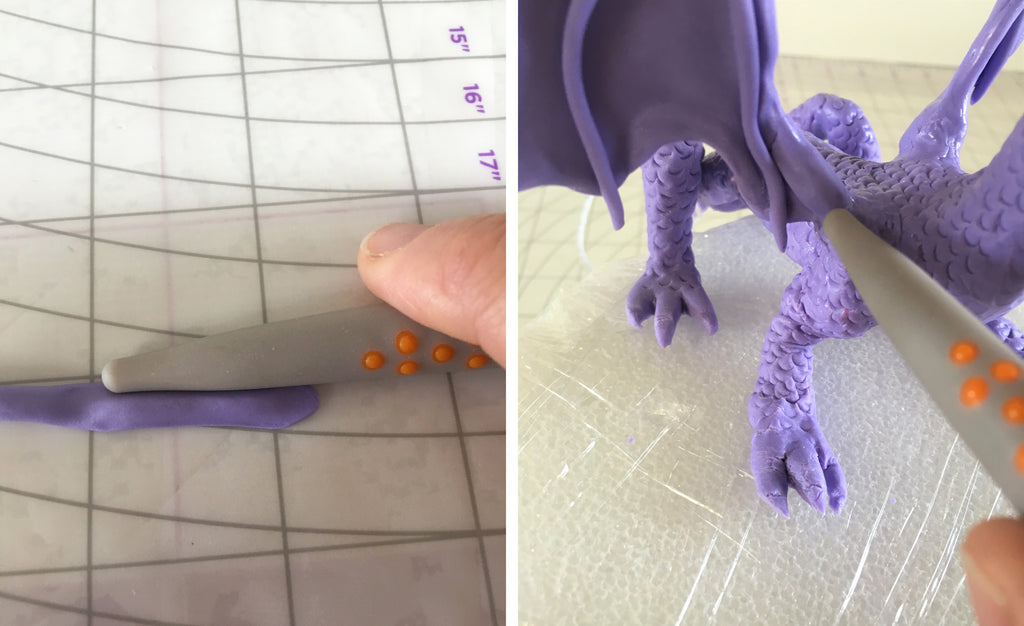
Step 7:
Add a ball of modeling chocolate on the leg to create a foot. Flatten the ball with your finger.
Note: Leave the wire longer than the leg on one front leg and one back leg. You will want a couple of inches extra to secure your dragon to the cake.
Push that extra wire into the Styrofoam and then create the foot where the wire meets the Styrofoam. Use your small orange Sugar Shaper to create an indentation at the ankle.
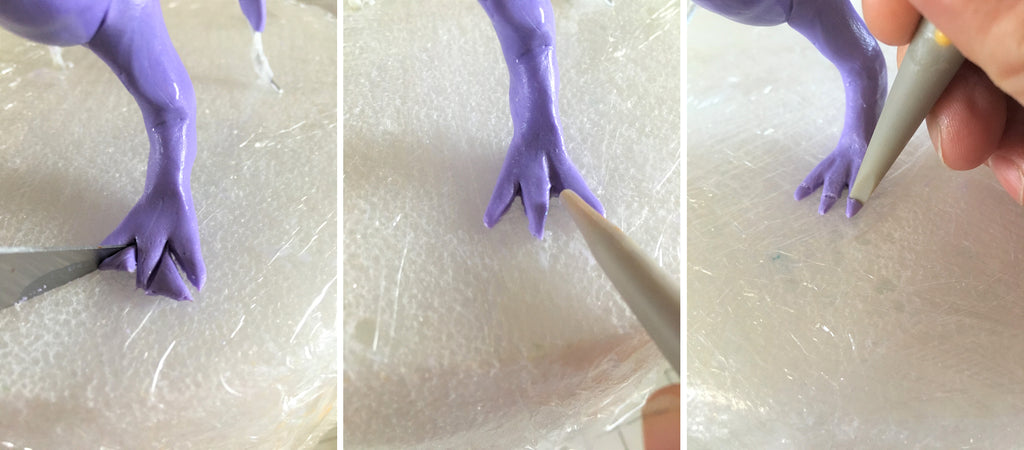
Step 8:
Cut triangles out of the foot to create three toes. Then, use the orange Sugar Shaper to smooth between the toes and create an impression on top of the foot from between the toes across the top of the foot. Now use the small side of the yellow sugar shaper to create a crease at the end of each toe to create a claw.
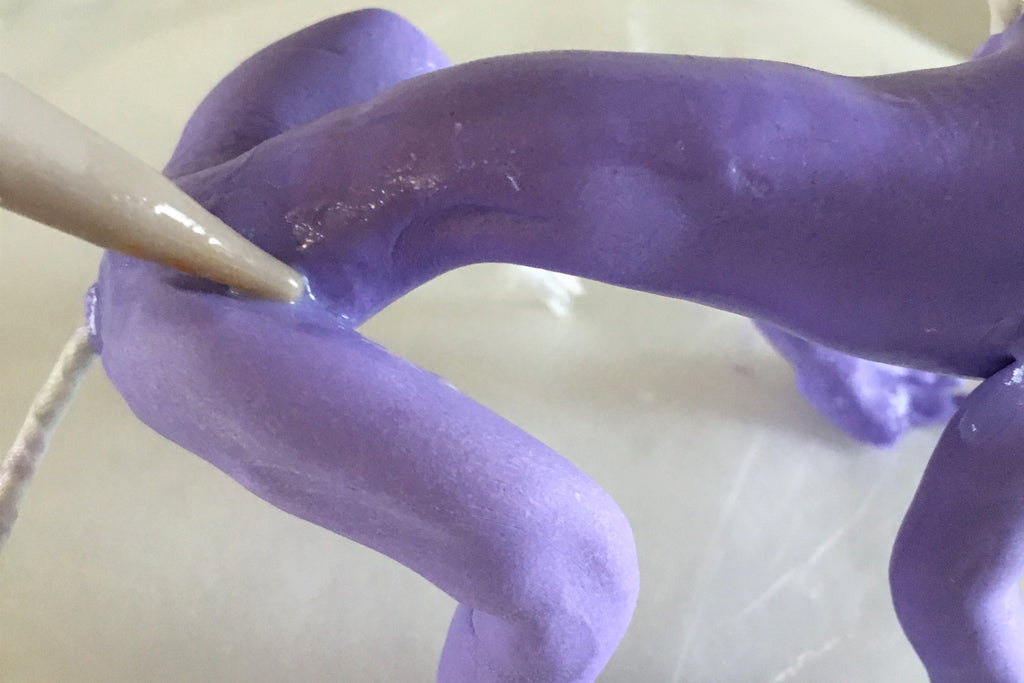
Step 9:
Using the orange Sugar Shaper, smooth the seams from the leg to the body and create a crease. You can add a little water at the seam to help smooth it.
Now we get to move on to the head!
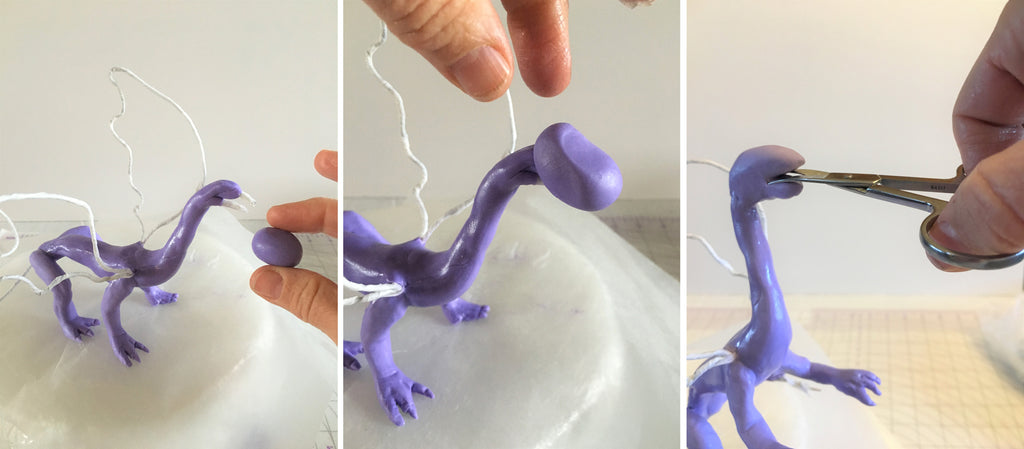
Step 10:
Roll a ball of modeling chocolate for the head. Mold the ball around the head wires with your fingers. Now cut the fondant between the top and bottom wire to make a mouth.
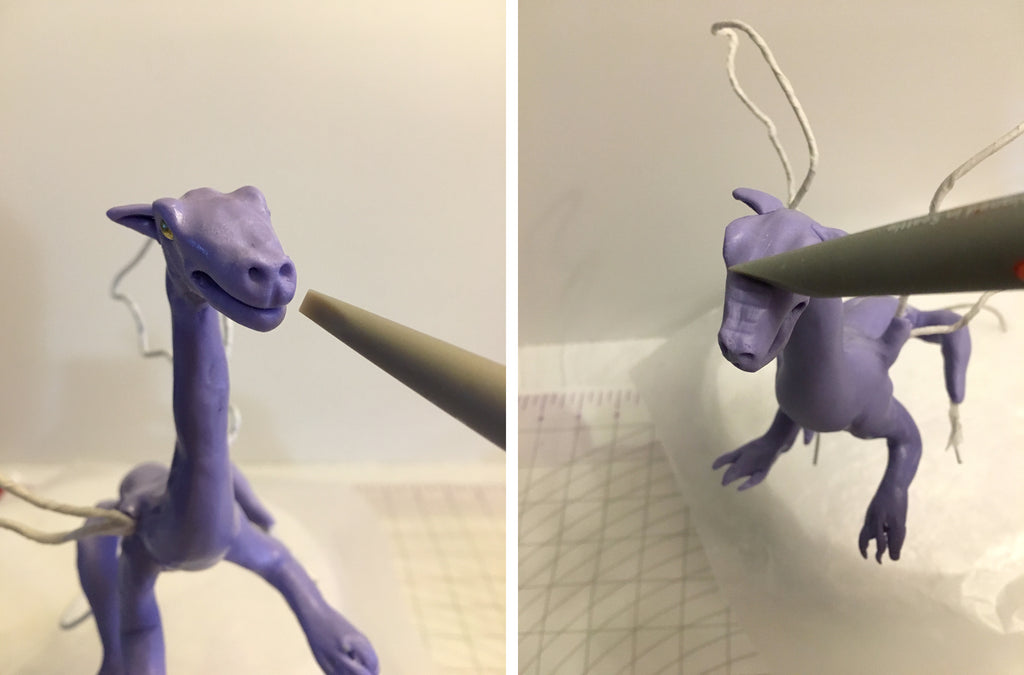
Step 11:
Using the small end of the aqua Sugar Shaper poke a small hole into the top of the head above the mouth to create nostrils. Pull up slightly to give the nostril shape. Next, use the big end of the orange Sugar Shaper to pull out the corner of the mouth. Then insert the big end of the yellow Sugar Shaper into the mouth and gently pull down to make the mouth open wider. We want room to add teeth!
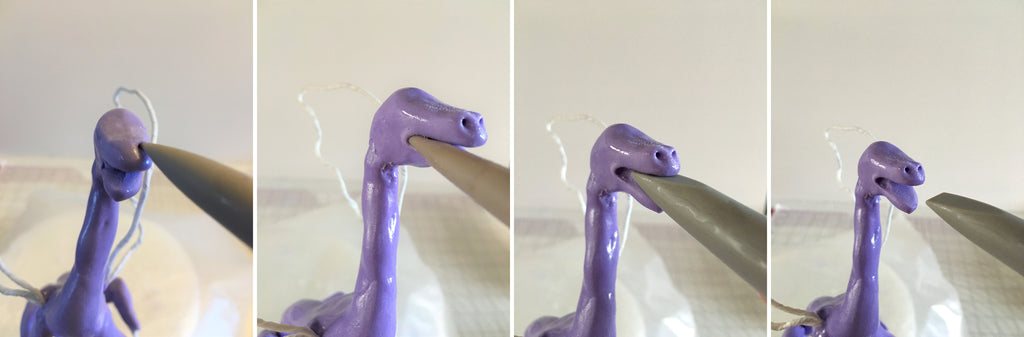
Step 12:
Use the big end of the green Sugar Shaper to make a curved indentation along the jaw line. Then roll the side of the orange Sugar Shaper along the top of the head to create an indentation between the nostrils and what will become the tops of the eyes.
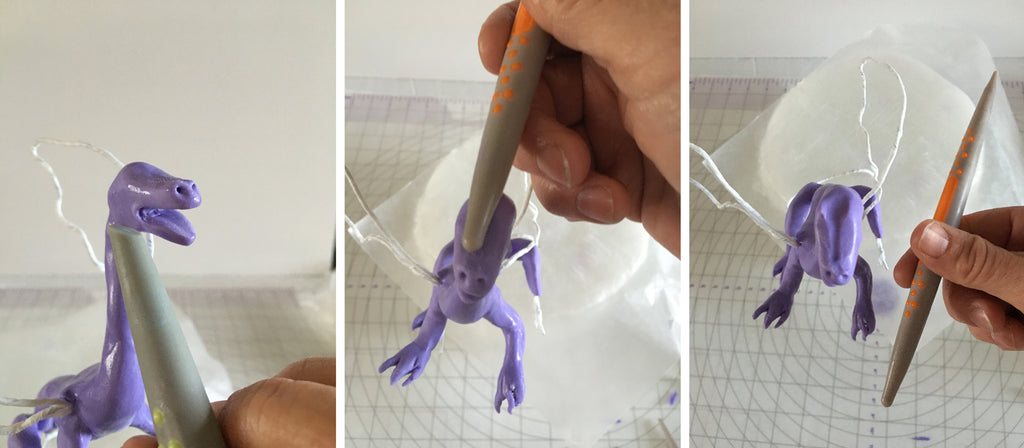
Step 13:
Make an eye socket by pressing the big end of the orange Sugar Shaper into the side of the head. Push in and up to create a brow area.

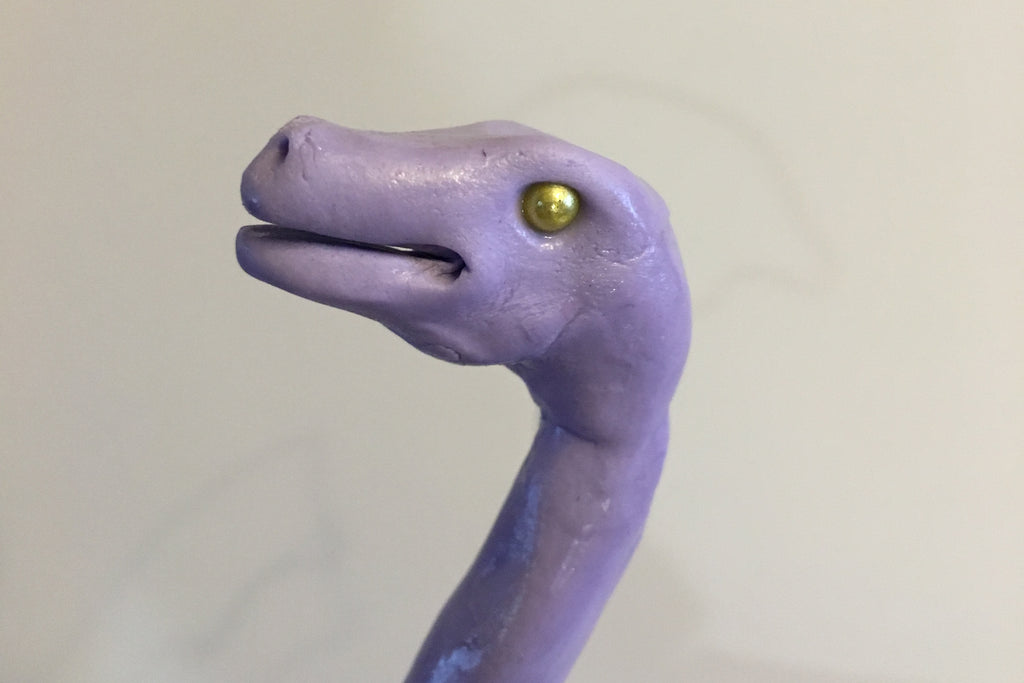
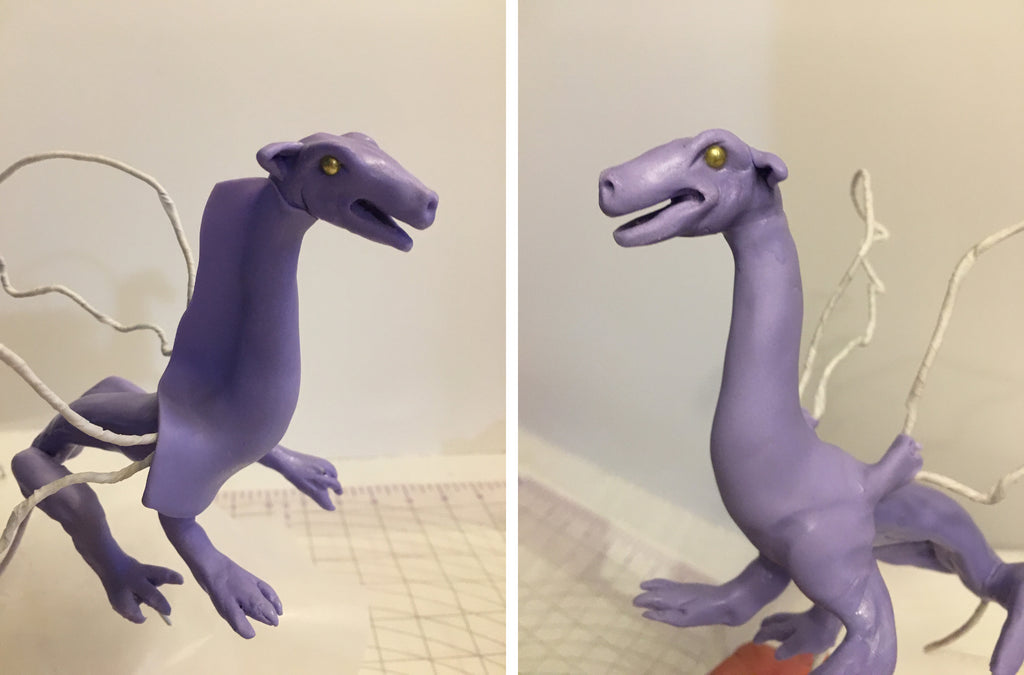
Step 14:
Paint a dot of piping gel in the eye socket and press in a gold dragee.
Time to make the ears!
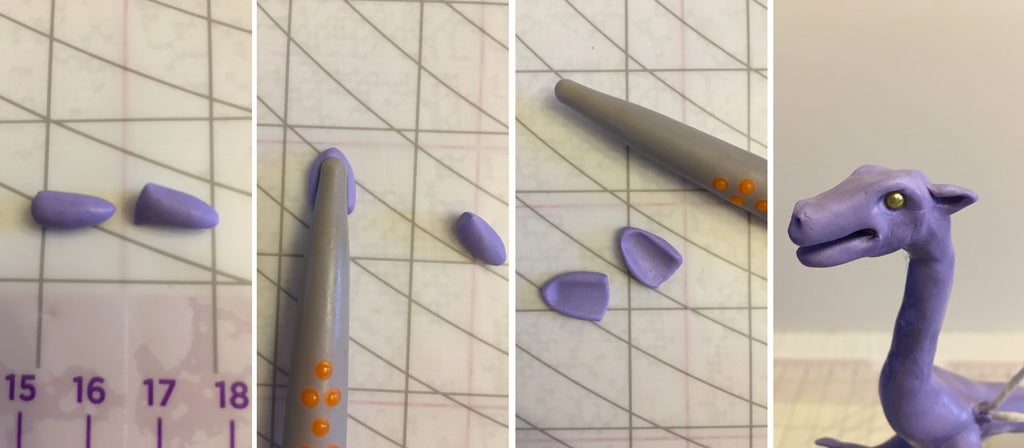
Step 15:
Roll a snake of modeling chocolate approximately one inch long. Cut it in half. Roll the big end of the orange sugar shaper on each piece to flatten it and cup the ear. Do not roll the sugar shaper out over the sides. Pinch top of ears so they come to a point. Attach the ears to the back of the head about eye level. Smooth seam with orange sugar shaper.
Step 16:
Create a vertical line in the middle of the upper part of the mouth below and centered between the nostrils using the small end of the yellow sugar shaper. Then make horizontal lines up the snout using the large end of the red sugar shaper.
Step 17:
After working on the head I decided my dragon’s neck and chest were too skinny. It is always a good idea to periodically step back and look at your dragon and at the model and make any adjustments. If you made yours big enough to begin with, you can skip this step. But if you think you need more body, continue along.
Wrap the modeling chocolate around the neck, creating a seam at the back of the neck. It will be easy to hide here when we add the spines down the back. Trim off the excess modeling chocolate and smooth the seams with the side of your orange Sugar Shaper.
How about a little magic?
Step 18:
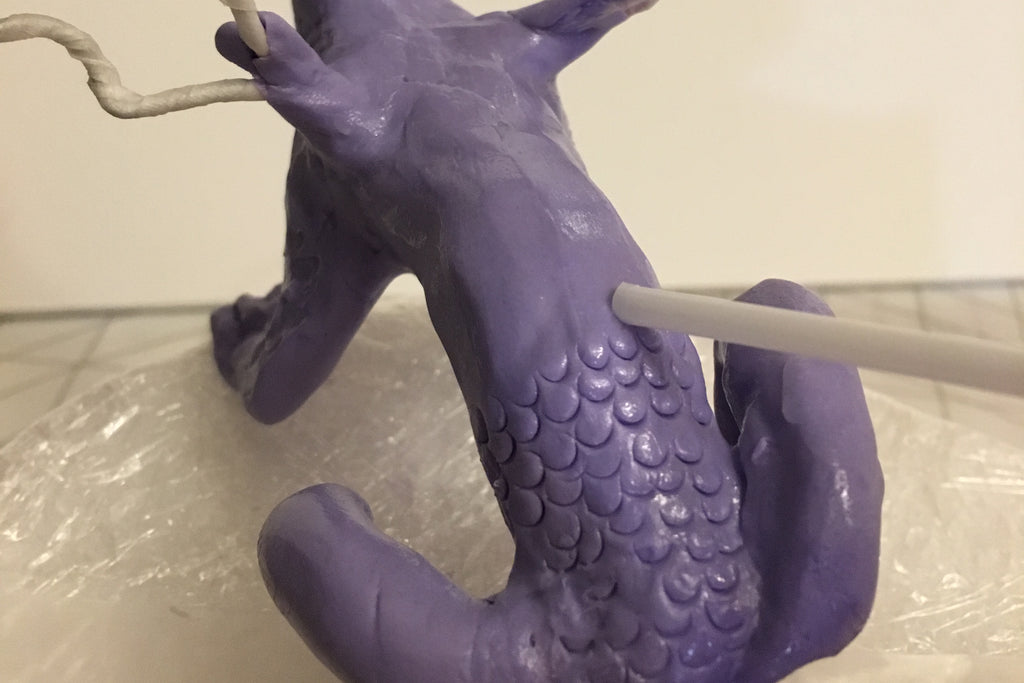
Use the big end of the blue Sugar Shaper to create scales on the dragon’s tummy. Start from the bottom and work upwards. Align each scale between the ones beneath it – like laying bricks.
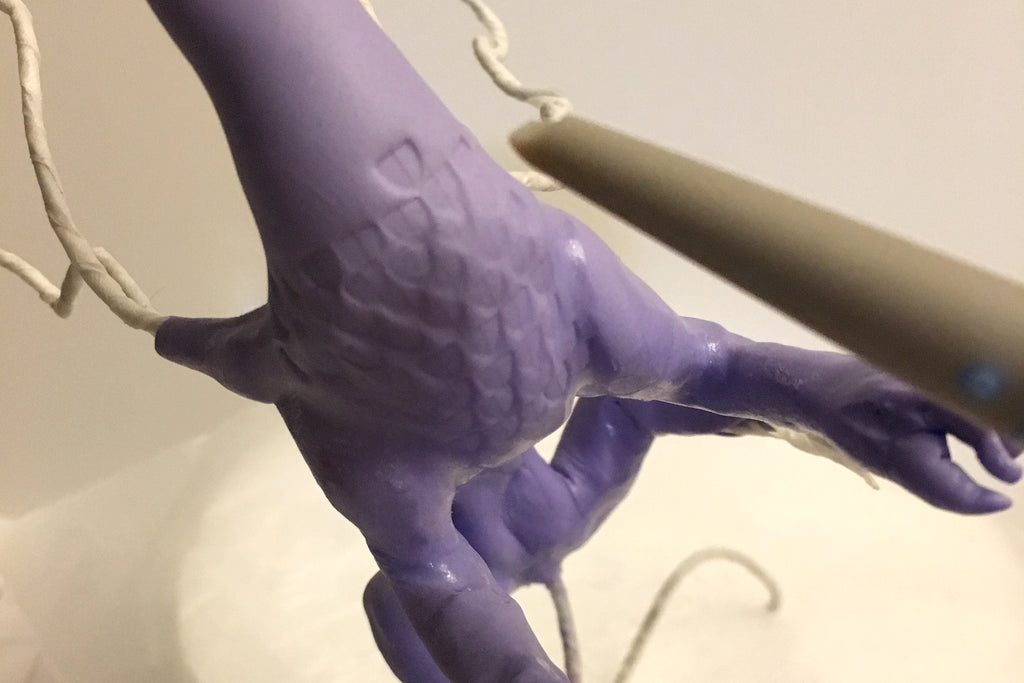
Step 19:
I want to make the scales on the back of the dragon look a little different and more defined than the ones on the tummy, so I will use a different method. Press the end of a coffee straw into the modeling chocolate to make a half circle. Make rows that are misaligned working from the tail to the top of the head, and then along the legs and feet.
Now on to the wings!
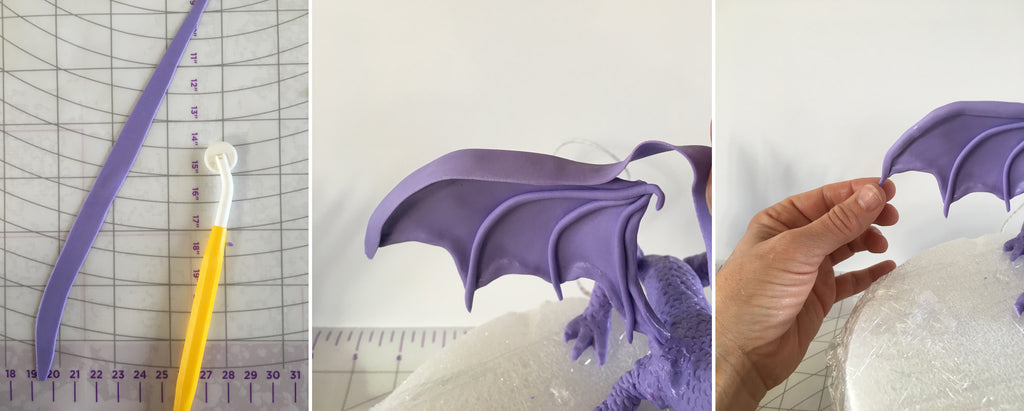
Step 20:
Roll out modeling chocolate at least twice the size of the wing. Paint the wire with piping gel. Then paint the back of the modeling chocolate with piping gel. Why do I do this when modeling chocolate sticks to itself? Well, I want to make sure it does and I want to be sure I don’t have any air bubbles.
Step 21:
Align the middle of the modeling chocolate with the top of the wing and fold it over the wing. Pinch the middle together around the wings. Trim off the excess modeling chocolate around the wire.
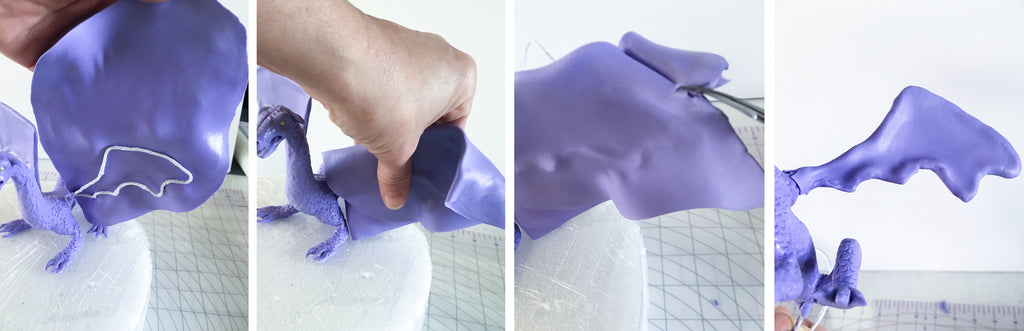
Then smooth the seam where the wings attach to the body using the big end of the orange Sugar Shaper. Gently run the large end of the orange sugar shaper along the wing inside the wire to define the bone structure of the dragon's wing.
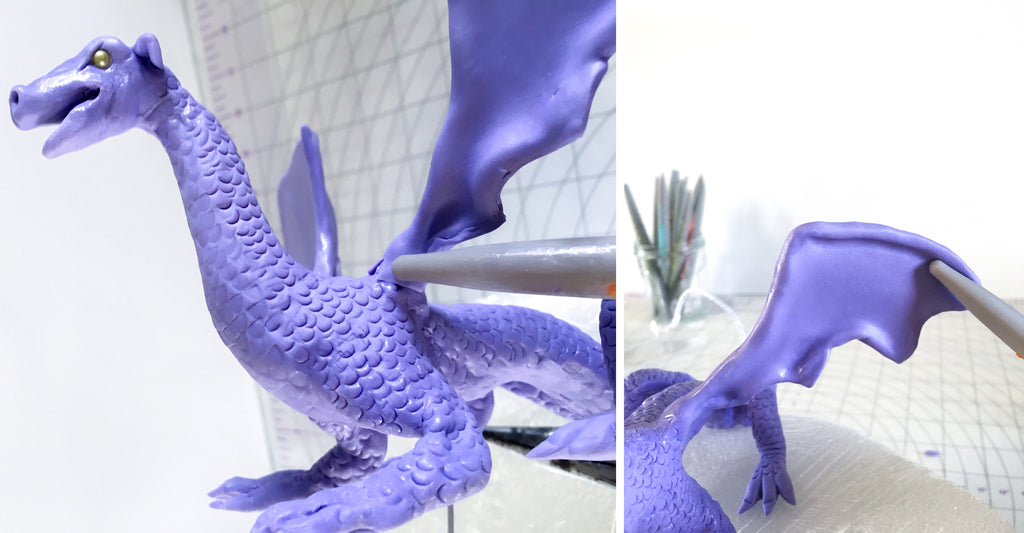
Step 22:
Roll a long thin snake in modeling chocolate and attach it to the wings to create fingers. Make the top finger extend beyond the top of the wing to create a claw.
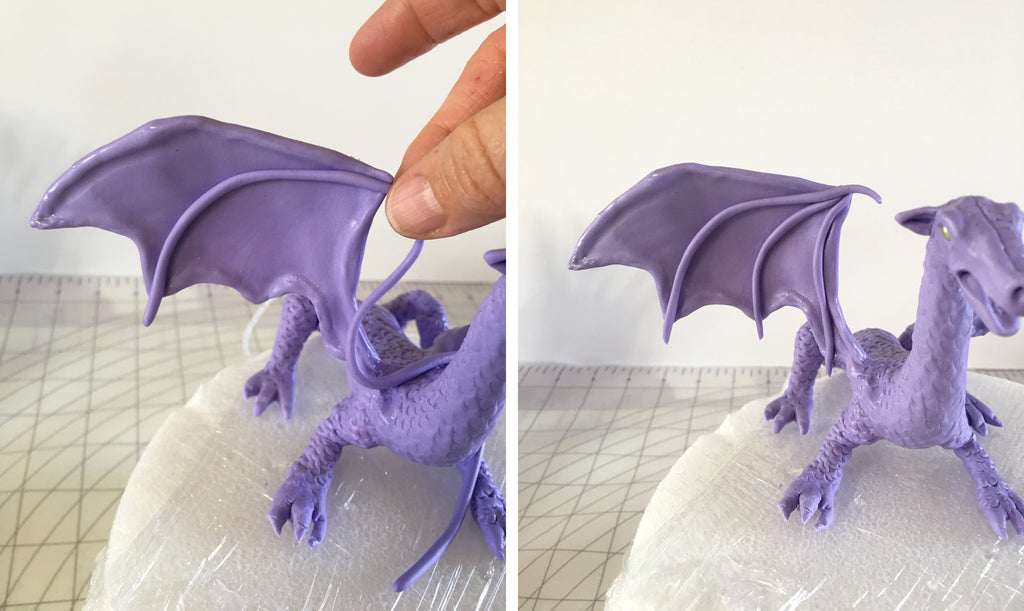
Step 23:
To enhance the shape of the wings, I decided to add a thin strip of modeling chocolate along the top of the wing. First I rolled out the fondant, then attached it. I rolled the bottom tip to a point.
Step 24:
Now it’s time to pump this dragon’s biceps up! Make a small snake and use the orange sugar shaper to thin the edges, leaving the middle thick. Now attach that bicep and smooth seams 3with orange sugar shaper.
Now on to the tail!
Step 25:
Roll a snake the length of the tail. Make an incision half way into the snake. You may see where I am going with this and wonder why I am not just threading the snake onto the tail. Well, here is why. The armature wire is hard to bend and so I would have to thread the snake along the curve of the tail which is a pain. Since we are putting spines all the way down the tale, I don’t have to worry about hiding a seam.
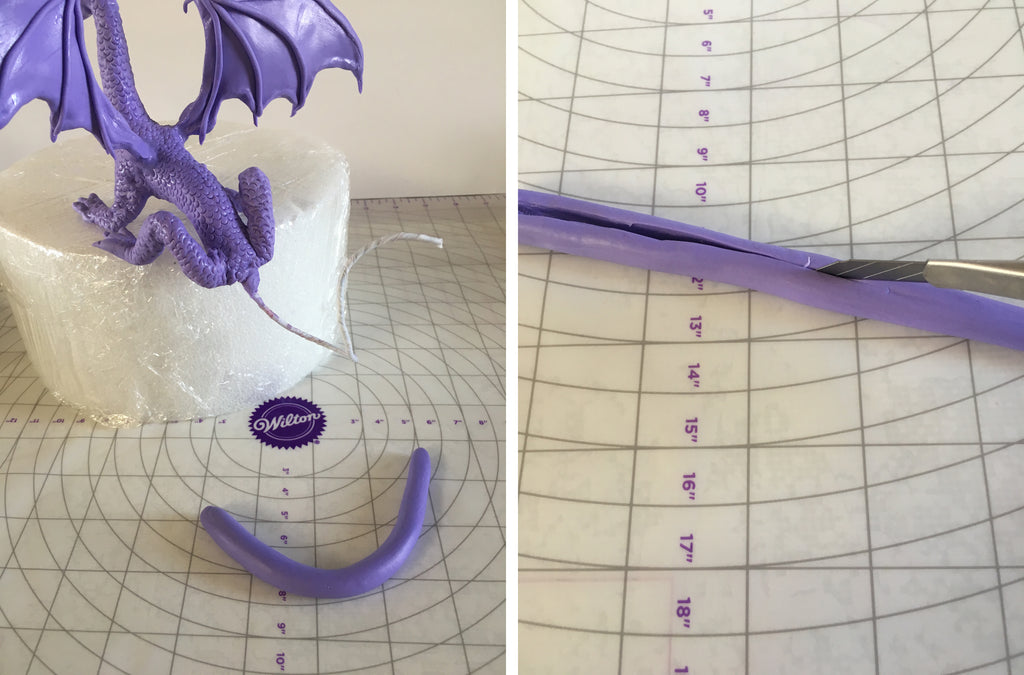
Step 26:
Paint inside the modeling chocolate with piping gel. Then wrap the modeling chocolate snake around the tail wire making sure the seam is at the top (so it will be covered by the spines). Now smooth the seam where the tail attaches to the trunk of the body and pinch the tip of the tail to make it come to a sharp point.

Next we will create the spines that run down the back of the dragon. I use black because I want to paint the spines gold and metallic paint shows up better on dark colors. For gold you can also use brown fondant. If you want to make the spines silver, definitely use black!
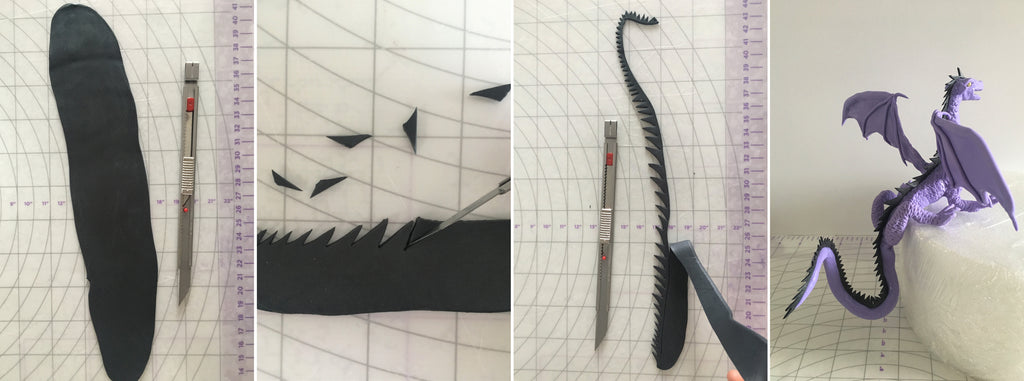
Step 27:
First you will need black fondant. Mix the fondant with approximately 1/8 tsp tylose powder. Roll out the fondant the length of the top of the head to the tip of the tail. Then cut out triangles along one side of the fondant.
They should begin small (for the tail) and get increasingly larger as you go up the back. The spines should then decrease in size until they are small again as they go up the neck to the top of the head. Cut the excess fondant from the side that will attach to the back of the dragon. Paint along the flat side of the spine with piping gel and attach it to the dragon body. If it is too floppy still, let it sit for a bit for it to dry enough to stand up.
Now let’s give our dragon some horns!
Step 28:
Roll a snake of black fondant with tylose powder into a snake about 1 inch long. Taper the snake at the ends and cut the snake in half. Then use your fingers to roll the horns thinner so that each half is approximately an inch long.
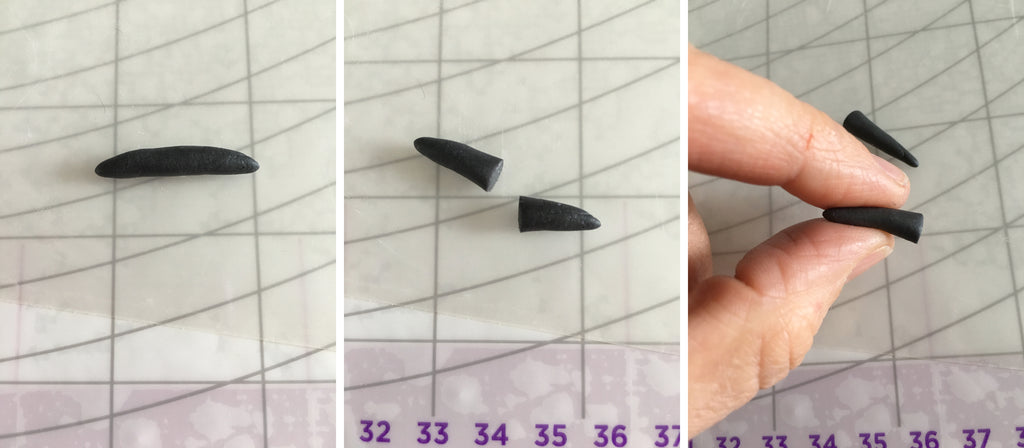
Step 29:
Use the red Sugar Shaper to make grooves on the horns to give them some texture. Curve the horns as shown in the photo and set them aside to set up so they hold their shape. Once they've set, attach the horns to the head above and between the eye and ear.
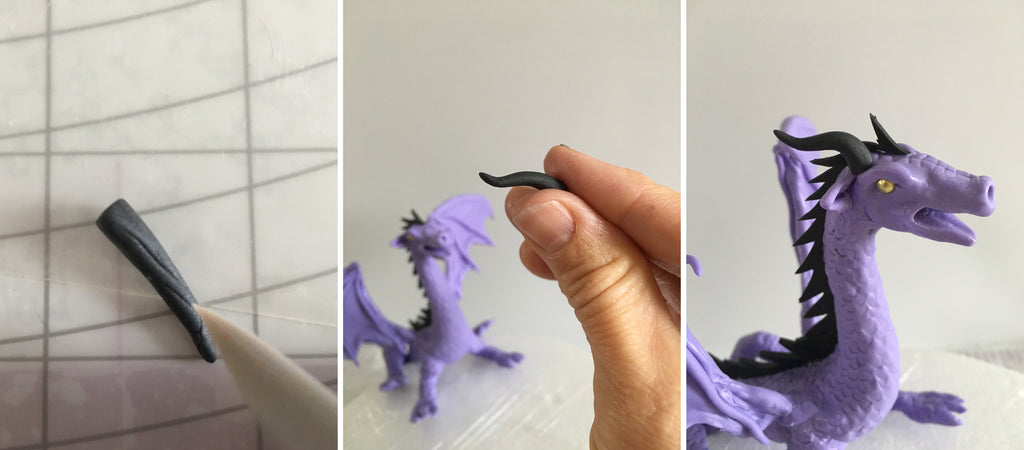
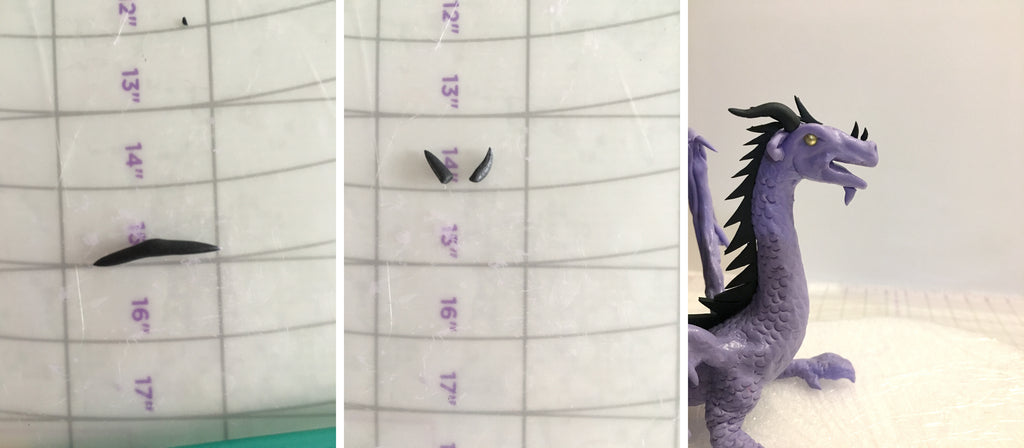
Step 30:
Roll a thin snake approximately ¾” long. This will become little horns on the snout. Cut the snake in half. You will want to cut them again so one half is bigger than the other. Then glue the horns to the snout with piping gel. Put the smaller horn in the front and the larger one in the back.
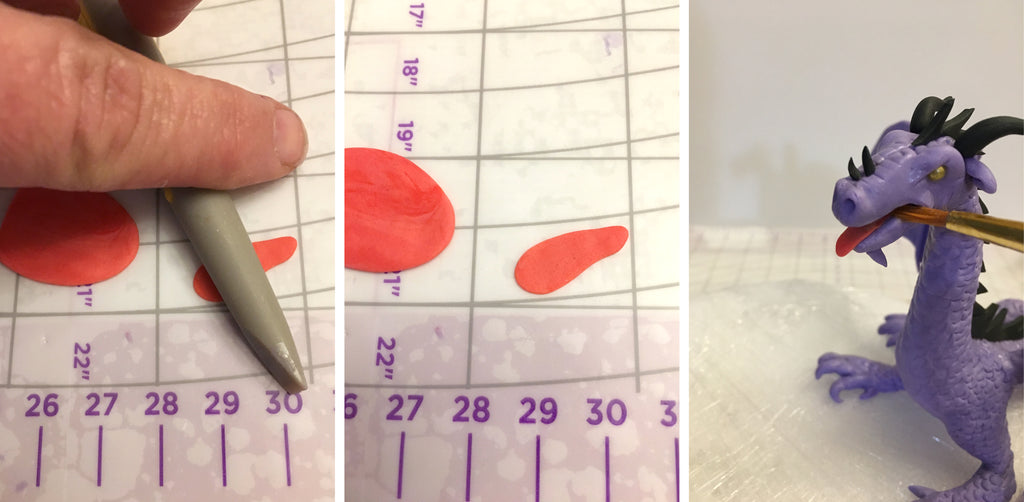
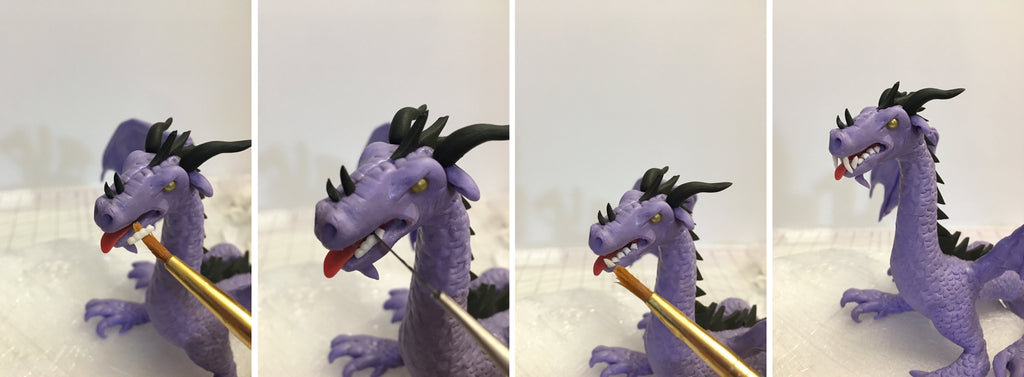
Now let's give this dragon a tongue!
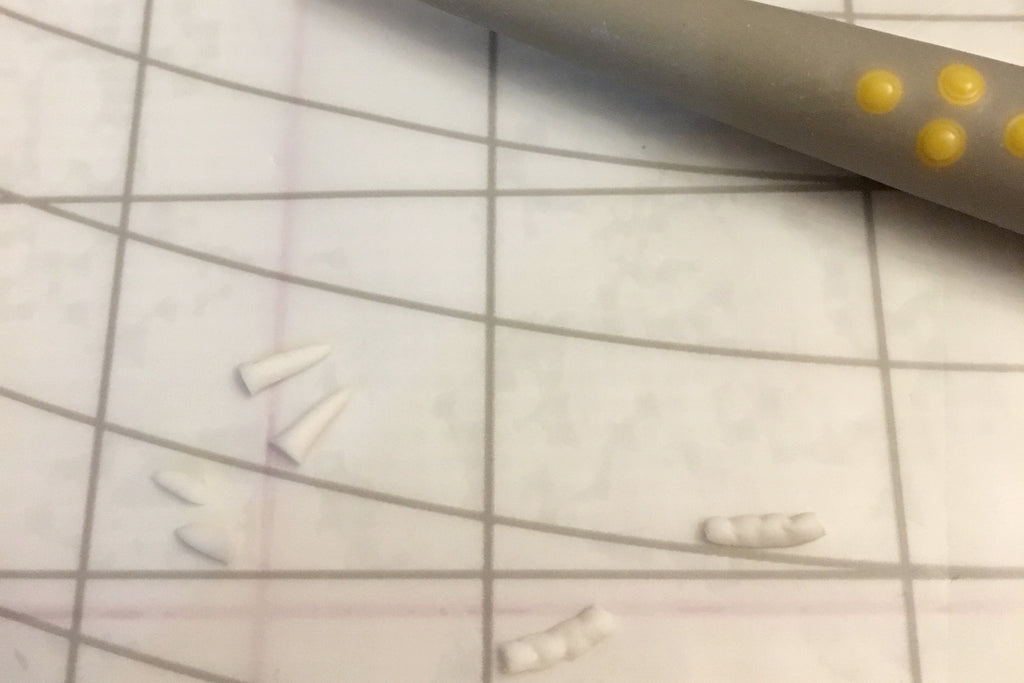
Step 31:
Mix a small ball of red and white fondant to make pink. Use the side of your yellow Sugar Shaper to roll out an oval long enough to cover the inside of the mouth and have about 1/8” - 1/4” extending over the edge of the mouth. The part that sticks out will need to be a little narrower than the part that is inside the mouth. This is so it will fit between the teeth.
No dragon is complete without some dangerous fangs, so let's give him some teeth!
Step 32:
Roll a thin snake of fondant approximate 1 ¼ ” long. Cut that into 5 equal parts, approximately ¼ ” long. Then cut one of the pieces in half. Taper the ends of the two smallest pieces and two of the larger pieces. These will be the top and bottom fangs. Square off the ends of the two remaining pieces. These will be molars. Use the small end of the yellow sugar shaper to make small indentations diving the snake into 4 equal parts.
Step 33:
Glue the molar snake onto each side of the mouth at the bottom. Then use a knife to cut along the indentations you made to separate the teeth. Glue on the small fangs in front of the molars with piping gel, and the long fangs to the top of the mouth. They should be in front of the bottom fangs.
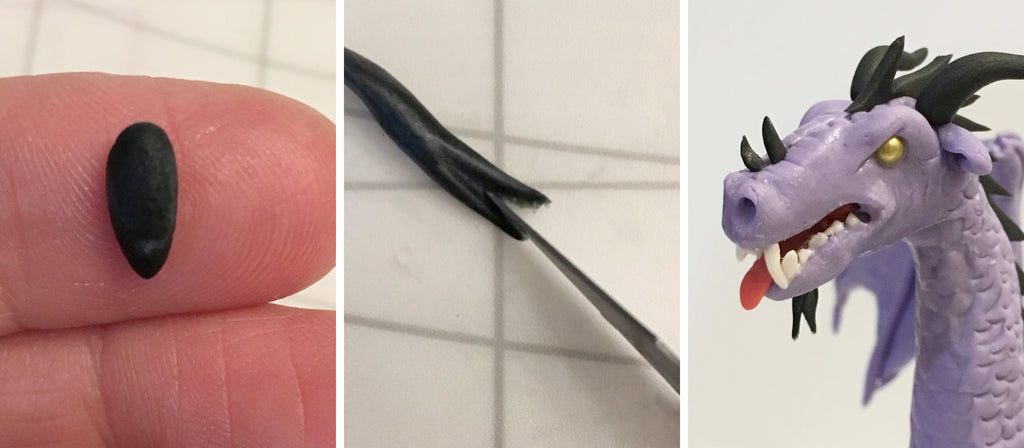
Now let's give him a little beard.
Step 34:
Get a small piece of black fondant. You will then roll this into a thin snake. Cut one end of the snake vertically (it will look a bit like a forked tongue). Then cut the fondant horizontally just below the fork so it is about ¼” long. Glue it to the bottom of the mouth toward the end.
Step 35:
Add a claw at the top of the wing using a cone of purple modeling chocolate. Blend the claw into the wing using the orange Sugar Shaper.

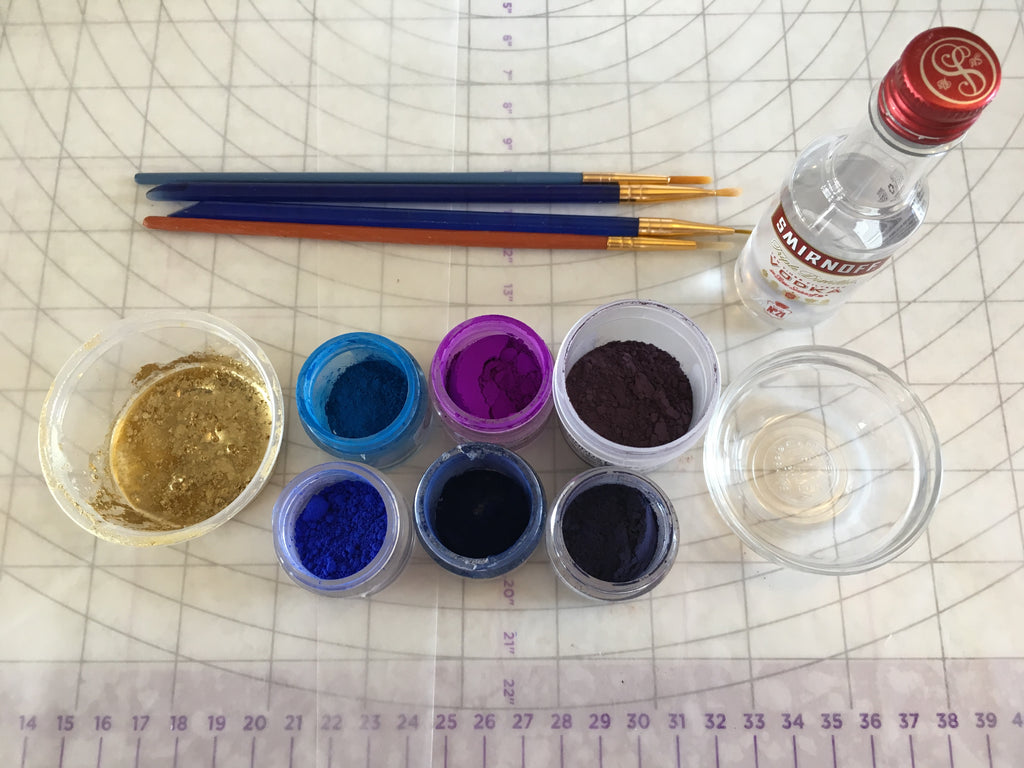
Your dragon is now ready for color! For this you will need:
- Purple and blue powdered food color (several shades of each)
- Metallic gold luster dust
- Vodka
- A small paint brush for each color
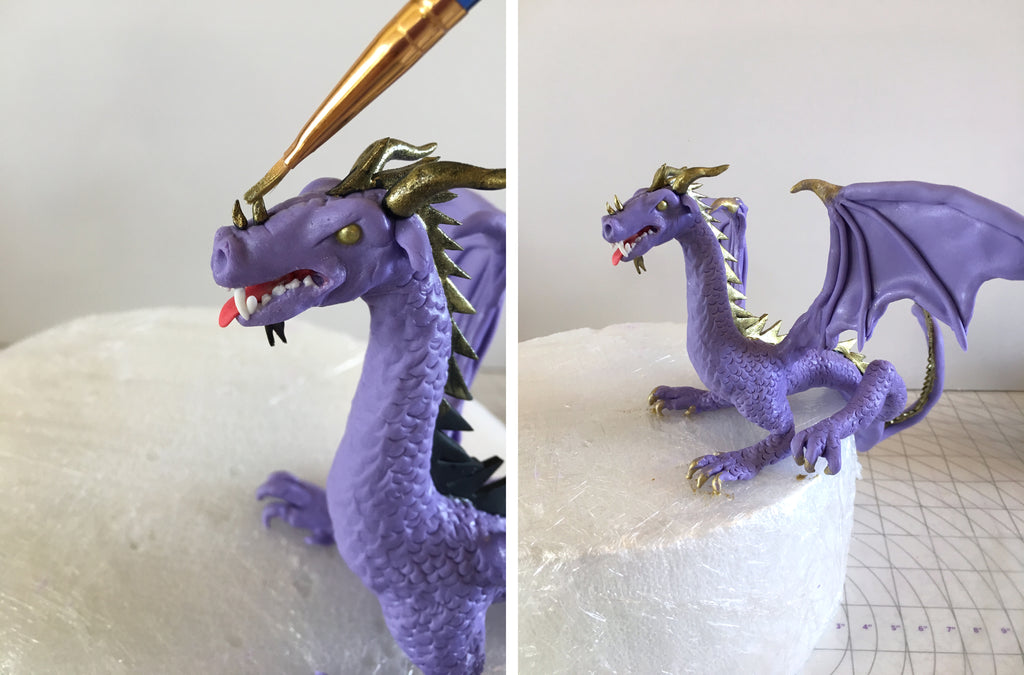
Step 36:
Mix the gold with some vodka and paint the spines, horns, claws and talons and beard gold.
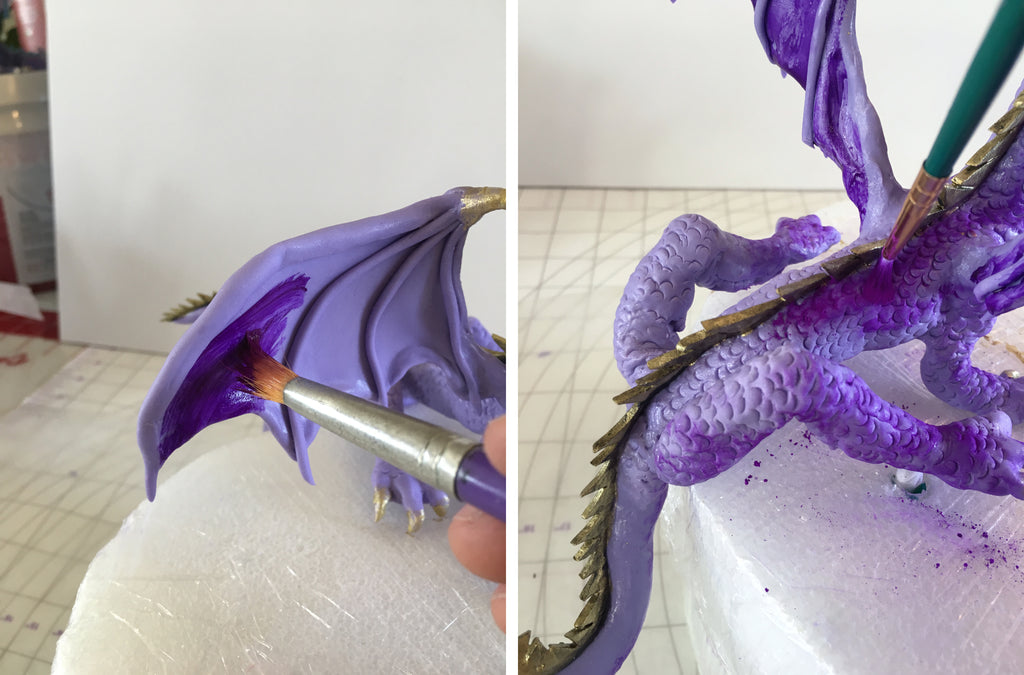
Step 37:
Paint the space between the fingers on the wings dark purple using vodka and powdered food color. Then shade the top of the back near the spine, behind the knees, and other creases with dry dark purple dust.
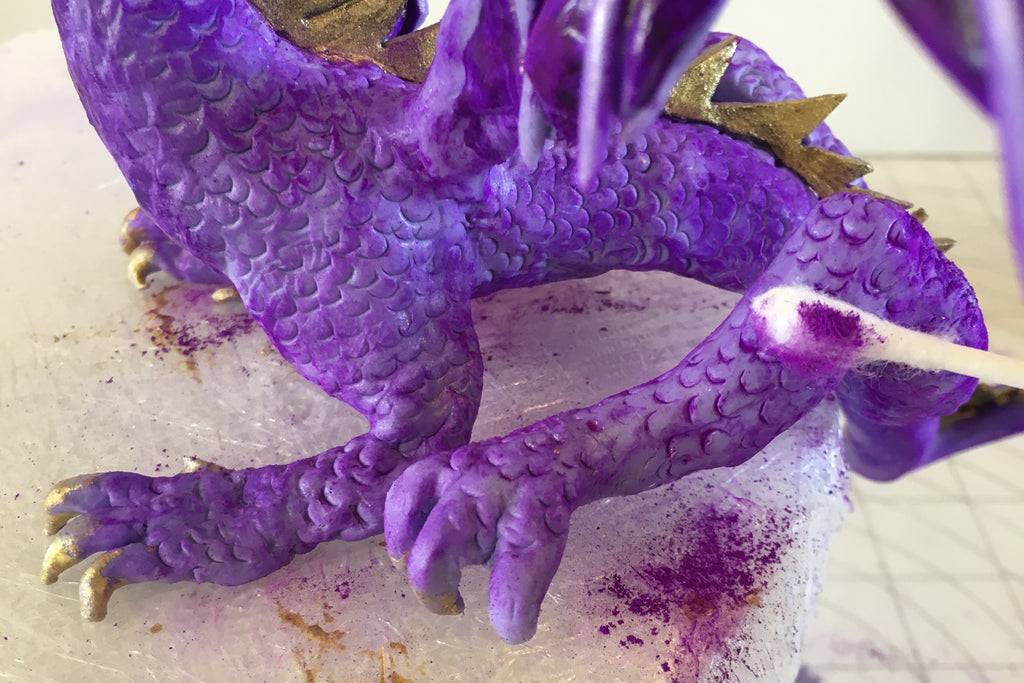
Step 38:
Using the same purple (or a different shade if you want to get fancy), dust the back sides of the back and legs and neck. Then take a cotton swab and wipe off the dust in the direction the scales face. This will leave the dust only where the scales are cut into the body and will give them more definition.
Step 39:
You can add highlights on the front/tummy scales by painting along the bottom arc of some of them with white powdered food color mixed with vodka. You will need to make the paint thick. As a final touch, use the black food color pen to draw a vertical line on the eye to make a pupil.
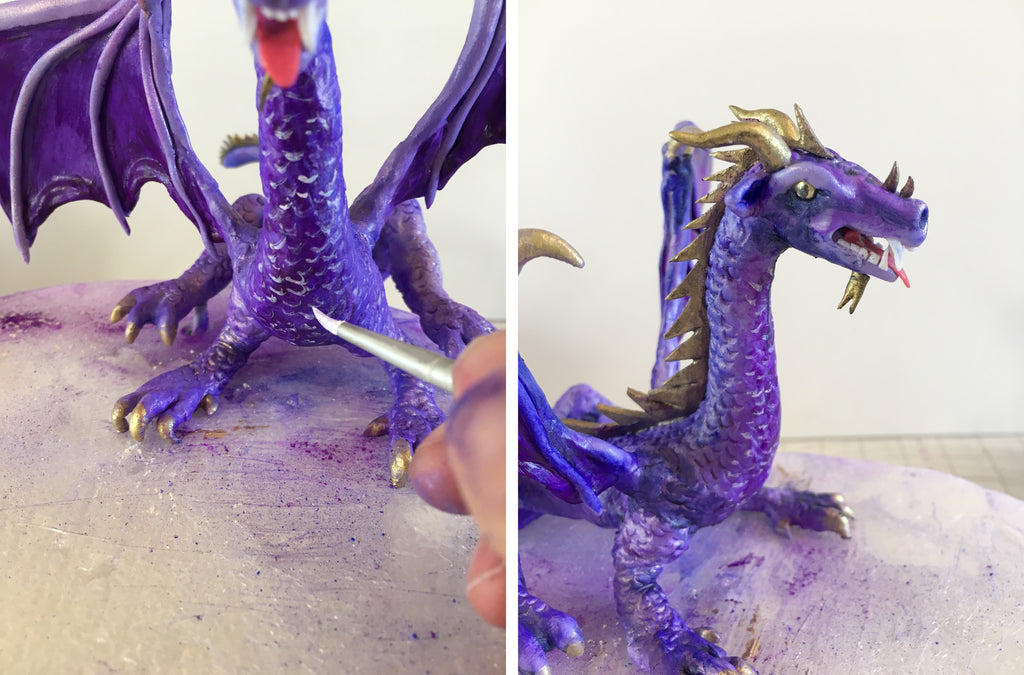
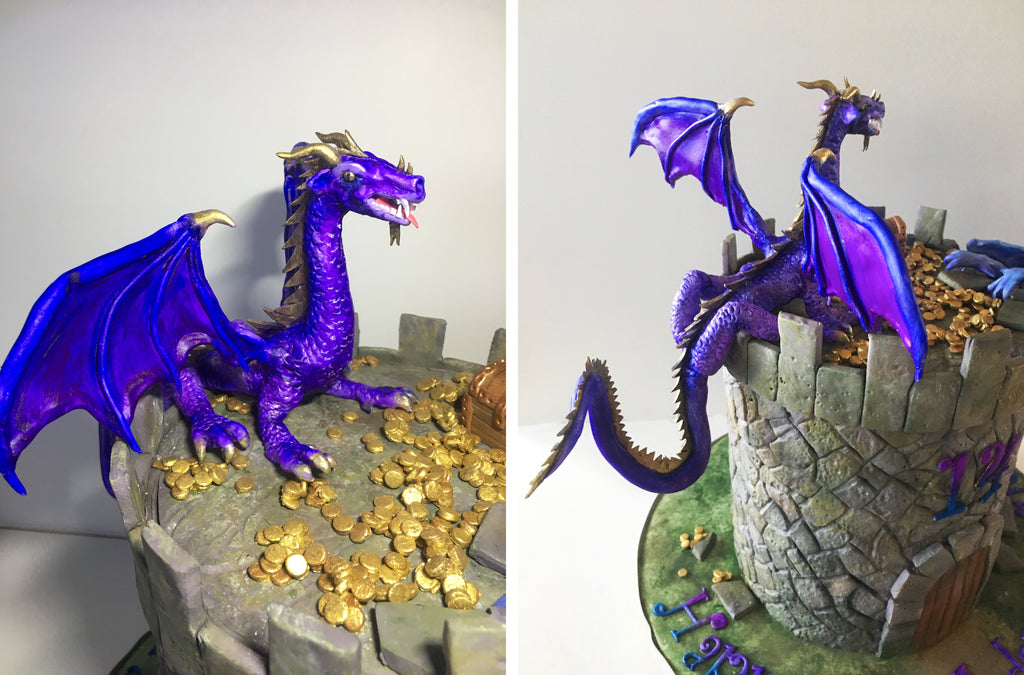
Voila!
That’s it! The dragon model is finished and ready to place on your cake!
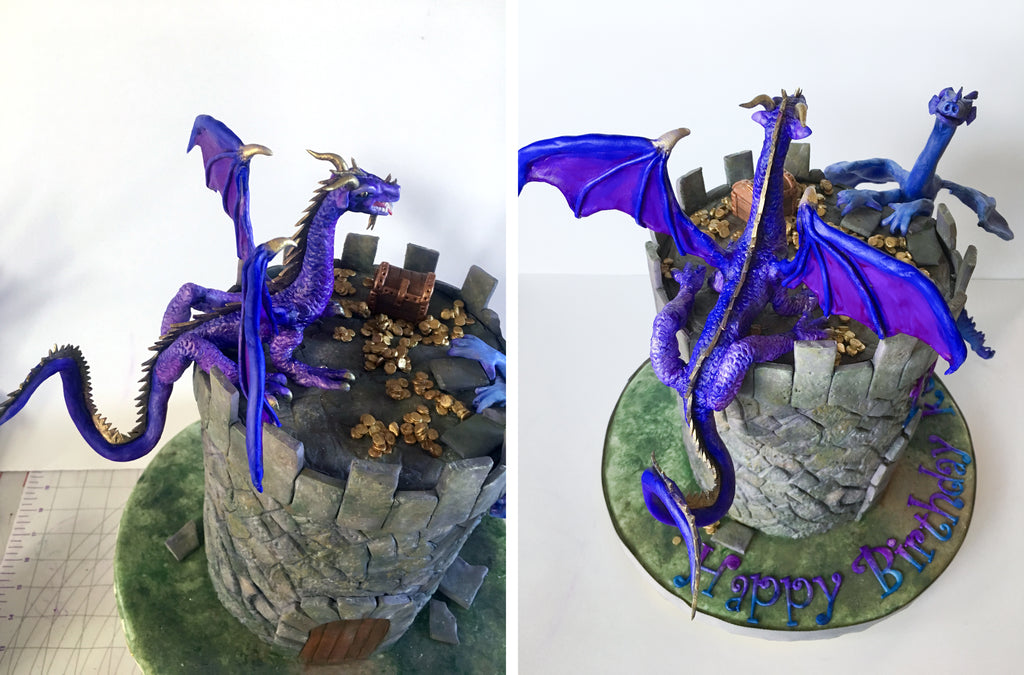
We hope you enjoyed this wonderful tutorial, and we look forward to seeing all the dragons it inspires!
You can find more of Jennifer Kennedy's work online:
Facebook: Jenny's Haute Cakes
Instagram: @jennys_haute_cakes