Sugarworks Blog
Home Grown Chocolate Chip Zucchini Bread
Labor Day has passed. The kids are back at school. Summer is definitely winding down. And if you're a backyard gardener like me, you are sick to death of zucchini.
Zucchini is a lot of fun early in the season- it grows fast, it's the first to fruit, it thrives in nearly every climate, and it can seemingly withstand all conditions of hardship. It is the viking of the vegetable patch.

It also makes a whole heckuva lot of food.
By late summer, you're drowning in zucchini. They never stop growing! You pick one zucchini longer than your arm and a half dozen smaller ones burst forth nearly instantly. You've steamed them, sauteed them, skewered them, and stir-fried them. You've braised them, broiled them, and breaded them. You've made them into those trendy "zucchini noodles" that really don't pass for real noodles no matter what the health fad magazines say.
Your friends have stopped inviting you over because they know you'll bring zucchini.
What do you do with it all?
Well, personally, by this point in the season I feel I've paid my dues in healthy summer home-grown vegetable eating and I'm ready to mash them all up with sugar and spice and make myself a treat.
It is time for zucchini bread!

If I'm baking for myself, I feel like the stakes are pretty low. (Meaning if it turns out truly awful I can quietly slip it in the compost bin and no one is any the wiser...) So I tend to make my own recipes. This one turned out pretty fab (an opinion validated by my two roommates, who scarfed it down in a day,) so I'm going to walk you through what I did.
The first thing I did was a quick internet search on quickbreads just to get a sense of basic proportions (flour:sugar:fat) commonly used. The I rummaged through my cupboards to see what I had on hand that sounded good in zucchini bread.
This is what I came up with:

Ingredients:
- 2 cups zucchini
- 1/2 cup vegetable oil
- 1/2 cup almond milk (or whatever type of milk you enjoy)
- 1 1/2 cups sugar
- 3 tablespoons dark molasses
- 2 tablespoons agave nectar (honey is fine also)
- 1 teaspoon vanilla extract
- 1 teaspoon cinnamon
- 1/2 teaspoon ground cloves
- 1 teaspoon salt
- 1/2 teaspoon baking soda
- 2 teaspoons baking powder
- 3 cups flour
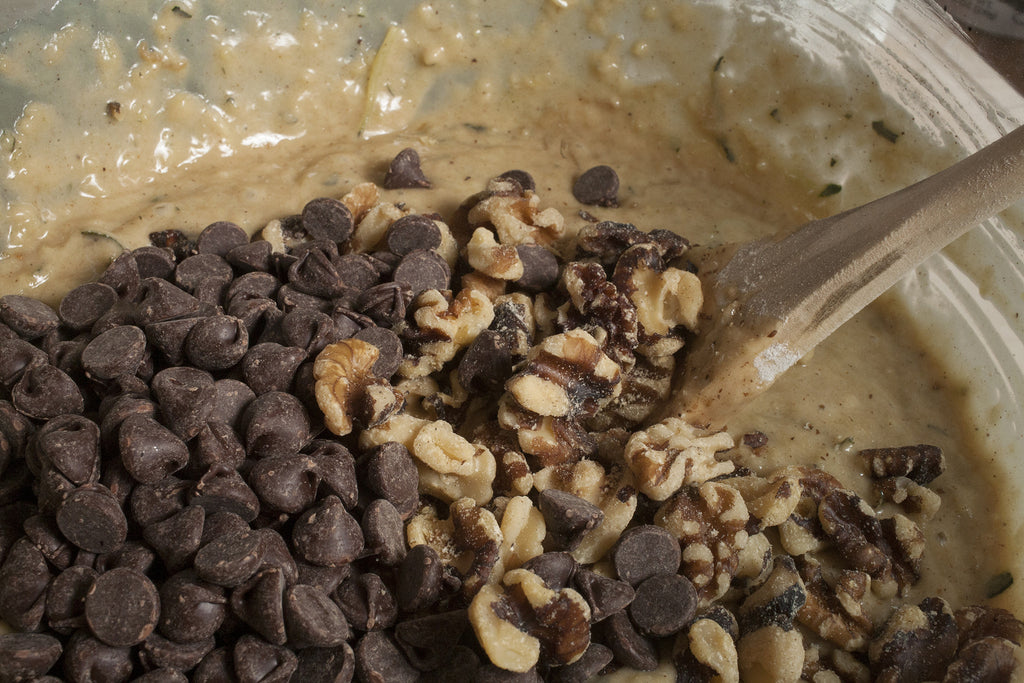
- Semi-sweet chocolate chips
- Walnuts
- A few pinches of turbinado sugar
Step One: Wet stuff

Grate 1 cup of the zucchini. Put the other cup in the food processor. It doesn't need to be pureed, but it should be processed down to tiny chunks. Put all the zucchini in a mixing bowl.
Add the oil, milk, molasses, agave, and vanilla extract. Mix it up. Then add your sugar and mix some more. Set this bowl aside for a minute.
Step Two: Dry stuff

In a separate bowl, mix together the flour, salt, baking soda, baking powder, and spices. You can sift all this if you want, but it's not crucial to do so. Just mind the baking soda. Nobody likes clumps of baking soda in their snack.
Step Three: Two worlds collide

Add the dry mixture to the wet, sugary, zucchini pulp in the mixing bowl. Stir it up until you have a nice batter. Fold in as many chocolate chips and walnuts as fits your taste. I was real heavy on the chocolate chips, but lighter on the walnuts.

Step Four: The final stretch
Pour your batter into a greased 8 1/2" x 4 1/2" loaf pan. I like to sprinkle a little turbinado sugar on top for a little sugary crunch in the top crust.

Bake at 350f for about 50 minutes. I've found over the years that bake times can vary a lot among home ovens, so start checking your bread around 45 minutes. When you can poke a knife through to the bottom and it comes out mostly clean, it's ready.
And there you have your Chocolate Chip Walnut Zucchini Bread!

Not only is this the best zucchini bread I've made so far, but it might be the most delicious end-of-summer zucchini disposal you could hope for.

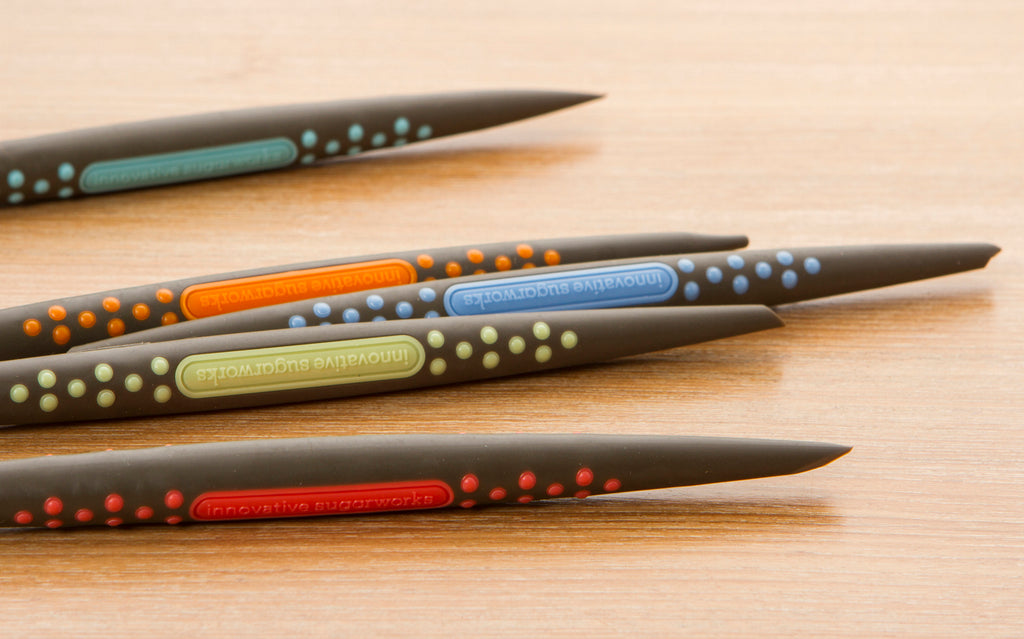
Sugar Shapers, even without the sugar!
When I was experimenting with Sugar Shapers for the very first time, I learned something pretty cool- they work just as well for traditional art media as they do for edible media!

This opened worlds of possibilities for me. I'll be honest- I don't like baking. I love cake as art, but the hours of kitchen work ahead of time just to get to the sculpting part? Ugh. Last time I tried that I burnt through an entire season of Peaky Blinders on Netflix before I even got to the fondant.
But clay? Ok, it doesn't taste as good, but you get right to the fun part! And since it doesn't get eaten, you can show it off to your friends forever.
It's also really great to be able to practice on something that doesn't go bad and can be reused. Clay or modeling compound are perfect for that, and Sugar Shapers work great with either.
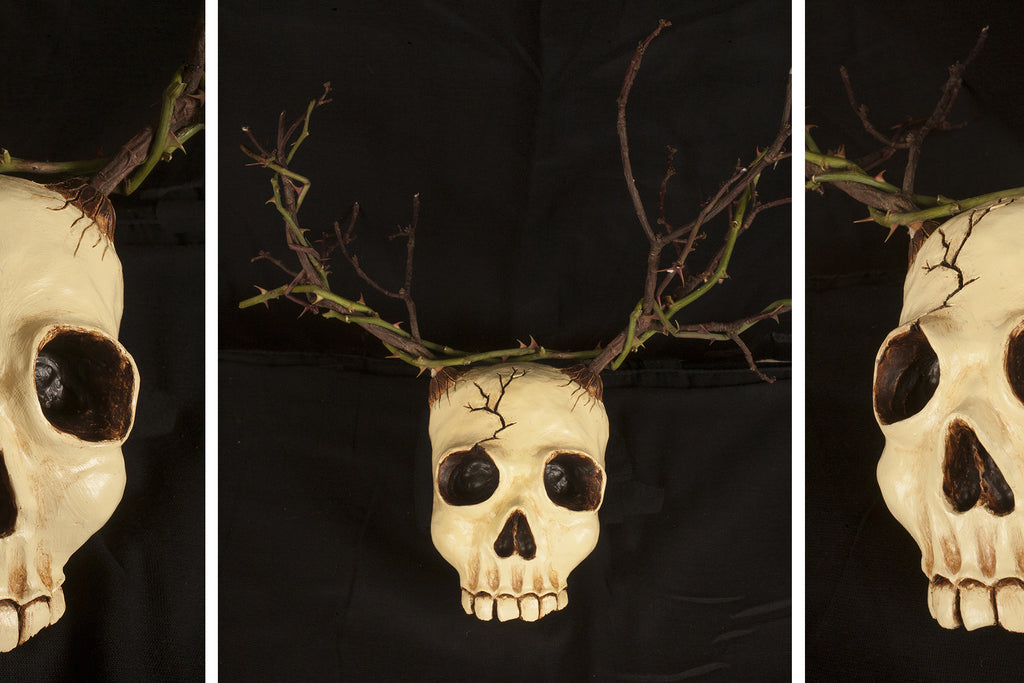
So, I've been reading The Mists of Avalon recently and my mind is all aswirl with this ancient Druidic imagery- the Lady of the Lake, the Moon Goddess, the Horned One... you get the idea. I decided I wanted to sculpt the skull of the Horned One. (You know, in case the rite of the Ancient Challenge ever needs to be performed in my living room. It could happen...)
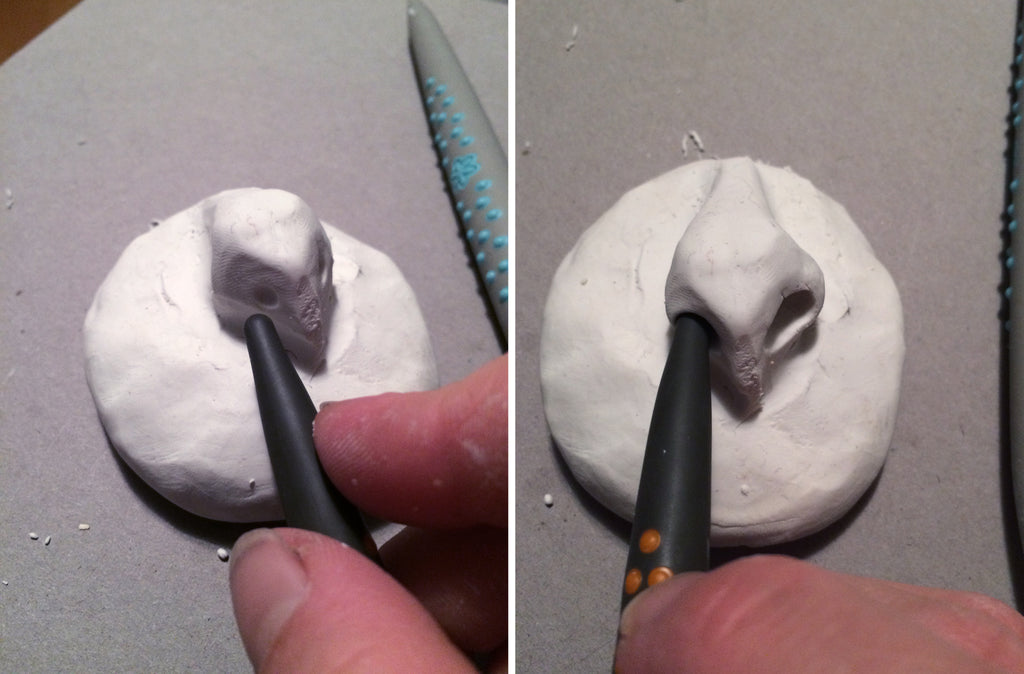
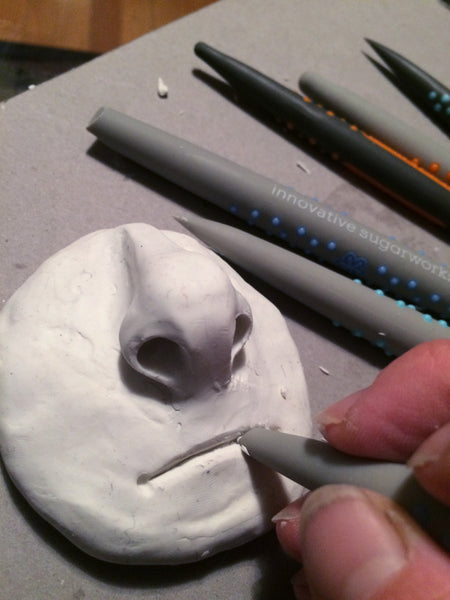
I used oven-bake polymer clay for this and started with just a big, round blob of clay. I first just made dots with my Bone Chisel Sugar Shaper to mark off where I wanted the eye sockets and nasal cavity to be. Then I used my firm-tip Bone Chisel (the orange shaper) to begin the eye sockets by pressing in and moving the shaper in increasingly large circles.
Continue widening your circles, letting the clay build up into a ridge outlining the sockets. Don't worry if your ridges get too high- you can blend them down later. Use the edge of your shaper to shape your sockets. Remember, eye sockets aren't perfect circles and no skull is perfectly symmetrical. Don't be afraid to give your skull some character.
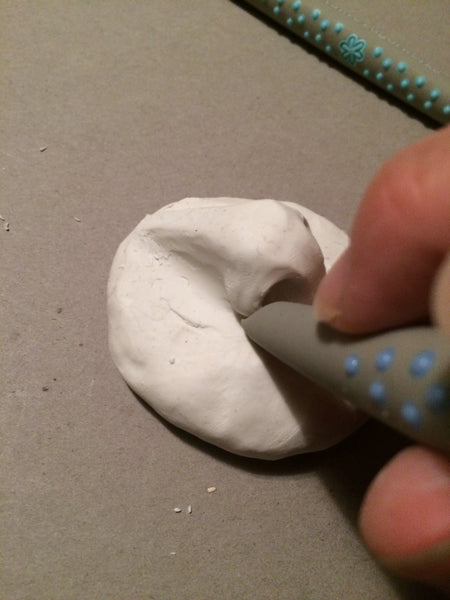
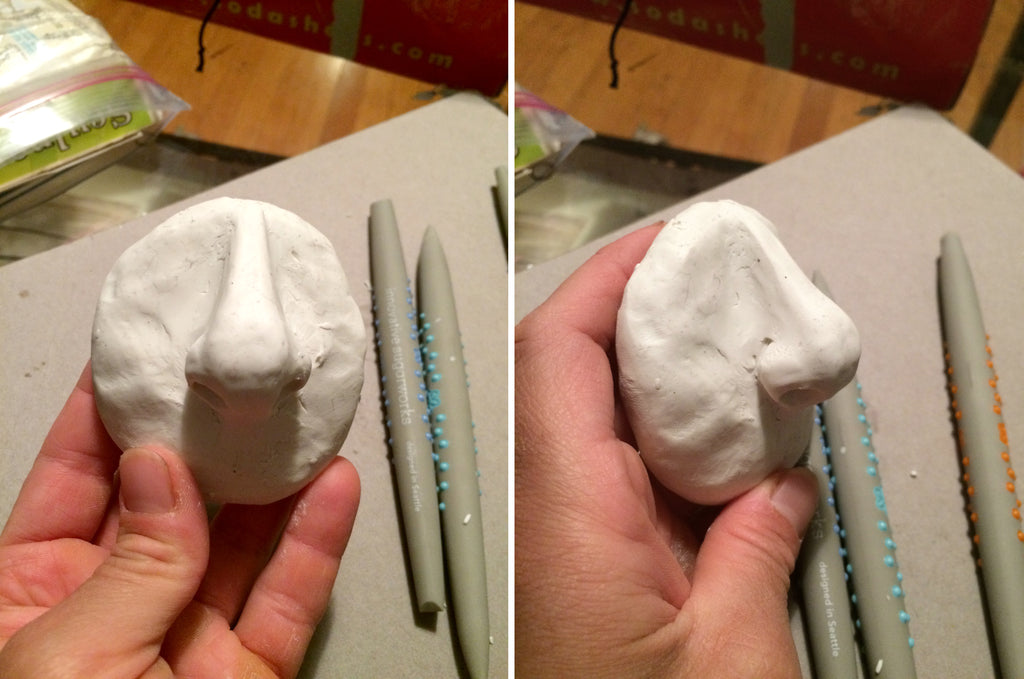
For the nasal cavity, I used the larger end of my bone chisel to start the two sides of the cavity at its bottom, then switched to the smaller end of the chisel to extend the cavity upwards, narrowing to a rounded point at the top. Again, I let the clay build up a bit around the edges of the cavity, especially at the top. This top ridge of bone is what would be the bridge of the nose if flesh were present.
The teeth were the most fun part. I started with my Lip Chisel (the purple/periwinkle one). While this chisel was specifically designed to sculpt lips, it's surprisingly ideal for teeth, as well. If you press the whole chisel head into your clay, you get a really good tooth shape. I used the larger end and just stamped out a line of them.
I then went in with my Pointed Chisel and scraped out the clay in between the teeth. I smoothed down any rough edges this created with the edge of the shaper.
Next I used my soft tip Round Chisel (the green one) to add some dimension to the area where the teeth insert into the upper jaw bone. Press the tip of the chisel into the clay at the top of the tooth shape and pull outward just slightly.
Add some more dimension by using your bone chisel to make indentations in between each tooth and pull upward toward the nasal cavity. The teeth roots extend upward into the jawbone, leaving slight recesses in between each root. You can use either the firm or soft tips for this, depending on how much you want to exaggerate the gaps.
And just for fun, I roughed up the teeth a bit. I bent one front one in towards its partner, broke off pieces of a couple, and added a slightly jagged texture to the bottoms of them all.
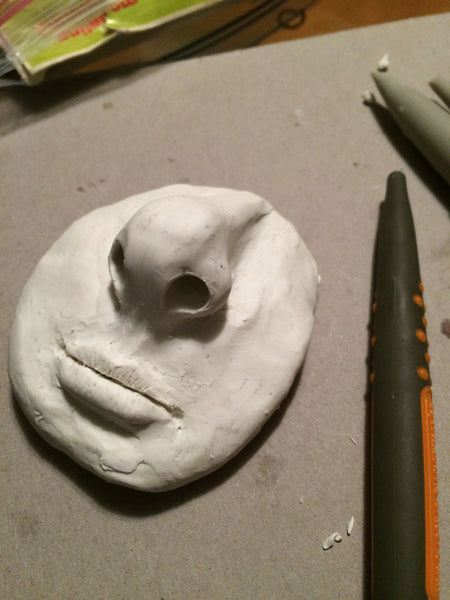
Now we have our skull; it's time to make it the Horned One.
I took two little blobs of clay and stuck them to the upper sides of the skull, above and inward from the temples, for the horn bases. Lacking a convenient supply of deer antlers, I just used sticks from my yard. They'll be taken out when the clay is baked, but for now leave them in to hold the shape, I used my firm tip Pointed Chisel like a pencil to draw some texture lines onto the horn bases.
I decided my skull should have a crack above one of its eyes. (It's an ancient relic; it can't have survived all those year undamaged.) So I used my Pointed Chisel to draw on the crack and then my Square Chisel (the yellow one) to widen the crack and give it some depth.
Here's a really cool thing I learned with this project- your Bone Chisel is an eraser! I decided i made too many crack lines and wanted to back-track a bit. I used the larger end of my Bone Chisel and rubbed it gently back and forth over the unwanted lines, just like an eraser. And the lines just disappeared, completely smoothly.
And there's your skull of the Horned One! 
Add a little paint and some rose thorns and you're done!
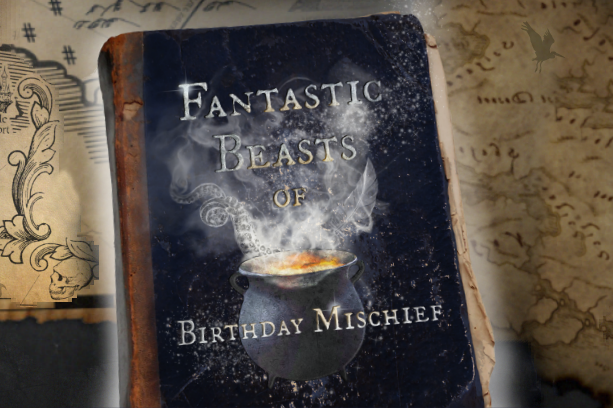
Birthday Mischief Managed!
Birthday Mischief is a Cake Art project inspired by J.K Rowling's Harry Potter book series. Founded in 2014 by Michelle “ChefMitchie” Curran of Mitchie's Munchies in Las Vegas, the idea was to celebrate Rowling's birthday (which, incidentally is also Harry Potter's birthday) with cakes inspired by her magical world placed in locations connected to the book series.

The project was such a success they've decided to continue it annually. This year, with the upcoming release of the Fantastic Beasts and Where to Find Them film, the Birthday Mischief crew decided to focus their cakes on the magical creatures described in Rowling's faux-textbook of the same name.
Many of the talented and renowned cake artists participating in Birthday Mischief used Innovative Sugarworks Sugar Shapers in their creation, and Chef Mitchie sent us photos of their amazing work. We've decided to compile them here where you can see a whole collection of Fantastic Beasts!
Drew the Dragon, Ukrainian Ironbelly
 Artist: Berenice Rabago of Berry's Sweet Studio
This shy dragon has the power to transfigure anything into beauty. He is known for his sage advice and his love of pumpkin spice flavored popcorn.
Dwendino the Erkling
 Artist: Lyle Clemente of Cake My Day Abu Dhabi Dy's CMD
Dwendino was one of the last of the now extinct Erklings to be captured and studied. Their uncontrollable tempers and insatiable cravings for human children's flesh caused them to be hunted into extinction by protective humans.
Pattersyn the Plimpy
 Artist: Ruth Rickey of Sugar Gypsy
Plimpies are harmless but annoying aquatic creatures. They pester swimmers and nibble the toes of bathers.
Nundu
 Artist: Corinna Maguire of Lovin From the Oven
The Nundu is a leopard-like beast found in East Africa. It is an aggressive animal and emits a lethal gas through vents in its mouth. The nundu generally feeds on large mammals, but is known to have a weakness for aroma-inducing herbaceous foods such as beans, prunes, and garlic.
Scrufflefluff the Griffin and his human, Ash
 Artist: Heather Sherman of Art2Eat Cakes
Scrufflefluff and Ash are best friends. Ash was raised high in the mountains, and spent much time alone in forests and meadows. Scrufflefluff was discovered by Ash as an injured kitten-chick, who simultaneously discovered previously un-tapped magical powers while defending the scruffy baby from the ignorant muggles who were "family". The two fled, and lived in a dry, sweet cave in happy harmony together.
Ash healed the baby's broken leg, and would laugh at Scrufflefluffs baby antics. Ash gave Scruffle his name for his very un-griffinlike and highly undignified crest of silly fluff that pops up whenever Scruffle is intrigued or happy. They are adorable baby feathers that have remained even after several moultings. The two have been fast friends ever since. Ash never shirked the (bloody) responsibility of the proper feeding of a Griffin kitten-chick, bringing Scruffle many rabbits until he learned to hunt them himself. Then Scruffle hunted for them both! It is nearly impossible to win the unbreakable devotion of a Griffin, to the point where they will share food.
When Hogwarts heard of the pair, Ash was extended an Invitation by Owl to attend Hogwarts, in Specialized Research of Creature Studies. Now, while Scrufflefluff wings about on his own (looking for lady Griffins), he returns frequently to Ash's eyrie tower room for cuddle-snuggles and rabbit tidbits. Ash has been spotted clambering onto Scruffle's back periodically and taking wild flights at all hours. Scrufflefluff is naturally the beloved live Mascot of Gryffindor, who welcomed Ash with wide open arms as long-lost kin. Hogwarts visitors are advised to look for Scruffle's Orange Ribbon (normally tied at his throat), and if they see a Griffin approaching to please hold all spells.
Sira the Ashwinder
 Artist: Renay Zamora of Sweetface Cakes
The Ashwinder is a fascinating creature. It lives for only one hour before turning to ash, yet manages to lay a full nest of eggs in that time. It eats nothing.
Antipodean Opaleye Dragon
 Artist: Mike Guerrero of Mad Mike's Cakes
The Antipodean Opaleye is a solitary and territorial dragon breed. They neither fear humans nor consider them prey, but will attack if threatened.
Billywigs
 Artist: Laura Burton of Dalton Cupcakes
Billywigs are swarm creatures. When threatened, they will coordinate to disorient a potential predator and can unite to sting as a unit. Billywigs feed on Bowtruckles and Flobberworm mucus. Their eggs are used in potion-making and their stings are highly valued by sweets manufacturers.
Lethifold
 Artist: Hailey Harris of Hailey's Sweet Temptations
The Lethifold is a silent and fast predator. It moves in the blink of an eye and kills its prey so swiftly there is never time for escape. As a creature of darkness, the smallest bit of light terrifies the Lethifold.
Silver Spur the Hippocamus

Artist: Irina Salazar of Enna's Cake Design
The Hippocamus is a gentle creature who will only attack in defense. Generally invisible, it will show itself only in the presence of magic.
Common Welsh Green Dragon

Artist: Jarid Altmark of Jarid's Awesome Cakes
This particular specimen of Welsh Green was clearly a juvenile. He has a propensity for exaggeration, dominates any conversation with his chatter, is highly sensitive, and demonstrates a lack of consideration for others. He is also surprising adept at Parkour for such a large and ungainly creature.
Jarvey
 Artist: Cynthia Lorow of The Vagabond Baker
The Jarvey spends most of his day beneath the sodden ground of Britain's farmlands and forests, coming out only to feed on moles and gnomes or to bombard a weary farmer with his scurrilous remarks delivered rapidly and thoughtlessly. Woe to the hapless human who surprises this boorish beast, as a startled Jarvey has been known to sink his sharp teeth into the tender flesh of an ear or an ankle drawing blood and rancor whilst hurling insults at his victim through blood stained teeth!
Garden Gnome
 Artist: Jaclyn Dinko of Cake'D Out Creations
Gnomes are a common pest in magical gardens. They feed on worms and the roots of vegetable plants. More a nuisance than a danger, gnome populations can be controlled by introducing Jarveys into the environment.
Chimaera
 Artist: Jacqui Kelly of Totally Sugar
From Greek origins - Chimera traditionally are created from three different animals: lion, goat and serpent. However, in the mystical world, this little hatching has the body and one head of a Welsh Green Dragon. The second head is from a Pegicorn, which is a mix of Unicorn and Pegasus, and the final head comes from the Fantastical Phoenix.
We hope you've enjoyed these Fantastic Beasts! Check back soon- we'll be adding more over the next few days!
Some Kind of Magic
Hello Sugar World!
This is Sugarworks' assistant, Jen, writing today. Most of you know that Meghan is the caker behind this operation; I came on board to help out with marketing and media. Not only am I neither artist nor baker, but before I took this job (full confession here) I didn't even know what fondant was!
But I'm educated now! And after 6 months of staring in awe at other people's work, I thought "I gotta try this out myself."
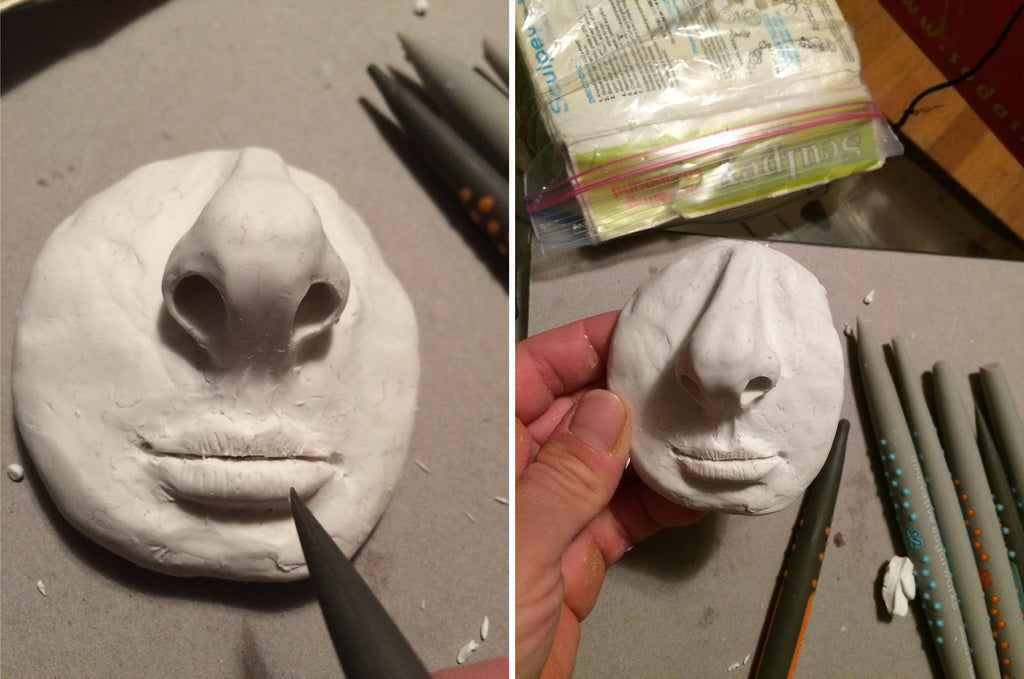
Now, I know enough of what goes into this craft to know not to be too ambitious on a first attempt. (4-tiered, double barreled wedding cake with sculpted flowers and the cast of Rent in fondant figurines? Umm... no.) How about just a nose?
And let's face it- all I really wanted to do was use the Sugar Shapers. (They just look so nice!)
So here it is- my very first attempt sculpting anything. Ever. (And I got to use the world's coolest tools! Job perk!)
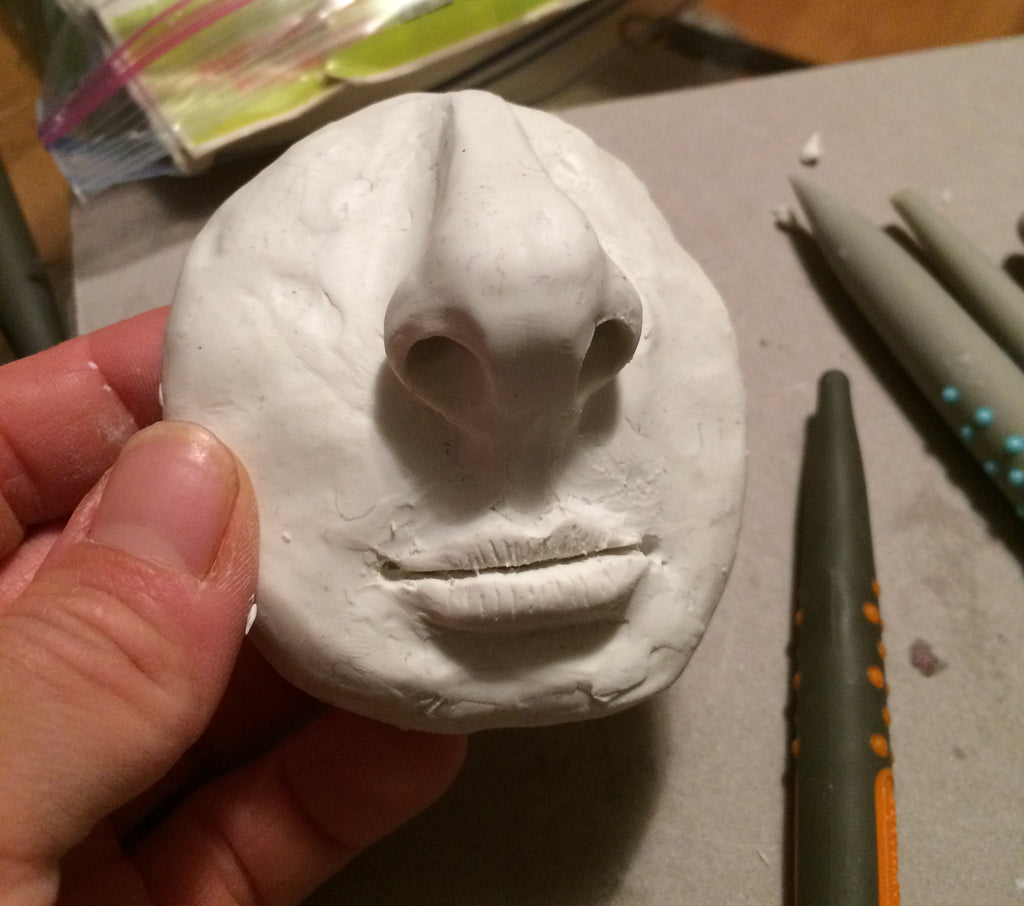
Not too shabby, eh? (remember- first time) The nose worked out better than I expected, so I continued on to lips. Now, I'm at an advantage because I was on set for Kaysie's last Innovative Sugarworks video shoot, so I got to watch a real pro do this before I tried. But I'll do my best to walk you through what I did. (And you'll be able to see Kaysie do it for real very soon! Subscribe to our YouTube Channel to get notified when that comes out!)
So I started out with a dome shaped lump and a diamond/kite shaped blob.
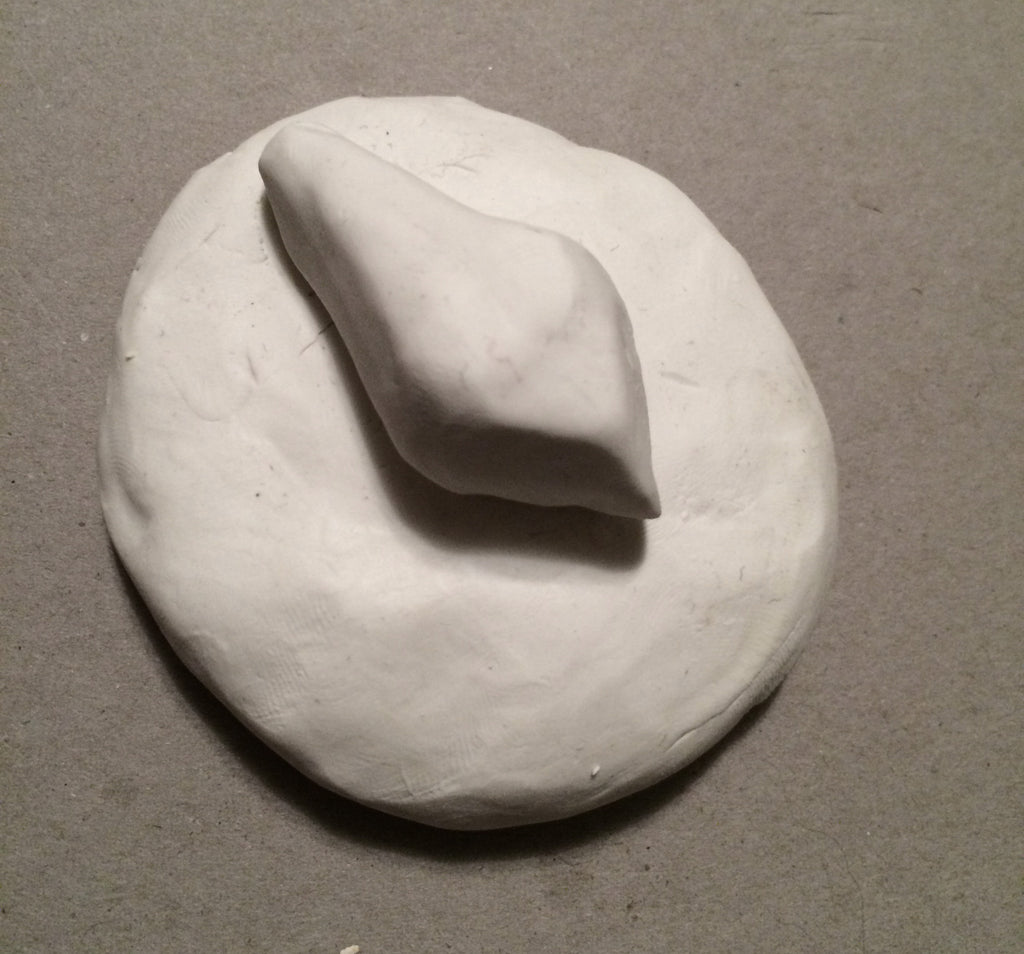
If you're really a caker, you'll probably want to use a 50/50 mix of fondant and modeling chocolate, but I just used some Sculpey from the craft store. I honestly thought this would be an epic failure and I wanted to the ability to mash it all up, make it into a pinch-pot, and pretend it never happened. So now there's half a face sitting on my coffee table because I'm too sentimental at having made A Thing to mush it back into the clay box. It's a conversation piece, right?
I used my soft Pointed Chisel (the light blue one) to smooth down the edges of the kite/nose blob onto the face/dome lump. I also used the side of that same shaper to roll-mold the bridge of the nose.

Next I used the larger end of my firm Bone Chisel Mini Shaper to make the nostrils. I started just by marking two divets in the nose where the nostrils would be. Then I pushed up and out with the shaper to push out the two nostrils into a nosey shape.
Lastly, I used my soft Lip Chisel to add some definition to the edges of the nostrils and I used my fingers to smooth out the septum a little.
Ta-Dah! A nose! A little on the bulbous side, but hey- don't judge. We're all beautiful.
That went so well, I thought I'd push my luck and go for a mouth. I started by using my firm Bone Chisel Mini Shaper to make two indentations for the edges of the mouth. Then I made a line connecting them with my firm Pointed Chisel Sugar Shaper.
Next I used my soft Lip Chisel Mini Shaper to give some depth to the parting of the lips.
Then I rolled out two little slug-shaped bits of clay for the lips. I used the side of the Shaper like a tiny rolling pin to smooth the edges of the lips onto the face and my soft Lip Chisel again to give them some shape. I also used my soft Bone Chisel Mini Shaper to shape up that little indented area in the middle of the upper lip. And for a final detail I used my firm Pointed Chisel Mini Shaper to add some lip-crease texture to the lips.

And there it was! My very first sculpted thing with Sugar Shapers! Now, I can't tell you that there's some kind of fairy-magic lurking in these tools, but I can say that I am not a sculptor, that I have never made a 3-dimensional art thing, and I had never used these tools before this attempt. And I managed a passable success on my first try.
And it was also super fun!!
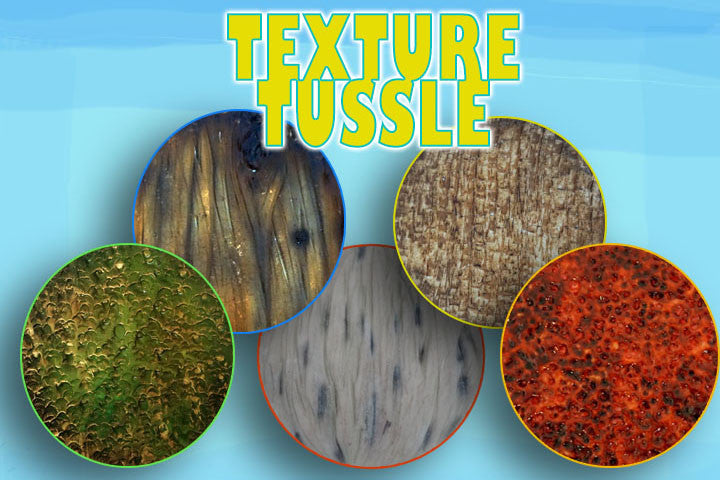
Jarid's Awesome Texture Tussle!
This month our featured guest here at Innovative Sugarworks is Jarid Altmark of Jarid's Awesome Cakes. Jarid's passion for creating edible artwork began when was just 12 years old, and at 14 he had won his first awards at That Takes the Cake in Austin, TX. Jarid has since been featured in publications including American Cake Decorating Magazine and travels the country teaching classes in cake art.

Jarid specializes in 3D sculpted cakes in a style described as whimsical, playful, or fantastic. Today he walks us through how he uses Sugar Shapers and advanced coloring techniques to achieve the realistic textures often admired in his work.

When paired together, skilled texturing and artful coloring can take a cake from a novel dessert to true art. When beautiful textures combine with proper shading and coloring choices, the results can be stunning.

So before we get into coloring, we have to make some textures, and what better to use than Innovative Sugarworks' Sugar Shapers!
For this tutorial, I've chosen 6 textures to demonstrate- wood grain, dog fur, dragon scales, wicker, and bloody flesh. You might be wondering, "What could those things possibly have in common?" Well, you can create all of these textures (and more!) with your Sugar Shapers! Now I will say, I did use all four styles and sizes when creating these textures, but whatever size or firmness you have, you'll be able to achieve all of these textures.

The Tools
So you probably know the crew by now, but if not, there are 6 different tips in each set of Sugar Shapers. And considering they are double sided with a smaller and larger end, you get 12 tools with just one set of Sugar Shapers. For this project, I challenged myself to use only one style tip per texture.

But, with a heavy heart, I regret to inform you that I couldn't figure out a cohesive texture for the Dark Blue Lip Chisel. While this tip is perfectly specialized for making lips, I found that for texturing it's best suited for lending a helping hand to the other Shapers. Below I show the anatomy of the Lip Chisel:

As you can see, there are four different "sides" to the tool. The top creates a crescent shape, angling the tool creates a puffy line, with the tool flat you create a puffy "D" shape, and lastly, with the tool on its point you can make a thin line. So as shown in Kaysie Lackey's Ruching Tutorial, the tool rounds sharp edges and just makes everything look more poofy. And as its name suggests, it is the perfect tool to help make lips!
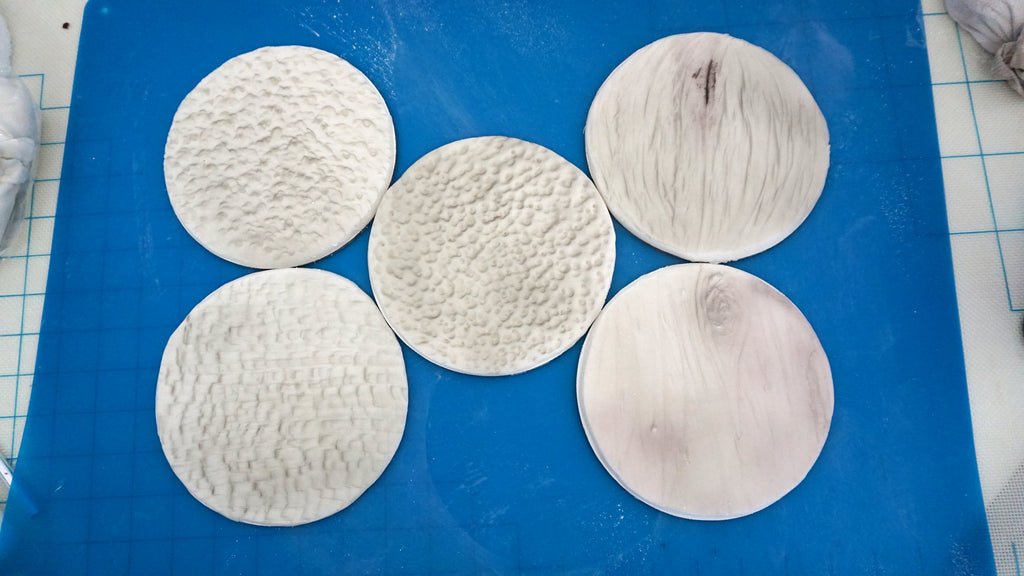
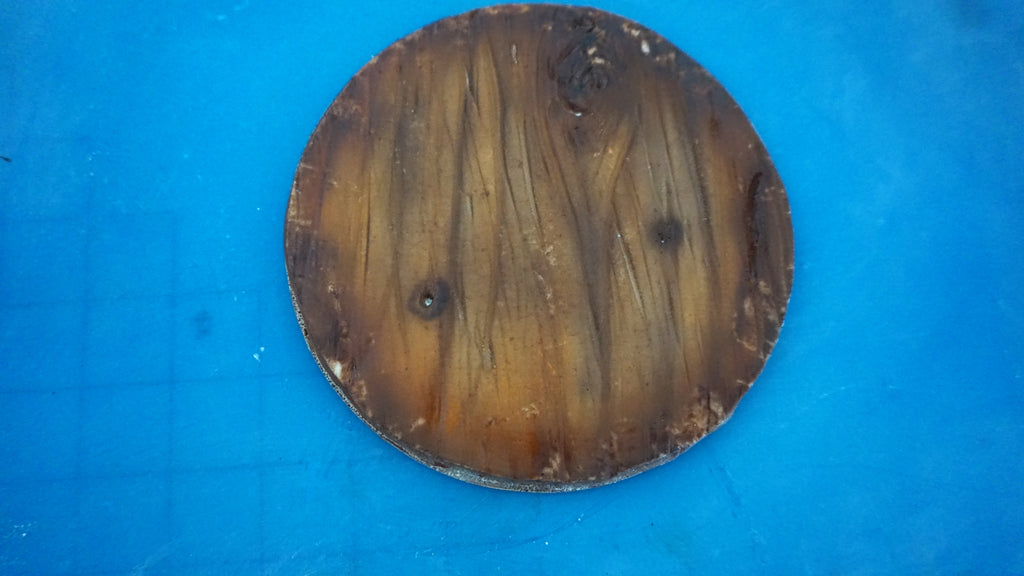
Wood Grain
This texture is created only using the Light Blue Pointed Chisel
Starting with a fresh and soft fondant surface, use your firm pointed chisel to map the major wood indentations and marks. This may include some curved lines, an elongated almond shape, or a little knot made up of a swirl of tiny little scratches to make a rough oval shape.

Next use your soft pointed chisel, in a sweeping motion, kind of like you are painting, create an excess of little lines. This doesn't have to be neat; the more wonky the better. But try not to do any wavy lines, as they don't appear in actual wood grain.

Hair/Fur
This texture is made using only the Red Tri-Tip Chisel

Starting with a fresh and soft fondant surface, or 50/50 mix of modeling chocolate and fondant, mark in the initial hair part, which is generally in the center, with your firm tri-tip chisel. Next divide your hair part into several sections, this will help create a natural flow to the hair or fur.

Then take your soft tri-tip chisel and mark up the surface, while staying in the sections, with lines. Now the style of line is up to you and depends on the look you are going for.
You can do wavy, straight, short, long, curly, anything! In this case I made a swatch of dog fur, so I did fairly short lines.

Possibilities: Think about extending the lines of the hair, adding waves and curls, anything to give the texture even more character.
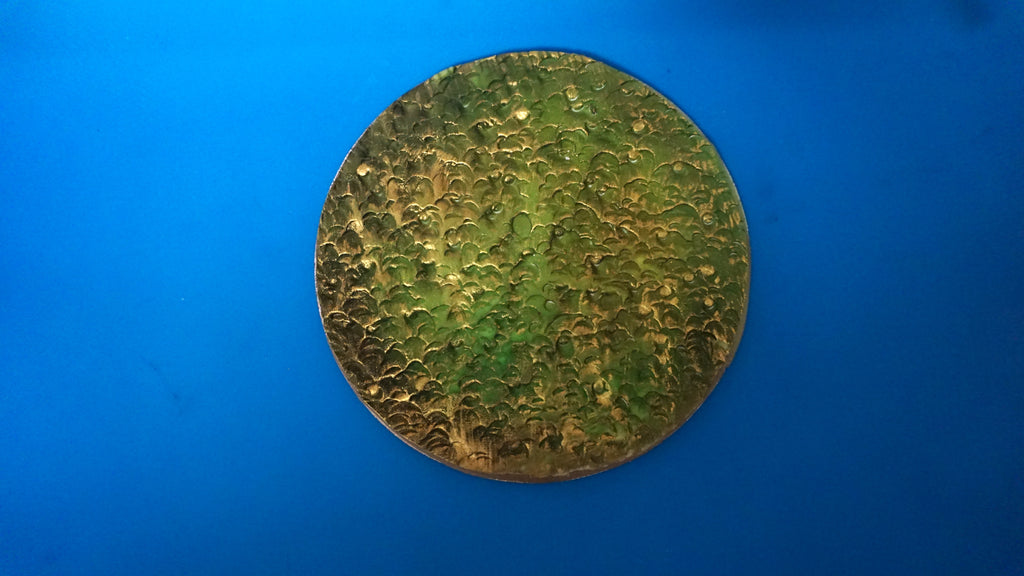
Dragon Scales
This texture is done by using the Green Round Tip Chisel and a totally optional piping tip

Starting with a fresh fondant surface, use your firm round tip chisel on an angle to mark up the surface with little crescent shapes. The more the better! Also, make sure you utilize the different sides to the tool to create variation in the texture.

Next, use your soft round tip chisel, flat, to press into the textured surface to make the oval shape. Now, do this sparingly, as it is only used to create depth in the scales, so it looks layered.

Now, this step is completely optional, but I personally like the look of it. Take a piping tip, lay it on its side and press into the textured surface to create the look of little scales that are sticking up. this also adds to the layered look.

Possibilities: This same texture of scales can be used for fish, lizards, and by changing the shape of the scales you can get a completely different look.
Wicker/Basket
This Texture is done by using only the Yellow Square Tip Chisel

Starting with a fresh fondant surface use your soft square tip chisel in a sewing machine motion (gently pressing the tool on an angle, try your best to keep each ripple equally spaced) to texture the surface to give a woven look.

Then, go back with your firm square tip chisel to deepen the lines and enhance the texture. Lastly, I went back with a veining tool by Morsels By Mark to mark of the woven finish with lots of lines as an added detail.

Possibilities: This texture would be a beautiful texture for a base on a rustic wedding or special occasion cake. Also, depending on the color you use, similar texturing can give a brick or a cobblestone effect.
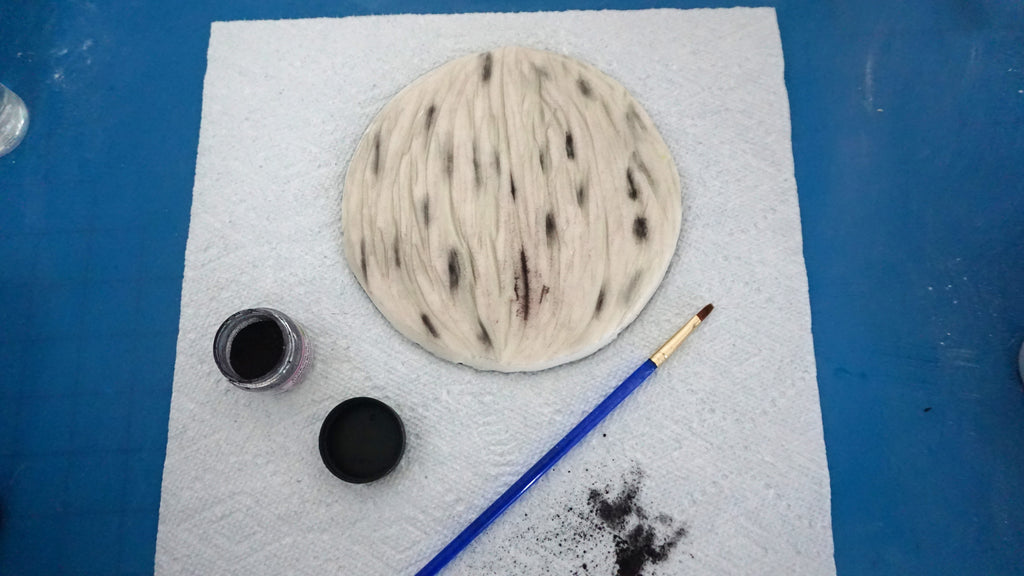
Bloody Flesh
This texture is created by using only the Orange Bone Chisel

This is the easiest of all of the textures I'm demonstrating today. Use each of your different size and firmness bone chisels and poke as many holes into the fresh fondant surface as possible. Try doing more with your bigger sizes and then filling the extra space with the smaller ends of your bone chisel sugar shapers. The more the better!

Possibilities: You can create a realistic coral, bath sponge, dimpled or hammered metal, all by using this same exact texture.
Now that we have got our six textures ready to go, it's time to add some color!
Coloring
Coloring is hands down my favorite thing to do, and with the right concepts in mind, it is a breeze! So the first thing we have to consider is our shadows.
I use TruColor Airbrush Colors on all of my pieces and cakes. They are colors derived from different vegetables, fruits, and spices to create super vibrant colors. These colors come in powder form because in this state they have an infinite shelf life. To make these powders into airbrush colors, mix them in 2:1 ratio of powder to room temperature tepid water. After the powders are dissolved, I add a splash of high proof alcohol to reduce drying time.

We are going to put one drop of black airbrush color into our color cup , then fill the rest of the cup with a high proof alcohol. This will create a light black color which we will use to spray into the textures we have just created. Also, by having this very small amount of color, it will prevent you from putting too much black on the surface.
After, lightly soak a piece of paper towel and wipe the surface lightly, so the color stays in all of the creases and lines. After, take a knee high filled with cornstarch and dust the surface liberally to dry off any water left on the fondant surface.
Wood Grain

For my first coat of color I used a 3:2:1 ratio of colors. So using 3 parts sunset yellow, 2 parts bright orange, and 1 part brown gives me a nice golden brown color. This happens to be one of the colors I use the most.

Next mixing equal parts super black and dark brown, use that toned down black color to add further shadow and give dimension to the wood grain. Make sure to give some color to all the extra mark ups and details you made like the knot in grain. Thin out the extra dark brown color with some high proof alcohol and spray a light coat to give a more natural look to the wood grain. I also like darkening the edges. Let it dry for a few minutes then dust liberally with cornstarch to take all shine out of it.
Hair/Fur

This fur finish is done all hand dusted with petal dusts. All of my petal dusts are from The Sugar Art. I love their vibrancy and range of colors. First take a small flat brush and dust in small lines in the lines you previously textured with Turkish Black petal dust. Then, dust the entire surface with white petal dust, or titanium dioxide, to create a slightly opaque layered look and tone down the intense black color.
Dragon Scales

First spray the textured surface with a equal ratio of spring green, leafy green, and holly green airbrush color. Next, spray a 2:1 ratio of holly green and super black, to shade the textured surface.

As an optional step, dilute some Gold Shine Shimmer Dust with a high proof alcohol and lightly brush the surface with a fan brush. This gives your dragon a little sheen that I think is a nice touch. You can also paint some individual scales with a small detail brush.
Wicker Basket

For my first coat of color I used my TruColor All Natural Airbrush Colors in a 3:2:1 ratio. So using 3 parts sunset yellow, 2 parts bright orange, and 1 part brown, gives me a nice golden brown color.

Next mixing equal parts super black and dark brown, use that toned down black color to add further shadow and give dimension. While still wet, I take a slightly damp paper towel and dab off the majority of the color while still leaving a brownish hinge.

Bloody Flesh
First spray the surface with pink airbrush color. Next, shade the surface with equal parts red annatto color (can be substituted by super red) and pink airbrush color, to create a more bold pink color. While wet, dab off some of the color with a dry paper towel to give a muscle kind of color.

To give it the ultra bloody look, I mixed some mirror glaze piping gel with 3 parts red, 2 parts black, and 1 part brown airbrush colors. I then use a large brush to dab it on in random places until you reach your desired look.

These are just a few ways you can add depth and complexity to your cakes. Try them out and get inspired!
We hope you enjoyed this tutorial by Jarid, and we'd love to see what it inspires from our community! If you try out these textures, or use his techniques in new ways, send us pictures at info@sugarworks.com, or post on our Facebook page!
And if you'd like to learn more from Jarid, he'll be teaching across the US throughout the summer. Follow him on Facebook to get all the details!

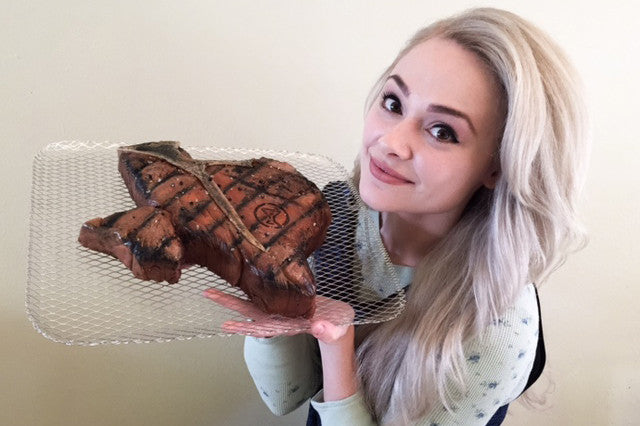
Natalie Sideserf and the Texas T-Bone Cake!
Natalie Sideserf
Award-winning cake sculptor Natalie Sideserf combines exceptional sculpting techniques with meaningful concepts to create edible works of art. After receiving a Bachelor of Fine Arts degree, Natalie shifted her focus from sculpting with traditional media to cake. Complex sculptures, thought-provoking designs, and Natalie's passion to entertain has lead to her world-wide recognition.

Today, Natalie shows us how she made her Texas T-Bone Steak Cake- just in time for your summer BBQs!
Texas Proud
Originally from Cleveland, I moved to Austin in 2011 to start my career in cake. Within the first week I learned two very important things about Texas: Barbecue is an art and Texans are a proud bunch. This inspired me to create a grilled t-bone steak cake shaped like Texas. Just in time for Summer, y'all!

Choose Your Done-ness
First, bake one 10” layer of vanilla cake and color the batter to your favorite degree of doneness. I prefer a medium rare steak, so I went with a pink hue. Next, print out a line drawing of the shape you'd like your cake to be (in this case Texas), cut it out, and use it as a template to carve the cake.

Smooth, Smooth, Smooth
Grab your Sugar Smoothers and use them to cover your cake in chocolate ganache. Sugar Smoothers work really well and are so fun to use that I've been guilty of smoothing for hours. Over-smoothing is a time-killer, so now it's time to chill... your cake in the refrigerator.

Shape and Texture
After 15 minutes or so, take your cake out of the fridge and cover it in tan-colored fondant. This is one of those rare designs where imperfections and rounded edges add to the realism of the cake. Use your Sugar Shapers to add organic lines and texture. Firm Sugar Shapers are great for deep/heavy lines and soft Sugar Shapers create subtle lines. Variety is key, so experiment with all of your Sugar Shaper tip options.

Add the bone by using the small end of the Soft Mini-Tip Bone Chisel tool to raise and carve the fondant. The rounded end allowed me to carve aggressively without worrying about tearing the fondant. Use the larger end to sculpt the diagonal grill marks.

Grill Lines, Meat Tones, and Charred Edges
Hand-paint the cake with a variety of gel food color: brown, tan, black, white, red, orange, and yellow. Most gel colors are translucent, but if you add white they will turn opaque for when you want a solid layer of color. Paint dark colors in the crevices and highlights on the raised areas.

Mix black food color with granulated sugar to enhance grill marks, and crush clear rock candy to look like sea salt. Last, use scissors to cut the cake board around the cake and lift it onto a grate (like mine) or block of wood.

That's it! You've now got a mouth-watering slab of juicy... cake. Perfect for this year's BBQ block party!

A steak-shaped cake doesn't have to be in the shape of Texas to work aesthetically. What about a heart shaped steak cake for your loved one, or a meat substitute for your favorite vegetarian - assuming he/she is a good sport? Have fun and experiment!

Modeling Chocolate: Two Different Approaches
For today's recipes, we're going to talk about modeling chocolate. Modeling chocolate is a wonderful edible sculpting medium. It's like clay you want to eat- firm, yet malleable, capable of holding it's shape or being reworked, and also delicious. We know of two different recipes for modeling chocolate- one that uses candy melts, and one that uses real chocolate. We're going to give you both.

Modeling Chocolate Using Candy Melts:
Ingredients:
- 454g Candy Melts
- 115g corn syrup
Tools:
- Plastic lined sheet tray
- Double Boiler
- Silicone Spatula
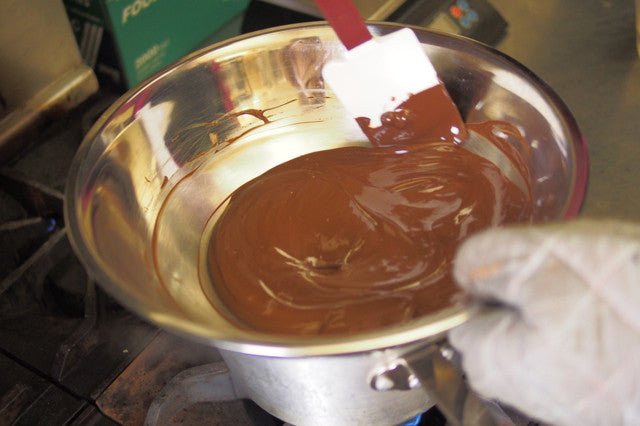
In a double boiler, heat your candy melts until they're mostly melted but a few lumps remain. You don't want to risk the candy melts getting too hot and burning, so take it off the double boiler and set it aside while there are still a few lumps. (The lumps will melt out from the residual heat of the warm melted candy).

Microwave your corn syrup for a minute and a half so that the syrup gets very warm and very thin. Put your melted candy melts back on the double boiler over a low heat and pour in the warm corn syrup.
Begin stirring! And keep stirring! Stir much longer than you think you need to; if you don't stir your mixture enough, the fats will separate out during the cooling process and your modeling chocolate will wind up lumpy. Your modeling chocolate is ready when it's absolutely silky-smooth and shiny- no air bubbles, no "curdled" appearance, and no liquid separated out.
Pour your warm modeling chocolate onto the lined sheet pan and spread to about 1/4" thick. Once it's cooled, you can start sculpting immediately or put it in an air-tight container for later.

Modeling Chocolate Using Real Chocolate:
Ingredients:
- 500g White Chocolate (or regular chocolate if you want an all-brown figure)
- 250g Glucose
- 1 Teaspoon water
- Gel color (optional)
Tools:
- Plastic lined sheet tray
- Double boiler
- Silicone spatula
In a double boiler, melt your chocolate over a medium heat until it is super smooth. Once your chocolate is completely smooth, take it off the double boiler and set it aside. You don't want it to continue to heat after it has reached the right consistency.

Because glucose has a lower water content than the corn syrup we used in the candy melt recipe, you'll need to add just a smidge of water. Add 1 teaspoon of water to your 250g of glucose now. Microwave the glucose and water for a minute or two- until it's warm enough to be smooth, liquidy, and easy to pour. Put your chocolate back on the double boiler over a low heat.
Pour the glucose-water mixture into the chocolate and begin stirring over a constant low heat. You should notice after a bit of stirring that the fat from the chocolate begins to separate out. Keep stirring! You want that fat content to be reabsorbed by the chocolate; don't stop stirring until it is. If you notice any lumping up of the chocolate- keep stirring! Eventually you will get to a stage where your chocolate is silky smooth. If you want to color your chocolate- this is a great time to do it! You can knead in color later when your chocolate has cooled, but it is so much easier to stir it in now while the chocolate is warm and soft.
Pour your warm chocolate onto a sheet tray lined with plastic and smooth it out to about 1/4" thick. Once it's cool, you can use it immediately or store it in an air-tight container in a cool, dry place.
That's it! Now you know how to make modeling chocolate. Get to sculpting!


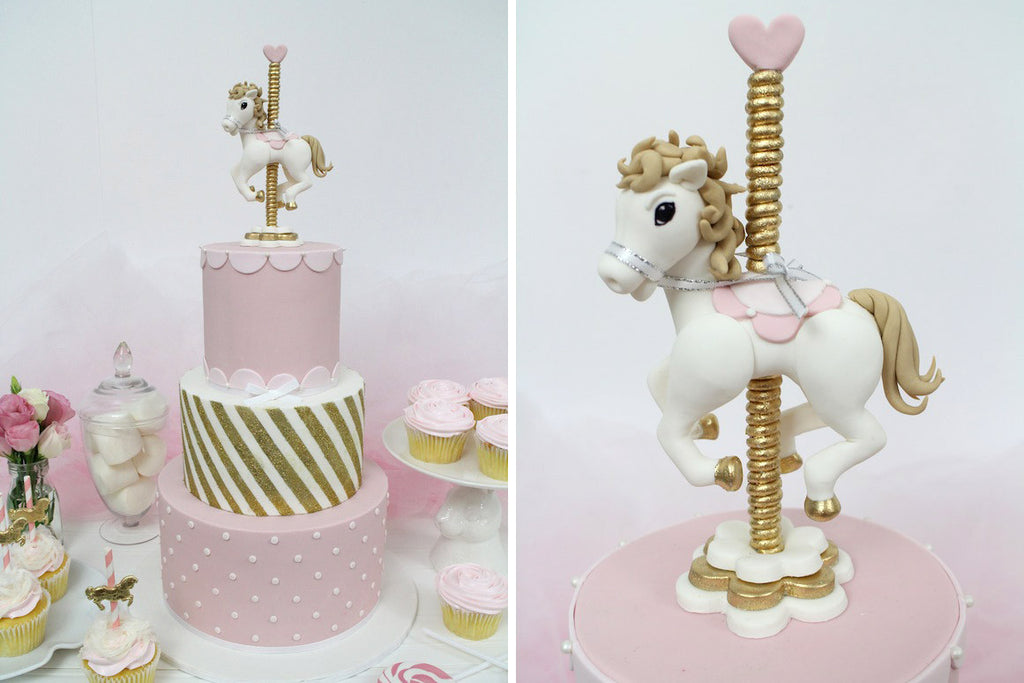
The Carousel Horse by Sharon Wee
This month we're spotlighting the work of  Sharon Wee who runs Sharon Wee Creations in Sydney, Australia. Sharon's work has been featured in magazines such as Hitched, Cosmo Bride, The Knot, and Modern Wedding. Her creations have been lauded on radio and television, and in 2013 the Australian Cake Decorating Network named her Cake Decorator of the Year. Sharon's work is often described as playful and whimsical. Today she is going to show us how to make a carousel horse cake topper.
The Carousel Horse

Tools You Will Need
- Innovative Sugarworks Sugar Shapers
- Small sharp knife
- Small scissors
- Small brush and water
- Long Skewer
- Black Edible Marker
- Circle cutter set
- Various sized blossom cutters
- Small heart shaped cutter
- Sugar Smoothers
- Styrofoam for holding the carousel topper
- White/silver 4mm ribbon (approximately 15in, for the reins)
Materials You Will Need
- 350g of white gum paste (horse topper)
- Small amount of light brown gum paste (horse mane and tail)
- Small amount of pink fondant (decorations)
- Small amount of light pink fondant (decorations)
- Gold lustre dust and cake decorating alcohol
- Piping gel
- Crisco
When I was younger, I loved carousels. There was just something fun and magical about getting on the ride with the music and moving horses. I wanted to capture the charming allure of the ride with this cake.
Step One: We're going to start with the body of the horse. Use about 120g of white gum paste for the body. Shape it into a long teardrop then roll your finger about 1/3 of the way in from the bigger end.
Step Two: Bend the skinnier end upwards to create the neck. Allow the body to sit upright to dry slightly. If you find the neck area falling forward, place something heavier up against it to support it.
Step Three: For the head, use a small amount of gum paste to create an egg shape. Roll your finger along the middle and towards the smaller end to create the nose. Roll the nose area between your forefinger and thumb to further define the shape.
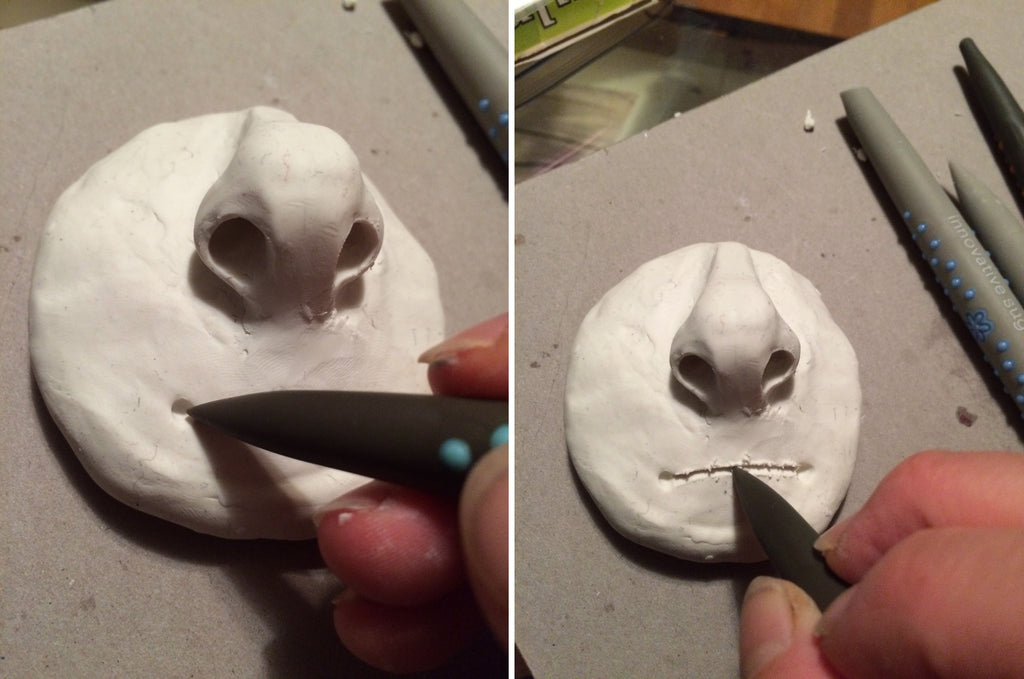
Step Four: Now we're going to go in and do some detail work to really sculpt the head. Use the Bone Chisel Sugar Shaper to define the head by pressing it against the bigger end.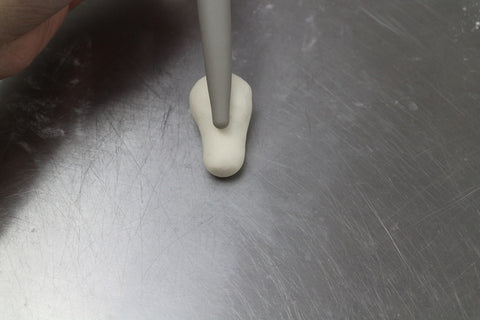
Then use the Pointed Chisel Sugar Shaper to indent the nostrils.
Cut the mouth area with the small scissors and gently open it up slightly. Then, create the eye socket by pressing the Pointed Chisel Sugar Shaper in at an angle on opposite sides to create an almond shaped eye.

Step Five: Once the body has dried slightly (when the neck can stand up on its own), gently cut the top of the neck flat (so the head can rest on it better) and press in the chest area to create a more natural body shape.
Next, insert a skewer all the way through the middle section of the body to create a channel. Insert a toothpick all the way down the neck and leave some of it sticking out. Place the head on the body only to mark a hole. Remove and allow both pieces to dry separately overnight.
Step Six: Create the pole of the carousel stand by inserting the skewer at least 3 inches into the styrofoam and then apply piping gel approx. 3 inches up the skewer. Roll the gum paste into a long thin rope and start wrapping it upwards. Cut off any excess and allow this section to dry overnight.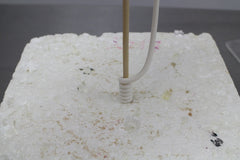

When dry, attach the head onto the body of the horse and slide the body of the horse down the skewer.
Step Seven: Now we're going to shape the legs of our horse. I found it useful to draw out a template of leg shapes as a guide in the shaping. The template I drew is included in my book Playful Party Cakes, but you can also draw your own. Place the sheet of acetate on top of your template and apply a thin coat of Crisco onto the acetate to prevent the gum paste from sticking.
For the legs, roll small amounts of gum paste into four long teardrop shapes. Place each teardrop within the template.  Push down along the edges of the shape to create a dome shape. Then, use the Trip-Tip Chisel Sugar Shaper to help and push the edges back into shape and focus on pinching the corners to get a more defined shape. Do the same for all the legs.
 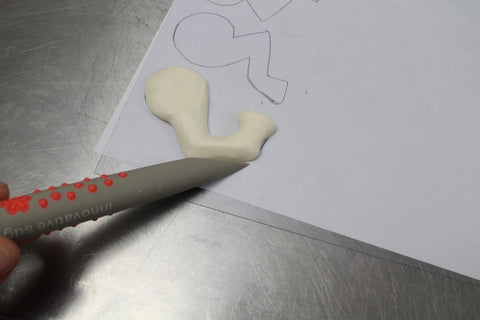 Remove the legs from the acetate and gently roll the edges of the lower legs to round them. Place the legs on a lightly corn floured surface. Cover the top area with cling wrap to allow only the lower leg area to dry.
Step Eight: Once the limb area is firm attach the pieces to the body. If the weight of the legs starts to deform the body, prop the body up on the front and back until it is completely dry. Use a soft material such as foam or rubber so it does not leave a harsh mark.
Step Nine: For the saddle, cut out a blossom shape approx. 2 inches wide and a circle 1.5 inches wide and poke holes towards the side of the shapes.
Attach the saddle onto the horse. Then, apply piping gel to the rest of the skewer and wrap a thin rope of gum paste around it to the top, leaving just a small amount for the heart cutout.
Step Ten: Cut out the heart shape from a thick layer of fondant and attach it to the top of the pole. Then, cut out three gradual blossom shapes from a thick layer of gum paste for the base.

Step Eleven: Mix the gold lustre dust with a small amount of alcohol and gently paint the carousel pole.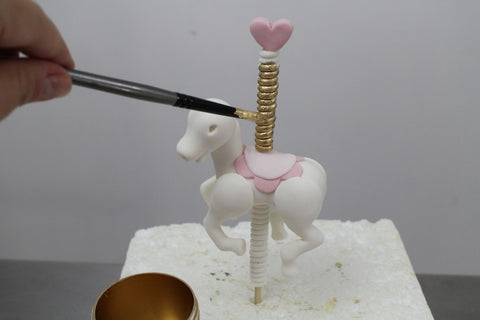 Then paint the hooves of the horse and the middle base blossom. Attach the three blossom pieces together and insert a skewer into the middle to create a hole.
Step Twelve: Create two small-flattened teardrop shapes for the ears. Pinch the rounded end together and cut that end flat.  Attach the ears to the side of the head, pointing it outwards.
Step Thirteen: For the mane, roll various sized small teardrop shapes and twist them randomly.
Attach along the neck area and work on positioning the pieces in various directions to create a curly mane.
Step Fourteen: For the tail, roll five thin sausage shapes and taper both ends. Place the pieces together and twist one end.  Attach it to the back of the horse and curl the ends upwards.
Step Fifteen: Use a black edible marker to outline the eye socket. 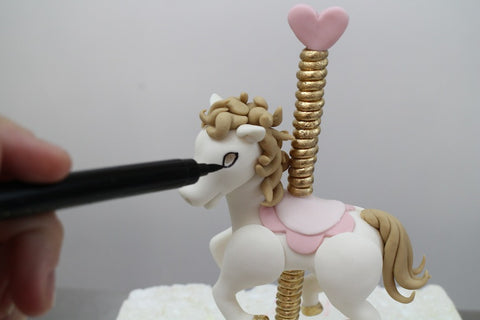 Roll a tiny long teardrop shape for the eyebrows and attach it over the eye socket. Then roll a tiny white teardrop shape and insert it into the eye socket.
Use the Trip-Tip Chisel Sugar Shaper to adjust the placement of the eyebrows if necessary.  Allow the eye area to dry before drawing in the eyeball with a black edible marker. Colour the middle, leaving a small white area for the eye shine.
Step Sixteen: Roll and place tiny balls of icing between the scallops of the saddle.
Attach the ribbon harness by applying some piping gel to the nose area. Loop the ribbon around in the middle and slide the loop over the nose.
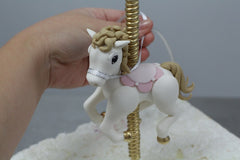
Bring the side of the ribbon pieces around the neck of the horse and behind the pole. Gently tie a knot and a bow at the back.

Step Seventeen: Attach the base of the carousel on a cake and insert the horse and pole.

Your carousel horse is now complete! This tutorial, and many other creative and imaginative sugar arts, can be found in Sharon Wee's new book Playful Party Cakes.
