Jarid's Awesome Texture Tussle!
This month our featured guest here at Innovative Sugarworks is Jarid Altmark of Jarid's Awesome Cakes. Jarid's passion for creating edible artwork began when was just 12 years old, and at 14 he had won his first awards at That Takes the Cake in Austin, TX. Jarid has since been featured in publications including American Cake Decorating Magazine and travels the country teaching classes in cake art.

Jarid specializes in 3D sculpted cakes in a style described as whimsical, playful, or fantastic. Today he walks us through how he uses Sugar Shapers and advanced coloring techniques to achieve the realistic textures often admired in his work.

When paired together, skilled texturing and artful coloring can take a cake from a novel dessert to true art. When beautiful textures combine with proper shading and coloring choices, the results can be stunning.

So before we get into coloring, we have to make some textures, and what better to use than Innovative Sugarworks' Sugar Shapers!
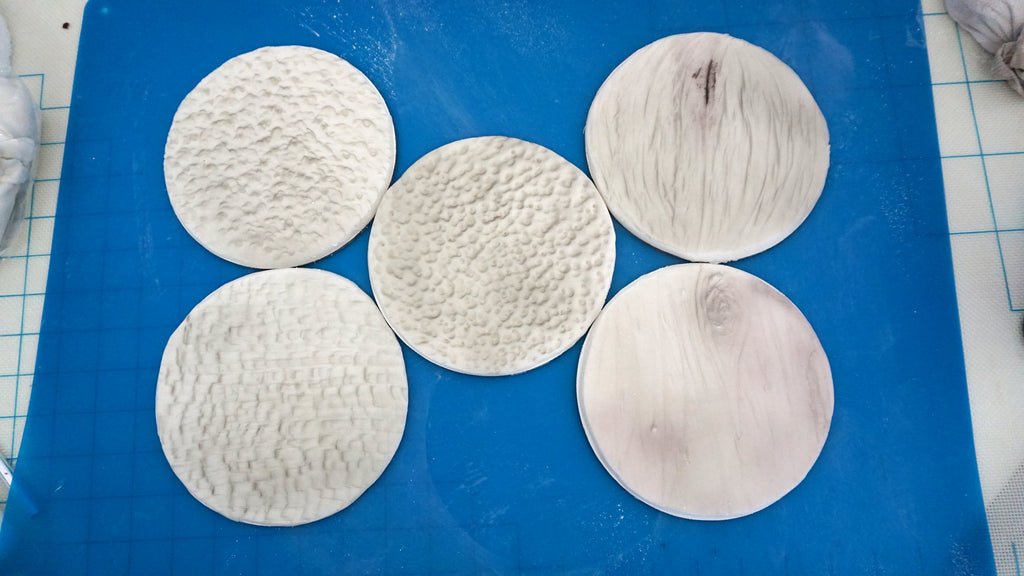
For this tutorial, I've chosen 6 textures to demonstrate- wood grain, dog fur, dragon scales, wicker, and bloody flesh. You might be wondering, "What could those things possibly have in common?" Well, you can create all of these textures (and more!) with your Sugar Shapers! Now I will say, I did use all four styles and sizes when creating these textures, but whatever size or firmness you have, you'll be able to achieve all of these textures.
The Tools
So you probably know the crew by now, but if not, there are 6 different tips in each set of Sugar Shapers. And considering they are double sided with a smaller and larger end, you get 12 tools with just one set of Sugar Shapers. For this project, I challenged myself to use only one style tip per texture.

But, with a heavy heart, I regret to inform you that I couldn't figure out a cohesive texture for the Dark Blue Lip Chisel. While this tip is perfectly specialized for making lips, I found that for texturing it's best suited for lending a helping hand to the other Shapers. Below I show the anatomy of the Lip Chisel:
As you can see, there are four different "sides" to the tool. The top creates a crescent shape, angling the tool creates a puffy line, with the tool flat you create a puffy "D" shape, and lastly, with the tool on its point you can make a thin line. So as shown in Kaysie Lackey's Ruching Tutorial, the tool rounds sharp edges and just makes everything look more poofy. And as its name suggests, it is the perfect tool to help make lips!
Wood Grain
This texture is created only using the Light Blue Pointed Chisel
Starting with a fresh and soft fondant surface, use your firm pointed chisel to map the major wood indentations and marks. This may include some curved lines, an elongated almond shape, or a little knot made up of a swirl of tiny little scratches to make a rough oval shape.
Next use your soft pointed chisel, in a sweeping motion, kind of like you are painting, create an excess of little lines. This doesn't have to be neat; the more wonky the better. But try not to do any wavy lines, as they don't appear in actual wood grain.
Hair/Fur
This texture is made using only the Red Tri-Tip Chisel

Starting with a fresh and soft fondant surface, or 50/50 mix of modeling chocolate and fondant, mark in the initial hair part, which is generally in the center, with your firm tri-tip chisel. Next divide your hair part into several sections, this will help create a natural flow to the hair or fur.
Then take your soft tri-tip chisel and mark up the surface, while staying in the sections, with lines. Now the style of line is up to you and depends on the look you are going for.
You can do wavy, straight, short, long, curly, anything! In this case I made a swatch of dog fur, so I did fairly short lines.
Possibilities: Think about extending the lines of the hair, adding waves and curls, anything to give the texture even more character.
Dragon Scales
This texture is done by using the Green Round Tip Chisel and a totally optional piping tip

Starting with a fresh fondant surface, use your firm round tip chisel on an angle to mark up the surface with little crescent shapes. The more the better! Also, make sure you utilize the different sides to the tool to create variation in the texture.
Next, use your soft round tip chisel, flat, to press into the textured surface to make the oval shape. Now, do this sparingly, as it is only used to create depth in the scales, so it looks layered.
Now, this step is completely optional, but I personally like the look of it. Take a piping tip, lay it on its side and press into the textured surface to create the look of little scales that are sticking up. this also adds to the layered look.
Possibilities: This same texture of scales can be used for fish, lizards, and by changing the shape of the scales you can get a completely different look.
Wicker/Basket
This Texture is done by using only the Yellow Square Tip Chisel

Starting with a fresh fondant surface use your soft square tip chisel in a sewing machine motion (gently pressing the tool on an angle, try your best to keep each ripple equally spaced) to texture the surface to give a woven look.
Then, go back with your firm square tip chisel to deepen the lines and enhance the texture. Lastly, I went back with a veining tool by Morsels By Mark to mark of the woven finish with lots of lines as an added detail.
Possibilities: This texture would be a beautiful texture for a base on a rustic wedding or special occasion cake. Also, depending on the color you use, similar texturing can give a brick or a cobblestone effect.
Bloody Flesh
This texture is created by using only the Orange Bone Chisel

This is the easiest of all of the textures I'm demonstrating today. Use each of your different size and firmness bone chisels and poke as many holes into the fresh fondant surface as possible. Try doing more with your bigger sizes and then filling the extra space with the smaller ends of your bone chisel sugar shapers. The more the better!

Possibilities: You can create a realistic coral, bath sponge, dimpled or hammered metal, all by using this same exact texture.
Now that we have got our six textures ready to go, it's time to add some color!
Coloring
Coloring is hands down my favorite thing to do, and with the right concepts in mind, it is a breeze! So the first thing we have to consider is our shadows.
I use TruColor Airbrush Colors on all of my pieces and cakes. They are colors derived from different vegetables, fruits, and spices to create super vibrant colors. These colors come in powder form because in this state they have an infinite shelf life. To make these powders into airbrush colors, mix them in 2:1 ratio of powder to room temperature tepid water. After the powders are dissolved, I add a splash of high proof alcohol to reduce drying time.
We are going to put one drop of black airbrush color into our color cup , then fill the rest of the cup with a high proof alcohol. This will create a light black color which we will use to spray into the textures we have just created. Also, by having this very small amount of color, it will prevent you from putting too much black on the surface.
After, lightly soak a piece of paper towel and wipe the surface lightly, so the color stays in all of the creases and lines. After, take a knee high filled with cornstarch and dust the surface liberally to dry off any water left on the fondant surface.

Wood Grain
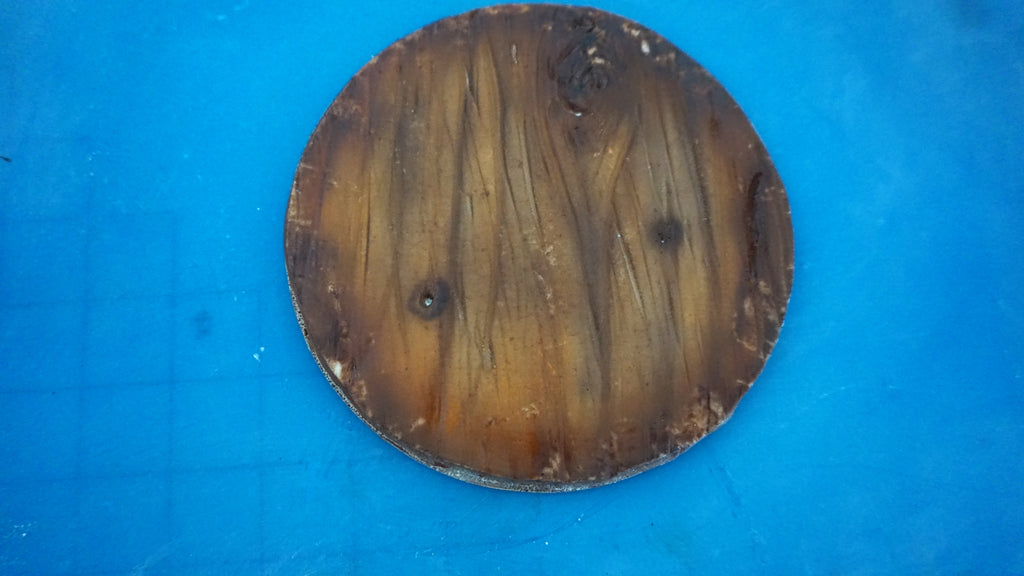
For my first coat of color I used a 3:2:1 ratio of colors. So using 3 parts sunset yellow, 2 parts bright orange, and 1 part brown gives me a nice golden brown color. This happens to be one of the colors I use the most.
Next mixing equal parts super black and dark brown, use that toned down black color to add further shadow and give dimension to the wood grain. Make sure to give some color to all the extra mark ups and details you made like the knot in grain. Thin out the extra dark brown color with some high proof alcohol and spray a light coat to give a more natural look to the wood grain. I also like darkening the edges. Let it dry for a few minutes then dust liberally with cornstarch to take all shine out of it.

Hair/Fur
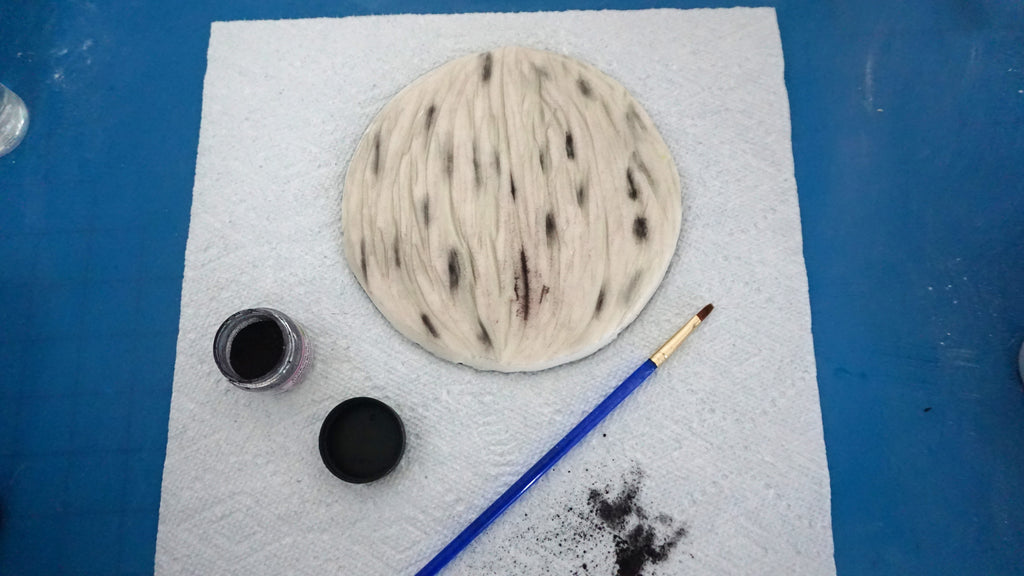
This fur finish is done all hand dusted with petal dusts. All of my petal dusts are from The Sugar Art. I love their vibrancy and range of colors. First take a small flat brush and dust in small lines in the lines you previously textured with Turkish Black petal dust. Then, dust the entire surface with white petal dust, or titanium dioxide, to create a slightly opaque layered look and tone down the intense black color.

Dragon Scales
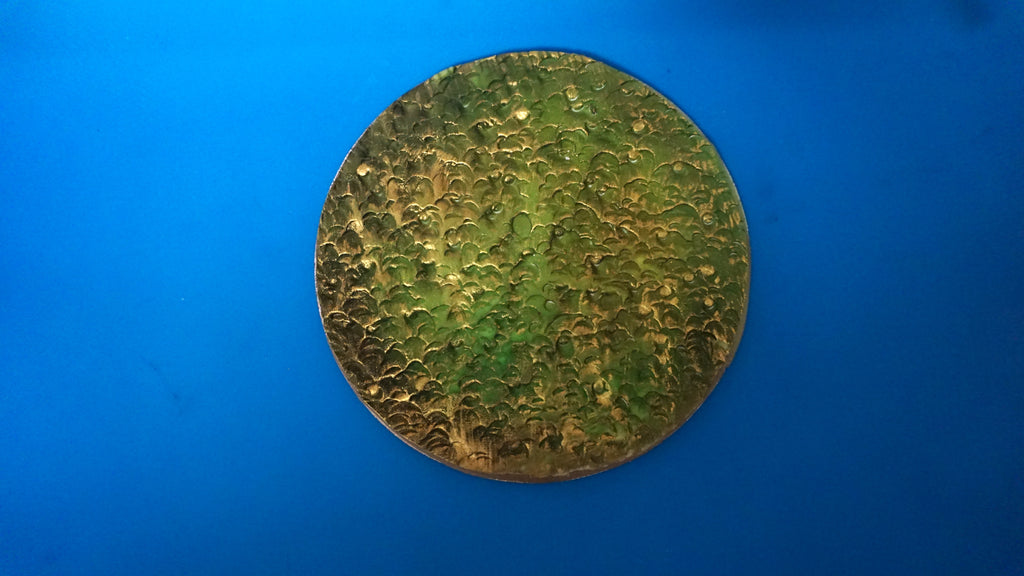
First spray the textured surface with a equal ratio of spring green, leafy green, and holly green airbrush color. Next, spray a 2:1 ratio of holly green and super black, to shade the textured surface.
As an optional step, dilute some Gold Shine Shimmer Dust with a high proof alcohol and lightly brush the surface with a fan brush. This gives your dragon a little sheen that I think is a nice touch. You can also paint some individual scales with a small detail brush.

Wicker Basket
For my first coat of color I used my TruColor All Natural Airbrush Colors in a 3:2:1 ratio. So using 3 parts sunset yellow, 2 parts bright orange, and 1 part brown, gives me a nice golden brown color.
Next mixing equal parts super black and dark brown, use that toned down black color to add further shadow and give dimension. While still wet, I take a slightly damp paper towel and dab off the majority of the color while still leaving a brownish hinge.
Bloody Flesh
First spray the surface with pink airbrush color. Next, shade the surface with equal parts red annatto color (can be substituted by super red) and pink airbrush color, to create a more bold pink color. While wet, dab off some of the color with a dry paper towel to give a muscle kind of color.
To give it the ultra bloody look, I mixed some mirror glaze piping gel with 3 parts red, 2 parts black, and 1 part brown airbrush colors. I then use a large brush to dab it on in random places until you reach your desired look.
These are just a few ways you can add depth and complexity to your cakes. Try them out and get inspired!
We hope you enjoyed this tutorial by Jarid, and we'd love to see what it inspires from our community! If you try out these textures, or use his techniques in new ways, send us pictures at info@sugarworks.com, or post on our Facebook page!
And if you'd like to learn more from Jarid, he'll be teaching across the US throughout the summer. Follow him on Facebook to get all the details!

Products
View all


