No matter how insane the Halloween season is, when Innovative Sugarworks asks me to do a guest spot, I have to leap at the opportunity. It is ALWAYS an honor.
My inspiration this year comes from a love of three things, 80’s horror, Japan, and realism cakes! Last year, a big box on my bucket list was checked off when I visited Japan DURING HALLOWEEN! I was lovingly described as “Kawaii”....or did I hear “Kowai”? While the words SOUND the same, “kawaii” means “CUTE” and “kowai” means “SCARY”...
On Halloween night, we visited the “Kawaii Monster Cafe” in the Harajuku district, and I would say the seed of inspiration for this cake was born there. The perfect combination of cute and scary....and adding in one of my favorite things, food realism!
Since food cakes, particularly BURGER cakes, have been quite the trend, I chose a burger to be the subject for my KAWAII/KOWAI Zombie Burger Cake! So let’s get into it, creepies!
Let’s start with the cake! I chose dark chocolate cake with chocolate ganache spiced with cayenne and cinnamon (for a little kick!) for the top bun. And for reasons I’ll explain later, a classic rich butter cake for the bottom bun, also using the chocolate ganache. 
I made three 8” rounds of the chocolate and three 8” rounds of the butter cake.
To create the top bun, I used two of my 8” chocolate layers and set aside the third. Looking at photos of gourmet burgers with those beautiful golden crispy buns, I carved away until I was happy with the shape....but it’s a bun, so we aren’t looking for perfection or symmetry. DOPE! 
Move on to the bottom bun, again, reserving one layer. Make sure the top is nice and flat like the bun was cut in half. Again, don’t spend too much time here.
Once you're happy with the shape, color some fondant with a tiny bit of ivory, a bit of brown, and some yellow until you achieve the light colored part of a bun. Roll out a thicker than usual circle large enough to cover top bun and lightly hit the entire surface with a torch.
This will help give a realistic texture to the bun later.
Cover the top bun. Embrace imperfections and wrinkles. Add texture by pressing balled up foil, wax paper, or a new scrubbing cloth. Use the pointed tip Sugar Shaper to add creases and indents, as well as that ridge that goes around the edge of a bun.
Using the torch, really hit the spots that a real bun would be toastier, letting it bubble, brown and harden. 
Next, using color dust, even out the toasty color all over the bun, hit the cracks, and be sure to leave lighter colors toward the bottom part of the bun. 
When you’re happy with the color, LIGHTLY roll a small rolling pin over the surface of the edges of your bun. If you did things right, you’ll have a beautiful effect of a real, cracked, crispy buttery bun! 
Move to the lower bun, adding color, and much less torching, but enough to give more texture. Texture texture texture is what sells these things as BREAD!
Now, the reason we chose dark cake and light cake is to make a realistic and delicious burger patty. If you’ve ever made cake clay (the stuff inside a cake pop) you’re familiar with this.
Break up your reserved layer of butter cake and chocolate cake in a large bowl and add a few heaps of ganache. Using your hands, mix together until you get a sort of brown cake dough with lots of specks of lighter color in it. Don’t over mix or you’ll lose that variation. Pat the mixture down with your hands onto a piece of parchment to make a burger patty. Let it crack and break as you press it out. This adds to the realistic texture. Chill in refrigerator until firm.
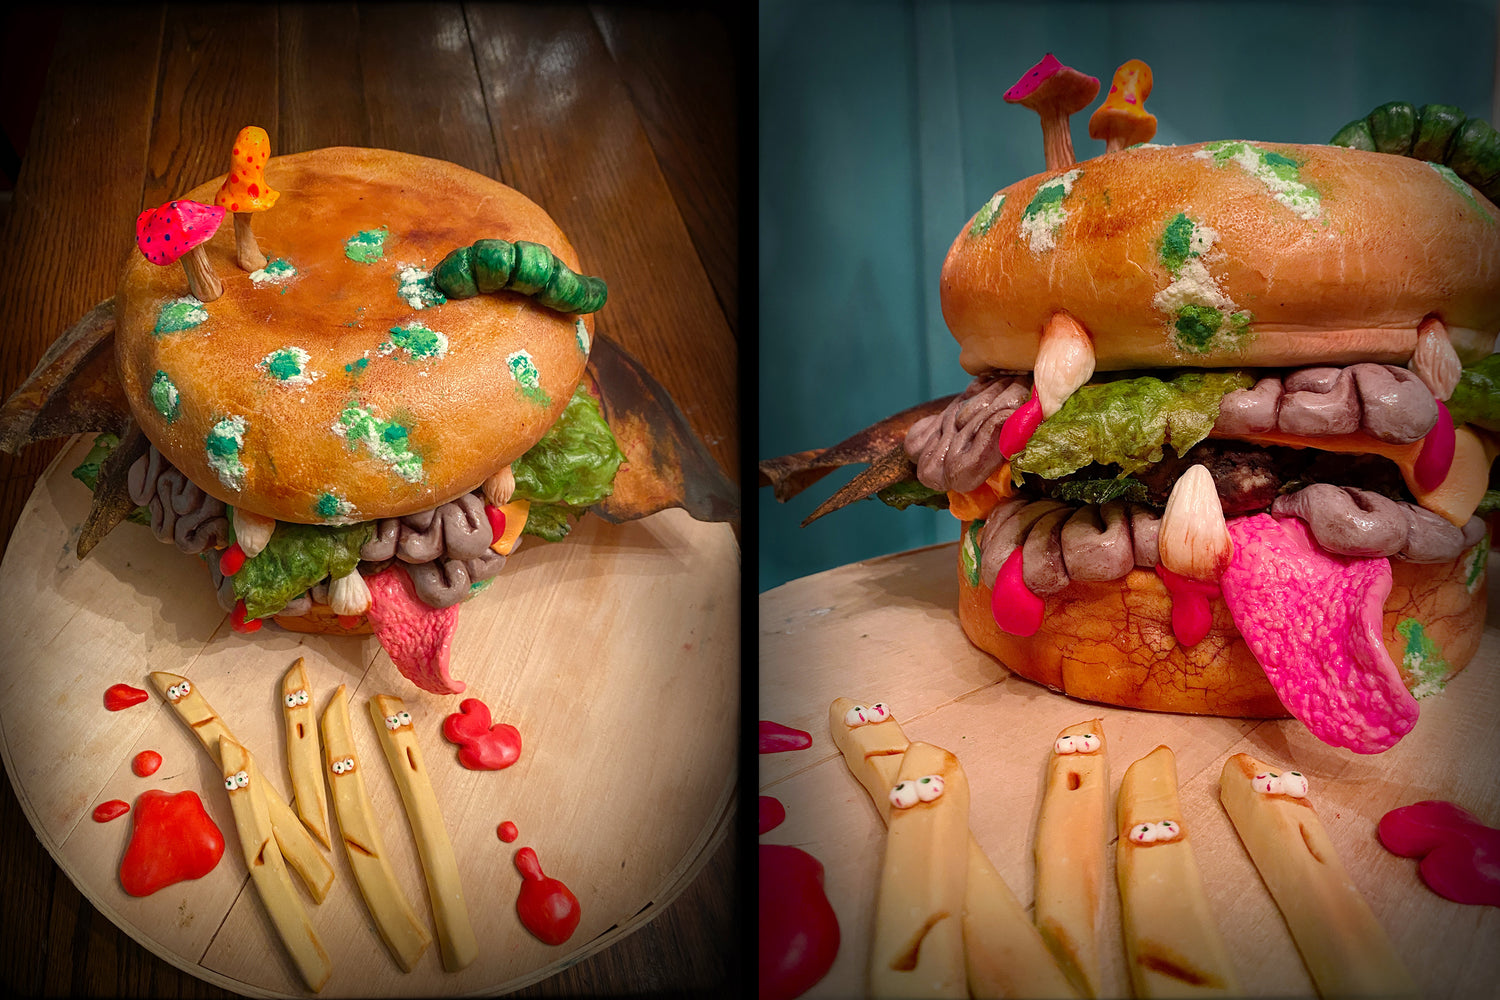
Next, since this cake is a KOWAI (scary) ZOMBIE burger, we gotta make some brain slices! No worries. It’s easy, ghoul friend. I colored some modeling chocolate with a little bit of pink, a little blue, and a little black, until I achieved a grayish lavender brain matter color.
Roll out tubes of modeling chocolate and make random noodle shapes to create brain patterns. Use your Sugar Shaper with the small rounded end to refine some of the details. Once you’re happy with the look, enhance those details with a deep purple or black color dust. 
What else would be delicious on a Kowai Zombie Burger?! How about some fresh bat wings?!
Create the shape of the bones inside a bat’s wings with some floral wire. I used 18 gauge, but you do you, BOO. When you’re happy with the shape, lay out your pieces onto a piece of wafer paper. Prepare some flexique following the instructions, and brush gently onto the wafer paper, pressing the floral wires in. Move quickly because it sets up fast. Add another piece or wafer paper on top of the wire, sandwiching it between the two pieces. Brush both sides with your mixture until fully covered and allow to set for an hour. 
Next, dust the entire surface with cornstarch to remove any tackiness, flip over, and repeat. Using a small paintbrush and some red gel color mixed with vodka or an extract of your choice, add in some veins to the wings. The great thing about these wings is they have that semi-translucency letting some light pass through, so this detail adds some very cool realism. Finally, darken up the edges with some brown gel color and a stiff, dry brush. 

Next up, lettuce and cheese!
Because this burger is UNDEAD, we want lettuce that looks like it’s on its last leg...wilted, sorta greasy, and browning on the edges. Using REAL pieces of romaine lettuce, reinforced underneath with some balled up paper towels, you have a natural mold.
Wet a surface with some water tinted with green gel color and just a touch of yellow. Lay a sheet of wafer paper on top of the wet surface, and with a SOFT brush, very gently saturate the paper. It tears VERY easily and holes can form, so go slowly. Wet your romaine leaves with the same mixture, pick up the paper carefully, and lay it over the leaf. Using a saturated brush, gently brush the paper onto the leaf, trying to get the paper to hug every vein and textural element. Set aside to dry overnight.
When it’s fully dry, peel away the real lettuce. Trim away the edges. Add in color details to really make the leaf look real...I used green and brown gel color mixed with vanilla extract, NOT water, (or vodka works too). If some of your lettuce has holes, no worries! USE IT! Boil, I told you...we are going for rotting lettuce here! 
For the cheese, mix a bit of orange and just a drop of red into some yellow modeling chocolate to get that cheddar cheese look. Roll out 1/4” thick piece large enough to cover your burger and cut into a square. 
Now that we’ve created all the elements, it’s time to assemble your burger! I’ll show pics of how I put mine together, but once again, you do you.
I started with the bottom bun, some lettuce and pieces of brain, and then topped it with the burger. Then I added the cheese slice and hit the edges with a torch to make it look melted. More lettuce, more brains, and the bat wings! Add the top bun! Depending on the size of your cake, you may need to add some bubble tea straws and wooden dowels. 
To add to the rotting undead burger look, I wanted to give it some more gross details and decided to make the buns look moldy. Here’s how I made the mold: I whipped up a batch of meringues! 
Divide the meringue into three portions. Tint one with leaf green, another with leaf green and a bit of teal, and leave the other white. Dollop onto a parchment lined baking sheet and bake for 45 minutes at 200 degrees, shut off the oven, and leave the meringues in the oven for at least 30 minutes! That was wasy, right? Still, reward yourself by eating a few meringues. You won’t need that many. 
Next, using a coffee grinder, pulverize other lighter green meringues, two or three at a time, until you have a fine powder. Repeat with the darker green and then the white. This makes the white turn out a very pale green.
To create the mold, the reason I love this powdered meringue mixture, is because you can take small clumps of it and press it right onto the surface of the cake and still have that powdery look that mold creates. It’s also much tastier than a mouth full of color dust! I start with white, then the lighter green, then the darker green. Use photos for reference and have fun with it. 
For the finishing details....I decided to sculpt a couple mushrooms and a big old worm and color them with a UV reactive color. 
I used the curved chisel tip to create spots for teeth in the buns and created a few teeth out of white modeling chocolate. I also made a tongue using a custom made mold, but you can achieve some cool effects and textures with foil. I dusted the tongue with uv reactive neon pink color dust. 
Finally, with the same fondant I used for the buns I added a little yellow modeling chocolate to create a warmer golden color, made some little eyes, and dusted the edges with some brown color dust and to make a few scared French fries and ketchup to place on the cake board. 
And that’s it! Can’t you just see this monster zombie burger in an 80’s B-movie? Kowai Zombie Burger Terrorizes Tokyo!
Boils, ghouls, I hope you had fun with this one, and OF CORPSE, if you decide to make your own, PLEASE tag me in your photos! Either Sugar Freakshow on Facebook or @sugarfreakshowdsm on Instagram!
Happy Halloween!! (幸せなハロウィーン)
