Sugarworks Blog
Edible Decoupage and Bringing your Concept To Cake
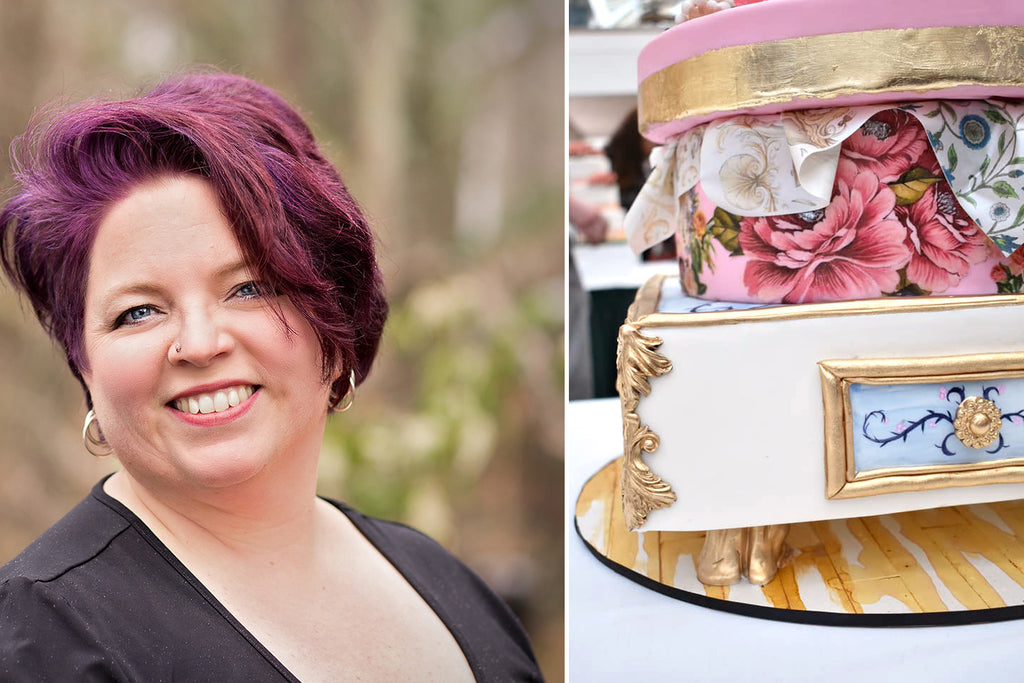
You probably know her as the face of Shinyball Cakes and Shinyball Creations- Rose Brown is a life-long artist and baking dabbler. Rose discovered the strong connection of sugar and art, and has been working on her sugar art skills for the last several years. Always trying to think beyond the traditional, looking for unique techniques and with a special love for hand painting, she creates cakes for friends, family and clients that are one of a kind. She also writes a blog - www.shinyballcreations.com - that shares tips, tricks and tutorials for sugar and baking enthusiasts. And this month, Rose is sharing her blogging expertise with us at Sugarworks, and we couldn't be more excited!
Read on for an excellent journey through bringing a concept into a finished cake as well as a step-by-step tutorial on the very unique technique of cake decoupage!
Have you ever entered a cake competition – a themed competition – and then been totally stumped on what to create? I have…and very recently!
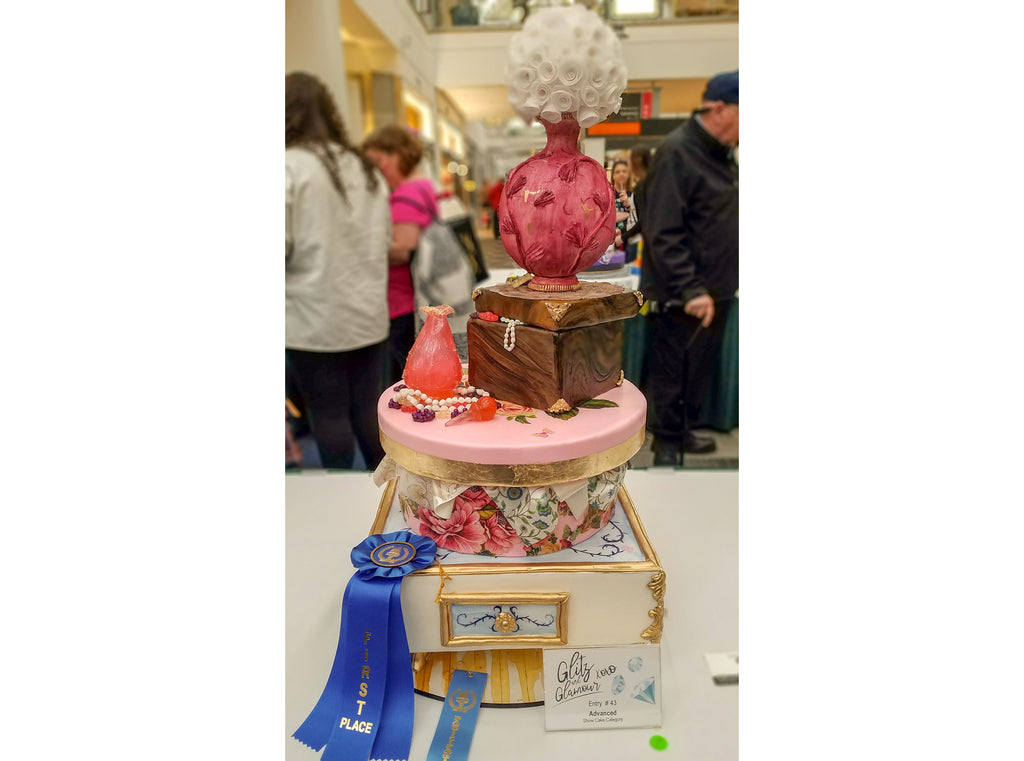
I entered a local cake show competition where the theme was “Glitz and Glamour”. Glitz and glamour… visions of glitter and shiny things everywhere! But then reality set in. I had to face it – I’m not a glittery, fancy, embellishing kind of girl. It didn’t speak to me. That left me in a bind – what on earth was I going to do??
Well, like all internet addicts, I turned to Pinterest. However – here is a tip – don’t EVER (I really mean ever) search for cakes on Pinterest when you’re looking for inspiration. I have gotten that advice from other cake artists as well. Get your inspiration from art, fashion, pottery, paper crafting – anything but other cakes. It will open things up for you and give you ideas that will be uniquely yours as you envision your own designs.
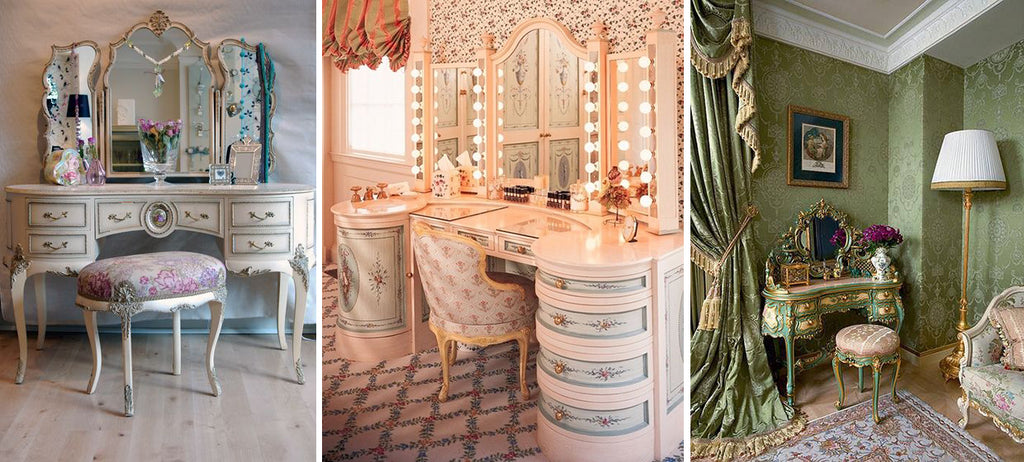
Anyways…on to my Pinterest-ing. I searched for “glamour”, I searched for “Grace Kelly”, and that took me to looking at jewelry, which led to jewelry boxes, which led to vintage jewelry boxes, which led to perfume bottles, and in looking at all these pictures I started to form my concept. The image that solidified my concept was that of a vintage looking vanity table.
And from there, everything else fell into place. I could finally visualize what I wanted to create.
Initially, the concept was a table with a stack of things on it – a large jewelry box and an oversized perfume bottle with flowers. I did a sketch and started working, but as so frequently happens to me, I changed midstream, because the way the cake was coming together needed something else.
I’ll be honest here, some of the change came about because of the size requirements of the competition, the base HAD to be 14”, which is relatively big (which will lead to some of my equipment choices you’ll read about later, hint hint). I needed something that size-wise would fit between a jewelry box and a table. In thinking about my Grace Kelly pins from earlier, I thought about a hat box – I had the right size dummies ready and available! I started looking at pictures of hat boxes and found inspiration in ones that had decoupage on them.
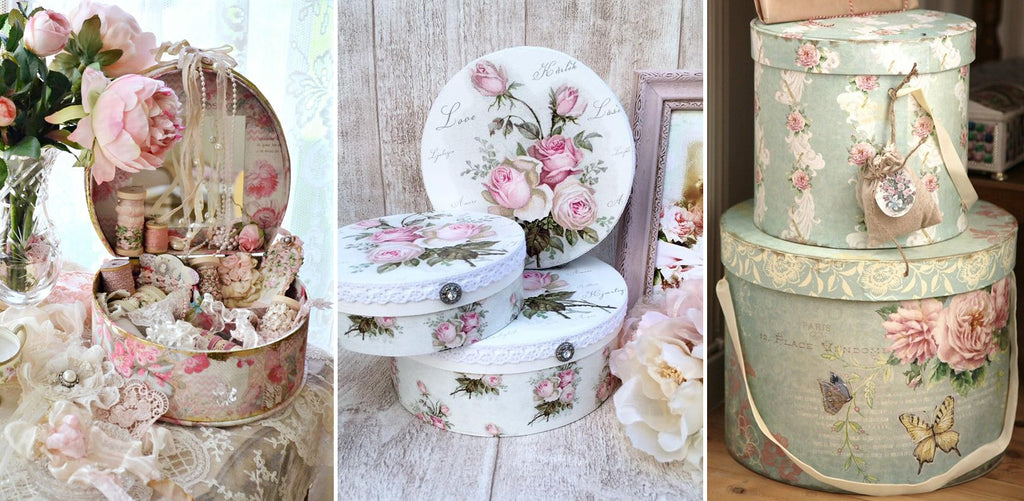
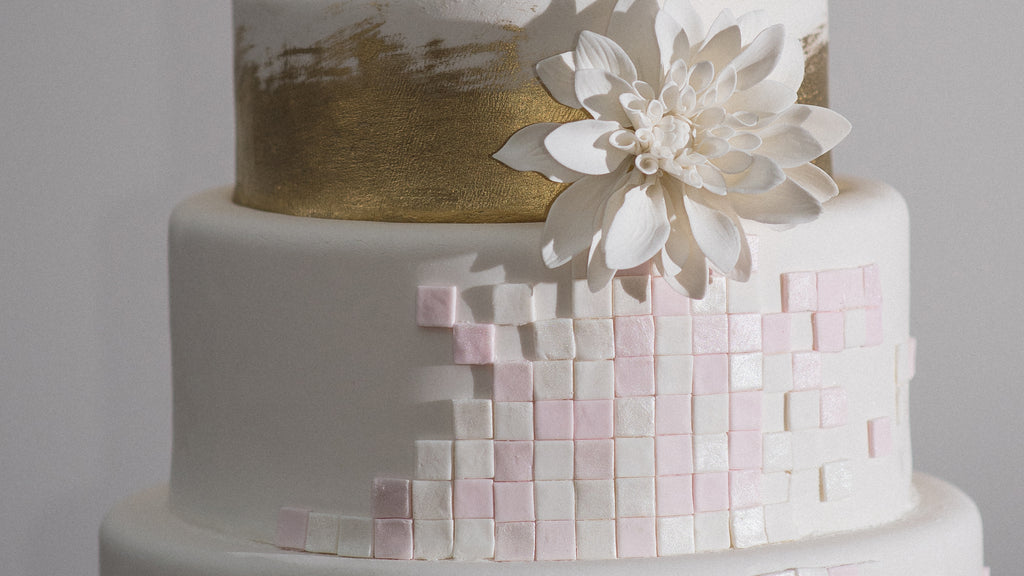
Decoupage is a form of collage that is usually used to cover items that are 3 dimensional, like boxes or even furniture. In the traditional form, you cut paper images out of thin paper and then paste them onto your item and coat everything with a layer of glue, or modge podge or other transparent adhesive that dries clear, and usually a bit shiny, but not always. I have enjoyed this kind of crafting before, so I thought – why not on my cake, and why not on a hat box tier? Poof, I had my idea!
Now I’m going to show you how I did it!
What you will need:
For any cake decoupage project, you will need the following: 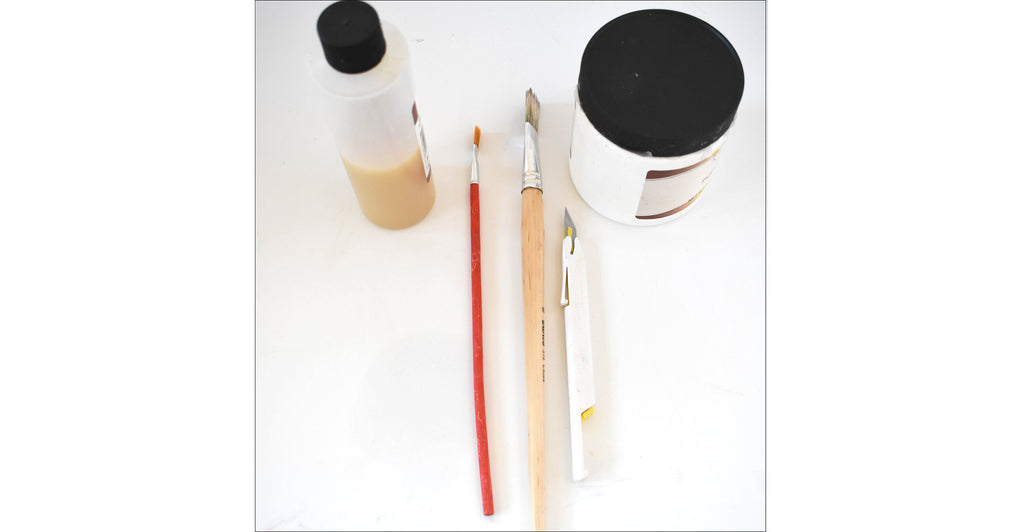
- Some sort of cutting blade or exacto knife
- Piping Gel
- Confectioners Glaze
- A small flat brush
- A large brush
- Wafer paper (not pictured)
- Edible ink printer (not pictured)
- Fondant Smoother (optional, not pictured)
To make life easier, especially for the size of cake tier I was creating, I also used my Innovative Sugarworks Artist Turntable, and my Innovative Sugarworks Turntable Expander.
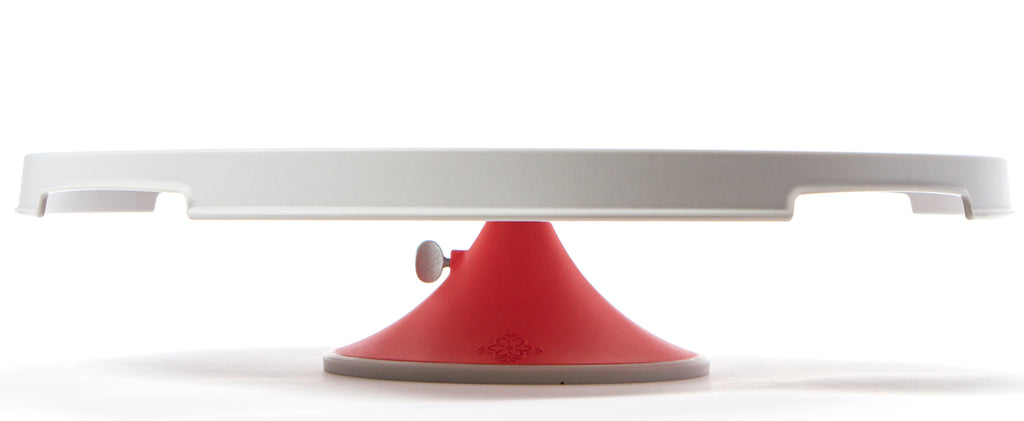
The fact that I could lock the turntable in place when working on small details and then loosen it to be able to rotate it was great. Never mind that the cake base was over 16” in diameter, so when I needed to work on the cake board or the vanity table tier, the expander was also a great help – no balancing acts needed!
Get prepped:
The first step here, is to cover your cake with fondant. In my case I covered a 4” high 12” dummy for the box and a 1” high 14” dummy for the lid. I recommend doing this step a little ahead of time from your decoupage project, so that the fondant firms up a bit. Otherwise, you may dent the fondant as you work.
Go online:
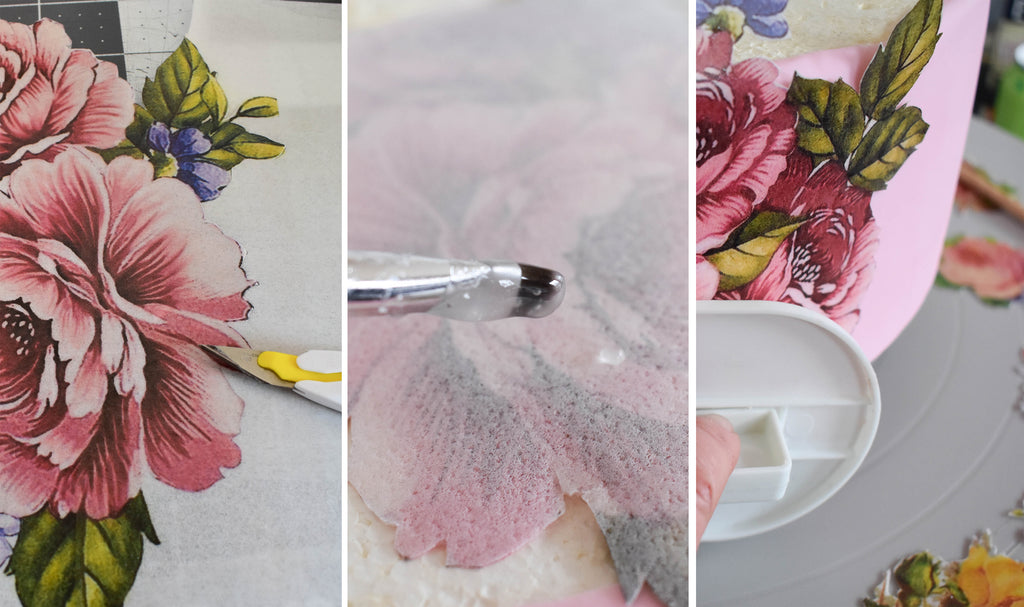
I’m going back to Pinterest again! I searched simply for “decoupage flowers” and a treasure trove of things showed up, like this one!
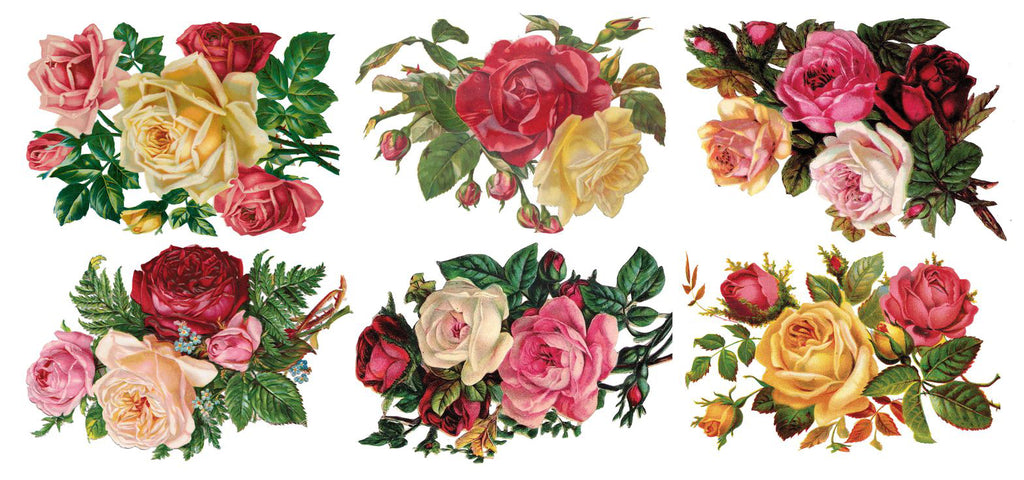
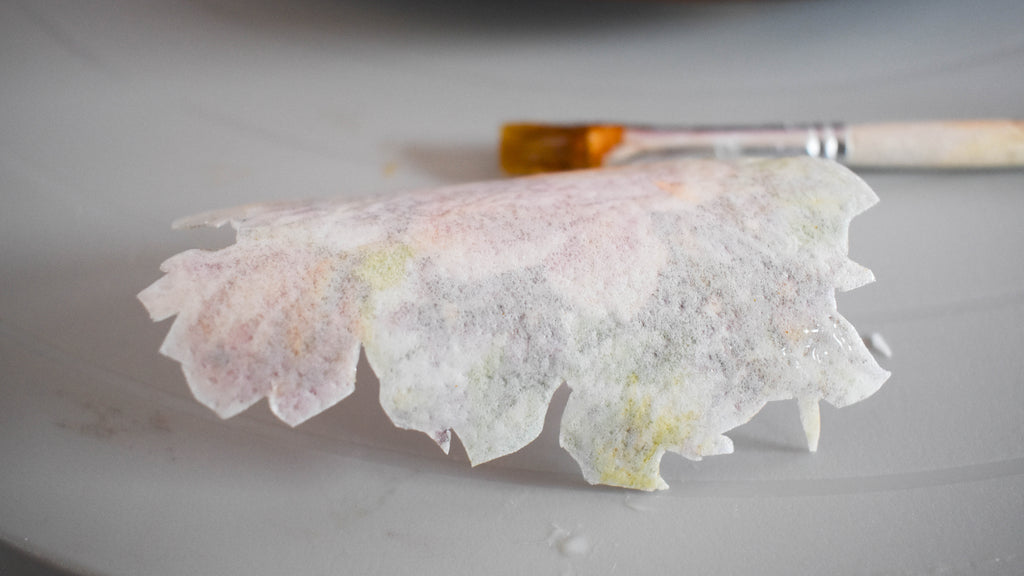
I searched for images that matched my color scheme, flower preferences and style (for me, peonies and roses with a Victorian or antique flavor) and found ones that I liked. I printed them onto wafer paper and painstakingly (although without any finger cuts!) cut out a whole mess of images! Look for images like these:
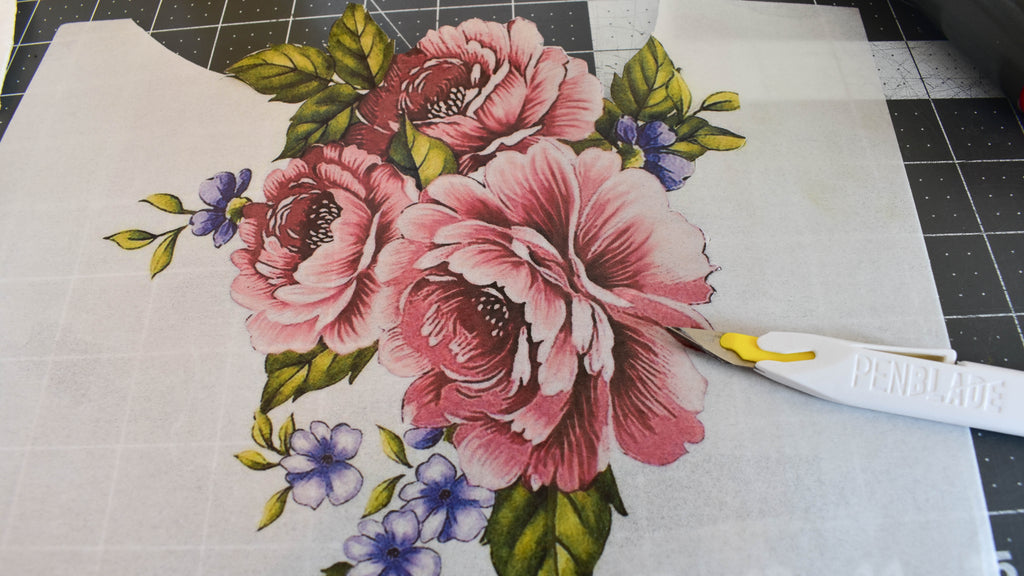
Start arranging and attach the images:
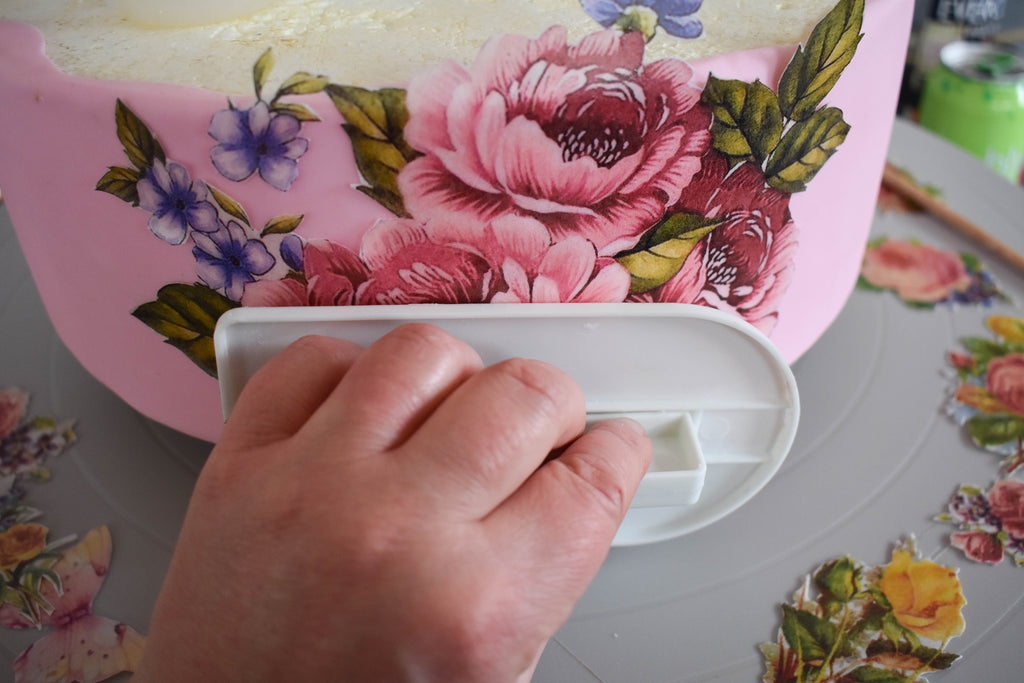
Now that I had all my paper cutouts ready, it was time to arrange the images and adhere them to the cakes. The Turntable Expander made it extra easy, because it gave me a ledge around the cake to place the cutouts and figure out where I wanted them.

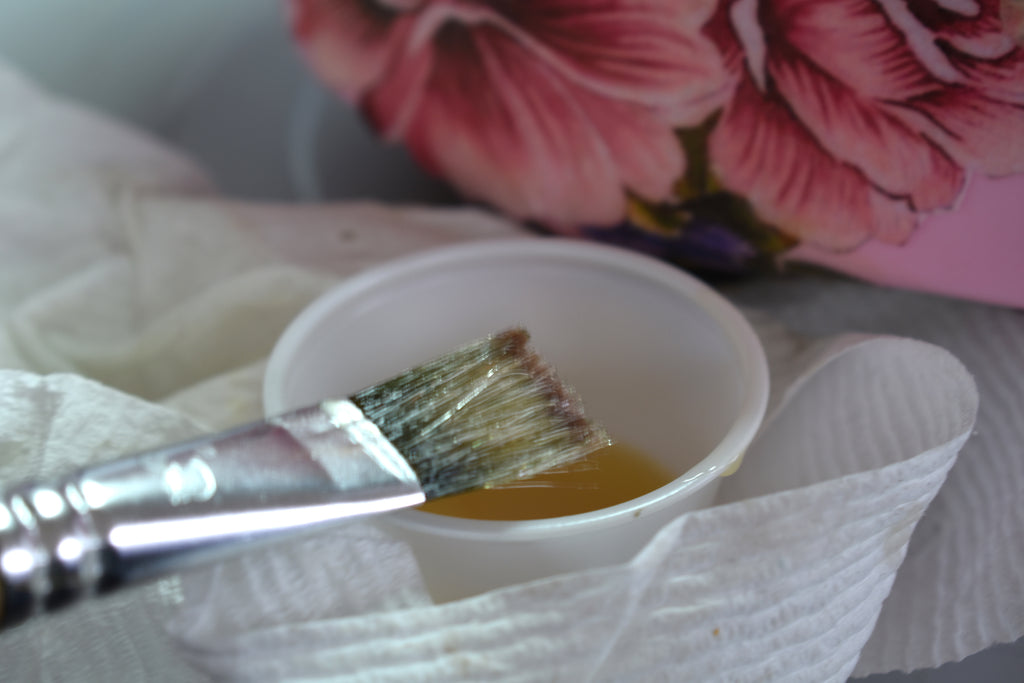
To attach the images, I painted a thin coat of piping gel to the back of each image. I used piping gel instead of water for a couple of reasons – water makes wafer paper dissolve, and it makes the ink run. I didn’t want either of these things to happen.
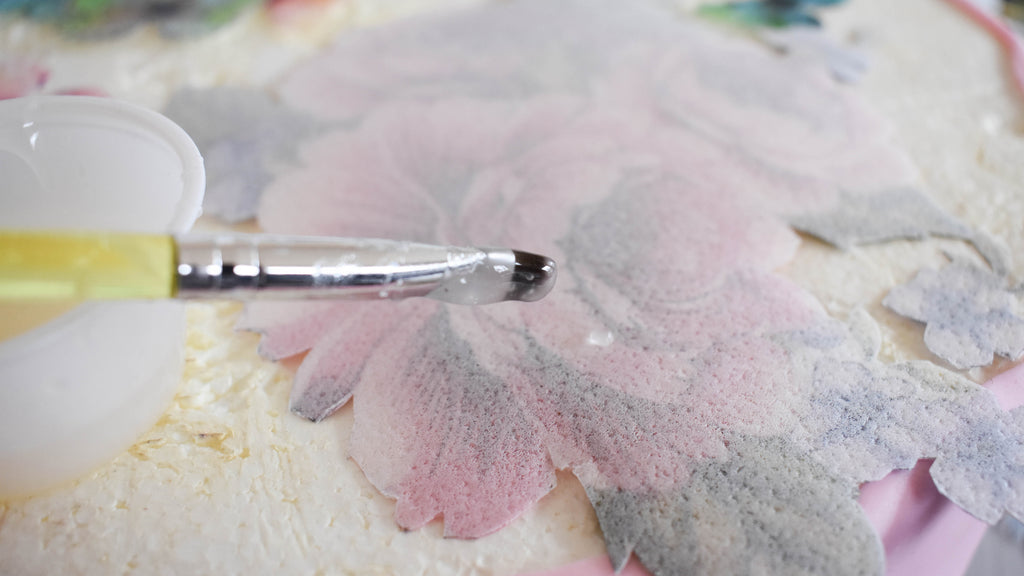
Once you coat the back of the wafer paper, it starts to soften, and then you can adhere the image to the cake, wherever you like. If the wafer paper feels stiff, use a little more piping gel or just use your paintbrush to massage the gel into the paper more, it will loosen up.
I attached the sticky side to the fondant and used a fondant smoother to help me press the images against the side of the cake and keep my fingers away from the fragile wafer paper.
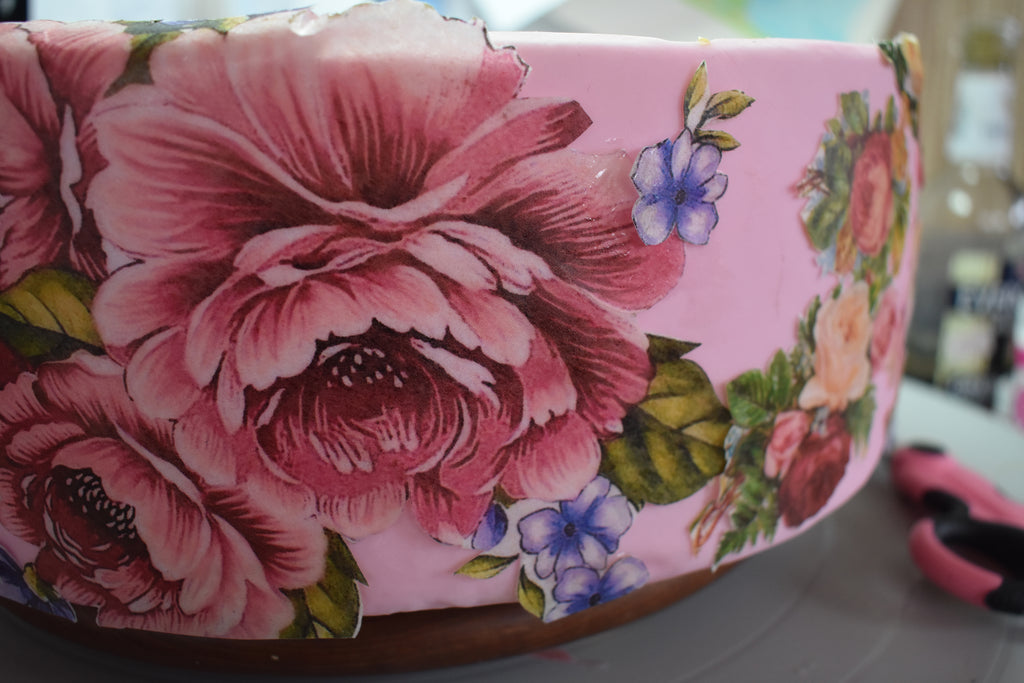
If you look at other decoupage art, usually you will find that images are overlapped, creating a new look from the existing image. This is where you can get creative – making your own garden, for example, made up of mixed images. In my case, I chose to spread the images out, because although I wanted the decoupage to stand out, I also wanted the color of the box to show through.
Shine it up:
Once the images were all adhered, I went around and made sure that all the edges were stuck down well. Once they dried a bit, I took my larger brush and some confectioners glaze, and I covered the whole cake and all the images with a coating of glaze.
I tested the glaze on the front of the images before I did this to ensure that the image ink didn’t run, and although it ran a teeny bit, it did not distort the image, and gave it more of a vintage, aged look, which I liked. I recommend that you test your images with the glaze first as well, because there is nothing worse than you brushing on a whole mess of glaze and it ruining your hard work!
Notes about Confectioners Glaze:
This stuff is mega sticky and hard to get off of things like clothing, tables, etc. Invest in some glaze thinner as well so that you can rescue your brushes afterwards and clean up any stray drips. I also recommend using a disposable container to hold your glaze while you’re painting, unless you already have a designated glaze container.
Also – never put left over confectioner’s glaze down your sink, always dispose of it in the trash instead – your pipes will thank you.
Finishing touches:
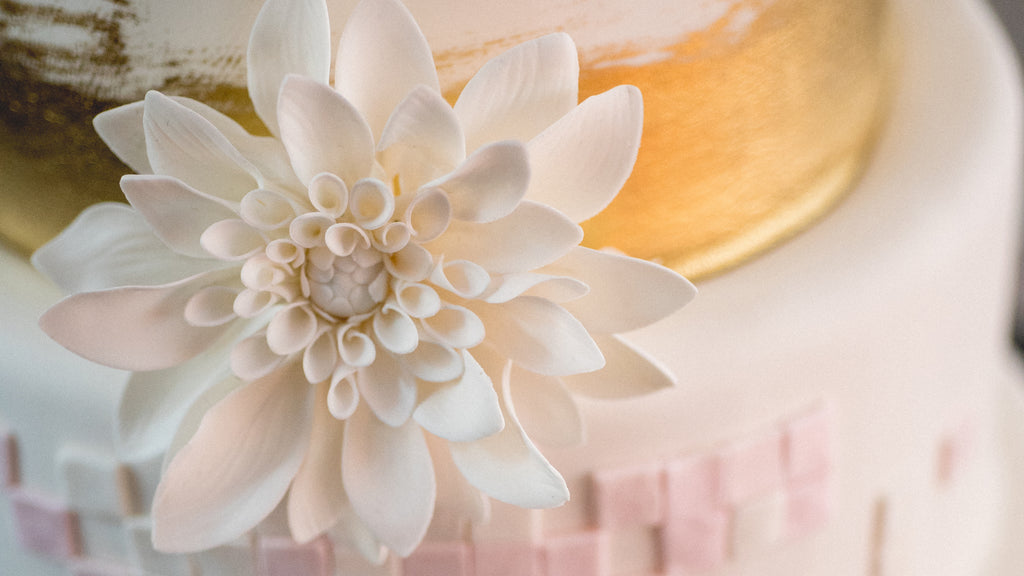
To add a little more “glitz” (remember that theme?), I adhered some imitation gold leaf around the band of the box and covered that with some glaze as well. (My soft brush from Innovative Sugarworks was wonderful for smoothing down that gold leaf!)

I also printed out some patterns I found (yes, on Pinterest) onto fabric icing sheets and cut those up to look as if there were scarves trying to escape out of the box. You can use your imagination here and do all sorts of fun things to have peeking out of the box.

All done:
Now that the hat box was complete, it was ready to stack onto the vanity table base and have the jewelry box, perfume bottle and vase sit on top of it. I’m thrilled to tell you that even though I was originally stumped by the competition theme, there is a very happy ending to this story – my cake won 1st prize in my division! Wow…that was a shock and surprise, and I was so honored.
I hope you give this technique a try. It’s lots of fun to do, and it really makes an impression!
We hope you enjoyed Rose's tutorial on cake decoupage! It's a beautiful and striking visual technique that we don't see used very often. Maybe now that you've all seen it done, our Instagram feed will light up with decoupage!
If you want to see more of Rose's gorgeous work, follow her on Social Media:
Facebook: Shinyball Creations
Instagram: @shinyballcakes
Twitter: @shiny_ball
And make sure you keep an eye on her blog - ShinyBallCreations.com - for more great tutorials, instructions, and caking advice!
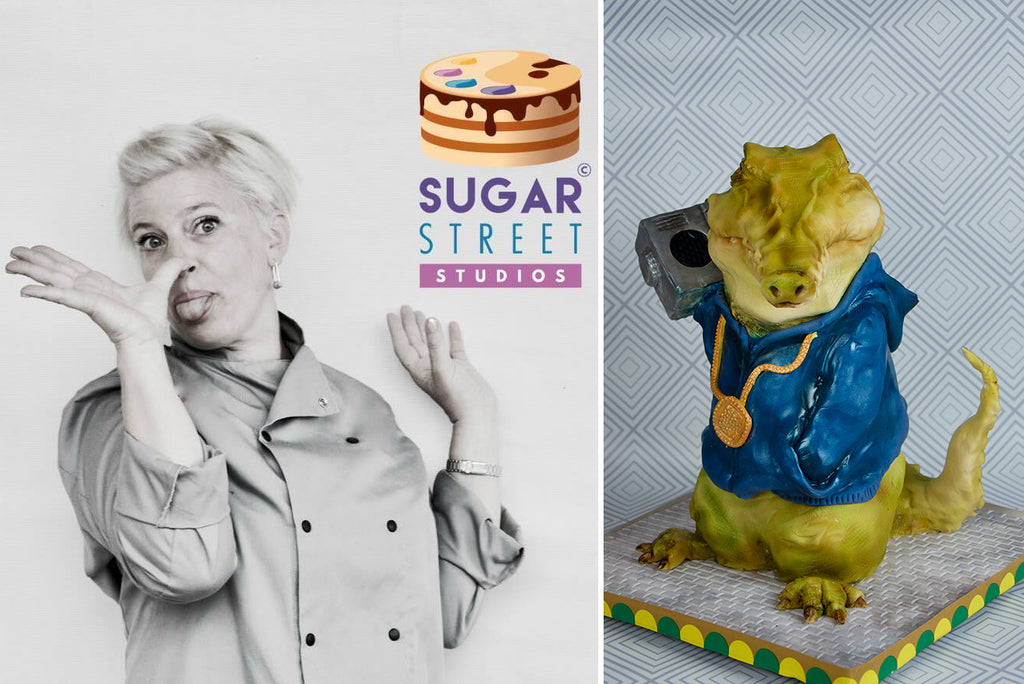
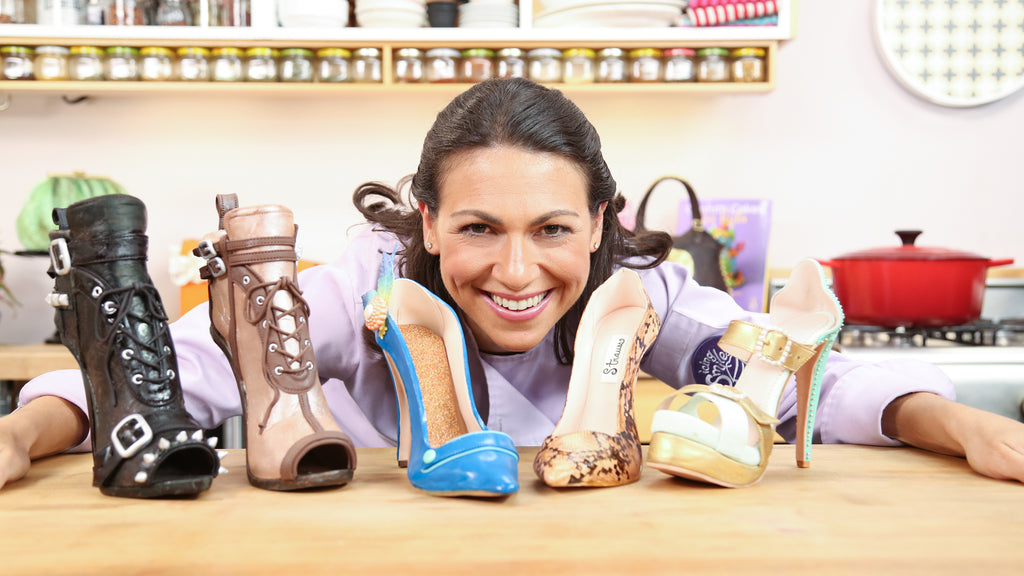
Zoe Burmester's Hip Hop Croc
Zoe Burmester is an internationally recognized, multi-award winning cake artist based in Somerset, UK. She is known for her highly detailed, realistic sculpted cakes, and a style defined by precise skill and a touch of whimsy.
In addition to running her own cake shop- Sugar Street Studios, Zoe has had her work featured on television, in magazines, in online collaborations, and at international cake shows. She is a regular contributor to Cake Decoration and Sugarcraft Magazine and a sugarcraft tutor.
Today Zoe is showing how she made this awesome Hip Hop Croc cake!
We hope you enjoyed Zoe's tutorial! If you want to learn more about Sugar Shapers, check them out in our shop here.
And make sure you keep up with Zoe's work!
Follow her on Facebook: @sugarstreetstudio
And Instagram: @sugarstreetstudios
And Sugar Street Studios has a brand new website coming soon! Bookmark this page and check back soon to see when it's up: www.sugarstreetstudios.com
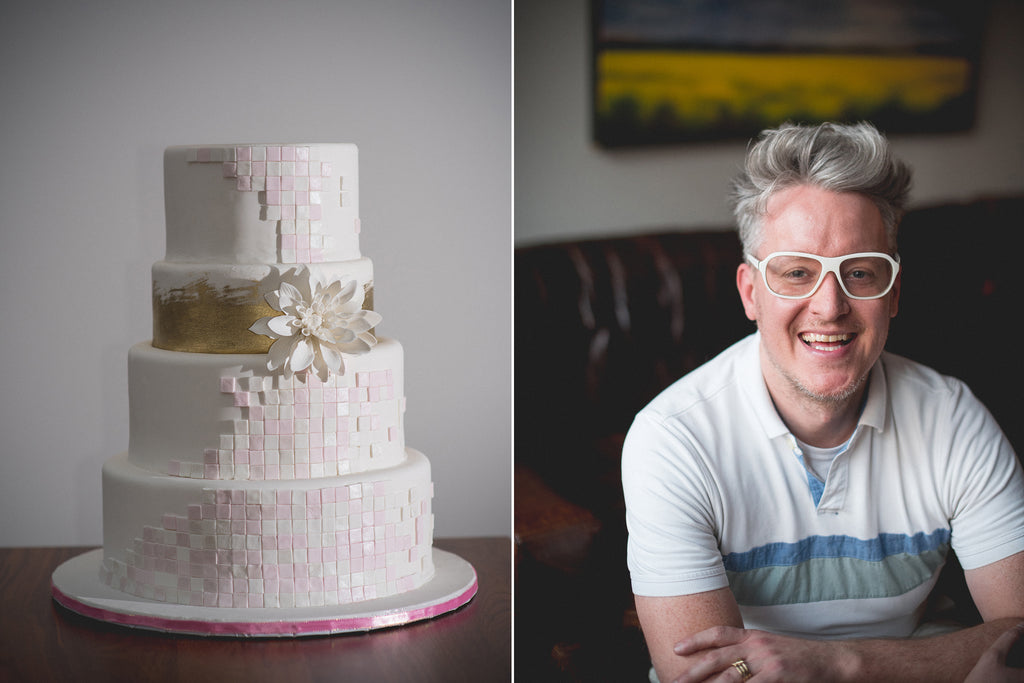
Brad Jarman and the Art of Design
March is a unique month for us in the Sugarworks Blog. Rather than reaching out to artists whose work we were familiar with, we held a contest for people interested in blogging. We were curious to see if anyone would respond who might be a little off our radar. And boy were we impressed with the submissions! It was so hard to choose that we ultimately went with 2 bloggers for this month, and we are super excited to introduce our 2nd March Artist- Brad Jarman!
Brad is having a wonderful time exploring the world of cake, cookie and cupcake decorating. Several years ago he began this journey with the Techniques and Art of Professional Cake Decorating program at the Institute for Culinary Education, where he had the incredible good fortune to study cake design under the legendary Toba Garrett. He is currently enrolled in the school's Introduction to Pastry and Baking course and is having a fabulous time playing with food and continuing to learn about the cake and baking arts.
Brad comes to the world of sugar from a decade of practice as an attorney. Being a lawyer is fun in its own way, but it is definitely not as sweet! Today, Brad is going to teach us how thoughtful design is as important as well-developed skill.
I want to talk a bit about cake design. I come to cake decorating after a decade spent practicing as an attorney - transitioning from that structured, organized setting into cake decorating, a craft of creation and creativity, was a stretch for me in many ways. In particular, I discovered that coming up with a workable cake design is not as easy as it seems! I still recall a cake I designed several years ago. In my mind it would be a towering celebration of my skills. A show-stopping extravaganza. An extravagant statement piece.
I wish I could tell you that’s how this story ended. In reality, when all was said and done? Child, it was a mess.
Techniques clashed, there was no coherent theme, and it generally looked like multiple tiers from different cakes were stacked at random. So what went wrong?
The problem was not technique. I had the skills I needed to produce quality work. The problem was my approach to my design - in my mind, only the most complicated, elaborate work would do. I felt like this was my only chance to show everything I had learned.
In reality, the designs that I most often find inspiring are simple, with components that complement each other gracefully (think of white tiers with draped fondant and a handful of sugar flowers - stunning!) In my previous life as an attorney I learned that legal arguments are best presented in an organized way with a coherent theory - couldn't I use that way of thinking for designing a clean and uncomplicated cake?
Don’t get me wrong - a complex design executed thoughtfully can be truly beautiful. For me, though, as I continue to learn about the craft of cake decorating, part of my growth as a cake artist means being open to cake designs that are simpler, with attention to the details that make the project feel clean.
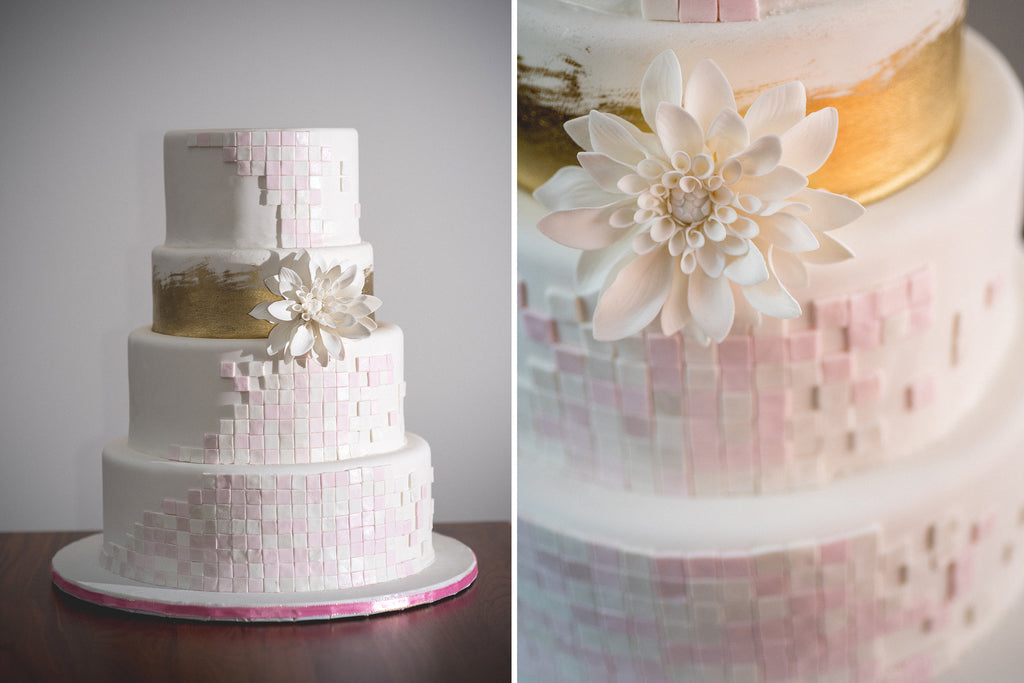
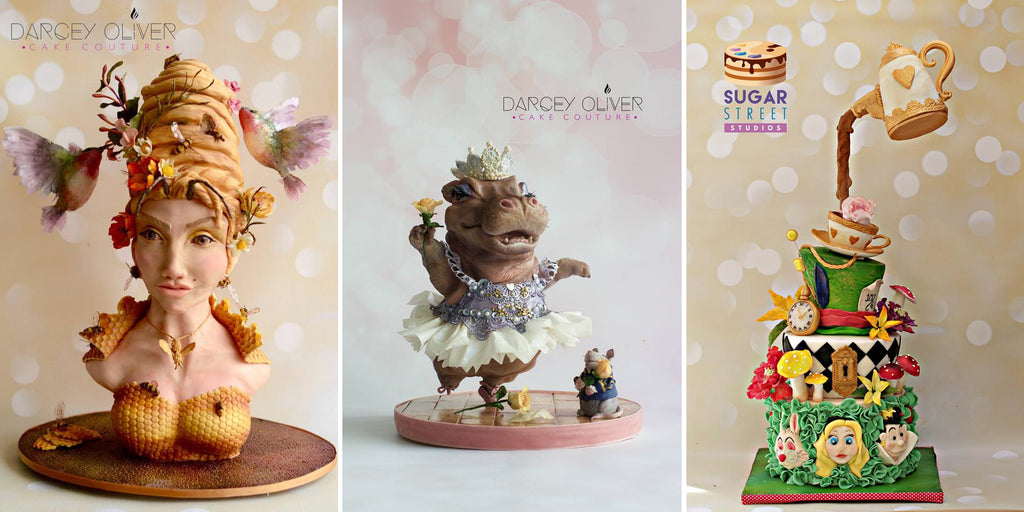
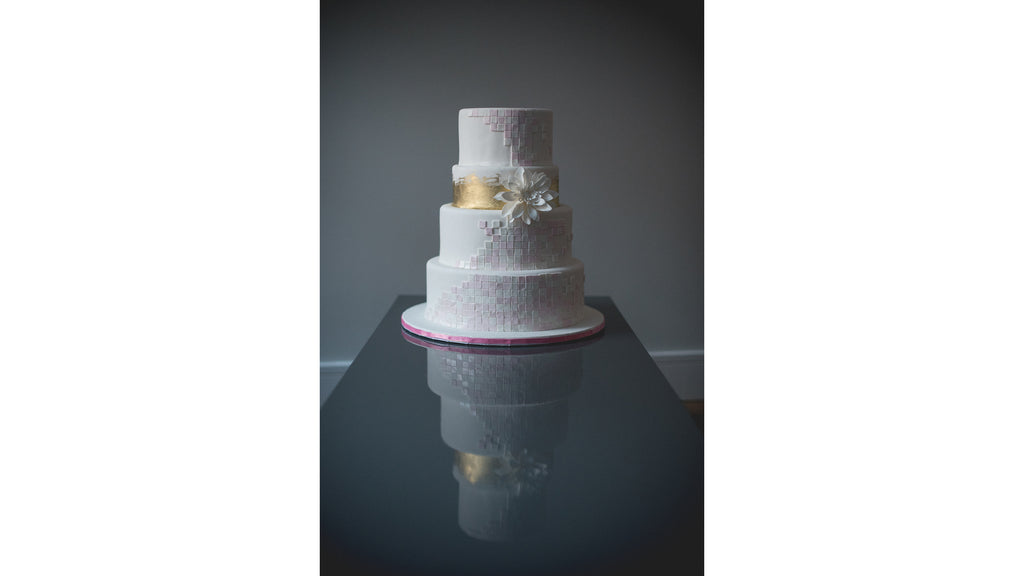
I recently made this tiled cake, and using that piece as a backdrop I'd love to share my process for creating a simple cake design with you. While I am focusing on the design process here, and not the mechanics for creating this cake, I have to note that my Sugar Shapers were instrumental in making this cake. I used them for cleaning up edges around my tiles, and also for filling in the gaps between tiers (this is called "gunging" and Kaysie Lackey has a great video on it which I found super helpful!)
Cake design is truly personal, but hopefully my process will be useful to you as you come up with your own approach and clean designs.
- Limited colors. Creating and complementing colors is a wonderful part of cake decorating. However, just like a painter doesn’t use every color in every single painting, cakes with just a few colors can be gorgeous - a white cake with all white flowers never goes out of style. For my work, I used white tiles, soft pink tiles, and gold - that’s it. I considered an ombré effect because I am apparently obsessed with making things complex. However, multiple shades could have felt busy, so I resisted, and I’m glad I did.
- Embrace the space. If you’ve ever been in a room with too much furniture it makes the walls feel like they’re closing in. I hate that. One of the hardest things for me to learn was that empty space on a cake is not necessarily unfinished - it can often add a great deal to the overall design. Just like interior design, with cakes sometimes less is more. For this cake half of the bottom tier is undecorated, with more blank space as the tiers go up. I wanted a cake that was not busy or distracting, and this space is crucial.
- Limited elements. Don't try to cram every technique into a single work. No one wants to listen to a song where all of the notes are being played constantly - we like music when notes and rhythms are arranged in ways that are pleasing, and cakes are no different. For my tiled cake, I used three elements. The tiles, uniform in shape, represent the first element; these are combined with a gold-brushed tier, element number two, and topped by a single dahlia (many thanks to Innovative Sugarworks for making this great Dahlia cutter set, and the awesome video on how to use it!) I felt an urge to make the design more complex with a spray of flowers...I told you I have a problem. I decided not to, though, because it felt finished without it.
- Gentle movement. Cakes invite the eye on a journey. Think about a cascade of sugar flowers spiraling around multiple tiers - the eye naturally follows the cascade, taking in the sights along the way. For this design I arranged the tiles in a soft arc curving right and then back to the left. The dahlia sits in the non-tiled space and keeps the eye moving along. Aim for gentle, relaxed movements, like ice skaters (the parts where they are gliding and twirling ethereally; not the movements they make when they attempt a jump and fall to the ice.)
None of these are hard and fast rules. A cake with numerous colors can feel quite simple if the design leaves most of the space on the cake undecorated, just as a cake with no blank space could feel elegant with a simple design repeated on every tier. While I will probably always struggle with being a complexaholic, the projects I've been most satisfied with are those that are clean and timeless.
I'd love to hear your thoughts - learning from each other is one of the most fun parts of this field! Feel free to email me at bradandbuttercream@gmail.com or connect with me on Instagram: @bradandbuttercream .
We're super impressed with Brad's discussion of design and aesthetic! It's so easy to be so excited about all the new techniques you've learned that you want to cram them all into your next cake, but elegance is often achieved through subtlety and simplicity. We hope you found this as helpful as we did!
We also like to give a little shout-out to photographer Rob Yaskovic who photographed Brad's bio pic and his stunning tiled dahlia cake. Check out some more of Rob's work on his website, www.yaskovic.com.

Elisa Strauss's Life-Size Cake Baby
This month we've got two amazing artists sharing the spotlight at the Sugarworks blog! Our first is noted cake artist, author, and fashionista Elisa Strauss!
Before shaking up the NY cake scene, Elisa worked as a designer for Ralph Lauren. In fact, it was a cake she made for Ralph (in the shape of a Bugatti, his favorite sports car) and the heaps of praise it received from fashion industry notables that inspired her to bring her design talents to the kitchen full-time.
Elisa founded her bakery, Confetti Cakes in 2000 and has since published 2 cookbooks and appeared several times on Food Network shows, including Extreme Cake Challenge where she won the grand prize. Her creations have appeared on the Today Show, Sex and the City, The View, and Martha, and her bakery has been featured in InStyle, Martha Stewart Weddings, Marie Claire, Seventeen, Elle, Vogue, Modern Bride, New York magazine, BRIDES, Elegant Bride, and The Knot. In 2008, Elisa was even selected as one of America’s Top Ten Pastry Chef’s in Pastry Art and Design.
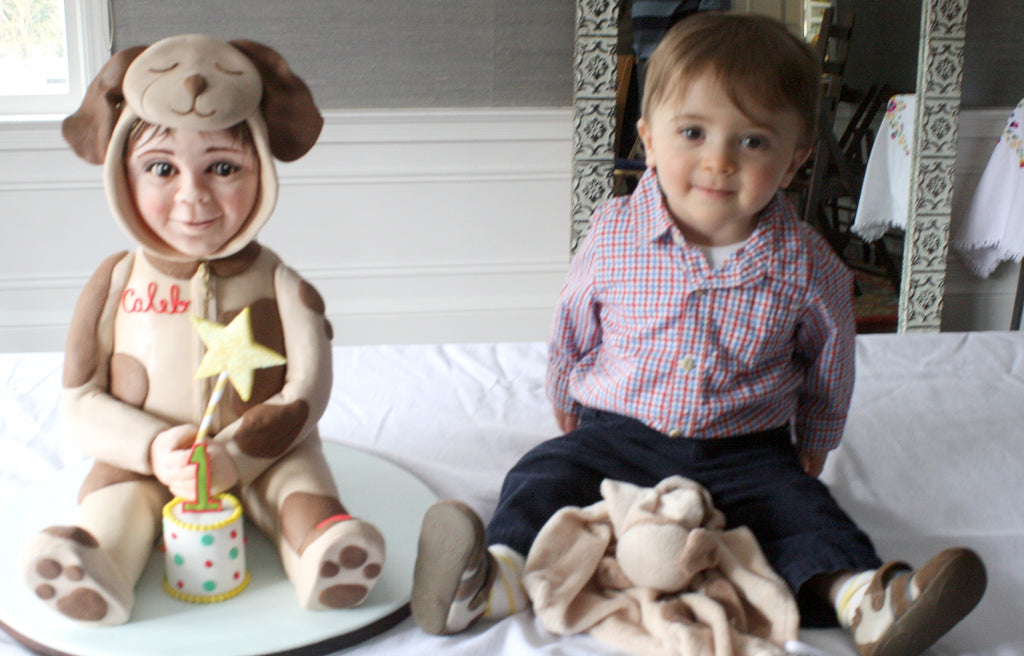
Today, Elisa is going to walk us through how she sculpted a life-size replica of her son for his 1st birthday cake!
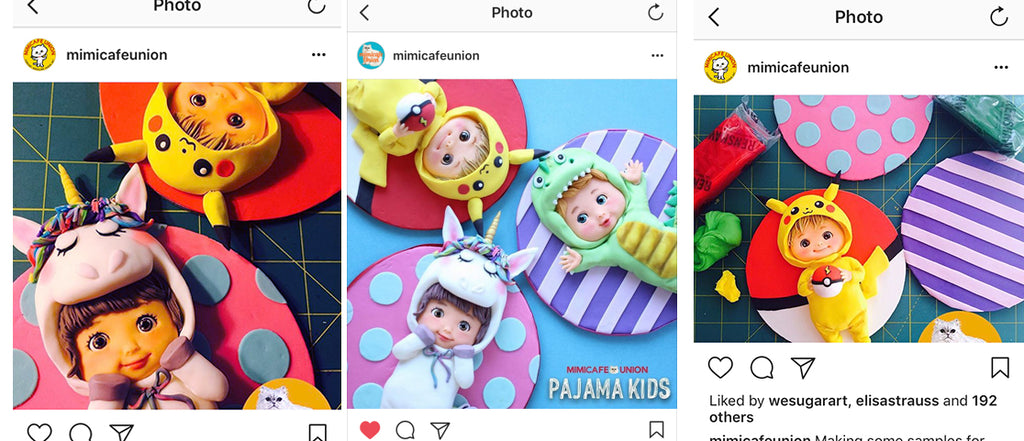
I was planning on making a cute little cake for my son’s first birthday- perhaps his favorite lovey or the car he likes to play in, but then I saw a photo on my friend Sachiko’s Instagram feed from Mimicafeunion.
I told my husband I wanted to challenge myself. He looked back at me wide-eyed and in silence; I can only imagine what he was thinking. Most likely, “Oh, no” or “Here she goes again: shirking household and child-rearing duties on me.”
I had never sculpted a human head before and I thought this was the perfect opportunity…since I was the client. I have sculpted many animals in my time: dogs (check), cats (check), dinosaurs, monsters, even an alien, shark and fish (check,check,check,check, and yes, check)- but never a human. Plus, I thought it would be fun to look at my cute baby boy all day.
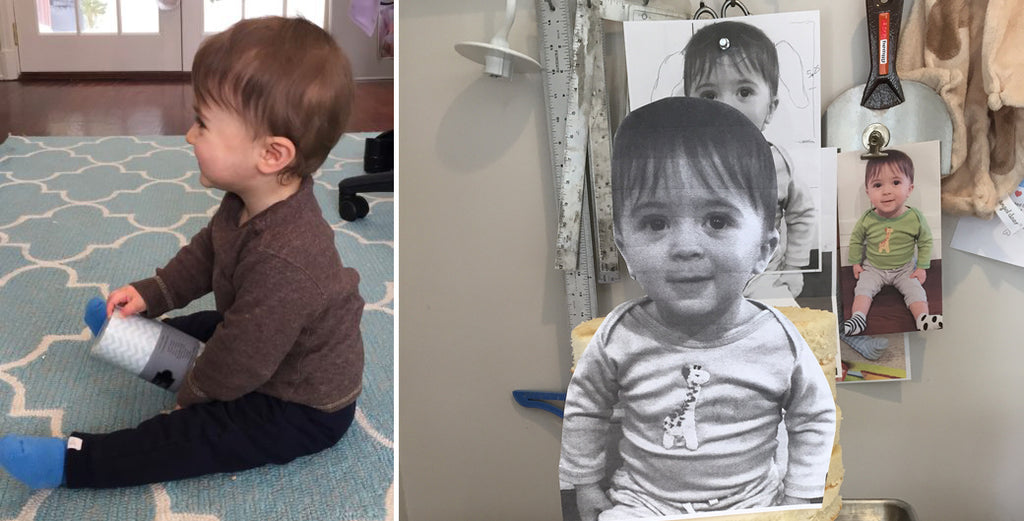
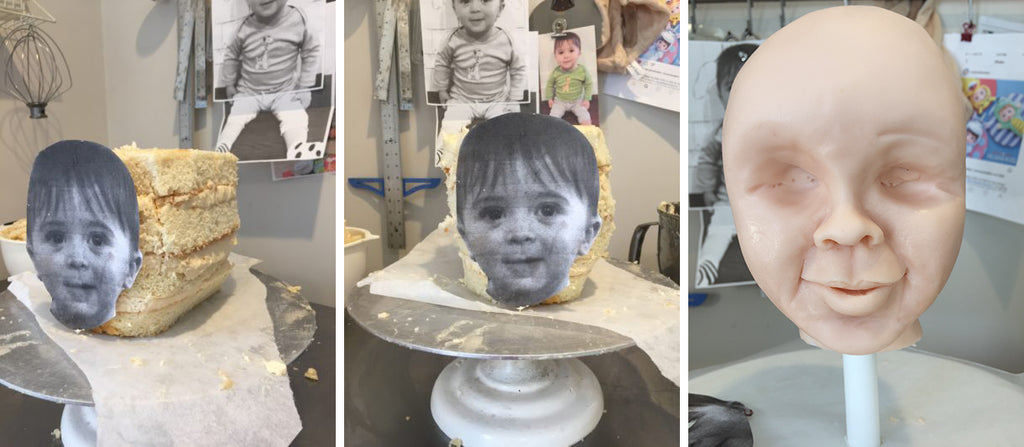
So I plopped him down in my studio and asked him to turn to the side so I could snap his profile. Luckily, he cooperated :-). I also took a photo of him in the position I wanted for the cake and blew it up based on the size (and amount of cake) I needed.
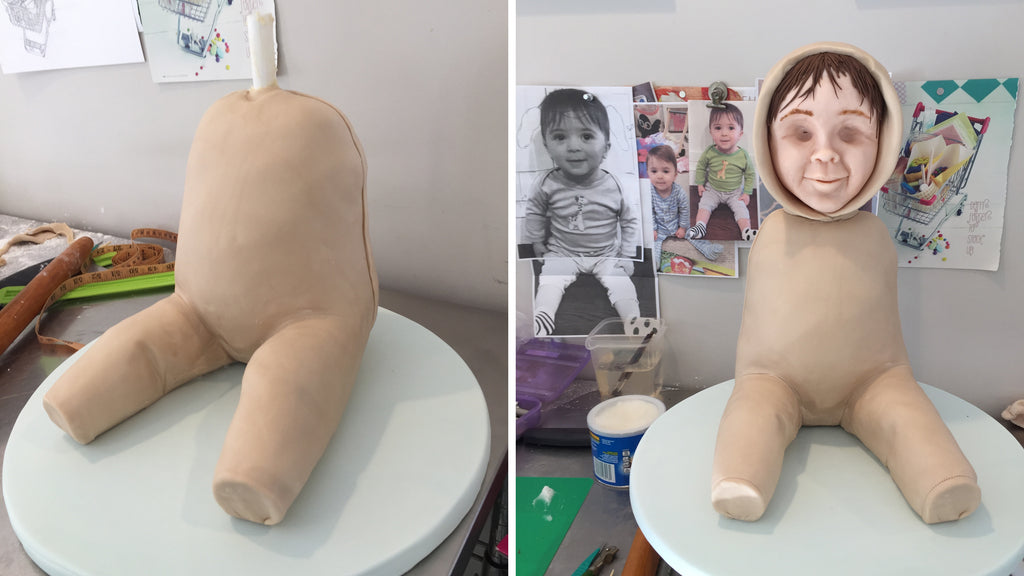
This cake took lots of planning. Aside from just the size and amount of cake to make, I needed to make a base for the bottom of the cake, a middle support board, a board for the bottom of the head, and cut holes through ALL the boards AND cake. I cut a hole through everything because I glued a dowel through the cake drum to hold all the cake together (in addition to internal support dowels).
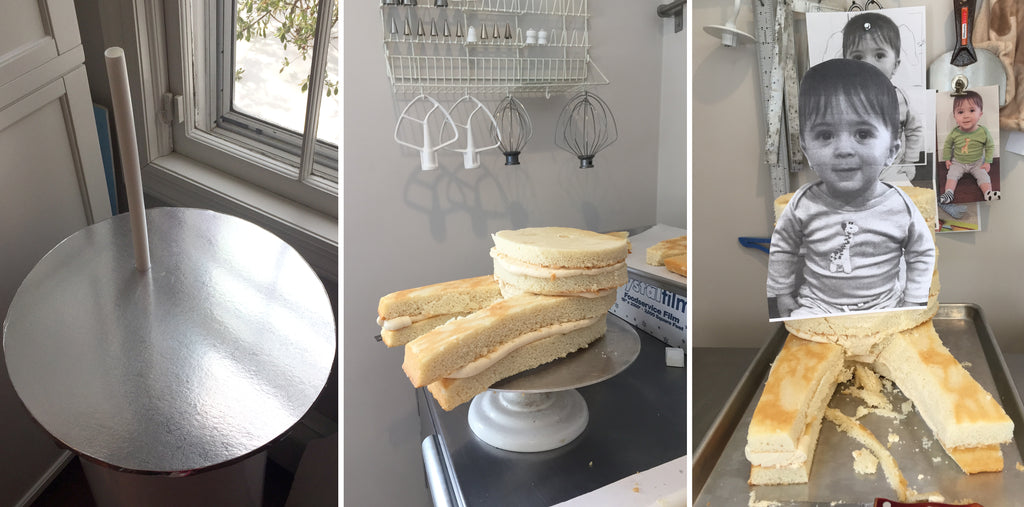
Once the cakes were all doweled, sculpted, crumb-coated and finally iced with buttercream I was ready to start on the head. I will admit this part WAS VERY EERIE.
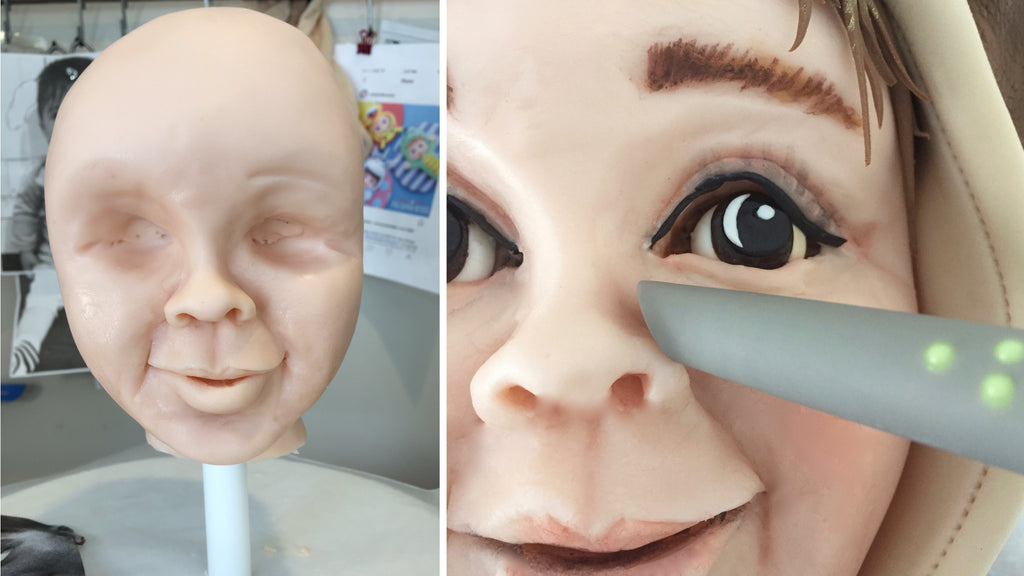
After carving the head, I decided it was going to be too heavy. I had enough cake to feed my guests (I baked a red velvet cake, too, because it was my cousin’s birthday and that’s his favorite!) so I opted to make the head out of styrofoam (I find Rice Krispie treats too heavy). I covered the head and made all the features out of Fondarific’s sculpting chocolate, and thank goodness for Innovative Sugarworks' Sugar Shapers…not sure how I would have done it without them! I also love my small ball tool and veining tool.
I covered the body with a combination of Satin Ice’s chocolate fondant and Fondarific’s sculpting chocolate. Then I THREADED the cake through the dowel and attached the cake to the board covered in pale blue fondant. Once I got the head pretty close to the shape I wanted then I attached everything together, the head was also threaded on dowel.
After a snow storm, a couple of sleepless nights, I finished the cake ONE HOUR before the guests arrived. And luckily for me, my awesome cousin, Jordan Pique arrived just in time to take professional photos.
I used an extruder to “embroider” his name onto the cake with Satin Ice’s pre-dyed gum paste.
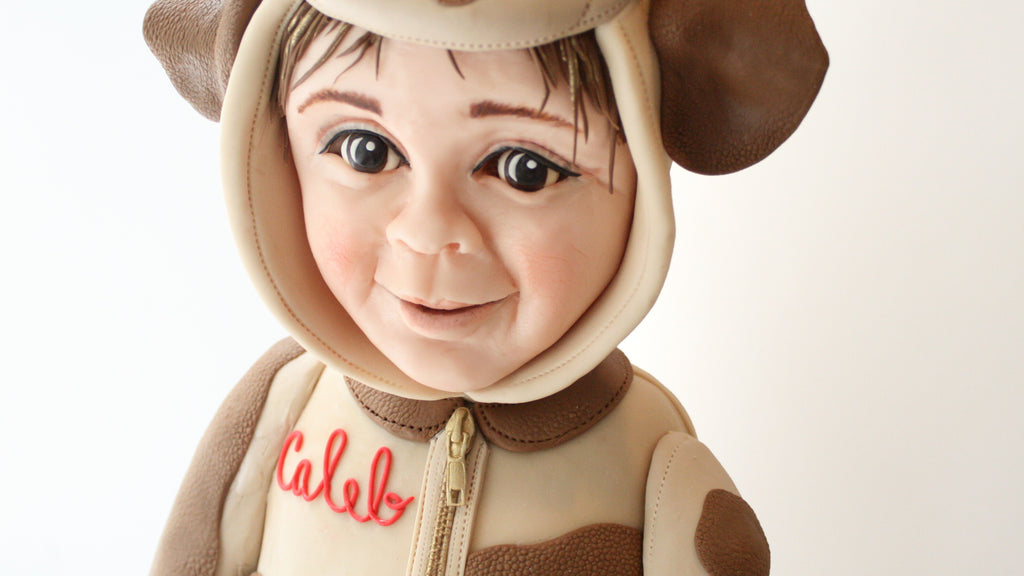
On this detail shot you can see the texture I created on the “spots” with my Marvelous Molds impression mat and the zipper painted with gold dust and vodka.
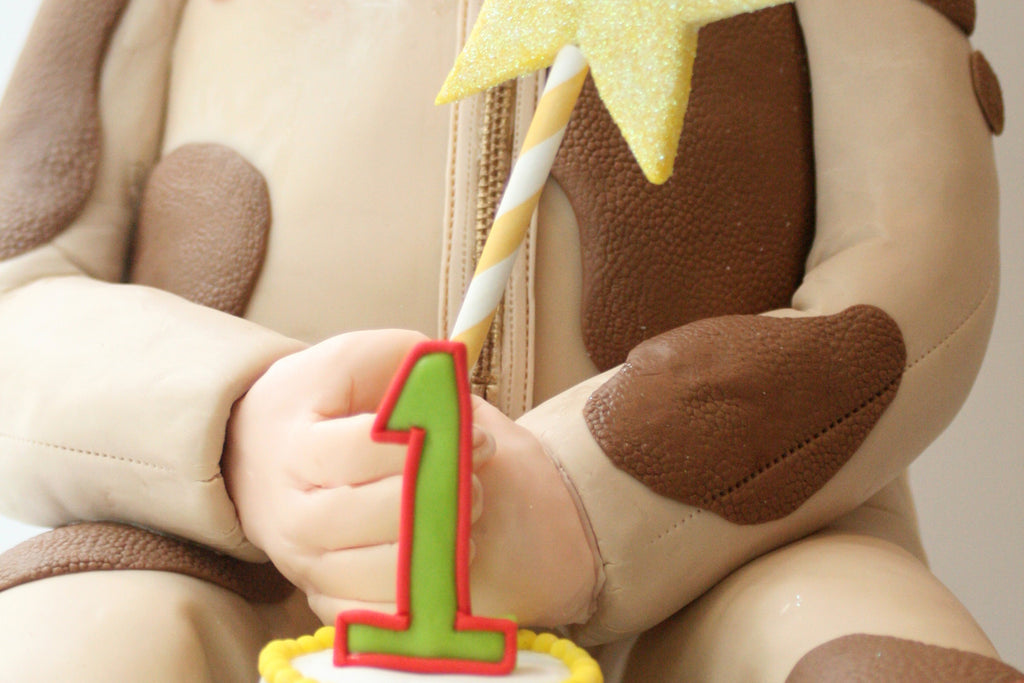
My poor baby boy didn’t know what to make of the cake! I’ve already started thinking about his cake for this year.

We hope you've enjoyed this look into the challenges of sculptural cake making and how to overcome them! We can think of no sweeter tribute than to sculpt your loved ones out of cake, and Elisa did a phenomenal job with her son's likeness!
If you want to see more of Elisa's work, you can visit her website, www.elisastrauss.com or follow her on social media:
Facebook: Confetti Cakes
Instagram: @elisastrauss
YouTube: Confetti Cakes
Twitter: Elisa Strauss
And if you'd like to learn more from Elisa, she has classes available on Craftsy, including one free course! Take a look online here!
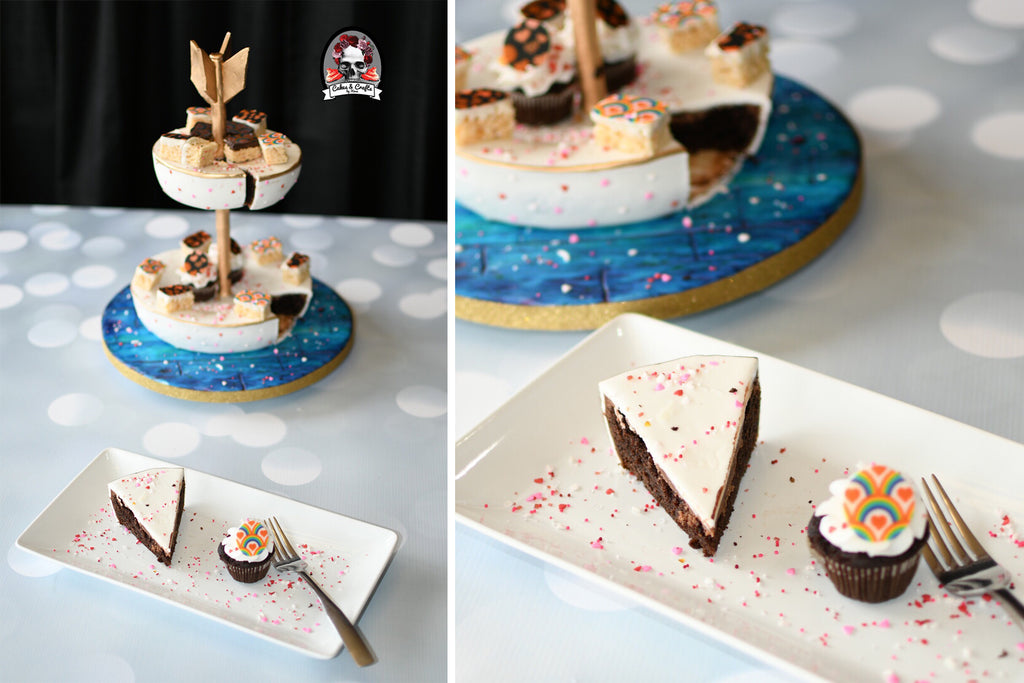
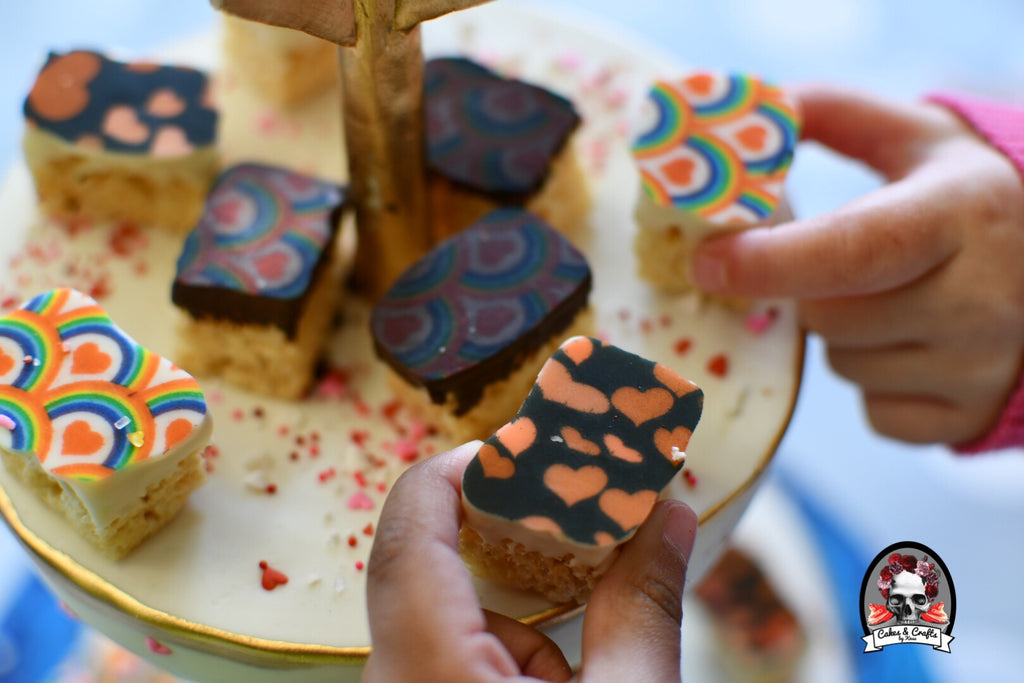
Cake Serving Cakes by Kass!
It's February- the month of love! And we are excited to feature an artist we absolutely love as our guest artist this month- Kassy Jimenez of Cakes & Crafts by Kass!
Kassandra Jimenez AKA Kassy is a self taught home baker from California and is currently located in Central Texas. She prides herself on being upfront to her followers, enjoys connecting with her “peeps” on social media and always being there to help anyone who may need it. From running Sweets University with her Cake Sister Wife (just go with it), Joyce of Toxic Sweets Shop to blogging about all things cake, running a popular YouTube channel, and putting on a Cake Show, she is always working on something! Her style is very much her own- modern, bold, rustic and detailed cakes. Kassy has been featured in magazines, has appeared on Food Network's Cake Wars, and is a brand ambassador for Icing Images! She is a wafer paper addict and buttercream is second nature to her.
This month, Kassy has invented something meta- a way to serve your cake... on cake. We'll never use a silver platter again!

Kassy has used Innovative Sugarworks Sugar Structures to build a central armature to turn two cakes into a 2-tiered serving platter, which she then piled high with delicious treats. This is truly the cross section of innovation and decadence!
In the video below, Kassy shows you how she made the whole thing, from the wood paneled base board to the armature construction and cake making. Check it out!
And if you liked that, be sure to subscribe to Kassy's YouTube Channel for more awesome tutorials and crazy cake ideas!
www.youtube.com/c/CakesCraftsbyKass
You can also follow her on Facebook:
www.facebook.com/CakesandCraftsByKass/
And on Instagram:
@cakesandcraftsbykass
And keep up with own cake blog on her website:
www.cakesbykass.com
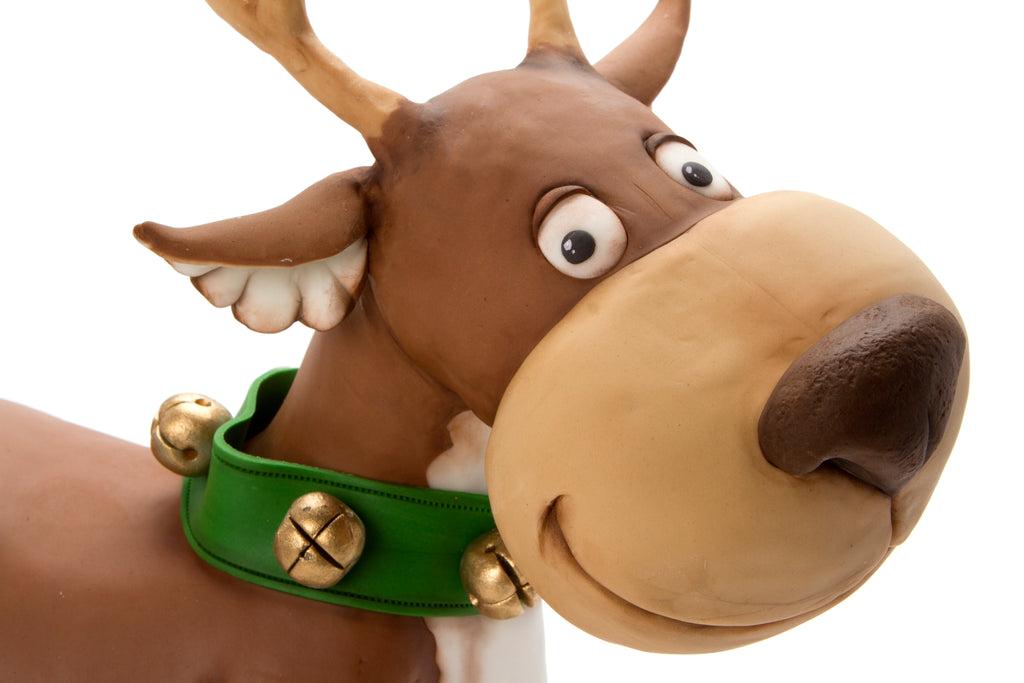
Rufus the Reindeer
You know Dasher and Dancer and Prancer and Vixen, you know Comet and Cupid and Donner and Blitzen. But do you recall the sweetest reindeer of all?
I'm talking about Rufus, of course! Kaysie Lackey's adorable and oh-so-delicious reindeer cake!

Rufus's basic form uses the Sugar Structure 4 Legged Standing kit, and we're going to show you in pictures how he came together!
This is what you'll need:
- Sugar Structure 4 Legged Standing kit
- Base board: 12" x 16" plywood
- Cake boards: 2 sheets 8" x 10" foam core
- Cakes: 9" x 7" x 1.5" (3 layers)
- Ganache: 750g
- Head: 4" foam ball and 5" foam egg, 50g modeling chocolate to fill gap, 75g m.c. for each cheek
- Primary body color: 800g fondant + 400g brown modeling chocolate
- White body color: 150g fondant + 75g white modeling chocolate
- Chest: 200g modeling chocolate
- Front legs: 150g modeling chocolate each
- Back legs: 200g m.c. each
- Neck: 200g m.c.
- Tail: 75g m.c.
- Muzzle: 75g primary body color + 75g yellow modeling chocolate
- Nose: 40g m.c.
- Hooves: 40g m.c. each
- Antlers: 100g m.c.
- Collar: 75g m.c.
Ok, let's get started! The first thing you want to do is cut your cake boards for Rufus's body. You're going to want 2 foam core boards to sandwich around your structure. Here are Kaysie's templates for the boards.

Next, assemble your 4 Legged Standing Sugar Structure according to the kit instructions, but splay out the legs a bit to give Rufus some motion.
Now sandwich those cake boards around your structure. Hollow out a bit of the boards where the rods will sit so the two boards fit right together around the armature, then hot glue them together.

Next stack your cakes and carve them into a nice chubby reindeer body. We find it handy to use your Sugar Shapers to draw in guidelines of where you're going to make cuts.


Refine the body's shape using small cuts- it's easier to cut more off than to add back on. The fatter your reindeer, the more servings you get.

And don't forget the reindeer booty!

Cover the body with a layer of ganache and use modeling chocolate to build out the chest.

Now make your legs out of modeling chocolate. Remember to split them open and carve out a space for the rod. Enclose the legs around the rod legs and shape as needed to attach them to the body in a natural manner. Smooth the edges over with ganache.


Now let's move on to the head. We generally use foam for heads because it's not worth the trouble of cutting cake boards, attaching, and carving for the small amount of servings you'd get from the head. So shape your foam pieces into a head by cutting the tip off the egg (this will be the top part of the head) and trimming a flat side into the ball (this will be the muzzle). Hot glue them together. Use modeling chocolate to fill in and space where the two pieces meet, to fill out the cheeks, and to build up the neck.

Rufus's basic form is made, now it's on to the fun part- making him look like a reindeer! Start by covering his whole body with the primary body color blend, then use the white blend to cover a strip running from his throat all the way to his bum.


Add on his tail, then cover the muzzle in the lighter blend and make some holes where his antlers will go.


For the ears, use a teardrop shaped cookie cutter and cut two teardrops from both the body colored blend and the white blend. Use your lip chisel (blue) and tri-tip chisel (red) Sugar Shapers to give a scalloped shape to the inside ear shapes (the white teardrops).


Attach the ears with the white side facing out. Then fold the ears downward and shape until you've got them how you like them. Use a wooden skewer to hold them in place until they dry.


Make antlers by shaping wire and wrapping it in floral tape. Tape the ends to pieces of sharpened dowels. Cover the wires in modeling chocolate and use pliers to place in the antler holes on the head.

For his eyes, use an oval cutter to cut out eye shapes and use the same cutter make whites to place in the eye holes. Add pupils in black.

Make a triangle out of dark brown modeling chocolate for his nose. Use your bone chisel (orange) Sugar Shaper to work in nostrils and your tri-tip chisel to draw the split in his nose.

Then use your Sugar Shapers to model a mouth.


If you want, you can add a collar with sleigh bells for a festive touch. Then just dust to add dimension and you're done!


(Mit)chie Sells Seashells!
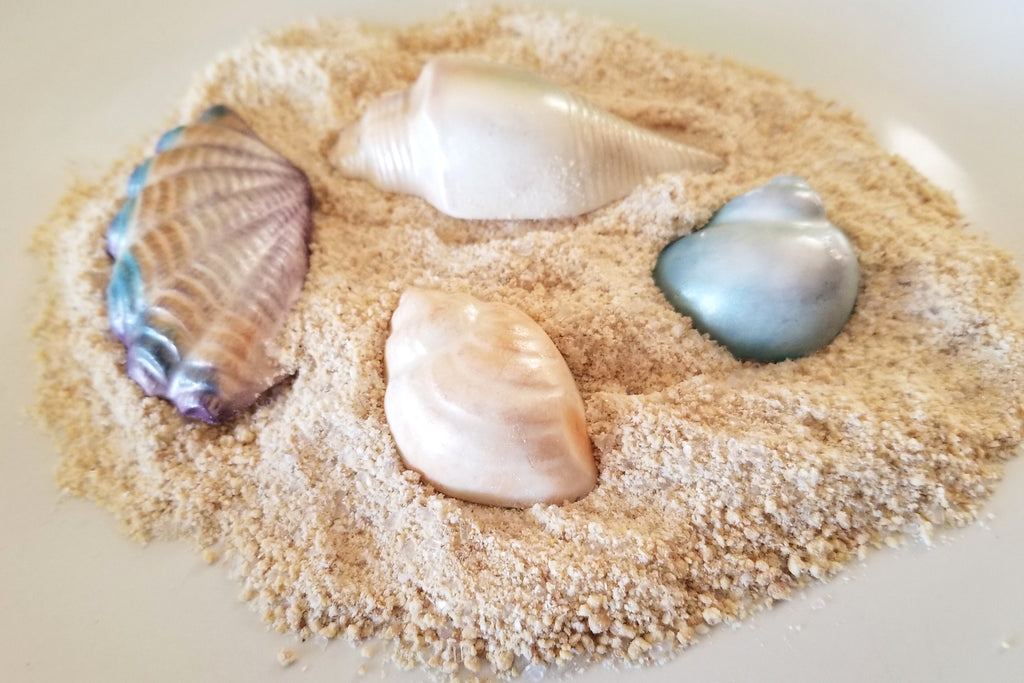
The winter weather has started to settle in here in the Pacific Northwest and the gloom was starting to get us down. Chef Mitchie of Mitchie's Munchies in Las Vegas swooped in with the sweetest solution! These delicious, shimmering white chocolate seashells have got us dreaming of summer days by the seashore!
Take a look at how she made these and bring a little touch of summer into your own winter doldrums!

Mitchie started these seashells by casting melted white chocolate in chocolate candy molds. Once set, the shells were released from their cavities and Chef Mitchie used our Sugar Blade to trim off excess from edges of shells.


Next Mitchie got out her Sugarworks Artists' Brushes and an assortment of pearl Luster Dusts.

Separating out small quantities of all the colors you plan to use onto a plate, paper towel, or work surface allows for easy access and blending and eliminates the risk of cross-color contamination in your jars.

Our Artists' Brushes are ideal for working with dry dusts. Dry dusting candies like these chocolate seashells allows the color to blend into the chocolate without the potential for streaking you might get painting on liquid colors.

The dry dusts make it easy to get soft and natural looking gradations to your coloring.

Chef Mitchie used edible lacquer spray to seal color onto chocolate. Then she finished off her project with some edible sand.

These seashells are great for sumptuous table centerpieces as well as individual party favors.

We hope you've enjoyed this project by Chef Mitchie! If you want to see more of her amazing edible creations, check out her website- MitchiesMunchies.com and follow her on social media!
Facebook: @MitchiesMunchies
Instagram: @ChefMitchiesMunchies
If you live around Las Vegas, you can even take classes with her!
http://www.mitchiesmunchies.com/cake-classes/
And if you'd like to watch these seashells come to life, take a look at this little video montage!
A Hairless Headless Horsecat for Halloween!
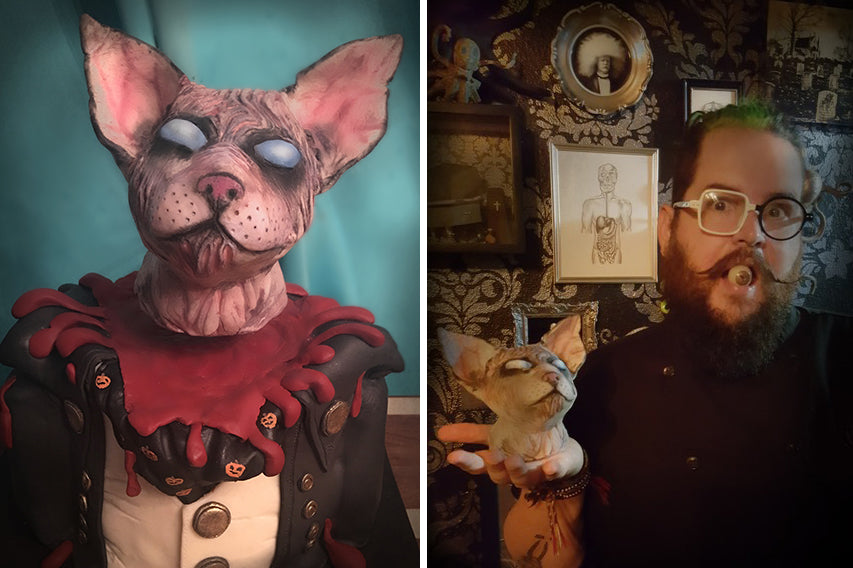
It's October! We could think of no more fitting guest artist for this month of macabre than that Master of the Morbid- Andrew Fuller of Guy Meets Cake!
Andrew is a collector of oddities, an avid traveler, a fan of all things macabre, and lives like every day is Halloween- down to the creepy, kooky aesthetics of his house. A self-taught caker, Andrew got into cake design just last March, after posting a photo of a cake he made with a travel theme. An artist at heart, he found a place in the world of cake with his sculpted pieces when he learned that if you make your art EDIBLE....people will buy it!

Today, Andrew has something special to make your Halloween even spookier- he's going to teach you how to make your cake... levitate.
If you can work this into a Carrie Halloween costume you'll win all the contests!
The Headless (hairless!) Horsecat of Sleepy Hollow

When I was asked to be the guest blogger for October, I knew I had to do something spooky, creepy, and surprising. October is the month I was born in and it's no secret to anyone who knows me that I live by the mantra "Everyday is Halloween". I'm pretty new to the world of cake, I'm honored to be here, and I hope I don't let you down!
So...what do I have for you? None other than a Headless Horse....CAT?! Not just any Headless Horsecat, but a Headless SPHYNX, AKA hairless cat. Not just ANY Hairless Headless Horsecat (still with me?!), but a Hairless Headless Horsecat with a levitating head...and I'm going to show YOU how to do it yourself.

A few months back, I did a Super Mario Bros. cake with a floating mushroom jumping up out from the question mark block. 
THAT has probably been my most asked about cake, so I decided to give up my trick for creating a cake that is sure to leave people scratching their heads and wondering HOW you did it. Shall we get started?!
A Decapitation Delight
First thing's first...the head. I happen to have four Sphynx cats and I'm not ashamed to admit that I'm slightly obsessed with them.

So I used my cat Hector as my inspiration and muse. The head is what will be levitating by way of a magnetic levitation device. It can only hold so much weight, unless you're ready to throw down some MAJOR cash, so we need to make it lightweight. The one I'm using today can hold 13.1 ounces, so I'm using styrofoam, aluminum foil tape, and modeling chocolate.
I used a styrofoam egg as my base, and a few 1/2" thick styrofoam discs to add some neck. Typically, when I do sculpt on top of styrofoam, I add pieces of chocolate or fondant to build a structure underneath my top layer, but here, we have to remember that it can't be more than 13.1 ounces, so I shaped it with some sandpaper and squeezing until I was happy with the shape, and then attached it to the neck and wrapped it with aluminum foil tape.

Before I decided to add the neck, I flattened and leveled the bottom of the egg and carved out a space for the levitation platform to nestle JUST under the surface. When I decided to add the neck, I did the same thing to that piece. I'm showing both photos so you know what to do depending on the decision you make.

Once you're happy with the shape, it's time to start sculpting your cat. I chose a sphnyx not ONLY because of my love for them, but also to showcase the versatility of modeling chocolate. To make sure you're not going over the 13.1 ounces, it's a good idea to weigh your sculpted foam piece and then weigh out your modeling chocolate. This way, you won't have to keep worrying about it and you'll know exactly how much chocolate you have to work with.

I have to give a shameless plug here to Hot Hands Modeling Chocolate. I have made my own modeling chocolate in the past, but nothing I've tried is comparable to this stuff. It stays firm, yet pliable, it doesn't get oily or greasy, and it can handle hot hands. I do wear gloves when I use it, but more so to avoid fingerprints and because I like keeping my hands clean. If you've not tried it, this is an awesome project for it because you can really create some nice wrinkles and creases....as well as smooth out creases you don't want.
Sphynx cats have DEEP and DISTINCT wrinkles, so while normally when I sculpt with wrinkled skin, I soften the rigidity with a soft paintbrush, today I'm using the small end of my mini soft round tip Sugar Shaper to create small valleys, the larger end for bigger crevices, and the mini soft pointed tip shaper to open up some of the tighter, smaller wrinkles and folds.

To create the nose and lip lines, I used the original-sized firm square tip Sugar Shaper to mark out my shape, and then I smoothed it out with the mini pointed tip chisel. I used the pointed tip to get the nostrils started, then opened them up and rounded them out with the round tip chisel. I used the small soft tip square chisel to marry the ears to the head. Because ears are thin and fragile, I sculpted them roughly directly on my surface and then let them sit to firm up before attaching to the head.

Now would be a good time to try him out on the levitation device, BEFORE you start to add your color. I promise you, it's going to take a while to get it to balance out and levitate correctly. If the head is too heavy on one side, it will topple to the other. Distribute the weight of the head by removing and adding chocolate. Adding in more wrinkles is a great way to add weight to the front if the ears are making the back of the head too heavy. Be patient. Magic doesn't come easy!

I really wanted to give him a realistic or almost wax figure look with some translucent effects, so here's how I did the base for his wrinkles. I lightly brushed the entire head with shortening and then used a blend of color dusts and corn starch. I ended up using a soft blush pink, dogwood brown, and plum purple.

I blotted the color into all of the wrinkles with the Deluxe Blending Fluff Brush, switching to the Deluxe Crease Brush where the wrinkles were tighter. Because I prepped the surface with shortening, I can now wipe away the color from the surface, leaving only color in the creases of the wrinkles. To give him his color, I dry dusted a blend of black and corn starch and lightly swept the surface with the Deluxe Oval Brush, concentrating on staying light and getting darker in the areas around the eyes, ears, and ridge of the snout.
Because this dude is undead, I wanted to give him bulging eyes with an eerie glow. To give them a gradient glow effect, I made some paints using a light blue color dust with some melted cocoa butter and white color dust mixed with cocoa butter.

I used a small paint brush to paint the outer edge with the blue, then added the white to the center. To create that gradient look, I gently blotted the whole area with a cotton ear swab until I got the look I wanted.

Spend some time on the details...color brings him to life...or in this case, UNLIFE. Add dimension by layering your colors, going back in with plums, pinks, and even blues. Use a fine brush and a light hand to give a veiny translucent look to the ears. Bask in his beauty, set him aside, and let's get to the cake!
Cake... or Death? (we'll have the cake)

I am using my Devil's Food Cake because it's great for carving, and I've chosen to ice the cake with dark chocolate ganache because it sets up beautifully on sculpted cakes.

We're going to create a bust, so I used two 7" round layers, a 5" layer on top, and then I used scraps to create shoulders and the back of the collar. Because this is a relatively small cake, I was comfortable sticking with two bubble tea straws for support. Ice your cake with the ganache, and use your Sugar Smoothers to round out the shoulders and give sharp edges where the arms meet the body. Pop int in the fridge for at least an hour to firm up.

A note on the levitation device:
There are a number of levitation devices on the market. I used this one by Yosoo and it's worked really well for my cakes.
The base has four LED lights to help you guide your platform into a spot to make it levitate, and be prepared...it takes practice to get it right. Use the lights to guide you into the right spot. Once you're comfortable, cover the lights with electrical tape to conceal them and then practice, practice, practice getting the platform to levitate without the aid of the lights to guide you.
---
Now it's time to wrap the base of the levitation device with Press N' Seal or cling film. I have some cardboard 4" square coasters that work perfectly as a board to rest the base on. You can find them online or just cut a cake board to fit. Place the wrapped base onto the board, angled so that the corner is at the front of the cake and the port to plug in your device is at the back of the cake. Using cake clay (or cake pop GUTS) made with cake scraps and ganache, build up the collar and neck scarf around the base. If your cake is well chilled, it will set up fairly quickly. Carefully, lift out the base to your levitation device, ice the cake clay, and chill again for an hour.

Time to cover! I chose to use Hot Hands Modeling Chocolate again so that I can have the freedom of adding and taking away without worrying about creases, as well as getting in details in the stitching and giving a fabric look with folds and wrinkles.

Create a vest by cutting the shape in two pieces, laying one side down on the surface and then placing the other on top to overlap in the center. Use the soft mini round tip Sugar Shaper to add in details like creases in the fabric and notches around buttons. Use your mini soft pointed tip Sugar Shaper to etch in a seam and poke holes close together to create stitching.

All Dressed up...
For the coat and buttons, I mixed my modeling chocolate with a 1/3rd fondant and colored it a dark navy blue. Buttons are simple. For the larger buttons, I cut circles with the large end of a piping tip and stamped an inner ring with a bubble tea straw.

For the smaller buttons, I used a bubble tea straw to cut the circles, and the small end of a piping tip I had on hand.
The larger buttons, I lightly brushed with Truly Mad Plastics Super Gold edible luster. For the smaller buttons, I painted them with a mixture of Everclear and the gold luster.

Roll out a large 1/8" thick piece of the navy, cover, and cut away the shape of the coat. Use your original sized firm round tip Sugar Shaper to burnish in the crevices around the collar and arms. Attach buttons to coat and vest with a small brush and water.

For the neck scarf, or cravat if you're really fancy, I used black modeling chocolate and the small soft round tip chisel to create the illusion of fabric.
For an added bit of flair, a nod to Halloween and the Headless Horseman, I mixed some bright red, bright yellow, a touch of brown, and white color dusts with some melted cocoa butter to make a pumpkin colored paint.

Because it's a repeating pattern on the cravat, you really don't need to make the jack o' lanterns perfect. They'll look great as a whole. Using a fine line paintbrush, paint the outline, divide the two eyes, draw a line for the mouth, and fill it in.

Replace the base of the levitation device, create a hole where the cord plugs in, and because the coat has a hood, simply plug in the device, and add a rounded sheet of the navy modeling chocolate/fondant mix and attach it to the collar, covering and concealing the cord. You can add feet to the base of your cake board and run the cord through a small hole next to the back of the cake to conceal the cord, or you can just place your cake in an area where the cord is concealed.

All that is left is the bloody neck splatters and covering the base. I colored some modeling chocolate with super red, chocolate brown, super black gel colors. Roll your chocolate as thin as you can get it because you want to get as much height on the levitation effect as you can! Cover the base and the top of the cake that is still uncovered. Now make some splashes and drips of blood by rolling various sized tubes of the modeling chocolate, tapering one end, and shaping with your fingers. Attach to the cake and remove seams by marrying the drips to the red chocolate with your soft square tip chisel.

When you're ready to add the head, carefully get the levitation platform into position. If you get it wrong, the magnets will pull it down, mar your chocolate and you'll have to smooth it out again. This is a good reason to use modeling chocolate instead fondant here. Once you have it levitating, again, slowly and carefully place your cat head. If you've done it correctly, you'll be in business! If it is off balance and spins out of control or keeps falling, don't fret. This is why I encourage you to test it out many times after you've sculpted the head. It can be a challenge, but all is not lost...You can cut away pieces of the neck, drive pieces of skewers into the bottom on a side that is too light...get creative with it and you'll get it. There's no exact way to do it. You're relying on a device that uses magnetic forces to create actual levitation. It's magic....but it's tricky! I've spent absurd amounts of time trying to get a piece to levitate to the point of giving up, but as you use it more, and I'm betting you will, you'll begin to understand it more.

I hope you've enjoyed this tutorial and find creative ways to make TRUE gravity defying pieces of edible art! Thanks, BOILS and GHOULS, for letting me be a part of your Halloween season!
Was that a spooktacular tutorial, or what? October's only just begun, and we're betting Andrew's got some more creepy confections up his sleeve! Follow Guy Meets Cake on social media to keep up with all his twisted treats and devilish delights!
Facebook: Guy Meets Cake
Instagram: @guymeetscake
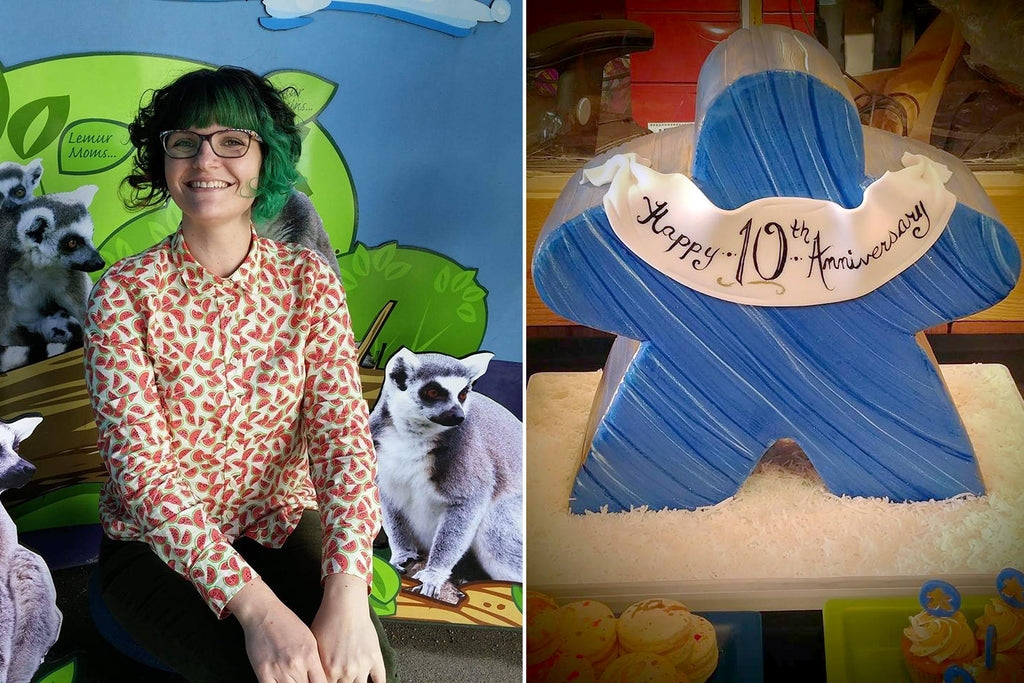
The Meeples of Jamie Louks
Our featured guest this month is Seattle's own Jamie Louks of Jamie Nicole Cakes! Jamie is one of our hometown cake heroes, famed for her quirky sculpted cakes and imaginative approach to special requests. Combine Alice in Wonderland with the Green Lantern? Yup, she's got it. Zombies, sports, Coca Cola, and a rock band all in one cake? Not a problem.

Jamie's very first job at age 15 was at Basin Robbins and this, along with her intense love affair with sugar, inspired her to make desserts into her life's work. She has an obsessive urge to perfect every recipe and believes desserts should taste even more amazing than they look. (And that's a high bar with how amazing her desserts look!) Jamie has worked in some of Seattle's finest cake and dessert shops before taking her own business full-time. Today, she's showing us how she perfects the scale and proportions of a giant cake based on a tiny figure.

How to make a tiny object into a BIG cake
These are Meeples. 
They are tiny, about 3/4" tall. I need this guy to be about x17 this size.
A Meeple is easily recognized by every board game geek on the planet. The proportions need to be spot on if this is going to be an amazing cake served to a room full of die hard board gamers.
Creating a giant version of a tiny object can be a difficult task. I've learned the hard way that rushing through planning creates something that is either too short/tall/fat/skinny or even 'WTF happened'! Don't let this happen to you. Dust off your handy calculator and #2 pencil, brush up on your middle school algebra and do it right from the beginning. Let's get started!
Templates: No, really- you need them.
If you can, find an image online that you can mess with on your computer. Print 2 of them, one for now and one for later. I found a meeple outline and then printed it in different sizes until I found one that my Sugarworks Sugar Structure fit into perfectly. 
Trace an outline of your Sugar Structure onto your stencil keeping in mind that the top of the feet of the armature will be level with the cake board. (Pretend your cake is standing on the armature's feet).
The Cake and the Boards
Now decide where cake boards need to go and how many tiers are needed. Things to consider:
- Thickness of your cake boards
- Thickness of your cake layers (each tier could have different thicknesses to accommodate for proportion)
- Thickness of your filling layers
- Thickness of your final icing layer
- Thickness of your fondant covering

So many numbers to think about! Be sure to write them all down. Notes are your friend! Measure and draw where each cake board will go. This will definitely come in handy later. Don't forget to draw a line about 3/8" in from the edge to show frosting and fondant thickness.
You can repeat this process from a side view also. This dude was a pretty simple flat profile, so no need for another stencil.

From this stencil, you can now measure the size of each cake board, the size and amount of cake you will need to bake, and exactly where holes need to be in your boards and layers so your Sugar Structure will fit beautifully.

Cake-struction!
Now CHOP UP YOUR STENCIL! Alright, maybe don't 'chop' it up, but cut your stencil into its separate tiers so you can use them as guides while building.

You can also measure your straw supports off of this.

Place your cut straws in the tier, then frost on top of them. When you drop the next tier on top, you'll be right on target for a perfectly proportioned cake!

Zoom ahead to built cake, perfect height and ready to be shaped. Use stencil #2 that you set aside for just this reason.

Cut off 3/8" on all "frosted" surfaces of the stencil. Place this frosting-less stencil on the cake and trim any excess. After trimming, fill any gaps with cake spackle (cake crumbs mushed together with frosting), give it a good crumb coat, and chill well before final icing.

From this point, its easy peasy lemon squeezy. Final ice 1/4" thick, cover in fondant 1/8" thick, and decorate your little heart out.

Now pour yourself a glass of wine and admire your perfectly planned cake :)

We hope you've found this tutorial by Jamie helpful. Scaling up small figures to make large sculpted cakes is a daunting endeavor that can be intimidating for both new and experienced cakers alike. Jamie is a master of replicating pop culture icons, figures, and characters and we think this instructional is one of the best guides we've found for getting your proportions spot-on!
If you want to see more of Jamie's work, follow her on social media and keep up with her crazy cake antics!
Facebook: Jamie Nicole Cakes
Instagram: @jamienicolecakes
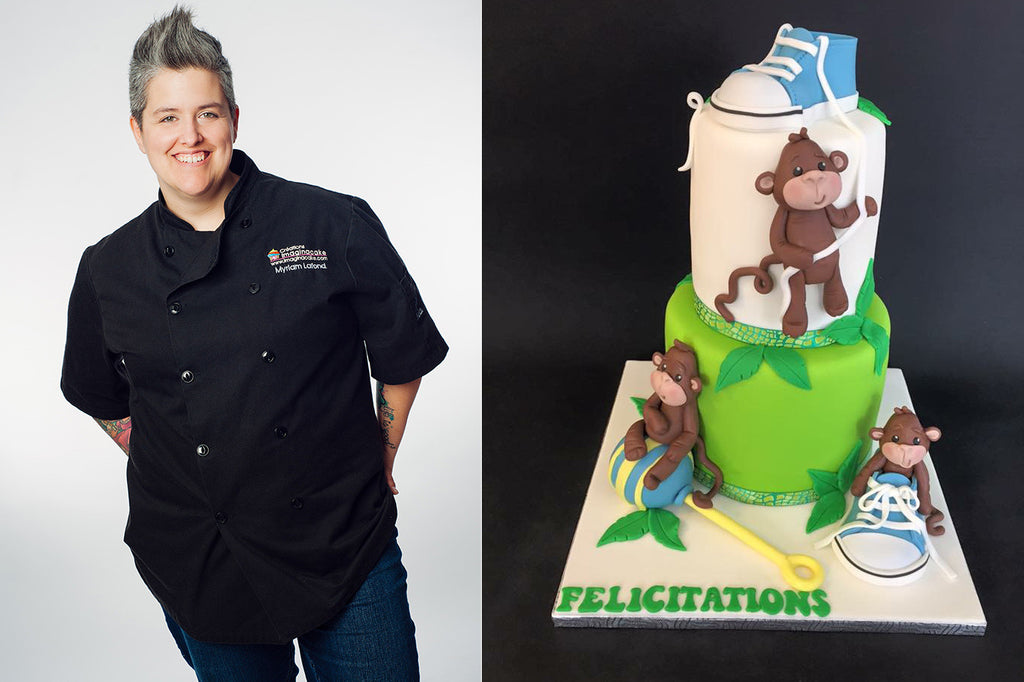
Myriam's Monkeys!
Hi everyone!
For those who don’t know me, my name is Myriam Lafond, owner and cake designer at Imaginacake. My native language is French, but being surrounded by amazing cake friends from all over, I quickly learned English. My creative side is really strong so when I started making cakes for fun, I found a passion that made people happy. My friends and clients started sharing my work, my business grew, and for the past 5 years, I have been making cakes full-time. I also give classes to people who want to learn my craft, in groups or in private. 3D cakes and figurines are my favorites, and I was really excited to work on this tutorial for my friends at Innovative Sugarworks.
For me, baby showers are always a good time to be creative. The Converse baby shoes are a classic and an easy way to represent the new family member to come. I really love adding some cute characters to create a unique cake each time.

If you don’t know how to make the shoes, you can follow my step by step video slideshow on how to create them. For the shoes seen in the video you can find the template to print and some extra information here on my French blog . As you will see I translated that page for you. I'm also happy to let you know that my entire blog will soon be translated to English.

Once you have the shoes done, you can start following this step by step pictorial to make the cute little monkeys for your shower cake.

You will need some modeling chocolate. You can use your own recipe or buy some amazing Hot Hands Modeling Chocolate, which I used for this project. Mix some food coloring in your modeling chocolate to get the brown for the body and some skin tone for the face and the inside of the ears. You will also need a set of Sugar Shapers (I used firm tipped Mini-Tip Sugar Shapers) and some black and white fondant for the details.
Step 1: The tail
Roll a small ball of brown modeling chocolate into a tube to make the tail and place it inside of one of the shoes. Try to keep some realistic proportions.

Step 2: The body
Make a tear drop shape for the body of the monkey and place it inside the shoe.

Step 3: the arms
Roll a tube and try to keep one end more round to be able to make the hand. Then press the rounder end down gently to form the hand.

With your trip-tip chisel sugar shapers (the coral one) mark the fingers. I use it tip down.

Cut your arm at a good length (it depends on the size of your body so try to keep it proportional.) After this, you will be able to stick the arm in place. You can also use the same tri-tip chisel Sugar Shaper to mark the elbow fold. Then repeat the same step for the second arm.

Step 4: The head
You can use a wood skewer to maintain the head in place on your monkey body. Roll a proportional ball for the head and with your pinkie just gently press the top to create the forehead.

Place the head gently on the skewer, pushing it down, then carefully push the skewer in the body to be sure it doesn't move.

Roll a small amount of skin tone paste into a tube. Try to keep the ends round. Then press it down in the bottom of the face.

With your round tip chisel tool (the lime green one) create the mouth. You can also mark the line over the mouth with the trip-tip chisel tool (the coral one).

Roll a tiny ball of skin tone modeling chocolate to create the nose,place it on the face and make some nostrils with your small bone chisel tool (the orange one)

Use the same tool to form the eye cavities then add the details like black eyes balls and some white small light in it. You can also add some eyebrows

For the ears, I use a small amount of skin tone paste that I put over a bigger part of brown paste then I press it down with the round chisel tool (the green one). I also pinch the bottom then cut it straight to get a bigger area to stick it on the side of the head.

You can also give your monkey a plush look by adding some stitching using your square tip chisel tool (the yellow one). Then use some pink powder and a small brush to color the cheeks.

You can always put more monkeys by following the same steps. Just sit them near the shoes. Add some legs, some foot prints and other details like a bow to make it unique.

I hope you have enjoyed this pictorial.
Have fun and be creative

We hope you've enjoyed this tutorial by Myriam Lafond, and we're looking forward to seeing millions of little monkeys on everyone's Facebooks and Instagrams!
If you want to see more of Myriam's work, check out her website- www.imaginacake.com and her blog- www.parlonsgateaux.com.
And if you'd like to take a class with Myriam, keep an eye on her events page for class offerings!
You can also follow her on social media:
IG: myriam_imaginacake
FB: @imaginacake
The Wonderful Mr. Blue by Yanira Anglada
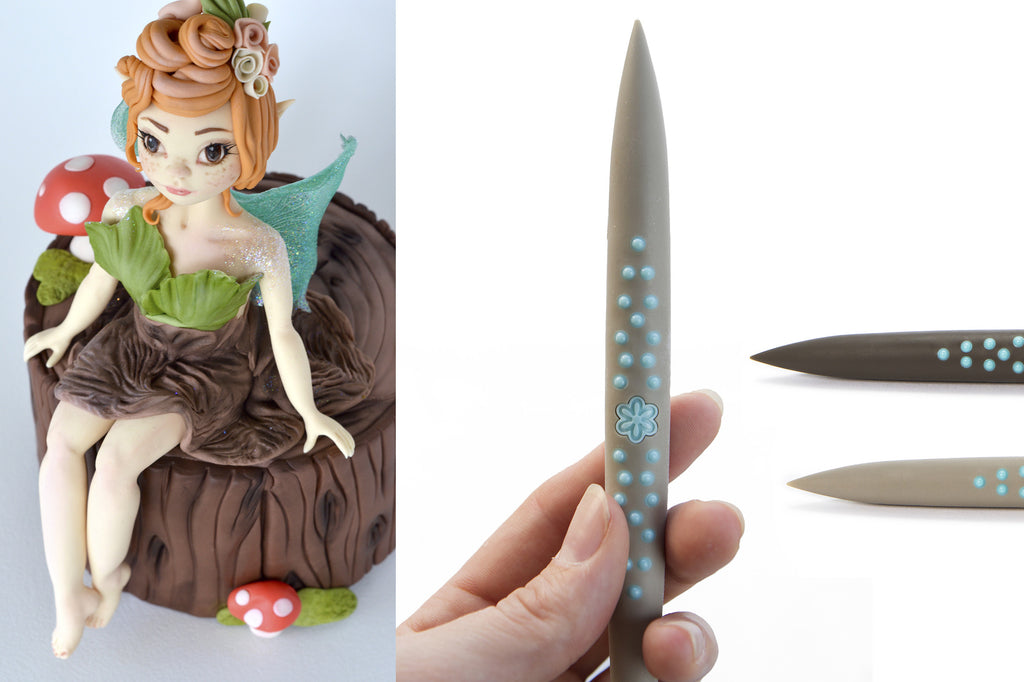
Yanira Anglada is the mastermind behind Cake Therapy in Puerto Rico. An exceptional cake designer and instructor, Yanira is most famous for her exquisite sculpted figures and cake toppers. Today she is going to show us all the many applications she's discovered for the pointed tip Sugar Shaper, AKA Mr. Blue.

The Blue Mini-Tip Sugar Shaper is one of my favorite tools due to its versatility. I use it regularly. Here's some examples of how I use it to achieve different textures:
Moss

After using a firm bristle brush to add texture to the gum paste or fondant of your choice, I use Mr. Blue to make zigzag movements to add dimension. Then I slightly press towards the inside at the edges.
Wood
After flattening the gum paste to about 1/8 on an inch, I use Mr. Blue to add indentations following an almost straight movement. I use the same tool to make "wood knots" in various sizes. 
Shells
After mixing white and brown to achieve a marble effect, I form a guitar pick shaped piece of gum paste and start moving Mr Blue from the narrow end to the wider end with the tip of the shaper towards the narrow end of the shell.
Simple Leaves
Make a fondant tear drop and press with the tip of the shaper aligned with the tip of the tear drop.
Hair
Hair is very similar to the moss technique. 
Roll a ball of gum paste or fondant to form a piece that has 2 pointed ends and slightly flatten it with your hand or a rolling pin. Use the blue shaper to make indentations from tip to tip, following the shape of the "strand". Use your hands to adjust the hair strand as you wish and add movement.
Fabric details
I love using Mr. Blue to add details to the "fabric", specially when I'm working with simple modeling figures and baby clothing. 
I can use it to add seam lines, folds, dots and make scalloped edges.
Lips
To make faces, I use a few different shapers, and I use Mr. Blue specially on the lips to define the inside of the lips and pull the lip upward from the chin using the side of the shaper. 
Chest
I use the blue shaper to create cleavage and define the clavicle. When I'm working on busts I also use it to separate the arm.
We hope you've enjoyed this exploration of the many and varied uses of Mr. Blue, the pointed tip chisel from your Sugar Shapers or Mini-Tip Sugar Shapers set.
To see more of Yanira's work, follow her on social media!
Facebook: @caketherapypr
Instagram: @caketherapypr

Chef Mitchie's Diary of a Brush Fiend
Michelle Curran aka “Chef Mitchie”, is a self-taught cake and sugar artist originally from Atlantic City, NJ now based in Las Vegas, NV. Nicknamed the “Femme Fatale of Fondant”, by NV Pageant Magazine and BEST CAKE ARTIST by Las Vegas Weekly Readers, her career in cake artistry has led her to compete locally, as well as nationally on Food Network, making her an award winning cake artist. Her truest passion as a Private Cake Artist for hire is creating custom cake and sugar art for her clients, which have included World Renowned DJs, celebrities, and athletes; it keeps her nestled inside her Las Vegas studio when she is not traveling the nation performing product demos and teaching the craft of cake decorating.

Mitchie is often referred as a product expert for top cake decorating supply companies and has designed food-grade silicone molds for Decorate the Cake. Today Mitchie admits to her Paintbrush Problem, and tells us all about her new fixation: Innovative Sugarworks Artists' Brushes.
Hi, my name is Mitchie, and I'm addicted to buying paintbrushes. :: Hi Mitchie! ::
It's a serious condition. I tend to blow out bristles faster than I can unpackage brushes. I'm quite neglectful to my brushes, but not on purpose. Cake artistry changes in the blink of an eye, it's fast paced, you have a change of heart on design in mere seconds, or you take your sweet lovin' time to nurture the project in front of you. What happens to your brushes?

The right answer would be to clean them right away! But nope, they're still sitting in clean water conforming to the cup's bottom or you find the one you used for piping gel stuck to the underside of your work bench...how? So what do I do?!
Innovative Sugarworks launched an incredibly sassy looking set of Artist Brushes; we need to take a serious moment to admire them.

The bristles are so soft, you will want to rub them on your face. Go ahead, I won't tell anyone. (OK, stop flirting with your brushes Mitchie.)
For the first time use, I baby-ed them... hardcore, rinsed immediately, soft towel dried. Stood them upright to dry. But then I got busy. Soon I was out the door for a delivery, and by the time I was done with traffic I just wanted to eat some noodles and go to bed. The next day I rolled my eyes in my head as I saw my brand new brushes were still covered in paint and powders on my workbench.

At least my Deluxe Oval was sitting in clean water. But the Precision Crease brush had a near permanent helmet of edible glue. Curses.

Success! The brushes cleaned really well and are now back to their former gorgeous condition.

These brushes perform really well, no shedding, which is super important for food! I highly recommend at least 2 sets; one to dedicate to dry brushing. I wouldn't suggest leaving them around for days unkempt, not everyone will have the same experiences. But overall, I am really pleased to have them join my arsenal of cake tools.
Check out this quick vid and watch me use the brushes, Sugar Shapers, and Artists' Turntable!
We hope you enjoyed Chef Mitchie's entertaining exploration of our new Artists' Brushes. We certainly did! If you want to see more of Chef Mitchie's incredible work, you can visit the Mitchie's Munchies website.
Or follow her on social media!
Facebook: MitchiesMunchies
Instagram: @chefmitchiesmunchies
Twitter: @Mitchies13