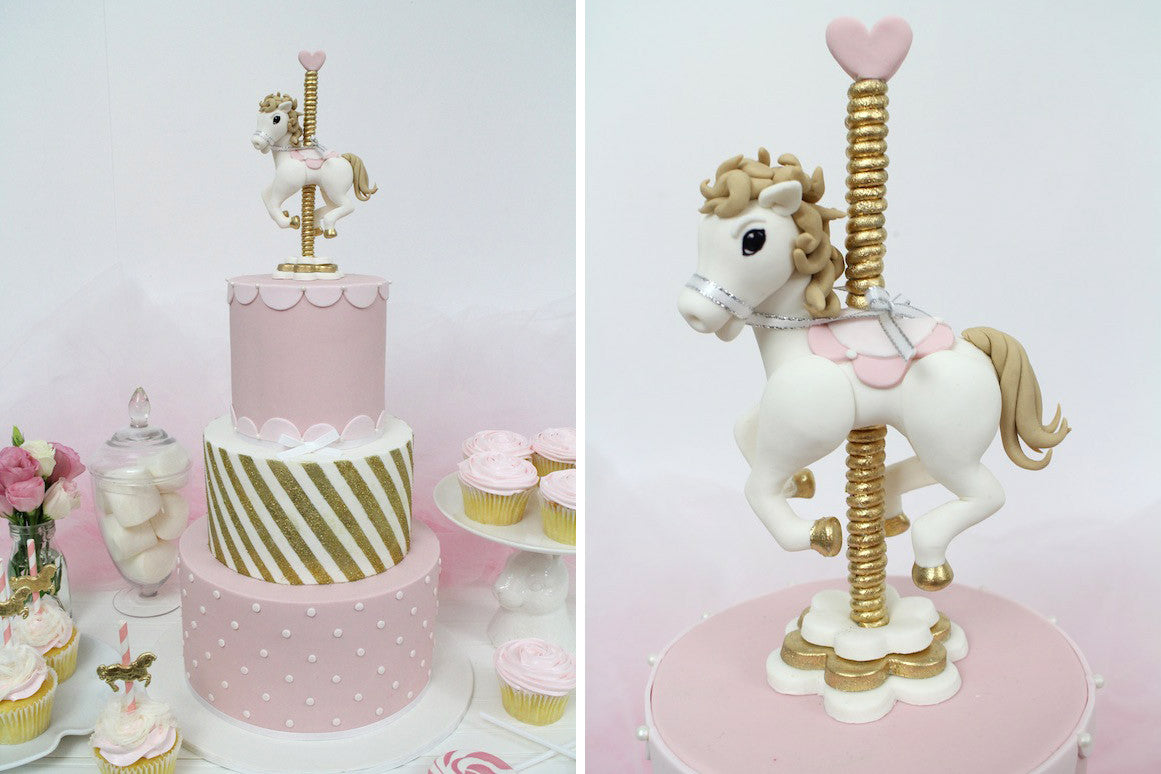
This month we're spotlighting the work of  Sharon Wee who runs Sharon Wee Creations in Sydney, Australia. Sharon's work has been featured in magazines such as Hitched, Cosmo Bride, The Knot, and Modern Wedding. Her creations have been lauded on radio and television, and in 2013 the Australian Cake Decorating Network named her Cake Decorator of the Year. Sharon's work is often described as playful and whimsical. Today she is going to show us how to make a carousel horse cake topper.
The Carousel Horse

Tools You Will Need
- Innovative Sugarworks Sugar Shapers
- Small sharp knife
- Small scissors
- Small brush and water
- Long Skewer
- Black Edible Marker
- Circle cutter set
- Various sized blossom cutters
- Small heart shaped cutter
- Sugar Smoothers
- Styrofoam for holding the carousel topper
- White/silver 4mm ribbon (approximately 15in, for the reins)
Materials You Will Need
- 350g of white gum paste (horse topper)
- Small amount of light brown gum paste (horse mane and tail)
- Small amount of pink fondant (decorations)
- Small amount of light pink fondant (decorations)
- Gold lustre dust and cake decorating alcohol
- Piping gel
- Crisco
When I was younger, I loved carousels. There was just something fun and magical about getting on the ride with the music and moving horses. I wanted to capture the charming allure of the ride with this cake.
Step One: We're going to start with the body of the horse. Use about 120g of white gum paste for the body. Shape it into a long teardrop then roll your finger about 1/3 of the way in from the bigger end.
Step Two: Bend the skinnier end upwards to create the neck. Allow the body to sit upright to dry slightly. If you find the neck area falling forward, place something heavier up against it to support it.
Step Three: For the head, use a small amount of gum paste to create an egg shape. Roll your finger along the middle and towards the smaller end to create the nose. Roll the nose area between your forefinger and thumb to further define the shape.
Step Four: Now we're going to go in and do some detail work to really sculpt the head. Use the Bone Chisel Sugar Shaper to define the head by pressing it against the bigger end.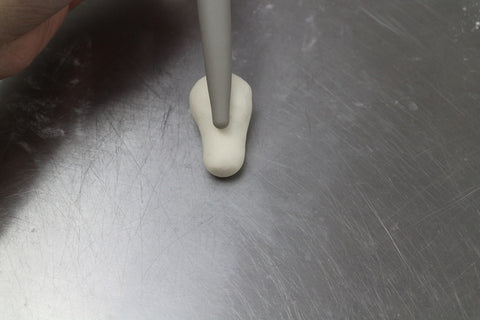
Then use the Pointed Chisel Sugar Shaper to indent the nostrils.
Cut the mouth area with the small scissors and gently open it up slightly. Then, create the eye socket by pressing the Pointed Chisel Sugar Shaper in at an angle on opposite sides to create an almond shaped eye.

Step Five: Once the body has dried slightly (when the neck can stand up on its own), gently cut the top of the neck flat (so the head can rest on it better) and press in the chest area to create a more natural body shape.
Next, insert a skewer all the way through the middle section of the body to create a channel. Insert a toothpick all the way down the neck and leave some of it sticking out. Place the head on the body only to mark a hole. Remove and allow both pieces to dry separately overnight.
Step Six: Create the pole of the carousel stand by inserting the skewer at least 3 inches into the styrofoam and then apply piping gel approx. 3 inches up the skewer. Roll the gum paste into a long thin rope and start wrapping it upwards. Cut off any excess and allow this section to dry overnight.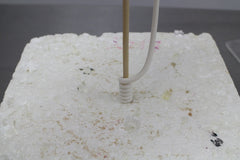

When dry, attach the head onto the body of the horse and slide the body of the horse down the skewer.
Step Seven: Now we're going to shape the legs of our horse. I found it useful to draw out a template of leg shapes as a guide in the shaping. The template I drew is included in my book Playful Party Cakes, but you can also draw your own. Place the sheet of acetate on top of your template and apply a thin coat of Crisco onto the acetate to prevent the gum paste from sticking.
For the legs, roll small amounts of gum paste into four long teardrop shapes. Place each teardrop within the template.  Push down along the edges of the shape to create a dome shape. Then, use the Trip-Tip Chisel Sugar Shaper to help and push the edges back into shape and focus on pinching the corners to get a more defined shape. Do the same for all the legs.
 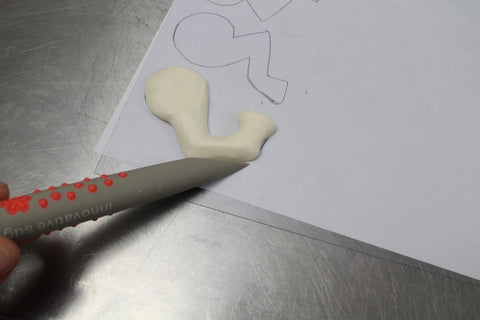 Remove the legs from the acetate and gently roll the edges of the lower legs to round them. Place the legs on a lightly corn floured surface. Cover the top area with cling wrap to allow only the lower leg area to dry.
Step Eight: Once the limb area is firm attach the pieces to the body. If the weight of the legs starts to deform the body, prop the body up on the front and back until it is completely dry. Use a soft material such as foam or rubber so it does not leave a harsh mark.
Step Nine: For the saddle, cut out a blossom shape approx. 2 inches wide and a circle 1.5 inches wide and poke holes towards the side of the shapes.
Attach the saddle onto the horse. Then, apply piping gel to the rest of the skewer and wrap a thin rope of gum paste around it to the top, leaving just a small amount for the heart cutout.
Step Ten: Cut out the heart shape from a thick layer of fondant and attach it to the top of the pole. Then, cut out three gradual blossom shapes from a thick layer of gum paste for the base.

Step Eleven: Mix the gold lustre dust with a small amount of alcohol and gently paint the carousel pole.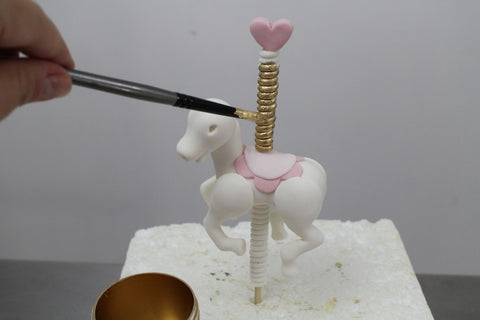 Then paint the hooves of the horse and the middle base blossom. Attach the three blossom pieces together and insert a skewer into the middle to create a hole.
Step Twelve: Create two small-flattened teardrop shapes for the ears. Pinch the rounded end together and cut that end flat.  Attach the ears to the side of the head, pointing it outwards.
Step Thirteen: For the mane, roll various sized small teardrop shapes and twist them randomly.
Attach along the neck area and work on positioning the pieces in various directions to create a curly mane.
Step Fourteen: For the tail, roll five thin sausage shapes and taper both ends. Place the pieces together and twist one end.  Attach it to the back of the horse and curl the ends upwards.
Step Fifteen: Use a black edible marker to outline the eye socket. 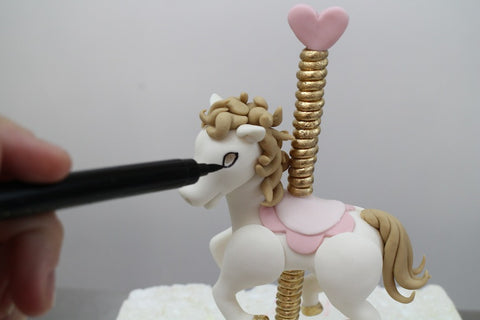 Roll a tiny long teardrop shape for the eyebrows and attach it over the eye socket. Then roll a tiny white teardrop shape and insert it into the eye socket.
Use the Trip-Tip Chisel Sugar Shaper to adjust the placement of the eyebrows if necessary.  Allow the eye area to dry before drawing in the eyeball with a black edible marker. Colour the middle, leaving a small white area for the eye shine.
Step Sixteen: Roll and place tiny balls of icing between the scallops of the saddle.
Attach the ribbon harness by applying some piping gel to the nose area. Loop the ribbon around in the middle and slide the loop over the nose.
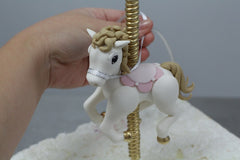
Bring the side of the ribbon pieces around the neck of the horse and behind the pole. Gently tie a knot and a bow at the back.

Step Seventeen: Attach the base of the carousel on a cake and insert the horse and pole.

Your carousel horse is now complete! This tutorial, and many other creative and imaginative sugar arts, can be found in Sharon Wee's new book Playful Party Cakes.
